3. AI Demo说明文档#
1. AI Demo开发框架介绍#
1.1. AI Demo开发框架#
为了帮助用户简化AI部分的开发,基于K230_CanMV提供的API接口,搭建了配套的AI 开发框架。框架结构如下图所示:

Camera默认出两路图像,一路格式为YUV420,直接给到Display显示;另一路格式为RGB888,给到AI部分进行处理。AI主要实现任务的前处理、推理和后处理流程,得到后处理结果后将其绘制在osd image实例上,并送给Display叠加显示。
1.2. 接口介绍#
1.2.1. PipeLine#
我们将Media部分的代码封装在PipeLine类型中,通过固定的接口实现整个流程操作。
其中PipeLine类提供的接口包括:
初始化参数包括:
(1)rgb888p_size:list类型,预设给到AI部分的图像分辨率;如rgb888p_size=[1920,1080]。
(2)display_size:list类型,显示部分Display的分辨率;如display_size=[1920,1080]。
(3)display_mode:str类型,显示模式,包括”hdmi“和”lcd“;如display_mode=”hdmi“。
(4)debug_mode:int类型,耗时调试模式,如果大于0,打印操作耗时;如debug_mode=0。
create(sensor=None,hmirror=None,vfilp=None):
(1)sensor:参数为可选参数,类型为Sensor对象,可自主配置现有CanMV、01Studio和k230d zero开发板实现了自动探测,可以默认使用create()实现。
(2)hmirror:默认为None,当主动设置时为bool类型(True/False),表示是否实现水平方向镜像显示。
(3)vflip: 默认为None,当主动设置时为bool类型(True/False),表示是否实现垂直方向翻转。
get_frame():返回一帧ulab.numpy.ndarray类型图像数据,分辨率为rgb888p_size,排布为CHW。
show_image():PipeLine实例中预设一帧OSD图像,该接口将成员变量osd_img显示在屏幕上。
destroy():销毁PipeLine实例。
下面给出无AI部分的示例代码:
from libs.PipeLine import PipeLine, ScopedTiming
from media.media import *
import gc
import sys,os

if __name__ == "__main__":
    # 显示模式,默认"hdmi",可以选择"hdmi"和"lcd"
    display_mode="hdmi"
    if display_mode=="hdmi":
        display_size=[1920,1080]
    else:
        display_size=[800,480]

    # 初始化PipeLine,用于图像处理流程
    pl = PipeLine(rgb888p_size=[1920,1080], display_size=display_size, display_mode=display_mode)
    pl.create()  # 创建PipeLine实例
    try:
        while True:
            os.exitpoint()                      # 检查是否有退出信号
            with ScopedTiming("total",1):
                img = pl.get_frame()            # 获取当前帧数据
                print(img.shape)
                gc.collect()                    # 垃圾回收
    except Exception as e:
        sys.print_exception(e)                  # 打印异常信息
    finally:
        pl.destroy()                            # 销毁PipeLine实例
上述代码中,通过pl.get_frame()接口获取一帧分辨率为rgb888p_size的图像,类型为ulab.numpy.ndarray,排布为CHW。基于上面的代码得到了一帧图像给AI处理,您可以只关注AI推理部分的操作。
图像AI开发过程包括:图像预处理、模型推理、输出后处理的过程,我们将整个过程封装在Ai2d类和AIBase类中。
1.2.2. Ai2d#
对于Ai2d类,我们给出了常见的几种预处理方法,包括crop/shift/pad/resize/affine。该类别提供的接口包括:
初始化参数包括:
(1)debug_mode:int类型,耗时调试模式,如果大于0,打印操作耗时;如debug_mode=0。
set_ai2d_dtype(input_format,output_format,input_type,output_type)
(1)input_format:ai2d预处理输入格式。
(2)output_format:ai2d预处理输出格式。
输入输出格式支持如下所示:
enum class ai2d_format
{
    YUV420_NV12 = 0,
    YUV420_NV21 = 1,
    YUV420_I420 = 2,
    NCHW_FMT = 3,
    RGB_packed = 4,
    RAW16 = 5,
}
输入格式 |
输出格式 |
备注 |
|---|---|---|
YUV420_NV12 |
RGB_planar/YUV420_NV12 |
|
YUV420_NV21 |
RGB_planar/YUV420_NV21 |
|
YUV420_I420 |
RGB_planar/YUV420_I420 |
|
YUV400 |
YUV400 |
|
NCHW(RGB_planar) |
NCHW(RGB_planar) |
|
RGB_packed |
RGB_planar/RGB_packed |
|
RAW16 |
RAW16/8 |
深度图,执行shift操作 |
(3)input_type:输入数据类型。
(4)output_type:输出数据类型。
下面是接口调用示例:
from libs.AI2D import Ai2d
import nncase_runtime as nn

my_ai2d=Ai2d(debug_mode=1)
my_ai2d.set_ai2d_type(nn.ai2d_format.NCHW_FMT, nn.ai2d_format.NCHW_FMT, np.uint8, np.uint8)
my_ai2d.set_ai2d_type(nn.ai2d_format.RGB_packed, nn.ai2d_format.NCHW_FMT, np.uint8, np.uint8)
crop(start_x,start_y,width,height):预处理crop函数。
(1)start_x:宽度方向的起始像素,int类型;
(2)start_y: 高度方向的起始像素,int类型;
(3)width: 宽度方向的crop长度,int类型;
(4)height: 高度方向的crop长度,int类型;
my_ai2d.crop(0,0,200,300)
shift(shift_val):预处理shift函数。
(1)shift_val:右移的比特数,int类型;
my_ai2d.shift(2)
pad(paddings,pad_mode,pad_val):预处理padding函数。
(1)paddings:list类型,各维度两侧padding的大小,对于4维的图像(NCHW),该参数包含8个值,分别表示N/C/H/W四个维度两侧的padding大小,一般只在后两个维度做padding;
(2)pad_mode:只支持constant padding,直接设为0;
(3)pad_val:list类型,每个像素位置填充的值,比如[114,114,114]、[0,0,0]
my_ai2d.pad([0,0,0,0,5,5,15,15],0,[114,114,114])
resize(interp_method,interp_mode):预处理resize函数。
(1)interp_method:resize插值方法,ai2d_interp_method类型,包括:nn.interp_method.tf_nearest、nn.interp_method.tf_bilinear、nn.interp_method.cv2_nearest、nn.interp_method.cv2_bilinear;
(2)interp_mode:resize模式,ai2d_interp_mode类型,包括:nn.interp_mode.none、nn.interp_mode.align_corner、nn.interp_mode.half_pixel;
my_ai2d.resize(nn.interp_method.tf_bilinear, nn.interp_mode.half_pixel)
affine(interp_method,crop_round,bound_ind,bound_val,bound_smooth,M):预处理affine函数。
(1)interp_method:Affine采用的插值方法,ai2d_interp_method类型,包括:nn.interp_method.tf_nearest、nn.interp_method.tf_bilinear、nn.interp_method.cv2_nearest、nn.interp_method.cv2_bilinear;
(2)cord_round:整数边界0或者1,uint32_t类型;
(3)bound_ind:边界像素模式0或者1,uint32_t类型;
(4)bound_val:边界填充值,uint32_t类型;
(5)bound_smooth:边界平滑0或者1,uint32_t类型;
(6)M:仿射变换矩阵对应的vector,仿射变换为Y=[a_0, a_1; a_2, a_3] \cdot X + [b_0, b_1] $, 则 M=[a_0,a_1,b_0,a_2,a_3,b_1 ],list类型。
affine_matrix=[0.2159457, -0.031286, -59.5312, 0.031286, 0.2159457, -35.30719]
my_ai2d.affine(nn.interp_method.cv2_bilinear,0, 0, 127, 1,affine_matrix)
build(ai2d_input_shape,ai2d_output_shape):ai2d构造函数,前面配置的预处理方法起作用。
(1)ai2d_input_shape:ai2d输入shape,list类型;
(2)ai2d_output_shape:ai2d输出shape,list类型;
my_ai2d.build([1,3,224,224],[1,3,512,512])
run(input_np):调用配置好的ai2d进行预处理的函数,返回一个tensor类型数据,可以直接给模型使用,也可以通过to_numpy()转换成ulab.numpy.ndarray类型的数据。
(1)input_np:ulab.numpy.ndarray类型,ai2d预处理的输入数据,shape和build函数中设置的ai2d_input_shape一致。
注意:
(1) Affine和Resize功能是互斥的,不能同时开启; (2) Shift功能的输入格式只能是Raw16; (3) Pad value是按通道配置的,对应的list元素个数要与channel数相等; (4) 当配置了多个功能时,执行顺序是Crop->Shift->Resize/Affine->Pad, 配置参数时注意要匹配;如果不符合该顺序,需要初始化多个Ai2d实例实现预处理过程;
下面是一个完整的示例:
from libs.PipeLine import PipeLine, ScopedTiming
from libs.AI2D import Ai2d
from media.media import *
import nncase_runtime as nn
import gc
import sys,os

if __name__ == "__main__":
    # 显示模式,默认"hdmi",可以选择"hdmi"和"lcd"
    display_mode="hdmi"
    if display_mode=="hdmi":
        display_size=[1920,1080]
    else:
        display_size=[800,480]

    # 初始化PipeLine,用于图像处理流程
    pl = PipeLine(rgb888p_size=[512,512], display_size=display_size, display_mode=display_mode)
    pl.create()  # 创建PipeLine实例
    my_ai2d=Ai2d(debug_mode=0) #初始化Ai2d实例
    # 配置resize预处理方法
    my_ai2d.resize(nn.interp_method.tf_bilinear, nn.interp_mode.half_pixel)
    # 构建预处理过程
    my_ai2d.build([1,3,512,512],[1,3,640,640])
    try:
        while True:
            os.exitpoint()                      # 检查是否有退出信号
            with ScopedTiming("total",1):
                img = pl.get_frame()            # 获取当前帧数据
                print(img.shape)                # 原图shape为[1,3,512,512]
                ai2d_output_tensor=my_ai2d.run(img) # 执行resize预处理
                ai2d_output_np=ai2d_output_tensor.to_numpy() # 类型转换
                print(ai2d_output_np.shape)        # 预处理后的shape为[1,3,640,640]
                gc.collect()                    # 垃圾回收
    except Exception as e:
        sys.print_exception(e)                  # 打印异常信息
    finally:
        pl.destroy()                            # 销毁PipeLine实例
1.2.3. AIBase#
AIBase部分封装了实现模型推理的主要接口,也是进行AI开发主要关注的部分。用户需要按照自己demo的要求实现前处理和后处理部分。
AIBase提供的接口包括:
初始化参数包括:
(1)kmodel_path:str类型,kmodel路径,用于初始化kpu对象并加载kmodel;
(2)model_input_size:list类型,可选,模型输入分辨率,在单输入时起作用,格式为[width,height],如:model_input_size=[512,512];
(3)rgb888p_size:list类型,可选,AI得到的图像的分辨率,在单输入时起作用,格式为[width,height],如:rgb888p_size=[640,640];
(4)debug_mode:int类型,耗时调试模式,如果大于0,打印操作耗时;如debug_mode=0。
get_kmodel_inputs_num():返回当前模型的输入个数;
get_kmodel_outputs_num():返回当前模型的输出个数;
preprocess(input_np):使用ai2d对input_np做预处理,如果不使用单个ai2d实例做预处理,需要在子类重写该函数。
(1)input_np:ulab.numpy.ndarray类型,ai2d预处理输入数据;
(2)返回tensor列表;如果该方法重写,请注意返回类型:tensor类型的列表;
inference(tensors):对预处理后得到的kmodel的输入(类型为tensor)进行推理,得到多个输出(类型为ulab.numpy.ndarray);
(1)tensors:列表类型,模型的输入,可以是一个可以是多个;
(2)返回ulab.numpy.ndarray类型的列表;
Tips:
Image对象转ulab.numpy.ndarray:
import image
img.to_rgb888().to_numpy_ref() #返回的array是HWC排布
ulab.numpy.ndarray转Image对象:
import ulab.numpy as np
import image
img_np = np.zeros((height,width,4),dtype=np.uint8)
img = image.Image(width, height, image.ARGB8888, alloc=image.ALLOC_REF,data =img_np)
ulab.numpy.ndarray转tensor类型:
import ulab.numpy as np
import nncase_runtime as nn
img_np = np.zeros((height,width,4),dtype=np.uint8)
tensor = nn.from_numpy(img_np)
tensor 类型转ulab.numpy.ndarray:
import ulab.numpy as np
import nncase_runtime as nn
img_np=tensor.to_numpy()
postprocess(results):模型输出后处理函数,该函数需要用户在任务子类重写,因为不同AI任务的后处理是不同的。
(1)results:list类型,list元素是ulab.numpy.ndarray类型,模型的推理输出。
run(input_np):模型的前处理、推理、后处理流程,适用于单ai2d实例能解决的前处理的AI任务,其他任务需要用户在子类重写。
(1)input_np:ulab.numpy.ndarray类型,ai2d预处理输入数据;该数据通过ai2d预处理输出1个tensor,tensor通过模型推理得到输出列表results,results经过后处理过程得到AI结果。
deinit():AIBase销毁函数。
1.2.4. ScopedTiming#
ScopedTiming 类在PipeLine.py模块内,是一个用来测量代码块执行时间的上下文管理器。上下文管理器通过定义包含 __enter__ 和 __exit__ 方法的类来创建。当在 with 语句中使用该类的实例时,__enter__ 在进入 with 块时被调用,__exit__ 在离开时被调用。
from libs.PipeLine import ScopedTiming

def test_time():
    with ScopedTiming("test",1):
        #####代码#####
        # ...
        ##############
1.3. 应用方法和示例#
注:一些AIDemo在K230D芯片上因内存受限无法运行。
1.3.1. 概述#
用户可根据具体的AI场景自写任务类继承AIBase,可以将任务分为如下四类:单模型任务、多模型任务,自定义预处理任务、无预处理任务。不同任务需要编写不同的代码实现,具体如下图所示:
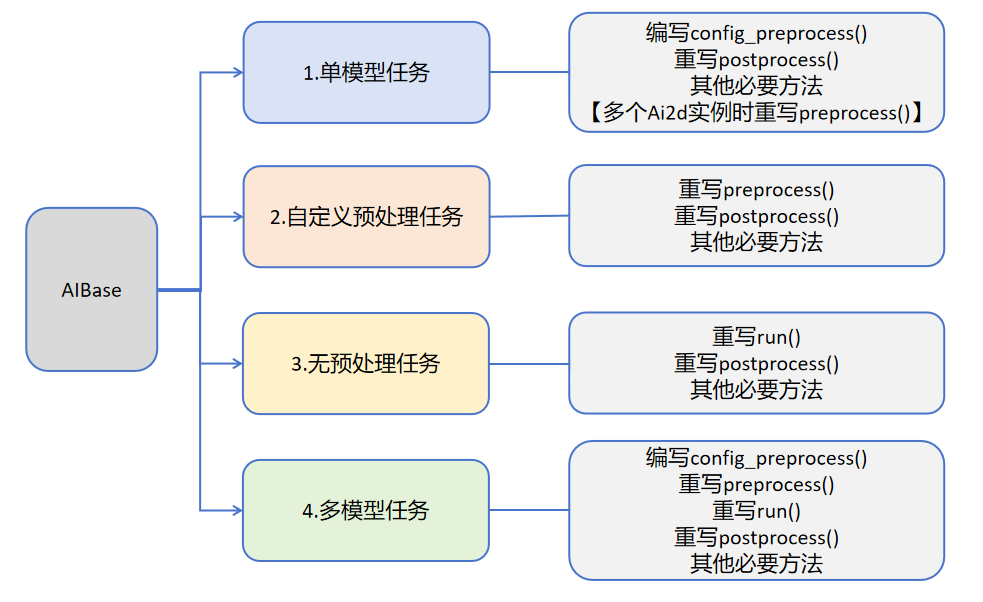
关于不同任务的介绍:
任务类型 |
任务描述 |
代码说明 |
|---|---|---|
单模型任务 |
该任务只有一个模型,只需要关注该模型的前处理、推理、后处理过程,此类任务的前处理使用Ai2d实现,可能使用一个Ai2d实例,也可能使用多个Ai2d实例,后处理基于场景自定义。 |
编写自定义任务类,主要关注任务类的config_preprocess、postprocess、以及该任务需要的其他方法如:draw_result等。 |
自定义预处理任务 |
该任务只有一个模型,只需要关注该模型的前处理、推理、后处理过程,此类任务的前处理不使用Ai2d实现,可以使用ulab.numpy自定义,后处理基于场景自定义。 |
编写自定义任务类,主要关注任务类的preprocess、postprocess、以及该任务需要的其他方法如:draw_result等 |
无预处理任务 |
该任务只有一个模型且不需要预处理,只需要关注该模型的推理和后处理过程,此类任务一般作为多模型任务的一部分,直接对前一个模型的输出做为输入推理,后处理基于需求自定义。 |
编写自定义任务类,主要关注任务类的run(模型推理的整个过程,包括preprocess、inference、postprocess中的全部或某一些步骤)、postprocess、以及该任务需要的其他方法如:draw_results等 |
多模型任务 |
该任务包含多个模型,可能是串联,也可能是其他组合方式。对于每个模型基本上属于前三种模型中的一种,最后通过一个完整的任务类将上述模型子任务统一起来。 |
编写多个子模型任务类,不同子模型任务参照前三种任务定义。不同任务关注不同的方法。 |
1.3.2. 单模型任务#
单模型任务的伪代码结构如下:
from libs.PipeLine import PipeLine, ScopedTiming
from libs.AIBase import AIBase
from libs.AI2D import Ai2d
import os
from media.media import *
import nncase_runtime as nn
import ulab.numpy as np
import image
import gc
import sys

# 自定义AI任务类,继承自AIBase基类
class MyAIApp(AIBase):
    def __init__(self, kmodel_path, model_input_size, rgb888p_size=[224,224], display_size=[1920,1080], debug_mode=0):
        # 调用基类的构造函数
        super().__init__(kmodel_path, model_input_size, rgb888p_size, debug_mode)
        # 模型文件路径
        self.kmodel_path = kmodel_path
        # 模型输入分辨率
        self.model_input_size = model_input_size
        # sensor给到AI的图像分辨率,并对宽度进行16的对齐
        self.rgb888p_size = [ALIGN_UP(rgb888p_size[0], 16), rgb888p_size[1]]
        # 显示分辨率,并对宽度进行16的对齐
        self.display_size = [ALIGN_UP(display_size[0], 16), display_size[1]]
        # 是否开启调试模式
        self.debug_mode = debug_mode
        # 实例化Ai2d,用于实现模型预处理
        self.ai2d = Ai2d(debug_mode)
        # 设置Ai2d的输入输出格式和类型
        self.ai2d.set_ai2d_dtype(nn.ai2d_format.NCHW_FMT, nn.ai2d_format.NCHW_FMT, np.uint8, np.uint8)

    # 配置预处理操作,这里使用了resize,Ai2d支持crop/shift/pad/resize/affine,具体代码请打开/sdcard/app/libs/AI2D.py查看
    def config_preprocess(self, input_image_size=None):
        with ScopedTiming("set preprocess config", self.debug_mode > 0):
            # 初始化ai2d预处理配置,默认为sensor给到AI的尺寸,可以通过设置input_image_size自行修改输入尺寸
            ai2d_input_size = input_image_size if input_image_size else self.rgb888p_size
            # 配置resize预处理方法
            self.ai2d.resize(nn.interp_method.tf_bilinear, nn.interp_mode.half_pixel)
            # 构建预处理流程
            self.ai2d.build([1,3,ai2d_input_size[1],ai2d_input_size[0]],[1,3,self.model_input_size[1],self.model_input_size[0]])

    # 自定义当前任务的后处理,results是模型输出array列表,需要根据实际任务重写
    def postprocess(self, results):
        with ScopedTiming("postprocess", self.debug_mode > 0):
           pass

    # 绘制结果到画面上,需要根据任务自己写
    def draw_result(self, pl, dets):
        with ScopedTiming("display_draw", self.debug_mode > 0):
            pass

if __name__ == "__main__":
    # 显示模式,默认"hdmi",可以选择"hdmi"和"lcd"
    display_mode="hdmi"
    if display_mode=="hdmi":
        display_size=[1920,1080]
    else:
        display_size=[800,480]
    # 设置模型路径,这里要替换成当前任务模型
    kmodel_path = "example_test.kmodel"
    rgb888p_size = [1920, 1080]
    ###### 其它参数########
    ...
    ######################

    # 初始化PipeLine,用于图像处理流程
    pl = PipeLine(rgb888p_size=rgb888p_size, display_size=display_size, display_mode=display_mode)
    pl.create()  # 创建PipeLine实例
    # 初始化自定义AI任务实例
    my_ai = MyAIApp(kmodel_path, model_input_size=[320, 320],rgb888p_size=rgb888p_size, display_size=display_size, debug_mode=0)
    my_ai.config_preprocess()  # 配置预处理

    try:
        while True:
            os.exitpoint()                      # 检查是否有退出信号
            with ScopedTiming("total",1):
                img = pl.get_frame()            # 获取当前帧数据
                res = my_ai.run(img)            # 推理当前帧
                my_ai.draw_result(pl, res)      # 绘制结果
                pl.show_image()                 # 显示结果
                gc.collect()                    # 垃圾回收
    except Exception as e:
        sys.print_exception(e)                  # 打印异常信息
    finally:
        my_ai.deinit()                          # 反初始化
        pl.destroy()                            # 销毁PipeLine实例
下面以人脸检测为例给出示例代码:
from libs.PipeLine import PipeLine, ScopedTiming
from libs.AIBase import AIBase
from libs.AI2D import Ai2d
import os
import ujson
from media.media import *
from time import *
import nncase_runtime as nn
import ulab.numpy as np
import time
import utime
import image
import random
import gc
import sys
import aidemo

# 自定义人脸检测类,继承自AIBase基类
class FaceDetectionApp(AIBase):
    def __init__(self, kmodel_path, model_input_size, anchors, confidence_threshold=0.5, nms_threshold=0.2, rgb888p_size=[224,224], display_size=[1920,1080], debug_mode=0):
        super().__init__(kmodel_path, model_input_size, rgb888p_size, debug_mode)  # 调用基类的构造函数
        self.kmodel_path = kmodel_path  # 模型文件路径
        self.model_input_size = model_input_size  # 模型输入分辨率
        self.confidence_threshold = confidence_threshold  # 置信度阈值
        self.nms_threshold = nms_threshold  # NMS(非极大值抑制)阈值
        self.anchors = anchors  # 锚点数据,用于目标检测
        self.rgb888p_size = [ALIGN_UP(rgb888p_size[0], 16), rgb888p_size[1]]  # sensor给到AI的图像分辨率,并对宽度进行16的对齐
        self.display_size = [ALIGN_UP(display_size[0], 16), display_size[1]]  # 显示分辨率,并对宽度进行16的对齐
        self.debug_mode = debug_mode  # 是否开启调试模式
        self.ai2d = Ai2d(debug_mode)  # 实例化Ai2d,用于实现模型预处理
        self.ai2d.set_ai2d_dtype(nn.ai2d_format.NCHW_FMT, nn.ai2d_format.NCHW_FMT, np.uint8, np.uint8)  # 设置Ai2d的输入输出格式和类型

    # 配置预处理操作,这里使用了pad和resize,Ai2d支持crop/shift/pad/resize/affine,具体代码请打开/sdcard/app/libs/AI2D.py查看
    def config_preprocess(self, input_image_size=None):
        with ScopedTiming("set preprocess config", self.debug_mode > 0):  # 计时器,如果debug_mode大于0则开启
            ai2d_input_size = input_image_size if input_image_size else self.rgb888p_size  # 初始化ai2d预处理配置,默认为sensor给到AI的尺寸,可以通过设置input_image_size自行修改输入尺寸
            top, bottom, left, right = self.get_padding_param()  # 获取padding参数
            self.ai2d.pad([0, 0, 0, 0, top, bottom, left, right], 0, [104, 117, 123])  # 填充边缘
            self.ai2d.resize(nn.interp_method.tf_bilinear, nn.interp_mode.half_pixel)  # 缩放图像
            self.ai2d.build([1,3,ai2d_input_size[1],ai2d_input_size[0]],[1,3,self.model_input_size[1],self.model_input_size[0]])  # 构建预处理流程

    # 自定义当前任务的后处理,results是模型输出array列表,这里使用了aidemo库的face_det_post_process接口
    def postprocess(self, results):
        with ScopedTiming("postprocess", self.debug_mode > 0):
            post_ret = aidemo.face_det_post_process(self.confidence_threshold, self.nms_threshold, self.model_input_size[1], self.anchors, self.rgb888p_size, results)
            if len(post_ret) == 0:
                return post_ret
            else:
                return post_ret[0]

    # 绘制检测结果到画面上
    def draw_result(self, pl, dets):
        with ScopedTiming("display_draw", self.debug_mode > 0):
            if dets:
                pl.osd_img.clear()  # 清除OSD图像
                for det in dets:
                    # 将检测框的坐标转换为显示分辨率下的坐标
                    x, y, w, h = map(lambda x: int(round(x, 0)), det[:4])
                    x = x * self.display_size[0] // self.rgb888p_size[0]
                    y = y * self.display_size[1] // self.rgb888p_size[1]
                    w = w * self.display_size[0] // self.rgb888p_size[0]
                    h = h * self.display_size[1] // self.rgb888p_size[1]
                    pl.osd_img.draw_rectangle(x, y, w, h, color=(255, 255, 0, 255), thickness=2)  # 绘制矩形框
            else:
                pl.osd_img.clear()

    # 获取padding参数
    def get_padding_param(self):
        dst_w = self.model_input_size[0]  # 模型输入宽度
        dst_h = self.model_input_size[1]  # 模型输入高度
        ratio_w = dst_w / self.rgb888p_size[0]  # 宽度缩放比例
        ratio_h = dst_h / self.rgb888p_size[1]  # 高度缩放比例
        ratio = min(ratio_w, ratio_h)  # 取较小的缩放比例
        new_w = int(ratio * self.rgb888p_size[0])  # 新宽度
        new_h = int(ratio * self.rgb888p_size[1])  # 新高度
        dw = (dst_w - new_w) / 2  # 宽度差
        dh = (dst_h - new_h) / 2  # 高度差
        top = int(round(0))
        bottom = int(round(dh * 2 + 0.1))
        left = int(round(0))
        right = int(round(dw * 2 - 0.1))
        return top, bottom, left, right

if __name__ == "__main__":
    # 显示模式,默认"hdmi",可以选择"hdmi"和"lcd"
    display_mode="hdmi"
    if display_mode=="hdmi":
        display_size=[1920,1080]
    else:
        display_size=[800,480]
    # 设置模型路径和其他参数
    kmodel_path = "/sdcard/app/tests/kmodel/face_detection_320.kmodel"
    # 其它参数
    confidence_threshold = 0.5
    nms_threshold = 0.2
    anchor_len = 4200
    det_dim = 4
    anchors_path = "/sdcard/app/tests/utils/prior_data_320.bin"
    anchors = np.fromfile(anchors_path, dtype=np.float)
    anchors = anchors.reshape((anchor_len, det_dim))
    rgb888p_size = [1920, 1080]

    # 初始化PipeLine,用于图像处理流程
    pl = PipeLine(rgb888p_size=rgb888p_size, display_size=display_size, display_mode=display_mode)
    pl.create()  # 创建PipeLine实例
    # 初始化自定义人脸检测实例
    face_det = FaceDetectionApp(kmodel_path, model_input_size=[320, 320], anchors=anchors, confidence_threshold=confidence_threshold, nms_threshold=nms_threshold, rgb888p_size=rgb888p_size, display_size=display_size, debug_mode=0)
    face_det.config_preprocess()  # 配置预处理

    try:
        while True:
            os.exitpoint()                      # 检查是否有退出信号
            with ScopedTiming("total",1):
                img = pl.get_frame()            # 获取当前帧数据
                res = face_det.run(img)         # 推理当前帧
                face_det.draw_result(pl, res)   # 绘制结果
                pl.show_image()                 # 显示结果
                gc.collect()                    # 垃圾回收
    except Exception as e:
        sys.print_exception(e)                  # 打印异常信息
    finally:
        face_det.deinit()                       # 反初始化
        pl.destroy()                            # 销毁PipeLine实例
多个Ai2d实例时的伪代码如下:
from libs.PipeLine import PipeLine, ScopedTiming
from libs.AIBase import AIBase
from libs.AI2D import Ai2d
import os
from media.media import *
import nncase_runtime as nn
import ulab.numpy as np
import image
import gc
import sys

# 自定义AI任务类,继承自AIBase基类
class MyAIApp(AIBase):
    def __init__(self, kmodel_path, model_input_size, rgb888p_size=[224,224], display_size=[1920,1080], debug_mode=0):
        # 调用基类的构造函数
        super().__init__(kmodel_path, model_input_size, rgb888p_size, debug_mode)
        # 模型文件路径
        self.kmodel_path = kmodel_path
        # 模型输入分辨率
        self.model_input_size = model_input_size
        # sensor给到AI的图像分辨率,并对宽度进行16的对齐
        self.rgb888p_size = [ALIGN_UP(rgb888p_size[0], 16), rgb888p_size[1]]
        # 显示分辨率,并对宽度进行16的对齐
        self.display_size = [ALIGN_UP(display_size[0], 16), display_size[1]]
        # 是否开启调试模式
        self.debug_mode = debug_mode
        # 实例化Ai2d,用于实现模型预处理
        self.ai2d_resize = Ai2d(debug_mode)
        # 设置Ai2d的输入输出格式和类型
        self.ai2d_resize.set_ai2d_dtype(nn.ai2d_format.NCHW_FMT, nn.ai2d_format.NCHW_FMT, np.uint8, np.uint8)
        # 实例化Ai2d,用于实现模型预处理
        self.ai2d_resize = Ai2d(debug_mode)
        # 设置Ai2d的输入输出格式和类型
        self.ai2d_resize.set_ai2d_dtype(nn.ai2d_format.NCHW_FMT, nn.ai2d_format.NCHW_FMT, np.uint8, np.uint8)
        # 实例化Ai2d,用于实现模型预处理
        self.ai2d_crop = Ai2d(debug_mode)
        # 设置Ai2d的输入输出格式和类型
        self.ai2d_crop.set_ai2d_dtype(nn.ai2d_format.NCHW_FMT, nn.ai2d_format.NCHW_FMT, np.uint8, np.uint8)

    # 配置预处理操作,这里使用了resize和crop,Ai2d支持crop/shift/pad/resize/affine,具体代码请打开/sdcard/app/libs/AI2D.py查看
    def config_preprocess(self, input_image_size=None):
        with ScopedTiming("set preprocess config", self.debug_mode > 0):
            # 初始化ai2d预处理配置,默认为sensor给到AI的尺寸,可以通过设置input_image_size自行修改输入尺寸
            ai2d_input_size = input_image_size if input_image_size else self.rgb888p_size
            # 配置resize预处理方法
            self.ai2d_resize.resize(nn.interp_method.tf_bilinear, nn.interp_mode.half_pixel)
            # 构建预处理流程
            self.ai2d_resize.build([1,3,ai2d_input_size[1],ai2d_input_size[0]],[1,3,640,640])
            # 配置crop预处理方法
            self.ai2d_crop.crop(0,0,320,320)
            # 构建预处理流程
            self.ai2d_crop.build([1,3,640,640],[1,3,320,320])

    # 假设该任务需要crop和resize预处理,顺序是先resize再crop,该顺序不符合ai2d的处理顺序,因此需要设置两个Ai2d实例分别处理
    def preprocess(self,input_np):
        resize_tensor=self.ai2d_resize.run(input_np)
        resize_np=resize_tensor.to_numpy()
        crop_tensor=self.ai2d_crop.run(resize_np)
        return [crop_tensor]


    # 自定义当前任务的后处理,results是模型输出array列表,需要根据实际任务重写
    def postprocess(self, results):
        with ScopedTiming("postprocess", self.debug_mode > 0):
           pass

    # 绘制结果到画面上,需要根据任务自己写
    def draw_result(self, pl, dets):
        with ScopedTiming("display_draw", self.debug_mode > 0):
            pass

    # 重写deinit,释放多个ai2d资源
    def deinit(self):
        with ScopedTiming("deinit",self.debug_mode > 0):
            del self.ai2d_resize
            del self.ai2d_crop
            super().deinit()

if __name__ == "__main__":
    # 显示模式,默认"hdmi",可以选择"hdmi"和"lcd"
    display_mode="hdmi"
    if display_mode=="hdmi":
        display_size=[1920,1080]
    else:
        display_size=[800,480]
    # 设置模型路径,这里要替换成当前任务模型
    kmodel_path = "example_test.kmodel"
    rgb888p_size = [1920, 1080]
    ###### 其它参数########
    ...
    ######################

    # 初始化PipeLine,用于图像处理流程
    pl = PipeLine(rgb888p_size=rgb888p_size, display_size=display_size, display_mode=display_mode)
    pl.create()  # 创建PipeLine实例
    # 初始化自定义AI任务实例
    my_ai = MyAIApp(kmodel_path, model_input_size=[320, 320],rgb888p_size=rgb888p_size, display_size=display_size, debug_mode=0)
    my_ai.config_preprocess()  # 配置预处理

    try:
        while True:
            os.exitpoint()                      # 检查是否有退出信号
            with ScopedTiming("total",1):
                img = pl.get_frame()            # 获取当前帧数据
                res = my_ai.run(img)            # 推理当前帧
                my_ai.draw_result(pl, res)      # 绘制结果
                pl.show_image()                 # 显示结果
                gc.collect()                    # 垃圾回收
    except Exception as e:
        sys.print_exception(e)                  # 打印异常信息
    finally:
        my_ai.deinit()                          # 反初始化
        pl.destroy()                            # 销毁PipeLine实例
1.3.3. 自定义预处理任务#
对于需要重写前处理(不使用提供的ai2d类,自己手动写预处理)的AI任务伪代码如下:
from libs.PipeLine import PipeLine, ScopedTiming
from libs.AIBase import AIBase
from libs.AI2D import Ai2d
import os
from media.media import *
import nncase_runtime as nn
import ulab.numpy as np
import image
import gc
import sys

# 自定义AI任务类,继承自AIBase基类
class MyAIApp(AIBase):
    def __init__(self, kmodel_path, model_input_size, rgb888p_size=[224,224], display_size=[1920,1080], debug_mode=0):
        # 调用基类的构造函数
        super().__init__(kmodel_path, model_input_size, rgb888p_size, debug_mode)
        # 模型文件路径
        self.kmodel_path = kmodel_path
        # 模型输入分辨率
        self.model_input_size = model_input_size
        # sensor给到AI的图像分辨率,并对宽度进行16的对齐
        self.rgb888p_size = [ALIGN_UP(rgb888p_size[0], 16), rgb888p_size[1]]
        # 显示分辨率,并对宽度进行16的对齐
        self.display_size = [ALIGN_UP(display_size[0], 16), display_size[1]]
        # 是否开启调试模式
        self.debug_mode = debug_mode
        # 实例化Ai2d,用于实现模型预处理
        self.ai2d = Ai2d(debug_mode)
        # 设置Ai2d的输入输出格式和类型
        self.ai2d.set_ai2d_dtype(nn.ai2d_format.NCHW_FMT, nn.ai2d_format.NCHW_FMT, np.uint8, np.uint8)

    # 对于不使用ai2d完成预处理的AI任务,使用封装的接口或者ulab.numpy实现预处理,需要在子类中重写该函数
    def preprocess(self,input_np):
        #############
        #注意自定义预处理过程
        #############
        return [tensor]

    # 自定义当前任务的后处理,results是模型输出array列表,需要根据实际任务重写
    def postprocess(self, results):
        with ScopedTiming("postprocess", self.debug_mode > 0):
           pass

    # 绘制结果到画面上,需要根据任务自己写
    def draw_result(self, pl, dets):
        with ScopedTiming("display_draw", self.debug_mode > 0):
            pass

if __name__ == "__main__":
    # 显示模式,默认"hdmi",可以选择"hdmi"和"lcd"
    display_mode="hdmi"
    if display_mode=="hdmi":
        display_size=[1920,1080]
    else:
        display_size=[800,480]
    # 设置模型路径,这里要替换成当前任务模型
    kmodel_path = "example_test.kmodel"
    rgb888p_size = [1920, 1080]
    ###### 其它参数########
    ...
    ######################

    # 初始化PipeLine,用于图像处理流程
    pl = PipeLine(rgb888p_size=rgb888p_size, display_size=display_size, display_mode=display_mode)
    pl.create()  # 创建PipeLine实例
    # 初始化自定义AI任务实例
    my_ai = MyAIApp(kmodel_path, model_input_size=[320, 320],rgb888p_size=rgb888p_size, display_size=display_size, debug_mode=0)
    my_ai.config_preprocess()  # 配置预处理

    try:
        while True:
            os.exitpoint()                      # 检查是否有退出信号
            with ScopedTiming("total",1):
                img = pl.get_frame()            # 获取当前帧数据
                res = my_ai.run(img)            # 推理当前帧
                my_ai.draw_result(pl, res)      # 绘制结果
                pl.show_image()                 # 显示结果
                gc.collect()                    # 垃圾回收
    except Exception as e:
        sys.print_exception(e)                  # 打印异常信息
    finally:
        my_ai.deinit()                          # 反初始化
        pl.destroy()                            # 销毁PipeLine实例
以关键词唤醒keyword_spotting为例:
from libs.PipeLine import ScopedTiming
from libs.AIBase import AIBase
from libs.AI2D import Ai2d
from media.pyaudio import *                     # 音频模块
from media.media import *                       # 软件抽象模块,主要封装媒体数据链路以及媒体缓冲区
import media.wave as wave                       # wav音频处理模块
import nncase_runtime as nn                     # nncase运行模块,封装了kpu(kmodel推理)和ai2d(图片预处理加速)操作
import ulab.numpy as np                         # 类似python numpy操作,但也会有一些接口不同
import aidemo                                   # aidemo模块,封装ai demo相关前处理、后处理等操作
import time                                     # 时间统计
import struct                                   # 字节字符转换模块
import gc                                       # 垃圾回收模块
import os,sys                                   # 操作系统接口模块

# 自定义关键词唤醒类,继承自AIBase基类
class KWSApp(AIBase):
    def __init__(self, kmodel_path, threshold, debug_mode=0):
        super().__init__(kmodel_path)  # 调用基类的构造函数
        self.kmodel_path = kmodel_path  # 模型文件路径
        self.threshold=threshold
        self.debug_mode = debug_mode  # 是否开启调试模式
        self.cache_np = np.zeros((1, 256, 105), dtype=np.float)

    # 自定义预处理,返回模型输入tensor列表
    def preprocess(self,pcm_data):
        pcm_data_list=[]
        # 获取音频流数据
        for i in range(0, len(pcm_data), 2):
            # 每两个字节组织成一个有符号整数,然后将其转换为浮点数,即为一次采样的数据,加入到当前一帧(0.3s)的数据列表中
            int_pcm_data = struct.unpack("<h", pcm_data[i:i+2])[0]
            float_pcm_data = float(int_pcm_data)
            pcm_data_list.append(float_pcm_data)
        # 将pcm数据处理为模型输入的特征向量
        mp_feats = aidemo.kws_preprocess(fp, pcm_data_list)[0]
        mp_feats_np = np.array(mp_feats).reshape((1, 30, 40))
        audio_input_tensor = nn.from_numpy(mp_feats_np)
        cache_input_tensor = nn.from_numpy(self.cache_np)
        return [audio_input_tensor,cache_input_tensor]

    # 自定义当前任务的后处理,results是模型输出array列表
    def postprocess(self, results):
        with ScopedTiming("postprocess", self.debug_mode > 0):
            logits_np = results[0]
            self.cache_np= results[1]
            max_logits = np.max(logits_np, axis=1)[0]
            max_p = np.max(max_logits)
            idx = np.argmax(max_logits)
            # 如果分数大于阈值,且idx==1(即包含唤醒词),播放回复音频
            if max_p > self.threshold and idx == 1:
                return 1
            else:
                return 0


if __name__ == "__main__":
    os.exitpoint(os.EXITPOINT_ENABLE)
    nn.shrink_memory_pool()
    # 设置模型路径和其他参数
    kmodel_path = "/sdcard/app/tests/kmodel/kws.kmodel"
    # 其它参数
    THRESH = 0.5                # 检测阈值
    SAMPLE_RATE = 16000         # 采样率16000Hz,即每秒采样16000次
    CHANNELS = 1                # 通道数 1为单声道,2为立体声
    FORMAT = paInt16            # 音频输入输出格式 paInt16
    CHUNK = int(0.3 * 16000)    # 每次读取音频数据的帧数,设置为0.3s的帧数16000*0.3=4800
    reply_wav_file = "/sdcard/app/tests/utils/wozai.wav"         # kws唤醒词回复音频路径

    # 初始化音频预处理接口
    fp = aidemo.kws_fp_create()
    # 初始化音频流
    p = PyAudio()
    p.initialize(CHUNK)
    MediaManager.init()    #vb buffer初始化
    # 用于采集实时音频数据
    input_stream = p.open(format=FORMAT,channels=CHANNELS,rate=SAMPLE_RATE,input=True,frames_per_buffer=CHUNK)
    # 用于播放回复音频
    output_stream = p.open(format=FORMAT,channels=CHANNELS,rate=SAMPLE_RATE,output=True,frames_per_buffer=CHUNK)
    # 初始化自定义关键词唤醒实例
    kws = KWSApp(kmodel_path,threshold=THRESH,debug_mode=0)

    try:
        while True:
            os.exitpoint()                      # 检查是否有退出信号
            with ScopedTiming("total",1):
                pcm_data=input_stream.read()
                res=kws.run(pcm_data)
                if res:
                    print("====Detected XiaonanXiaonan!====")
                    wf = wave.open(reply_wav_file, "rb")
                    wav_data = wf.read_frames(CHUNK)
                    while wav_data:
                        output_stream.write(wav_data)
                        wav_data = wf.read_frames(CHUNK)
                    time.sleep(1) # 时间缓冲,用于播放回复声音
                    wf.close()
                else:
                    print("Deactivated!")
                gc.collect()                    # 垃圾回收
    except Exception as e:
        sys.print_exception(e)                  # 打印异常信息
    finally:
        input_stream.stop_stream()
        output_stream.stop_stream()
        input_stream.close()
        output_stream.close()
        p.terminate()
        MediaManager.deinit()              #释放vb buffer
        aidemo.kws_fp_destroy(fp)
        kws.deinit()                       # 反初始化
1.3.4. 无预处理任务#
对于不需要预处理(直接输入推理)的AI任务伪代码如下:
 from libs.PipeLine import PipeLine, ScopedTiming
from libs.AIBase import AIBase
from libs.AI2D import Ai2d
import os
from media.media import *
import nncase_runtime as nn
import ulab.numpy as np
import image
import gc
import sys

# 自定义AI任务类,继承自AIBase基类
class MyAIApp(AIBase):
    def __init__(self, kmodel_path, model_input_size, rgb888p_size=[224,224], display_size=[1920,1080], debug_mode=0):
        # 调用基类的构造函数
        super().__init__(kmodel_path, model_input_size, rgb888p_size, debug_mode)
        # 模型文件路径
        self.kmodel_path = kmodel_path
        # 模型输入分辨率
        self.model_input_size = model_input_size
        # sensor给到AI的图像分辨率,并对宽度进行16的对齐
        self.rgb888p_size = [ALIGN_UP(rgb888p_size[0], 16), rgb888p_size[1]]
        # 显示分辨率,并对宽度进行16的对齐
        self.display_size = [ALIGN_UP(display_size[0], 16), display_size[1]]
        # 是否开启调试模式
        self.debug_mode = debug_mode

    # 自定义当前任务的后处理,results是模型输出array列表,需要根据实际任务重写
    def postprocess(self, results):
        with ScopedTiming("postprocess", self.debug_mode > 0):
           pass

    # 对于用预处理的AI任务,需要在子类中重写该函数
    def run(self,inputs_np):
        # 先将ulab.numpy.ndarray列表转换成tensor列表
        tensors=[]
        for input_np in inputs_np:
            tensors.append(nn.from_numpy(input_np))
        # 调用AIBase内的inference函数进行模型推理
        results=self.inference(tensors)
        # 调用当前子类的postprocess方法进行自定义后处理
        outputs=self.postprocess(results)
        return outputs

    # 绘制结果到画面上,需要根据任务自己写
    def draw_result(self, pl, dets):
        with ScopedTiming("display_draw", self.debug_mode > 0):
            pass

if __name__ == "__main__":
    # 显示模式,默认"hdmi",可以选择"hdmi"和"lcd"
    display_mode="hdmi"
    if display_mode=="hdmi":
        display_size=[1920,1080]
    else:
        display_size=[800,480]
    # 设置模型路径,这里要替换成当前任务模型
    kmodel_path = "example_test.kmodel"
    rgb888p_size = [1920, 1080]
    ###### 其它参数########
    ...
    ######################

    # 初始化PipeLine,用于图像处理流程
    pl = PipeLine(rgb888p_size=rgb888p_size, display_size=display_size, display_mode=display_mode)
    pl.create()  # 创建PipeLine实例
    # 初始化自定义AI任务实例
    my_ai = MyAIApp(kmodel_path, model_input_size=[320, 320],rgb888p_size=rgb888p_size, display_size=display_size, debug_mode=0)
    my_ai.config_preprocess()  # 配置预处理

    try:
        while True:
            os.exitpoint()                      # 检查是否有退出信号
            with ScopedTiming("total",1):
                img = pl.get_frame()            # 获取当前帧数据
                res = my_ai.run(img)            # 推理当前帧
                my_ai.draw_result(pl, res)      # 绘制结果
                pl.show_image()                 # 显示结果
                gc.collect()                    # 垃圾回收
    except Exception as e:
        sys.print_exception(e)                  # 打印异常信息
    finally:
        my_ai.deinit()                          # 反初始化
        pl.destroy()                            # 销毁PipeLine实例
比如单目标跟踪(nanotracker.py)中的追踪模块,只需要对模版模型和实时推理模型的输出作为追踪模型的输入,不需要预处理:
class TrackerApp(AIBase):
    def __init__(self,kmodel_path,crop_input_size,thresh,rgb888p_size=[1280,720],display_size=[1920,1080],debug_mode=0):
        super().__init__(kmodel_path,rgb888p_size,debug_mode)
        # kmodel路径
        self.kmodel_path=kmodel_path
        # crop模型的输入尺寸
        self.crop_input_size=crop_input_size
        # 跟踪框阈值
        self.thresh=thresh
        # 跟踪框宽、高调整系数
        self.CONTEXT_AMOUNT = 0.5
        # sensor给到AI的图像分辨率,宽16字节对齐
        self.rgb888p_size=[ALIGN_UP(rgb888p_size[0],16),rgb888p_size[1]]
        # 视频输出VO分辨率,宽16字节对齐
        self.display_size=[ALIGN_UP(display_size[0],16),display_size[1]]
        # debug模式
        self.debug_mode=debug_mode
        # 可以不定义
        self.ai2d=Ai2d(debug_mode)
        self.ai2d.set_ai2d_dtype(nn.ai2d_format.NCHW_FMT,nn.ai2d_format.NCHW_FMT,np.uint8, np.uint8)

    # 可以不定义
    def config_preprocess(self,input_image_size=None):
        with ScopedTiming("set preprocess config",self.debug_mode > 0):
            pass

    # 重写run函数,因为没有预处理过程,所以原来run操作中包含的preprocess->inference->postprocess不合适,这里只包含inference->postprocess
    def run(self,input_np_1,input_np_2,center_xy_wh):
        input_tensors=[]
        input_tensors.append(nn.from_numpy(input_np_1))
        input_tensors.append(nn.from_numpy(input_np_2))
        results=self.inference(input_tensors)
        return self.postprocess(results,center_xy_wh)


    # 自定义后处理,results是模型输出array的列表,这里使用了aidemo的nanotracker_postprocess列表
    def postprocess(self,results,center_xy_wh):
        with ScopedTiming("postprocess",self.debug_mode > 0):
            det = aidemo.nanotracker_postprocess(results[0],results[1],[self.rgb888p_size[1],self.rgb888p_size[0]],self.thresh,center_xy_wh,self.crop_input_size[0],self.CONTEXT_AMOUNT)
            return det
1.3.5. 多模型任务#
这里以双模型串联推理为例,给出的伪代码如下:
from libs.PipeLine import PipeLine, ScopedTiming
from libs.AIBase import AIBase
from libs.AI2D import Ai2d
import os
from media.media import *
import nncase_runtime as nn
import ulab.numpy as np
import image
import gc
import sys

# 自定义AI任务类,继承自AIBase基类
class MyAIApp_1(AIBase):
    def __init__(self, kmodel_path, model_input_size, rgb888p_size=[224,224], display_size=[1920,1080], debug_mode=0):
        # 调用基类的构造函数
        super().__init__(kmodel_path, model_input_size, rgb888p_size, debug_mode)
        # 模型文件路径
        self.kmodel_path = kmodel_path
        # 模型输入分辨率
        self.model_input_size = model_input_size
        # sensor给到AI的图像分辨率,并对宽度进行16的对齐
        self.rgb888p_size = [ALIGN_UP(rgb888p_size[0], 16), rgb888p_size[1]]
        # 显示分辨率,并对宽度进行16的对齐
        self.display_size = [ALIGN_UP(display_size[0], 16), display_size[1]]
        # 是否开启调试模式
        self.debug_mode = debug_mode
        # 实例化Ai2d,用于实现模型预处理
        self.ai2d = Ai2d(debug_mode)
        # 设置Ai2d的输入输出格式和类型
        self.ai2d.set_ai2d_dtype(nn.ai2d_format.NCHW_FMT, nn.ai2d_format.NCHW_FMT, np.uint8, np.uint8)

    # 配置预处理操作,这里使用了resize,Ai2d支持crop/shift/pad/resize/affine,具体代码请打开/sdcard/app/libs/AI2D.py查看
    def config_preprocess(self, input_image_size=None):
        with ScopedTiming("set preprocess config", self.debug_mode > 0):
            # 初始化ai2d预处理配置,默认为sensor给到AI的尺寸,可以通过设置input_image_size自行修改输入尺寸
            ai2d_input_size = input_image_size if input_image_size else self.rgb888p_size
            # 配置resize预处理方法
            self.ai2d.resize(nn.interp_method.tf_bilinear, nn.interp_mode.half_pixel)
            # 构建预处理流程
            self.ai2d.build([1,3,ai2d_input_size[1],ai2d_input_size[0]],[1,3,self.model_input_size[1],self.model_input_size[0]])

    # 自定义当前任务的后处理,results是模型输出array列表,需要根据实际任务重写
    def postprocess(self, results):
        with ScopedTiming("postprocess", self.debug_mode > 0):
           pass


# 自定义AI任务类,继承自AIBase基类
class MyAIApp_2(AIBase):
    def __init__(self, kmodel_path, model_input_size, rgb888p_size=[224,224], display_size=[1920,1080], debug_mode=0):
        # 调用基类的构造函数
        super().__init__(kmodel_path, model_input_size, rgb888p_size, debug_mode)
        # 模型文件路径
        self.kmodel_path = kmodel_path
        # 模型输入分辨率
        self.model_input_size = model_input_size
        # sensor给到AI的图像分辨率,并对宽度进行16的对齐
        self.rgb888p_size = [ALIGN_UP(rgb888p_size[0], 16), rgb888p_size[1]]
        # 显示分辨率,并对宽度进行16的对齐
        self.display_size = [ALIGN_UP(display_size[0], 16), display_size[1]]
        # 是否开启调试模式
        self.debug_mode = debug_mode
        # 实例化Ai2d,用于实现模型预处理
        self.ai2d = Ai2d(debug_mode)
        # 设置Ai2d的输入输出格式和类型
        self.ai2d.set_ai2d_dtype(nn.ai2d_format.NCHW_FMT, nn.ai2d_format.NCHW_FMT, np.uint8, np.uint8)

    # 配置预处理操作,这里使用了resize,Ai2d支持crop/shift/pad/resize/affine,具体代码请打开/sdcard/app/libs/AI2D.py查看
    def config_preprocess(self, input_image_size=None):
        with ScopedTiming("set preprocess config", self.debug_mode > 0):
            # 初始化ai2d预处理配置,默认为sensor给到AI的尺寸,可以通过设置input_image_size自行修改输入尺寸
            ai2d_input_size = input_image_size if input_image_size else self.rgb888p_size
            # 配置resize预处理方法
            self.ai2d.resize(nn.interp_method.tf_bilinear, nn.interp_mode.half_pixel)
            # 构建预处理流程
            self.ai2d.build([1,3,ai2d_input_size[1],ai2d_input_size[0]],[1,3,self.model_input_size[1],self.model_input_size[0]])

    # 自定义当前任务的后处理,results是模型输出array列表,需要根据实际任务重写
    def postprocess(self, results):
        with ScopedTiming("postprocess", self.debug_mode > 0):
           pass


class MyApp:
    def __init__(kmodel1_path,kmodel2_path,kmodel1_input_size,kmodel2_input_size,rgb888p_size,display_size,debug_mode):
        # 创建两个模型推理的实例
        self.app_1=MyApp_1(kmodel1_path,kmodel1_input_size,rgb888p_size,display_size,debug_mode)
        self.app_2=MyApp_2(kmodel2_path,kmodel2_input_size,rgb888p_size,display_size,debug_mode)
        self.app_1.config_preprocess()

    # 编写run函数,具体代码根据AI任务的需求编写,此处只是给出一个示例
    def run(self,input_np):
        outputs_1=self.app_1.run(input_np)
        outputs_2=[]
        for out in outputs_1:
            self.app_2.config_preprocess(out)
            out_2=self.app_2.run(input_np)
            outputs_2.append(out_2)
        return outputs_1,outputs_2

    # 绘制
    def draw_result(self,pl,outputs_1,outputs_2):
        pass

    ######其他函数########
    # 省略
    ####################


if __name__ == "__main__":
    # 显示模式,默认"hdmi",可以选择"hdmi"和"lcd"
    display_mode="hdmi"
    if display_mode=="hdmi":
        display_size=[1920,1080]
    else:
        display_size=[800,480]
    rgb888p_size = [1920, 1080]
    # 设置模型路径,这里要替换成当前任务模型
    kmodel1_path = "test_kmodel1.kmodel"
    kmdoel1_input_size=[320,320]
    kmodel2_path = "test_kmodel2.kmodel"
    kmodel2_input_size=[48,48]

    ###### 其它参数########
    # 省略
    ######################

    # 初始化PipeLine,用于图像处理流程
    pl = PipeLine(rgb888p_size=rgb888p_size, display_size=display_size, display_mode=display_mode)
    pl.create()  # 创建PipeLine实例
    # 初始化自定义AI任务实例
    my_ai = MyApp(kmodel1_path,kmodel2_path, kmodel1_input_size,kmodel2_input_size,rgb888p_size=rgb888p_size, display_size=display_size, debug_mode=0)
    my_ai.config_preprocess()  # 配置预处理

    try:
        while True:
            os.exitpoint()                      # 检查是否有退出信号
            with ScopedTiming("total",1):
                img = pl.get_frame()            # 获取当前帧数据
                outputs_1,outputs_2 = my_ai.run(img)            # 推理当前帧
                my_ai.draw_result(pl, outputs_1,outputs_2)      # 绘制结果
                pl.show_image()                 # 显示结果
                gc.collect()                    # 垃圾回收
    except Exception as e:
        sys.print_exception(e)                  # 打印异常信息
    finally:
        my_ai.app_1.deinit()                    # 反初始化
        my_ai.app_2.deinit()
        pl.destroy()                            # 销毁PipeLine实例
下面以车牌检测为例给出示例代码:
from libs.PipeLine import PipeLine, ScopedTiming
from libs.AIBase import AIBase
from libs.AI2D import Ai2d
import os
import ujson
from media.media import *
from time import *
import nncase_runtime as nn
import ulab.numpy as np
import time
import image
import aidemo
import random
import gc
import sys

# 自定义车牌检测类
class LicenceDetectionApp(AIBase):
    # 初始化函数,设置车牌检测应用的参数
    def __init__(self, kmodel_path, model_input_size, confidence_threshold=0.5, nms_threshold=0.2, rgb888p_size=[224,224], display_size=[1920,1080], debug_mode=0):
        super().__init__(kmodel_path, model_input_size, rgb888p_size, debug_mode)  # 调用基类的初始化函数
        self.kmodel_path = kmodel_path  # 模型路径
        # 模型输入分辨率
        self.model_input_size = model_input_size
        # 分类阈值
        self.confidence_threshold = confidence_threshold
        self.nms_threshold = nms_threshold
        # sensor给到AI的图像分辨率
        self.rgb888p_size = [ALIGN_UP(rgb888p_size[0], 16), rgb888p_size[1]]
        # 显示分辨率
        self.display_size = [ALIGN_UP(display_size[0], 16), display_size[1]]
        self.debug_mode = debug_mode
        # Ai2d实例,用于实现模型预处理
        self.ai2d = Ai2d(debug_mode)
        # 设置Ai2d的输入输出格式和类型
        self.ai2d.set_ai2d_dtype(nn.ai2d_format.NCHW_FMT, nn.ai2d_format.NCHW_FMT, np.uint8, np.uint8)

    # 配置预处理操作,这里使用了resize,Ai2d支持crop/shift/pad/resize/affine
    def config_preprocess(self, input_image_size=None):
        with ScopedTiming("set preprocess config", self.debug_mode > 0):
            # 初始化ai2d预处理配置,默认为sensor给到AI的尺寸,可以通过设置input_image_size自行修改输入尺寸
            ai2d_input_size = input_image_size if input_image_size else self.rgb888p_size
            self.ai2d.resize(nn.interp_method.tf_bilinear, nn.interp_mode.half_pixel)
            self.ai2d.build([1,3,ai2d_input_size[1],ai2d_input_size[0]],[1,3,self.model_input_size[1],self.model_input_size[0]])

    # 自定义当前任务的后处理
    def postprocess(self, results):
        with ScopedTiming("postprocess", self.debug_mode > 0):
            # 对检测结果进行后处理
            det_res = aidemo.licence_det_postprocess(results, [self.rgb888p_size[1], self.rgb888p_size[0]], self.model_input_size, self.confidence_threshold, self.nms_threshold)
            return det_res

# 自定义车牌识别任务类
class LicenceRecognitionApp(AIBase):
    def __init__(self,kmodel_path,model_input_size,rgb888p_size=[1920,1080],display_size=[1920,1080],debug_mode=0):
        super().__init__(kmodel_path,model_input_size,rgb888p_size,debug_mode)
        # kmodel路径
        self.kmodel_path=kmodel_path
        # 检测模型输入分辨率
        self.model_input_size=model_input_size
        # sensor给到AI的图像分辨率,宽16字节对齐
        self.rgb888p_size=[ALIGN_UP(rgb888p_size[0],16),rgb888p_size[1]]
        # 视频输出VO分辨率,宽16字节对齐
        self.display_size=[ALIGN_UP(display_size[0],16),display_size[1]]
        # debug模式
        self.debug_mode=debug_mode
        # 车牌字符字典
        self.dict_rec = ["挂", "使", "领", "澳", "港", "皖", "沪", "津", "渝", "冀", "晋", "蒙", "辽", "吉", "黑", "苏", "浙", "京", "闽", "赣", "鲁", "豫", "鄂", "湘", "粤", "桂", "琼", "川", "贵", "云", "藏", "陕", "甘", "青", "宁", "新", "警", "学", "0", "1", "2", "3", "4", "5", "6", "7", "8", "9", "A", "B", "C", "D", "E", "F", "G", "H", "J", "K", "L", "M", "N", "P", "Q", "R", "S", "T", "U", "V", "W", "X", "Y", "Z", "_", "-"]
        self.dict_size = len(self.dict_rec)
        self.ai2d=Ai2d(debug_mode)
        self.ai2d.set_ai2d_dtype(nn.ai2d_format.NCHW_FMT,nn.ai2d_format.NCHW_FMT,np.uint8, np.uint8)

    # 配置预处理操作,这里使用了resize,Ai2d支持crop/shift/pad/resize/affine
    def config_preprocess(self,input_image_size=None):
        with ScopedTiming("set preprocess config",self.debug_mode > 0):
            ai2d_input_size=input_image_size if input_image_size else self.rgb888p_size
            self.ai2d.resize(nn.interp_method.tf_bilinear, nn.interp_mode.half_pixel)
            self.ai2d.build([1,3,ai2d_input_size[1],ai2d_input_size[0]],[1,3,self.model_input_size[1],self.model_input_size[0]])

    # 自定义后处理,results是模型输出的array列表
    def postprocess(self,results):
        with ScopedTiming("postprocess",self.debug_mode > 0):
            output_data=results[0].reshape((-1,self.dict_size))
            max_indices = np.argmax(output_data, axis=1)
            result_str = ""
            for i in range(max_indices.shape[0]):
                index = max_indices[i]
                if index > 0 and (i == 0 or index != max_indices[i - 1]):
                    result_str += self.dict_rec[index - 1]
            return result_str

# 车牌识别任务类
class LicenceRec:
    def __init__(self,licence_det_kmodel,licence_rec_kmodel,det_input_size,rec_input_size,confidence_threshold=0.25,nms_threshold=0.3,rgb888p_size=[1920,1080],display_size=[1920,1080],debug_mode=0):
        # 车牌检测模型路径
        self.licence_det_kmodel=licence_det_kmodel
        # 车牌识别模型路径
        self.licence_rec_kmodel=licence_rec_kmodel
        # 人脸检测模型输入分辨率
        self.det_input_size=det_input_size
        # 人脸姿态模型输入分辨率
        self.rec_input_size=rec_input_size
        # 置信度阈值
        self.confidence_threshold=confidence_threshold
        # nms阈值
        self.nms_threshold=nms_threshold
        # sensor给到AI的图像分辨率,宽16字节对齐
        self.rgb888p_size=[ALIGN_UP(rgb888p_size[0],16),rgb888p_size[1]]
        # 视频输出VO分辨率,宽16字节对齐
        self.display_size=[ALIGN_UP(display_size[0],16),display_size[1]]
        # debug_mode模式
        self.debug_mode=debug_mode
        self.licence_det=LicenceDetectionApp(self.licence_det_kmodel,model_input_size=self.det_input_size,confidence_threshold=self.confidence_threshold,nms_threshold=self.nms_threshold,rgb888p_size=self.rgb888p_size,display_size=self.display_size,debug_mode=0)
        self.licence_rec=LicenceRecognitionApp(self.licence_rec_kmodel,model_input_size=self.rec_input_size,rgb888p_size=self.rgb888p_size)
        self.licence_det.config_preprocess()

    # run函数
    def run(self,input_np):
        # 执行车牌检测
        det_boxes=self.licence_det.run(input_np)
        # 将车牌部分抠出来
        imgs_array_boxes = aidemo.ocr_rec_preprocess(input_np,[self.rgb888p_size[1],self.rgb888p_size[0]],det_boxes)
        imgs_array = imgs_array_boxes[0]
        boxes = imgs_array_boxes[1]
        rec_res = []
        for img_array in imgs_array:
            # 对每一个检测到的车牌进行识别
            self.licence_rec.config_preprocess(input_image_size=[img_array.shape[3],img_array.shape[2]])
            licence_str=self.licence_rec.run(img_array)
            rec_res.append(licence_str)
            gc.collect()
        return det_boxes,rec_res

    # 绘制车牌检测识别效果
    def draw_result(self,pl,det_res,rec_res):
        pl.osd_img.clear()
        if det_res:
            point_8 = np.zeros((8),dtype=np.int16)
            for det_index in range(len(det_res)):
                for i in range(4):
                    x = det_res[det_index][i * 2 + 0]/self.rgb888p_size[0]*self.display_size[0]
                    y = det_res[det_index][i * 2 + 1]/self.rgb888p_size[1]*self.display_size[1]
                    point_8[i * 2 + 0] = int(x)
                    point_8[i * 2 + 1] = int(y)
                for i in range(4):
                    pl.osd_img.draw_line(point_8[i * 2 + 0],point_8[i * 2 + 1],point_8[(i+1) % 4 * 2 + 0],point_8[(i+1) % 4 * 2 + 1],color=(255, 0, 255, 0),thickness=4)
                pl.osd_img.draw_string_advanced( point_8[6], point_8[7] + 20, 40,rec_res[det_index] , color=(255,255,153,18))


if __name__=="__main__":
    # 显示模式,默认"hdmi",可以选择"hdmi"和"lcd"
    display_mode="hdmi"
    if display_mode=="hdmi":
        display_size=[1920,1080]
    else:
        display_size=[800,480]
    # 车牌检测模型路径
    licence_det_kmodel_path="/sdcard/app/tests/kmodel/LPD_640.kmodel"
    # 车牌识别模型路径
    licence_rec_kmodel_path="/sdcard/app/tests/kmodel/licence_reco.kmodel"
    # 其它参数
    rgb888p_size=[640,360]
    licence_det_input_size=[640,640]
    licence_rec_input_size=[220,32]
    confidence_threshold=0.2
    nms_threshold=0.2

    # 初始化PipeLine,只关注传给AI的图像分辨率,显示的分辨率
    pl=PipeLine(rgb888p_size=rgb888p_size,display_size=display_size,display_mode=display_mode)
    pl.create()
    lr=LicenceRec(licence_det_kmodel_path,licence_rec_kmodel_path,det_input_size=licence_det_input_size,rec_input_size=licence_rec_input_size,confidence_threshold=confidence_threshold,nms_threshold=nms_threshold,rgb888p_size=rgb888p_size,display_size=display_size)
    try:
        while True:
            os.exitpoint()
            with ScopedTiming("total",1):
                img=pl.get_frame()                  # 获取当前帧
                det_res,rec_res=lr.run(img)         # 推理当前帧
                lr.draw_result(pl,det_res,rec_res)  # 绘制当前帧推理结果
                pl.show_image()                     # 展示推理结果
                gc.collect()
    except Exception as e:
        sys.print_exception(e)
    finally:
        lr.licence_det.deinit()
        lr.licence_rec.deinit()
        pl.destroy()
1.4. 参考文档#
1.4.1. k230 canmv文档#
文档链接:Welcome to K230 CanMV’s documentation! — K230 CanMV 文档 (canaan-creative.com)
1.4.2. Ulab库支持#
链接: ulab – Manipulate numeric data similar to numpy — Adafruit CircuitPython 9.1.0-beta.3 documentation
2. AI Demo#
AI Demo分为两种类型:单模型、多模型,涵盖物体、人脸、人手、人体、车牌、OCR、音频(KWS、TTS)等方向;参考该文档,k230用户可以更快上手K230 AI应用的开发,实现预期效果。一些Demo在K230D芯片上因为内存限制无法运行,请注意适配列表。
Demo名称 |
场景 |
任务类型 |
K230 |
K230D |
|---|---|---|---|---|
dynamic_gesture |
动态手势识别 |
多模型任务 |
√ |
|
eye_gaze |
注视估计 |
多模型任务 |
√ |
|
face_detection |
人脸检测 |
单模型任务 |
√ |
√ |
face_landmark |
人脸关键部位 |
多模型任务 |
√ |
√ |
face_mesh |
人脸3D网格 |
多模型任务 |
√ |
|
face_parse |
人脸解析 |
多模型任务 |
√ |
|
face_pose |
人脸姿态 |
多模型任务 |
√ |
√ |
face_recognition |
人脸识别 |
多模型任务 |
√ |
|
face_registration |
人脸注册 |
多模型任务 |
√ |
√ |
falldown_detection |
跌倒检测 |
单模型任务 |
√ |
√ |
finger_guessing |
猜拳游戏 |
多模型任务 |
√ |
√ |
hand_detection |
手掌检测 |
单模型任务 |
√ |
√ |
hand_keypoint_class |
手掌关键点分类 |
多模型任务 |
√ |
√ |
hand_keypoint_detection |
手掌关键点检测 |
多模型任务 |
√ |
√ |
hand_recognition |
手势识别 |
多模型任务 |
√ |
√ |
keyword_spotting |
关键词唤醒 |
单模型任务 |
√ |
|
licence_det |
车牌检测 |
单模型任务 |
√ |
√ |
licence_det_rec |
车牌识别 |
多模型任务 |
√ |
√ |
nanotracker |
单目标跟踪 |
多模型任务 |
√ |
√ |
object_detect_yolov8n |
yolov8n目标检测 |
单模型任务 |
√ |
√ |
ocr_det |
OCR检测 |
单模型任务 |
√ |
|
ocr_rec |
OCR识别 |
多模型任务 |
√ |
|
person_detection |
人体检测 |
单模型任务 |
√ |
√ |
person_kp_detect |
人体关键点检测 |
多模型任务 |
√ |
√ |
puzzle_game |
拼图游戏 |
多模型任务 |
√ |
√ |
segment_yolov8n |
yolov8分割 |
单模型任务 |
√ |
|
self_learning |
自学习 |
单模型任务 |
√ |
√ |
space_resize |
局部放大器 |
多模型任务 |
√ |
√ |
tts_zh |
中文文本转语音 |
多模型任务 |
√ |
2.1. 动态手势识别#
from libs.PipeLine import PipeLine, ScopedTiming
from libs.AIBase import AIBase
from libs.AI2D import Ai2d
from random import randint
import os
import ujson
from media.media import *
from time import *
import nncase_runtime as nn
import ulab.numpy as np
import time
import image
import aicube
import random
import gc
import sys
# 自定义手掌检测任务类
class HandDetApp(AIBase):
def __init__(self,kmodel_path,labels,model_input_size,anchors,confidence_threshold=0.2,nms_threshold=0.5,nms_option=False, strides=[8,16,32],rgb888p_size=[1920,1080],display_size=[1920,1080],debug_mode=0):
super().__init__(kmodel_path,model_input_size,rgb888p_size,debug_mode)
# kmodel路径
self.kmodel_path=kmodel_path
# 检测标签
self.labels=labels
# 检测模型输入分辨率
self.model_input_size=model_input_size
# 置信度阈值
self.confidence_threshold=confidence_threshold
# nms阈值
self.nms_threshold=nms_threshold
# 检测锚框
self.anchors=anchors
self.strides = strides # 特征下采样倍数
self.nms_option = nms_option # NMS选项,如果为True做类间NMS,如果为False做类内NMS
# sensor给到AI的图像分辨率,宽16字节对齐
self.rgb888p_size=[ALIGN_UP(rgb888p_size[0],16),rgb888p_size[1]]
# 视频输出VO分辨率,宽16字节对齐
self.display_size=[ALIGN_UP(display_size[0],16),display_size[1]]
# debug模式
self.debug_mode=debug_mode
# Ai2d实例,用于实现模型预处理
self.ai2d=Ai2d(debug_mode)
# 设置Ai2d的输入输出格式和类型
self.ai2d.set_ai2d_dtype(nn.ai2d_format.NCHW_FMT,nn.ai2d_format.NCHW_FMT,np.uint8, np.uint8)
# 配置预处理操作,这里使用了padding和resize,Ai2d支持crop/shift/pad/resize/affine,具体代码请打开/sdcard/app/libs/AI2D.py查看
def config_preprocess(self,input_image_size=None):
with ScopedTiming("set preprocess config",self.debug_mode > 0):
# 初始化ai2d预处理配置,默认为sensor给到AI的尺寸,可以通过设置input_image_size自行修改输入尺寸
ai2d_input_size = input_image_size if input_image_size else self.rgb888p_size
# 计算padding参数并应用pad操作,以确保输入图像尺寸与模型输入尺寸匹配
top, bottom, left, right = self.get_padding_param()
self.ai2d.pad([0, 0, 0, 0, top, bottom, left, right], 0, [114, 114, 114])
# 使用双线性插值进行resize操作,调整图像尺寸以符合模型输入要求
self.ai2d.resize(nn.interp_method.tf_bilinear, nn.interp_mode.half_pixel)
# 构建预处理流程,参数为预处理输入tensor的shape和预处理输出的tensor的shape
self.ai2d.build([1,3,ai2d_input_size[1],ai2d_input_size[0]],[1,3,self.model_input_size[1],self.model_input_size[0]])
# 自定义后处理过程,这里使用了aicube的anchorbasedet_post_process接口
def postprocess(self,results):
with ScopedTiming("postprocess",self.debug_mode > 0):
dets = aicube.anchorbasedet_post_process(results[0], results[1], results[2], self.model_input_size, self.rgb888p_size, self.strides, len(self.labels), self.confidence_threshold, self.nms_threshold, self.anchors, self.nms_option)
# 返回手掌检测结果
return dets
# 计算padding参数,确保输入图像尺寸与模型输入尺寸匹配
def get_padding_param(self):
# 根据目标宽度和高度计算比例因子
dst_w = self.model_input_size[0]
dst_h = self.model_input_size[1]
input_width = self.rgb888p_size[0]
input_high = self.rgb888p_size[1]
ratio_w = dst_w / input_width
ratio_h = dst_h / input_high
# 选择较小的比例因子,以确保图像内容完整
if ratio_w < ratio_h:
ratio = ratio_w
else:
ratio = ratio_h
# 计算新的宽度和高度
new_w = int(ratio * input_width)
new_h = int(ratio * input_high)
# 计算宽度和高度的差值,并确定padding的位置
dw = (dst_w - new_w) / 2
dh = (dst_h - new_h) / 2
top = int(round(dh - 0.1))
bottom = int(round(dh + 0.1))
left = int(round(dw - 0.1))
right = int(round(dw + 0.1))
return top, bottom, left, right
# 自定义手势关键点分类任务类
class HandKPClassApp(AIBase):
def __init__(self,kmodel_path,model_input_size,rgb888p_size=[1920,1080],display_size=[1920,1080],debug_mode=0):
super().__init__(kmodel_path,model_input_size,rgb888p_size,debug_mode)
# kmodel路径
self.kmodel_path=kmodel_path
# 手掌关键点模型输入分辨率
self.model_input_size=model_input_size
# sensor给到AI的图像分辨率,宽16字节对齐
self.rgb888p_size=[ALIGN_UP(rgb888p_size[0],16),rgb888p_size[1]]
# 视频输出VO分辨率,宽16字节对齐
self.display_size=[ALIGN_UP(display_size[0],16),display_size[1]]
# crop参数列表
self.crop_params=[]
# debug模式
self.debug_mode=debug_mode
# Ai2d实例,用于实现模型预处理
self.ai2d=Ai2d(debug_mode)
# 设置Ai2d的输入输出格式和类型
self.ai2d.set_ai2d_dtype(nn.ai2d_format.NCHW_FMT,nn.ai2d_format.NCHW_FMT,np.uint8, np.uint8)
# 配置预处理操作,这里使用了crop和resize,Ai2d支持crop/shift/pad/resize/affine,具体代码请打开/sdcard/app/libs/AI2D.py查看
def config_preprocess(self,det,input_image_size=None):
with ScopedTiming("set preprocess config",self.debug_mode > 0):
# 如果input_image_size为None,使用视频出图大小,否则按照自定义设置
ai2d_input_size=input_image_size if input_image_size else self.rgb888p_size
# 计算crop参数
self.crop_params = self.get_crop_param(det)
# 设置crop预处理过程
self.ai2d.crop(self.crop_params[0],self.crop_params[1],self.crop_params[2],self.crop_params[3])
# 设置resize预处理过程
self.ai2d.resize(nn.interp_method.tf_bilinear, nn.interp_mode.half_pixel)
# build预处理过程,参数为输入tensor的shape和输出tensor的shape
self.ai2d.build([1,3,ai2d_input_size[1],ai2d_input_size[0]],[1,3,self.model_input_size[1],self.model_input_size[0]])
# 自定义后处理,results是模型输出的array列表
def postprocess(self,results):
with ScopedTiming("postprocess",self.debug_mode > 0):
results=results[0].reshape(results[0].shape[0]*results[0].shape[1])
results_show = np.zeros(results.shape,dtype=np.int16)
results_show[0::2] = results[0::2] * self.crop_params[3] + self.crop_params[0]
results_show[1::2] = results[1::2] * self.crop_params[2] + self.crop_params[1]
# 根据输出计算手势
gesture=self.hk_gesture(results_show)
return results_show,gesture
# 计算crop参数
def get_crop_param(self,det_box):
x1, y1, x2, y2 = det_box[2],det_box[3],det_box[4],det_box[5]
w,h= int(x2 - x1),int(y2 - y1)
w_det = int(float(x2 - x1) * self.display_size[0] // self.rgb888p_size[0])
h_det = int(float(y2 - y1) * self.display_size[1] // self.rgb888p_size[1])
x_det = int(x1*self.display_size[0] // self.rgb888p_size[0])
y_det = int(y1*self.display_size[1] // self.rgb888p_size[1])
length = max(w, h)/2
cx = (x1+x2)/2
cy = (y1+y2)/2
ratio_num = 1.26*length
x1_kp = int(max(0,cx-ratio_num))
y1_kp = int(max(0,cy-ratio_num))
x2_kp = int(min(self.rgb888p_size[0]-1, cx+ratio_num))
y2_kp = int(min(self.rgb888p_size[1]-1, cy+ratio_num))
w_kp = int(x2_kp - x1_kp + 1)
h_kp = int(y2_kp - y1_kp + 1)
return [x1_kp, y1_kp, w_kp, h_kp]
# 求两个vector之间的夹角
def hk_vector_2d_angle(self,v1,v2):
with ScopedTiming("hk_vector_2d_angle",self.debug_mode > 0):
v1_x,v1_y,v2_x,v2_y = v1[0],v1[1],v2[0],v2[1]
v1_norm = np.sqrt(v1_x * v1_x+ v1_y * v1_y)
v2_norm = np.sqrt(v2_x * v2_x + v2_y * v2_y)
dot_product = v1_x * v2_x + v1_y * v2_y
cos_angle = dot_product/(v1_norm*v2_norm)
angle = np.acos(cos_angle)*180/np.pi
return angle
# 根据手掌关键点检测结果判断手势类别
def hk_gesture(self,results):
with ScopedTiming("hk_gesture",self.debug_mode > 0):
angle_list = []
for i in range(5):
angle = self.hk_vector_2d_angle([(results[0]-results[i*8+4]), (results[1]-results[i*8+5])],[(results[i*8+6]-results[i*8+8]),(results[i*8+7]-results[i*8+9])])
angle_list.append(angle)
thr_angle,thr_angle_thumb,thr_angle_s,gesture_str = 65.,53.,49.,None
if 65535. not in angle_list:
if (angle_list[0]>thr_angle_thumb) and (angle_list[1]>thr_angle) and (angle_list[2]>thr_angle) and (angle_list[3]>thr_angle) and (angle_list[4]>thr_angle):
gesture_str = "fist"
elif (angle_list[0]<thr_angle_s) and (angle_list[1]<thr_angle_s) and (angle_list[2]<thr_angle_s) and (angle_list[3]<thr_angle_s) and (angle_list[4]<thr_angle_s):
gesture_str = "five"
elif (angle_list[0]<thr_angle_s) and (angle_list[1]<thr_angle_s) and (angle_list[2]>thr_angle) and (angle_list[3]>thr_angle) and (angle_list[4]>thr_angle):
gesture_str = "gun"
elif (angle_list[0]<thr_angle_s) and (angle_list[1]<thr_angle_s) and (angle_list[2]>thr_angle) and (angle_list[3]>thr_angle) and (angle_list[4]<thr_angle_s):
gesture_str = "love"
elif (angle_list[0]>5) and (angle_list[1]<thr_angle_s) and (angle_list[2]>thr_angle) and (angle_list[3]>thr_angle) and (angle_list[4]>thr_angle):
gesture_str = "one"
elif (angle_list[0]<thr_angle_s) and (angle_list[1]>thr_angle) and (angle_list[2]>thr_angle) and (angle_list[3]>thr_angle) and (angle_list[4]<thr_angle_s):
gesture_str = "six"
elif (angle_list[0]>thr_angle_thumb) and (angle_list[1]<thr_angle_s) and (angle_list[2]<thr_angle_s) and (angle_list[3]<thr_angle_s) and (angle_list[4]>thr_angle):
gesture_str = "three"
elif (angle_list[0]<thr_angle_s) and (angle_list[1]>thr_angle) and (angle_list[2]>thr_angle) and (angle_list[3]>thr_angle) and (angle_list[4]>thr_angle):
gesture_str = "thumbUp"
elif (angle_list[0]>thr_angle_thumb) and (angle_list[1]<thr_angle_s) and (angle_list[2]<thr_angle_s) and (angle_list[3]>thr_angle) and (angle_list[4]>thr_angle):
gesture_str = "yeah"
return gesture_str
# 自定义动态手势识别任务类
class DynamicGestureApp(AIBase):
def __init__(self,kmodel_path,model_input_size,rgb888p_size=[1920,1080],display_size=[1920,1080],debug_mode=0):
super().__init__(kmodel_path,model_input_size,rgb888p_size,debug_mode)
# kmodel路径
self.kmodel_path=kmodel_path
# 检测模型输入分辨率
self.model_input_size=model_input_size
# sensor给到AI的图像分辨率,宽16字节对齐
self.rgb888p_size=[ALIGN_UP(rgb888p_size[0],16),rgb888p_size[1]]
# 视频输出VO分辨率,宽16字节对齐
self.display_size=[ALIGN_UP(display_size[0],16),display_size[1]]
# debug模式
self.debug_mode=debug_mode
# 注意:ai2d设置多个预处理时执行的顺序为:crop->shift->resize/affine->pad,如果不符合该顺序,需要配置多个ai2d对象;
# 如下模型预处理要先做resize再做crop,因此要配置两个Ai2d对象
self.ai2d_resize=Ai2d(debug_mode)
self.ai2d_resize.set_ai2d_dtype(nn.ai2d_format.NCHW_FMT,nn.ai2d_format.NCHW_FMT,np.uint8, np.uint8)
self.ai2d_crop=Ai2d(debug_mode)
self.ai2d_crop.set_ai2d_dtype(nn.ai2d_format.NCHW_FMT,nn.ai2d_format.NCHW_FMT,np.uint8, np.uint8)
# 动态手势识别模型输入tensors列表
self.input_tensors=[]
# 动态手势识别模型的输入tensor的shape
self.gesture_kmodel_input_shape = [[1, 3, 224, 224], # 动态手势识别kmodel输入分辨率
[1,3,56,56],
[1,4,28,28],
[1,4,28,28],
[1,8,14,14],
[1,8,14,14],
[1,8,14,14],
[1,12,14,14],
[1,12,14,14],
[1,20,7,7],
[1,20,7,7]]
# 预处理参数
self.resize_shape = 256
self.mean_values = np.array([0.485, 0.456, 0.406]).reshape((3,1,1)) # 动态手势识别预处理均值
self.std_values = np.array([0.229, 0.224, 0.225]).reshape((3,1,1)) # 动态手势识别预处理方差
self.first_data=None
self.max_hist_len=20
self.crop_params=self.get_crop_param()
# 配置预处理
def config_preprocess(self,input_image_size=None):
with ScopedTiming("set preprocess config",self.debug_mode > 0):
# 初始化ai2d预处理配置
ai2d_input_size=input_image_size if input_image_size else self.rgb888p_size
# 配置resize和crop预处理
self.ai2d_resize.resize(nn.interp_method.tf_bilinear, nn.interp_mode.half_pixel)
self.ai2d_resize.build([1,3,ai2d_input_size[1],ai2d_input_size[0]],[1,3,self.crop_params[1],self.crop_params[0]])
self.ai2d_crop.crop(self.crop_params[2],self.crop_params[3],self.crop_params[4],self.crop_params[5])
self.ai2d_crop.build([1,3,self.crop_params[1],self.crop_params[0]],[1,3,self.model_input_size[1],self.model_input_size[0]])
# 初始化动态手势识别模型输入列表
inputs_num=self.get_kmodel_inputs_num()
self.first_data = np.ones(self.gesture_kmodel_input_shape[0], dtype=np.float)
for i in range(inputs_num):
data = np.zeros(self.gesture_kmodel_input_shape[i], dtype=np.float)
self.input_tensors.append(nn.from_numpy(data))
# 重写预处理,因为该部分不是单纯的走一个ai2d做预处理,所以该函数需要重写
def preprocess(self,input_np):
# 先走resize,再走crop
resize_tensor=self.ai2d_resize.run(input_np)
crop_output_tensor=self.ai2d_crop.run(resize_tensor.to_numpy())
ai2d_output = crop_output_tensor.to_numpy()
self.first_data[0] = ai2d_output[0].copy()
self.first_data[0] = (self.first_data[0]*1.0/255 -self.mean_values)/self.std_values
self.input_tensors[0]=nn.from_numpy(self.first_data)
return
# run函数重写
def run(self,input_np,his_logit,history):
# 预处理
self.preprocess(input_np)
# 推理
outputs=self.inference(self.input_tensors)
# 使用当前帧的输出更新下一帧的输入列表
outputs_num=self.get_kmodel_outputs_num()
for i in range(1,outputs_num):
self.input_tensors[i]=nn.from_numpy(outputs[i])
# 返回后处理结果
return self.postprocess(outputs,his_logit,history)
# 自定义后处理
def postprocess(self,results,his_logit, history):
with ScopedTiming("postprocess",self.debug_mode > 0):
his_logit.append(results[0])
avg_logit = sum(np.array(his_logit))
idx_ = np.argmax(avg_logit)
idx = self.gesture_process_output(idx_, history)
if (idx_ != idx):
his_logit_last = his_logit[-1]
his_logit = []
his_logit.append(his_logit_last)
return idx, avg_logit
# 手势处理函数
def gesture_process_output(self,pred,history):
if (pred == 7 or pred == 8 or pred == 21 or pred == 22 or pred == 3 ):
pred = history[-1]
if (pred == 0 or pred == 4 or pred == 6 or pred == 9 or pred == 14 or pred == 1 or pred == 19 or pred == 20 or pred == 23 or pred == 24) :
pred = history[-1]
if (pred == 0) :
pred = 2
if (pred != history[-1]) :
if (len(history)>= 2) :
if (history[-1] != history[len(history)-2]) :
pred = history[-1]
history.append(pred)
if (len(history) > self.max_hist_len) :
history = history[-self.max_hist_len:]
return history[-1]
# 计算crop参数
def get_crop_param(self):
ori_w = self.rgb888p_size[0]
ori_h = self.rgb888p_size[1]
width = self.model_input_size[0]
height = self.model_input_size[1]
ratiow = float(self.resize_shape) / ori_w
ratioh = float(self.resize_shape) / ori_h
if ratiow < ratioh:
ratio = ratioh
else:
ratio = ratiow
new_w = int(ratio * ori_w)
new_h = int(ratio * ori_h)
top = int((new_h-height)/2)
left = int((new_w-width)/2)
return new_w,new_h,left,top,width,height
# 重写逆初始化
def deinit(self):
with ScopedTiming("deinit",self.debug_mode > 0):
del self.kpu
del self.ai2d_resize
del self.ai2d_crop
self.tensors.clear()
del self.tensors
gc.collect()
nn.shrink_memory_pool()
os.exitpoint(os.EXITPOINT_ENABLE_SLEEP)
time.sleep_ms(100)
# 自定义动态手势识别任务
class DynamicGesture:
def __init__(self,hand_det_kmodel,hand_kp_kmodel,gesture_kmodel,det_input_size,kp_input_size,gesture_input_size,labels,anchors,confidence_threshold=0.25,nms_threshold=0.3,nms_option=False,strides=[8,16,32],rgb888p_size=[1280,720],display_size=[1920,1080],debug_mode=0):
# 手掌检测模型路径
self.hand_det_kmodel=hand_det_kmodel
# 手掌关键点模型路径
self.hand_kp_kmodel=hand_kp_kmodel
# 动态手势识别路径
self.gesture_kmodel=gesture_kmodel
# 手掌检测模型输入分辨率
self.det_input_size=det_input_size
# 手掌关键点模型输入分辨率
self.kp_input_size=kp_input_size
# 动态手势识别模型输入分辨率
self.gesture_input_size=gesture_input_size
self.labels=labels
# anchors
self.anchors=anchors
# 置信度阈值
self.confidence_threshold=confidence_threshold
# nms阈值
self.nms_threshold=nms_threshold
self.nms_option=nms_option
self.strides=strides
# sensor给到AI的图像分辨率,宽16字节对齐
self.rgb888p_size=[ALIGN_UP(rgb888p_size[0],16),rgb888p_size[1]]
# 视频输出VO分辨率,宽16字节对齐
self.display_size=[ALIGN_UP(display_size[0],16),display_size[1]]
# 动态手势识别贴图
self.bin_width = 150 # 动态手势识别屏幕坐上角标志状态文件的短边尺寸
self.bin_height = 216 # 动态手势识别屏幕坐上角标志状态文件的长边尺寸
shang_argb = np.fromfile("/sdcard/app/tests/utils/shang.bin", dtype=np.uint8)
self.shang_argb = shang_argb.reshape((self.bin_height, self.bin_width, 4))
xia_argb = np.fromfile("/sdcard/app/tests/utils/xia.bin", dtype=np.uint8)
self.xia_argb = xia_argb.reshape((self.bin_height, self.bin_width, 4))
zuo_argb = np.fromfile("/sdcard/app/tests/utils/zuo.bin", dtype=np.uint8)
self.zuo_argb = zuo_argb.reshape((self.bin_width, self.bin_height, 4))
you_argb = np.fromfile("/sdcard/app/tests/utils/you.bin", dtype=np.uint8)
self.you_argb = you_argb.reshape((self.bin_width, self.bin_height, 4))
#其他参数
self.TRIGGER = 0 # 动态手势识别应用的结果状态
self.MIDDLE = 1
self.UP = 2
self.DOWN = 3
self.LEFT = 4
self.RIGHT = 5
self.max_hist_len = 20 # 最多存储多少帧的结果
# debug_mode模式
self.debug_mode=debug_mode
self.cur_state = self.TRIGGER
self.pre_state = self.TRIGGER
self.draw_state = self.TRIGGER
self.vec_flag = []
self.his_logit = []
self.history = [2]
self.s_start = time.time_ns()
self.m_start=None
self.hand_det=HandDetApp(self.hand_det_kmodel,self.labels,model_input_size=self.det_input_size,anchors=self.anchors,confidence_threshold=self.confidence_threshold,nms_threshold=self.nms_threshold,nms_option=self.nms_option,strides=self.strides,rgb888p_size=self.rgb888p_size,display_size=self.display_size,debug_mode=0)
self.hand_kp=HandKPClassApp(self.hand_kp_kmodel,model_input_size=self.kp_input_size,rgb888p_size=self.rgb888p_size,display_size=self.display_size)
self.dg=DynamicGestureApp(self.gesture_kmodel,model_input_size=self.gesture_input_size,rgb888p_size=self.rgb888p_size,display_size=self.display_size)
self.hand_det.config_preprocess()
self.dg.config_preprocess()
# run函数
def run(self,input_np):
if self.cur_state == self.TRIGGER:
# 手掌检测
det_boxes=self.hand_det.run(input_np)
boxes=[]
gesture_res=[]
for det_box in det_boxes:
# 筛选检测框
x1, y1, x2, y2 = det_box[2],det_box[3],det_box[4],det_box[5]
w,h= int(x2 - x1),int(y2 - y1)
if (h<(0.1*self.rgb888p_size[1])):
continue
if (w<(0.25*self.rgb888p_size[0]) and ((x1<(0.03*self.rgb888p_size[0])) or (x2>(0.97*self.rgb888p_size[0])))):
continue
if (w<(0.15*self.rgb888p_size[0]) and ((x1<(0.01*self.rgb888p_size[0])) or (x2>(0.99*self.rgb888p_size[0])))):
continue
# 手掌关键点预处理配置
self.hand_kp.config_preprocess(det_box)
# 手掌关键点检测
hk_results,gesture_str=self.hand_kp.run(input_np)
boxes.append(det_box)
gesture_res.append((hk_results,gesture_str))
return boxes,gesture_res
else:
# 动态手势识别
idx, avg_logit = self.dg.run(input_np, self.his_logit, self.history)
return idx,avg_logit
# 根据输出结果绘制效果
def draw_result(self,pl,output1,output2):
pl.osd_img.clear()
draw_img_np = np.zeros((self.display_size[1],self.display_size[0],4),dtype=np.uint8)
draw_img=image.Image(self.display_size[0], self.display_size[1], image.ARGB8888,alloc=image.ALLOC_REF,data=draw_img_np)
if self.cur_state == self.TRIGGER:
for i in range(len(output1)):
hk_results,gesture=output2[i][0],output2[i][1]
if ((gesture == "five") or (gesture == "yeah")):
v_x = hk_results[24]-hk_results[0]
v_y = hk_results[25]-hk_results[1]
angle = self.hand_kp.hk_vector_2d_angle([v_x,v_y],[1.0,0.0])
if (v_y>0):
angle = 360-angle
if ((70.0<=angle) and (angle<110.0)):
if ((self.pre_state != self.UP) or (self.pre_state != self.MIDDLE)):
self.vec_flag.append(self.pre_state)
if ((len(self.vec_flag)>10)or(self.pre_state == self.UP) or (self.pre_state == self.MIDDLE) or(self.pre_state == self.TRIGGER)):
draw_img_np[:self.bin_height,:self.bin_width,:] = self.shang_argb
self.cur_state = self.UP
elif ((110.0<=angle) and (angle<225.0)): # 手指向右(实际方向)
if (self.pre_state != self.RIGHT):
self.vec_flag.append(self.pre_state)
if ((len(self.vec_flag)>10)or(self.pre_state == self.RIGHT)or(self.pre_state == self.TRIGGER)):
draw_img_np[:self.bin_width,:self.bin_height,:] = self.you_argb
self.cur_state = self.RIGHT
elif((225.0<=angle) and (angle<315.0)): # 手指向下
if (self.pre_state != self.DOWN):
self.vec_flag.append(self.pre_state)
if ((len(self.vec_flag)>10)or(self.pre_state == self.DOWN)or(self.pre_state == self.TRIGGER)):
draw_img_np[:self.bin_height,:self.bin_width,:] = self.xia_argb
self.cur_state = self.DOWN
else: # 手指向左(实际方向)
if (self.pre_state != self.LEFT):
self.vec_flag.append(self.pre_state)
if ((len(self.vec_flag)>10)or(self.pre_state == self.LEFT)or(self.pre_state == self.TRIGGER)):
draw_img_np[:self.bin_width,:self.bin_height,:] = self.zuo_argb
self.cur_state = self.LEFT
self.m_start = time.time_ns()
self.his_logit = []
else:
idx,avg_logit=output1,output2[0]
if (self.cur_state == self.UP):
draw_img_np[:self.bin_height,:self.bin_width,:] = self.shang_argb
if ((idx==15) or (idx==10)):
self.vec_flag.clear()
if (((avg_logit[idx] >= 0.7) and (len(self.his_logit) >= 2)) or ((avg_logit[idx] >= 0.3) and (len(self.his_logit) >= 4))):
self.s_start = time.time_ns()
self.cur_state = self.TRIGGER
self.draw_state = self.DOWN
self.history = [2]
self.pre_state = self.UP
elif ((idx==25)or(idx==26)) :
self.vec_flag.clear()
if (((avg_logit[idx] >= 0.4) and (len(self.his_logit) >= 2)) or ((avg_logit[idx] >= 0.3) and (len(self.his_logit) >= 3))):
self.s_start = time.time_ns()
self.cur_state = self.TRIGGER
self.draw_state = self.MIDDLE
self.history = [2]
self.pre_state = self.MIDDLE
else:
self.his_logit.clear()
elif (self.cur_state == self.RIGHT):
draw_img_np[:self.bin_width,:self.bin_height,:] = self.you_argb
if ((idx==16)or(idx==11)) :
self.vec_flag.clear()
if (((avg_logit[idx] >= 0.4) and (len(self.his_logit) >= 2)) or ((avg_logit[idx] >= 0.3) and (len(self.his_logit) >= 3))):
self.s_start = time.time_ns()
self.cur_state = self.TRIGGER
self.draw_state = self.RIGHT
self.history = [2]
self.pre_state = self.RIGHT
else:
self.his_logit.clear()
elif (self.cur_state == self.DOWN):
draw_img_np[:self.bin_height,:self.bin_width,:] = self.xia_argb
if ((idx==18)or(idx==13)):
self.vec_flag.clear()
if (((avg_logit[idx] >= 0.4) and (len(self.his_logit) >= 2)) or ((avg_logit[idx] >= 0.3) and (len(self.his_logit) >= 3))):
self.s_start = time.time_ns()
self.cur_state = self.TRIGGER
self.draw_state = self.UP
self.history = [2]
self.pre_state = self.DOWN
else:
self.his_logit.clear()
elif (self.cur_state == self.LEFT):
draw_img_np[:self.bin_width,:self.bin_height,:] = self.zuo_argb
if ((idx==17)or(idx==12)):
self.vec_flag.clear()
if (((avg_logit[idx] >= 0.4) and (len(self.his_logit) >= 2)) or ((avg_logit[idx] >= 0.3) and (len(self.his_logit) >= 3))):
self.s_start = time.time_ns()
self.cur_state = self.TRIGGER
self.draw_state = self.LEFT
self.history = [2]
self.pre_state = self.LEFT
else:
self.his_logit.clear()
self.elapsed_time = round((time.time_ns() - self.m_start)/1000000)
if ((self.cur_state != self.TRIGGER) and (self.elapsed_time>2000)):
self.cur_state = self.TRIGGER
self.pre_state = self.TRIGGER
self.elapsed_ms_show = round((time.time_ns()-self.s_start)/1000000)
if (self.elapsed_ms_show<1000):
if (self.draw_state == self.UP):
draw_img.draw_arrow(1068,330,1068,130, (255,170,190,230), thickness=13) # 判断为向上挥动时,画一个向上的箭头
draw_img.draw_string_advanced(self.display_size[0]//2-50,self.display_size[1]//2-50,32,"向上")
elif (self.draw_state == self.RIGHT):
draw_img.draw_arrow(1290,540,1536,540, (255,170,190,230), thickness=13) # 判断为向右挥动时,画一个向右的箭头
draw_img.draw_string_advanced(self.display_size[0]//2-50,self.display_size[1]//2-50,32,"向右")
elif (self.draw_state == self.DOWN):
draw_img.draw_arrow(1068,750,1068,950, (255,170,190,230), thickness=13) # 判断为向下挥动时,画一个向下的箭头
draw_img.draw_string_advanced(self.display_size[0]//2-50,self.display_size[1]//2-50,32,"向下")
elif (self.draw_state == self.LEFT):
draw_img.draw_arrow(846,540,600,540, (255,170,190,230), thickness=13) # 判断为向左挥动时,画一个向左的箭头
draw_img.draw_string_advanced(self.display_size[0]//2-50,self.display_size[1]//2-50,32,"向左")
elif (self.draw_state == self.MIDDLE):
draw_img.draw_circle(1068,540,100, (255,170,190,230), thickness=2, fill=True) # 判断为五指捏合手势时,画一个实心圆
draw_img.draw_string_advanced(self.display_size[0]//2-50,self.display_size[1]//2-50,32,"中间")
else:
self.draw_state = self.TRIGGER
pl.osd_img.copy_from(draw_img)
if __name__=="__main__":
# 显示模式,默认"hdmi",可以选择"hdmi"和"lcd"
display_mode="hdmi"
if display_mode=="hdmi":
display_size=[1920,1080]
else:
display_size=[800,480]
# 手掌检测模型路径
hand_det_kmodel_path="/sdcard/app/tests/kmodel/hand_det.kmodel"
# 手部关键点模型路径
hand_kp_kmodel_path="/sdcard/app/tests/kmodel/handkp_det.kmodel"
# 动态手势识别模型路径
gesture_kmodel_path="/sdcard/app/tests/kmodel/gesture.kmodel"
# 其他参数
rgb888p_size=[1920,1080]
hand_det_input_size=[512,512]
hand_kp_input_size=[256,256]
gesture_input_size=[224,224]
confidence_threshold=0.2
nms_threshold=0.5
labels=["hand"]
anchors = [26,27, 53,52, 75,71, 80,99, 106,82, 99,134, 140,113, 161,172, 245,276]
# 初始化PipeLine,只关注传给AI的图像分辨率,显示的分辨率
pl=PipeLine(rgb888p_size=rgb888p_size,display_size=display_size,display_mode=display_mode)
pl.create()
# 自定义动态手势识别任务实例
dg=DynamicGesture(hand_det_kmodel_path,hand_kp_kmodel_path,gesture_kmodel_path,det_input_size=hand_det_input_size,kp_input_size=hand_kp_input_size,gesture_input_size=gesture_input_size,labels=labels,anchors=anchors,confidence_threshold=confidence_threshold,nms_threshold=nms_threshold,nms_option=False,strides=[8,16,32],rgb888p_size=rgb888p_size,display_size=display_size)
try:
while True:
os.exitpoint()
with ScopedTiming("total",1):
img=pl.get_frame() # 获取当前帧
output1,output2=dg.run(img) # 推理当前帧
dg.draw_result(pl,output1,output2) # 绘制推理结果
pl.show_image() # 展示推理结果
gc.collect()
except Exception as e:
sys.print_exception(e)
finally:
dg.hand_det.deinit()
dg.hand_kp.deinit()
dg.dg.deinit()
pl.destroy()
2.2. 注视估计#
from libs.PipeLine import PipeLine, ScopedTiming
from libs.AIBase import AIBase
from libs.AI2D import Ai2d
import os
import ujson
from media.media import *
from time import *
import nncase_runtime as nn
import ulab.numpy as np
import time
import image
import aidemo
import random
import gc
import sys
import math

# 自定义人脸检测任务类
class FaceDetApp(AIBase):
    def __init__(self,kmodel_path,model_input_size,anchors,confidence_threshold=0.25,nms_threshold=0.3,rgb888p_size=[1280,720],display_size=[1920,1080],debug_mode=0):
        super().__init__(kmodel_path,model_input_size,rgb888p_size,debug_mode)
        # kmodel路径
        self.kmodel_path=kmodel_path
        # 检测模型输入分辨率
        self.model_input_size=model_input_size
        # 置信度阈值
        self.confidence_threshold=confidence_threshold
        # nms阈值
        self.nms_threshold=nms_threshold
        self.anchors=anchors
        # sensor给到AI的图像分辨率,宽16字节对齐
        self.rgb888p_size=[ALIGN_UP(rgb888p_size[0],16),rgb888p_size[1]]
        # 视频输出VO分辨率,宽16字节对齐
        self.display_size=[ALIGN_UP(display_size[0],16),display_size[1]]
        # debug模式
        self.debug_mode=debug_mode
        # Ai2d实例,用于实现模型预处理
        self.ai2d=Ai2d(debug_mode)
        # 设置Ai2d的输入输出格式和类型
        self.ai2d.set_ai2d_dtype(nn.ai2d_format.NCHW_FMT,nn.ai2d_format.NCHW_FMT,np.uint8, np.uint8)

    # 配置预处理操作,这里使用了pad和resize,Ai2d支持crop/shift/pad/resize/affine,具体代码请打开/sdcard/app/libs/AI2D.py查看
    def config_preprocess(self,input_image_size=None):
        with ScopedTiming("set preprocess config",self.debug_mode > 0):
            # 初始化ai2d预处理配置,默认为sensor给到AI的尺寸,可以通过设置input_image_size自行修改输入尺寸
            ai2d_input_size=input_image_size if input_image_size else self.rgb888p_size
            # 设置padding预处理
            self.ai2d.pad(self.get_pad_param(), 0, [104,117,123])
            # 设置resize预处理
            self.ai2d.resize(nn.interp_method.tf_bilinear, nn.interp_mode.half_pixel)
            # 构建预处理流程,参数为预处理输入tensor的shape和预处理输出的tensor的shape
            self.ai2d.build([1,3,ai2d_input_size[1],ai2d_input_size[0]],[1,3,self.model_input_size[1],self.model_input_size[0]])

    # 自定义任务后处理,这里使用了aidemo库的face_det_post_process接口
    def postprocess(self,results):
        with ScopedTiming("postprocess",self.debug_mode > 0):
            res = aidemo.face_det_post_process(self.confidence_threshold,self.nms_threshold,self.model_input_size[0],self.anchors,self.rgb888p_size,results)
            if len(res)==0:
                return res
            else:
                return res[0]

    # 计算padding参数
    def get_pad_param(self):
        dst_w = self.model_input_size[0]
        dst_h = self.model_input_size[1]
        # 计算最小的缩放比例,等比例缩放
        ratio_w = dst_w / self.rgb888p_size[0]
        ratio_h = dst_h / self.rgb888p_size[1]
        if ratio_w < ratio_h:
            ratio = ratio_w
        else:
            ratio = ratio_h
        new_w = (int)(ratio * self.rgb888p_size[0])
        new_h = (int)(ratio * self.rgb888p_size[1])
        dw = (dst_w - new_w) / 2
        dh = (dst_h - new_h) / 2
        top = (int)(round(0))
        bottom = (int)(round(dh * 2 + 0.1))
        left = (int)(round(0))
        right = (int)(round(dw * 2 - 0.1))
        return [0,0,0,0,top, bottom, left, right]

# 自定义注视估计任务类
class EyeGazeApp(AIBase):
    def __init__(self,kmodel_path,model_input_size,rgb888p_size=[1920,1080],display_size=[1920,1080],debug_mode=0):
        super().__init__(kmodel_path,model_input_size,rgb888p_size,debug_mode)
        # kmodel路径
        self.kmodel_path=kmodel_path
        # 注视估计模型输入分辨率
        self.model_input_size=model_input_size
        # sensor给到AI的图像分辨率,宽16字节对齐
        self.rgb888p_size=[ALIGN_UP(rgb888p_size[0],16),rgb888p_size[1]]
        # 视频输出VO分辨率,宽16字节对齐
        self.display_size=[ALIGN_UP(display_size[0],16),display_size[1]]
        # debug模式
        self.debug_mode=debug_mode
        # Ai2d实例,用于实现模型预处理
        self.ai2d=Ai2d(debug_mode)
        # 设置Ai2d的输入输出格式和类型
        self.ai2d.set_ai2d_dtype(nn.ai2d_format.NCHW_FMT,nn.ai2d_format.NCHW_FMT,np.uint8, np.uint8)

    # 配置预处理操作,这里使用了crop和resize,Ai2d支持crop/shift/pad/resize/affine,具体代码请打开/sdcard/app/libs/AI2D.py查看
    def config_preprocess(self,det,input_image_size=None):
        with ScopedTiming("set preprocess config",self.debug_mode > 0):
            # 初始化ai2d预处理配置
            ai2d_input_size=input_image_size if input_image_size else self.rgb888p_size
            # 计算crop预处理参数
            x, y, w, h = map(lambda x: int(round(x, 0)), det[:4])
            # 设置crop预处理
            self.ai2d.crop(x,y,w,h)
            # 设置resize预处理
            self.ai2d.resize(nn.interp_method.tf_bilinear, nn.interp_mode.half_pixel)
            # 构建预处理流程,参数为预处理输入tensor的shape和预处理输出的tensor的shape
            self.ai2d.build([1,3,ai2d_input_size[1],ai2d_input_size[0]],[1,3,self.model_input_size[1],self.model_input_size[0]])

    # 自定义后处理,results是模型输出的array列表,这里调用了aidemo库的eye_gaze_post_process接口
    def postprocess(self,results):
        with ScopedTiming("postprocess",self.debug_mode > 0):
            post_ret = aidemo.eye_gaze_post_process(results)
            return post_ret[0],post_ret[1]

# 自定义注视估计类
class EyeGaze:
    def __init__(self,face_det_kmodel,eye_gaze_kmodel,det_input_size,eye_gaze_input_size,anchors,confidence_threshold=0.25,nms_threshold=0.3,rgb888p_size=[1920,1080],display_size=[1920,1080],debug_mode=0):
        # 人脸检测模型路径
        self.face_det_kmodel=face_det_kmodel
        # 人脸注视估计模型路径
        self.eye_gaze_kmodel=eye_gaze_kmodel
        # 人脸检测模型输入分辨率
        self.det_input_size=det_input_size
        # 人脸注视估计模型输入分辨率
        self.eye_gaze_input_size=eye_gaze_input_size
        # anchors
        self.anchors=anchors
        # 置信度阈值
        self.confidence_threshold=confidence_threshold
        # nms阈值
        self.nms_threshold=nms_threshold
        # sensor给到AI的图像分辨率,宽16字节对齐
        self.rgb888p_size=[ALIGN_UP(rgb888p_size[0],16),rgb888p_size[1]]
        # 视频输出VO分辨率,宽16字节对齐
        self.display_size=[ALIGN_UP(display_size[0],16),display_size[1]]
        # debug_mode模式
        self.debug_mode=debug_mode
        # 人脸检测实例
        self.face_det=FaceDetApp(self.face_det_kmodel,model_input_size=self.det_input_size,anchors=self.anchors,confidence_threshold=self.confidence_threshold,nms_threshold=self.nms_threshold,rgb888p_size=self.rgb888p_size,display_size=self.display_size,debug_mode=0)
        # 注视估计实例
        self.eye_gaze=EyeGazeApp(self.eye_gaze_kmodel,model_input_size=self.eye_gaze_input_size,rgb888p_size=self.rgb888p_size,display_size=self.display_size)
        # 人脸检测配置预处理
        self.face_det.config_preprocess()

    #run方法
    def run(self,input_np):
        # 先进行人脸检测
        det_boxes=self.face_det.run(input_np)
        eye_gaze_res=[]
        for det_box in det_boxes:
            # 对每一个检测到的人脸做注视估计
            self.eye_gaze.config_preprocess(det_box)
            pitch,yaw=self.eye_gaze.run(input_np)
            eye_gaze_res.append((pitch,yaw))
        return det_boxes,eye_gaze_res

    # 绘制注视估计效果
    def draw_result(self,pl,dets,eye_gaze_res):
        pl.osd_img.clear()
        if dets:
            for det,gaze_ret in zip(dets,eye_gaze_res):
                pitch , yaw = gaze_ret
                length = self.display_size[0]/ 2
                x, y, w, h = map(lambda x: int(round(x, 0)), det[:4])
                x = x * self.display_size[0] // self.rgb888p_size[0]
                y = y * self.display_size[1] // self.rgb888p_size[1]
                w = w * self.display_size[0] // self.rgb888p_size[0]
                h = h * self.display_size[1] // self.rgb888p_size[1]
                center_x = (x + w / 2.0)
                center_y = (y + h / 2.0)
                dx = -length * math.sin(pitch) * math.cos(yaw)
                target_x = int(center_x + dx)
                dy = -length * math.sin(yaw)
                target_y = int(center_y + dy)
                pl.osd_img.draw_arrow(int(center_x), int(center_y), target_x, target_y, color = (255,255,0,0), size = 30, thickness = 2)


if __name__=="__main__":
    # 显示模式,默认"hdmi",可以选择"hdmi"和"lcd"
    display_mode="hdmi"
    if display_mode=="hdmi":
        display_size=[1920,1080]
    else:
        display_size=[800,480]
    # 人脸检测模型路径
    face_det_kmodel_path="/sdcard/app/tests/kmodel/face_detection_320.kmodel"
    # 人脸注视估计模型路径
    eye_gaze_kmodel_path="/sdcard/app/tests/kmodel/eye_gaze.kmodel"
    # 其他参数
    anchors_path="/sdcard/app/tests/utils/prior_data_320.bin"
    rgb888p_size=[1920,1080]
    face_det_input_size=[320,320]
    eye_gaze_input_size=[448,448]
    confidence_threshold=0.5
    nms_threshold=0.2
    anchor_len=4200
    det_dim=4
    anchors = np.fromfile(anchors_path, dtype=np.float)
    anchors = anchors.reshape((anchor_len,det_dim))

    # 初始化PipeLine,只关注传给AI的图像分辨率,显示的分辨率
    pl=PipeLine(rgb888p_size=rgb888p_size,display_size=display_size,display_mode=display_mode)
    pl.create()
    eg=EyeGaze(face_det_kmodel_path,eye_gaze_kmodel_path,det_input_size=face_det_input_size,eye_gaze_input_size=eye_gaze_input_size,anchors=anchors,confidence_threshold=confidence_threshold,nms_threshold=nms_threshold,rgb888p_size=rgb888p_size,display_size=display_size)
    try:
        while True:
            os.exitpoint()
            with ScopedTiming("total",1):
                img=pl.get_frame()                          # 获取当前帧
                det_boxes,eye_gaze_res=eg.run(img)          # 推理当前帧
                eg.draw_result(pl,det_boxes,eye_gaze_res)   # 绘制推理效果
                pl.show_image()                             # 展示推理效果
                gc.collect()
    except Exception as e:
        sys.print_exception(e)
    finally:
        eg.face_det.deinit()
        eg.eye_gaze.deinit()
        pl.destroy()
2.3. 人脸检测#
from libs.PipeLine import PipeLine, ScopedTiming
from libs.AIBase import AIBase
from libs.AI2D import Ai2d
import os
import ujson
from media.media import *
from time import *
import nncase_runtime as nn
import ulab.numpy as np
import time
import utime
import image
import random
import gc
import sys
import aidemo

# 自定义人脸检测类,继承自AIBase基类
class FaceDetectionApp(AIBase):
    def __init__(self, kmodel_path, model_input_size, anchors, confidence_threshold=0.5, nms_threshold=0.2, rgb888p_size=[224,224], display_size=[1920,1080], debug_mode=0):
        super().__init__(kmodel_path, model_input_size, rgb888p_size, debug_mode)  # 调用基类的构造函数
        self.kmodel_path = kmodel_path  # 模型文件路径
        self.model_input_size = model_input_size  # 模型输入分辨率
        self.confidence_threshold = confidence_threshold  # 置信度阈值
        self.nms_threshold = nms_threshold  # NMS(非极大值抑制)阈值
        self.anchors = anchors  # 锚点数据,用于目标检测
        self.rgb888p_size = [ALIGN_UP(rgb888p_size[0], 16), rgb888p_size[1]]  # sensor给到AI的图像分辨率,并对宽度进行16的对齐
        self.display_size = [ALIGN_UP(display_size[0], 16), display_size[1]]  # 显示分辨率,并对宽度进行16的对齐
        self.debug_mode = debug_mode  # 是否开启调试模式
        self.ai2d = Ai2d(debug_mode)  # 实例化Ai2d,用于实现模型预处理
        self.ai2d.set_ai2d_dtype(nn.ai2d_format.NCHW_FMT, nn.ai2d_format.NCHW_FMT, np.uint8, np.uint8)  # 设置Ai2d的输入输出格式和类型

    # 配置预处理操作,这里使用了pad和resize,Ai2d支持crop/shift/pad/resize/affine,具体代码请打开/sdcard/app/libs/AI2D.py查看
    def config_preprocess(self, input_image_size=None):
        with ScopedTiming("set preprocess config", self.debug_mode > 0):  # 计时器,如果debug_mode大于0则开启
            ai2d_input_size = input_image_size if input_image_size else self.rgb888p_size  # 初始化ai2d预处理配置,默认为sensor给到AI的尺寸,可以通过设置input_image_size自行修改输入尺寸
            top, bottom, left, right = self.get_padding_param()  # 获取padding参数
            self.ai2d.pad([0, 0, 0, 0, top, bottom, left, right], 0, [104, 117, 123])  # 填充边缘
            self.ai2d.resize(nn.interp_method.tf_bilinear, nn.interp_mode.half_pixel)  # 缩放图像
            self.ai2d.build([1,3,ai2d_input_size[1],ai2d_input_size[0]],[1,3,self.model_input_size[1],self.model_input_size[0]])  # 构建预处理流程

    # 自定义当前任务的后处理,results是模型输出array列表,这里使用了aidemo库的face_det_post_process接口
    def postprocess(self, results):
        with ScopedTiming("postprocess", self.debug_mode > 0):
            post_ret = aidemo.face_det_post_process(self.confidence_threshold, self.nms_threshold, self.model_input_size[1], self.anchors, self.rgb888p_size, results)
            if len(post_ret) == 0:
                return post_ret
            else:
                return post_ret[0]

    # 绘制检测结果到画面上
    def draw_result(self, pl, dets):
        with ScopedTiming("display_draw", self.debug_mode > 0):
            if dets:
                pl.osd_img.clear()  # 清除OSD图像
                for det in dets:
                    # 将检测框的坐标转换为显示分辨率下的坐标
                    x, y, w, h = map(lambda x: int(round(x, 0)), det[:4])
                    x = x * self.display_size[0] // self.rgb888p_size[0]
                    y = y * self.display_size[1] // self.rgb888p_size[1]
                    w = w * self.display_size[0] // self.rgb888p_size[0]
                    h = h * self.display_size[1] // self.rgb888p_size[1]
                    pl.osd_img.draw_rectangle(x, y, w, h, color=(255, 255, 0, 255), thickness=2)  # 绘制矩形框
            else:
                pl.osd_img.clear()

    # 获取padding参数
    def get_padding_param(self):
        dst_w = self.model_input_size[0]  # 模型输入宽度
        dst_h = self.model_input_size[1]  # 模型输入高度
        ratio_w = dst_w / self.rgb888p_size[0]  # 宽度缩放比例
        ratio_h = dst_h / self.rgb888p_size[1]  # 高度缩放比例
        ratio = min(ratio_w, ratio_h)  # 取较小的缩放比例
        new_w = int(ratio * self.rgb888p_size[0])  # 新宽度
        new_h = int(ratio * self.rgb888p_size[1])  # 新高度
        dw = (dst_w - new_w) / 2  # 宽度差
        dh = (dst_h - new_h) / 2  # 高度差
        top = int(round(0))
        bottom = int(round(dh * 2 + 0.1))
        left = int(round(0))
        right = int(round(dw * 2 - 0.1))
        return top, bottom, left, right

if __name__ == "__main__":
    # 显示模式,默认"hdmi",可以选择"hdmi"和"lcd"
    display_mode="hdmi"
    if display_mode=="hdmi":
        display_size=[1920,1080]
    else:
        display_size=[800,480]
    # 设置模型路径和其他参数
    kmodel_path = "/sdcard/app/tests/kmodel/face_detection_320.kmodel"
    # 其它参数
    confidence_threshold = 0.5
    nms_threshold = 0.2
    anchor_len = 4200
    det_dim = 4
    anchors_path = "/sdcard/app/tests/utils/prior_data_320.bin"
    anchors = np.fromfile(anchors_path, dtype=np.float)
    anchors = anchors.reshape((anchor_len, det_dim))
    rgb888p_size = [1920, 1080]

    # 初始化PipeLine,用于图像处理流程
    pl = PipeLine(rgb888p_size=rgb888p_size, display_size=display_size, display_mode=display_mode)
    pl.create()  # 创建PipeLine实例
    # 初始化自定义人脸检测实例
    face_det = FaceDetectionApp(kmodel_path, model_input_size=[320, 320], anchors=anchors, confidence_threshold=confidence_threshold, nms_threshold=nms_threshold, rgb888p_size=rgb888p_size, display_size=display_size, debug_mode=0)
    face_det.config_preprocess()  # 配置预处理

    try:
        while True:
            os.exitpoint()                      # 检查是否有退出信号
            with ScopedTiming("total",1):
                img = pl.get_frame()            # 获取当前帧数据
                res = face_det.run(img)         # 推理当前帧
                face_det.draw_result(pl, res)   # 绘制结果
                pl.show_image()                 # 显示结果
                gc.collect()                    # 垃圾回收
    except Exception as e:
        sys.print_exception(e)                  # 打印异常信息
    finally:
        face_det.deinit()                       # 反初始化
        pl.destroy()                            # 销毁PipeLine实例
2.4. 人脸关键部位#
from libs.PipeLine import PipeLine, ScopedTiming
from libs.AIBase import AIBase
from libs.AI2D import Ai2d
import os
import ujson
from media.media import *
from time import *
import nncase_runtime as nn
import ulab.numpy as np
import time
import image
import aidemo
import random
import gc
import sys

# 自定义人脸检测任务类
class FaceDetApp(AIBase):
    def __init__(self,kmodel_path,model_input_size,anchors,confidence_threshold=0.25,nms_threshold=0.3,rgb888p_size=[1280,720],display_size=[1920,1080],debug_mode=0):
        super().__init__(kmodel_path,model_input_size,rgb888p_size,debug_mode)
        # kmodel路径
        self.kmodel_path=kmodel_path
        # 检测模型输入分辨率
        self.model_input_size=model_input_size
        # 置信度阈值
        self.confidence_threshold=confidence_threshold
        # nms阈值
        self.nms_threshold=nms_threshold
        # 检测任务锚框
        self.anchors=anchors
        # sensor给到AI的图像分辨率,宽16字节对齐
        self.rgb888p_size=[ALIGN_UP(rgb888p_size[0],16),rgb888p_size[1]]
        # 视频输出VO分辨率,宽16字节对齐
        self.display_size=[ALIGN_UP(display_size[0],16),display_size[1]]
        # debug模式
        self.debug_mode=debug_mode
        # 实例化Ai2d,用于实现模型预处理
        self.ai2d=Ai2d(debug_mode)
        # 设置Ai2d的输入输出格式和类型
        self.ai2d.set_ai2d_dtype(nn.ai2d_format.NCHW_FMT,nn.ai2d_format.NCHW_FMT,np.uint8, np.uint8)

    # 配置预处理操作,这里使用了pad和resize,Ai2d支持crop/shift/pad/resize/affine,具体代码请打开/sdcard/app/libs/AI2D.py查看
    def config_preprocess(self,input_image_size=None):
        with ScopedTiming("set preprocess config",self.debug_mode > 0):
            # 初始化ai2d预处理配置,默认为sensor给到AI的尺寸,可以通过设置input_image_size自行修改输入尺寸
            ai2d_input_size=input_image_size if input_image_size else self.rgb888p_size
            # 设置padding预处理
            self.ai2d.pad(self.get_pad_param(), 0, [104,117,123])
            # 设置resize预处理
            self.ai2d.resize(nn.interp_method.tf_bilinear, nn.interp_mode.half_pixel)
            # 构建预处理流程,参数为预处理输入tensor的shape和预处理输出的tensor的shape
            self.ai2d.build([1,3,ai2d_input_size[1],ai2d_input_size[0]],[1,3,self.model_input_size[1],self.model_input_size[0]])

    # 自定义后处理,results是模型输出的array列表,这里使用了aidemo的face_det_post_process列表
    def postprocess(self,results):
        with ScopedTiming("postprocess",self.debug_mode > 0):
            res = aidemo.face_det_post_process(self.confidence_threshold,self.nms_threshold,self.model_input_size[0],self.anchors,self.rgb888p_size,results)
            if len(res)==0:
                return res
            else:
                return res[0]

    # 计算padding参数
    def get_pad_param(self):
        dst_w = self.model_input_size[0]
        dst_h = self.model_input_size[1]
        # 计算最小的缩放比例,等比例缩放
        ratio_w = dst_w / self.rgb888p_size[0]
        ratio_h = dst_h / self.rgb888p_size[1]
        if ratio_w < ratio_h:
            ratio = ratio_w
        else:
            ratio = ratio_h
        new_w = (int)(ratio * self.rgb888p_size[0])
        new_h = (int)(ratio * self.rgb888p_size[1])
        dw = (dst_w - new_w) / 2
        dh = (dst_h - new_h) / 2
        top = (int)(round(0))
        bottom = (int)(round(dh * 2 + 0.1))
        left = (int)(round(0))
        right = (int)(round(dw * 2 - 0.1))
        return [0,0,0,0,top, bottom, left, right]

# 自定义人脸关键点任务类
class FaceLandMarkApp(AIBase):
    def __init__(self,kmodel_path,model_input_size,rgb888p_size=[1920,1080],display_size=[1920,1080],debug_mode=0):
        super().__init__(kmodel_path,model_input_size,rgb888p_size,debug_mode)
        # kmodel路径
        self.kmodel_path=kmodel_path
        # 关键点模型输入分辨率
        self.model_input_size=model_input_size
        # sensor给到AI的图像分辨率,宽16字节对齐
        self.rgb888p_size=[ALIGN_UP(rgb888p_size[0],16),rgb888p_size[1]]
        # 视频输出VO分辨率,宽16字节对齐
        self.display_size=[ALIGN_UP(display_size[0],16),display_size[1]]
        # debug模式
        self.debug_mode=debug_mode
        # 目标矩阵
        self.matrix_dst=None
        self.ai2d=Ai2d(debug_mode)
        self.ai2d.set_ai2d_dtype(nn.ai2d_format.NCHW_FMT,nn.ai2d_format.NCHW_FMT,np.uint8, np.uint8)

    # 配置预处理操作,这里使用了affine,Ai2d支持crop/shift/pad/resize/affine,具体代码请打开/sdcard/app/libs/AI2D.py查看
    def config_preprocess(self,det,input_image_size=None):
        with ScopedTiming("set preprocess config",self.debug_mode > 0):
            # 初始化ai2d预处理配置,默认为sensor给到AI的尺寸,可以通过设置input_image_size自行修改输入尺寸
            ai2d_input_size=input_image_size if input_image_size else self.rgb888p_size
            # 计算目标矩阵,并获取仿射变换矩阵
            self.matrix_dst = self.get_affine_matrix(det)
            affine_matrix = [self.matrix_dst[0][0],self.matrix_dst[0][1],self.matrix_dst[0][2],
                             self.matrix_dst[1][0],self.matrix_dst[1][1],self.matrix_dst[1][2]]
            # 设置仿射变换预处理
            self.ai2d.affine(nn.interp_method.cv2_bilinear,0, 0, 127, 1,affine_matrix)
            # 构建预处理流程,参数为预处理输入tensor的shape和预处理输出的tensor的shape
            self.ai2d.build([1,3,ai2d_input_size[1],ai2d_input_size[0]],[1,3,self.model_input_size[1],self.model_input_size[0]])

    # 自定义后处理,results是模型输出的array列表,这里使用了aidemo库的invert_affine_transform接口
    def postprocess(self,results):
        with ScopedTiming("postprocess",self.debug_mode > 0):
            pred=results[0]
            # (1)将人脸关键点输出变换模型输入
            half_input_len = self.model_input_size[0] // 2
            pred = pred.flatten()
            for i in range(len(pred)):
                pred[i] += (pred[i] + 1) * half_input_len
            # (2)获取仿射矩阵的逆矩阵
            matrix_dst_inv = aidemo.invert_affine_transform(self.matrix_dst)
            matrix_dst_inv = matrix_dst_inv.flatten()
            # (3)对每个关键点进行逆变换
            half_out_len = len(pred) // 2
            for kp_id in range(half_out_len):
                old_x = pred[kp_id * 2]
                old_y = pred[kp_id * 2 + 1]
                # 逆变换公式
                new_x = old_x * matrix_dst_inv[0] + old_y * matrix_dst_inv[1] + matrix_dst_inv[2]
                new_y = old_x * matrix_dst_inv[3] + old_y * matrix_dst_inv[4] + matrix_dst_inv[5]
                pred[kp_id * 2] = new_x
                pred[kp_id * 2 + 1] = new_y
            return pred

    def get_affine_matrix(self,bbox):
        # 获取仿射矩阵,用于将边界框映射到模型输入空间
        with ScopedTiming("get_affine_matrix", self.debug_mode > 1):
            # 从边界框提取坐标和尺寸
            x1, y1, w, h = map(lambda x: int(round(x, 0)), bbox[:4])
            # 计算缩放比例,使得边界框映射到模型输入空间的一部分
            scale_ratio = (self.model_input_size[0]) / (max(w, h) * 1.5)
            # 计算边界框中心点在模型输入空间的坐标
            cx = (x1 + w / 2) * scale_ratio
            cy = (y1 + h / 2) * scale_ratio
            # 计算模型输入空间的一半长度
            half_input_len = self.model_input_size[0] / 2
            # 创建仿射矩阵并进行设置
            matrix_dst = np.zeros((2, 3), dtype=np.float)
            matrix_dst[0, 0] = scale_ratio
            matrix_dst[0, 1] = 0
            matrix_dst[0, 2] = half_input_len - cx
            matrix_dst[1, 0] = 0
            matrix_dst[1, 1] = scale_ratio
            matrix_dst[1, 2] = half_input_len - cy
            return matrix_dst

# 人脸标志解析
class FaceLandMark:
    def __init__(self,face_det_kmodel,face_landmark_kmodel,det_input_size,landmark_input_size,anchors,confidence_threshold=0.25,nms_threshold=0.3,rgb888p_size=[1920,1080],display_size=[1920,1080],debug_mode=0):
        # 人脸检测模型路径
        self.face_det_kmodel=face_det_kmodel
        # 人脸标志解析模型路径
        self.face_landmark_kmodel=face_landmark_kmodel
        # 人脸检测模型输入分辨率
        self.det_input_size=det_input_size
        # 人脸标志解析模型输入分辨率
        self.landmark_input_size=landmark_input_size
        # anchors
        self.anchors=anchors
        # 置信度阈值
        self.confidence_threshold=confidence_threshold
        # nms阈值
        self.nms_threshold=nms_threshold
        # sensor给到AI的图像分辨率,宽16字节对齐
        self.rgb888p_size=[ALIGN_UP(rgb888p_size[0],16),rgb888p_size[1]]
        # 视频输出VO分辨率,宽16字节对齐
        self.display_size=[ALIGN_UP(display_size[0],16),display_size[1]]
        # debug_mode模式
        self.debug_mode=debug_mode

        # 人脸关键点不同部位关键点列表
        self.dict_kp_seq = [
            [43, 44, 45, 47, 46, 50, 51, 49, 48],              # left_eyebrow
            [97, 98, 99, 100, 101, 105, 104, 103, 102],        # right_eyebrow
            [35, 36, 33, 37, 39, 42, 40, 41],                  # left_eye
            [89, 90, 87, 91, 93, 96, 94, 95],                  # right_eye
            [34, 88],                                          # pupil
            [72, 73, 74, 86],                                  # bridge_nose
            [77, 78, 79, 80, 85, 84, 83],                      # wing_nose
            [52, 55, 56, 53, 59, 58, 61, 68, 67, 71, 63, 64],  # out_lip
            [65, 54, 60, 57, 69, 70, 62, 66],                  # in_lip
            [1, 9, 10, 11, 12, 13, 14, 15, 16, 2, 3, 4, 5, 6, 7, 8, 0, 24, 23, 22, 21, 20, 19, 18, 32, 31, 30, 29, 28, 27, 26, 25, 17]  # basin
        ]

        # 人脸关键点不同部位(顺序同dict_kp_seq)颜色配置,argb
        self.color_list_for_osd_kp = [
            (255, 0, 255, 0),
            (255, 0, 255, 0),
            (255, 255, 0, 255),
            (255, 255, 0, 255),
            (255, 255, 0, 0),
            (255, 255, 170, 0),
            (255, 255, 255, 0),
            (255, 0, 255, 255),
            (255, 255, 220, 50),
            (255, 30, 30, 255)
        ]
        # 人脸检测实例
        self.face_det=FaceDetApp(self.face_det_kmodel,model_input_size=self.det_input_size,anchors=self.anchors,confidence_threshold=self.confidence_threshold,nms_threshold=self.nms_threshold,rgb888p_size=self.rgb888p_size,display_size=self.display_size,debug_mode=0)
        # 人脸标志解析实例
        self.face_landmark=FaceLandMarkApp(self.face_landmark_kmodel,model_input_size=self.landmark_input_size,rgb888p_size=self.rgb888p_size,display_size=self.display_size)
        # 配置人脸检测的预处理
        self.face_det.config_preprocess()

    # run函数
    def run(self,input_np):
        # 执行人脸检测
        det_boxes=self.face_det.run(input_np)
        landmark_res=[]
        for det_box in det_boxes:
            # 对每一个检测到的人脸解析关键部位
            self.face_landmark.config_preprocess(det_box)
            res=self.face_landmark.run(input_np)
            landmark_res.append(res)
        return det_boxes,landmark_res


    # 绘制人脸解析效果
    def draw_result(self,pl,dets,landmark_res):
        pl.osd_img.clear()
        if dets:
            draw_img_np = np.zeros((self.display_size[1],self.display_size[0],4),dtype=np.uint8)
            draw_img = image.Image(self.display_size[0], self.display_size[1], image.ARGB8888, alloc=image.ALLOC_REF,data = draw_img_np)
            for pred in landmark_res:
                # (1)获取单个人脸框对应的人脸关键点
                for sub_part_index in range(len(self.dict_kp_seq)):
                    # (2)构建人脸某个区域关键点集
                    sub_part = self.dict_kp_seq[sub_part_index]
                    face_sub_part_point_set = []
                    for kp_index in range(len(sub_part)):
                        real_kp_index = sub_part[kp_index]
                        x, y = pred[real_kp_index * 2], pred[real_kp_index * 2 + 1]
                        x = int(x * self.display_size[0] // self.rgb888p_size[0])
                        y = int(y * self.display_size[1] // self.rgb888p_size[1])
                        face_sub_part_point_set.append((x, y))
                    # (3)画人脸不同区域的轮廓
                    if sub_part_index in (9, 6):
                        color = np.array(self.color_list_for_osd_kp[sub_part_index],dtype = np.uint8)
                        face_sub_part_point_set = np.array(face_sub_part_point_set)
                        aidemo.polylines(draw_img_np, face_sub_part_point_set,False,color,5,8,0)
                    elif sub_part_index == 4:
                        color = self.color_list_for_osd_kp[sub_part_index]
                        for kp in face_sub_part_point_set:
                            x,y = kp[0],kp[1]
                            draw_img.draw_circle(x,y ,2, color, 1)
                    else:
                        color = np.array(self.color_list_for_osd_kp[sub_part_index],dtype = np.uint8)
                        face_sub_part_point_set = np.array(face_sub_part_point_set)
                        aidemo.contours(draw_img_np, face_sub_part_point_set,-1,color,2,8)
            pl.osd_img.copy_from(draw_img)


if __name__=="__main__":
    # 显示模式,默认"hdmi",可以选择"hdmi"和"lcd"
    display_mode="hdmi"
    if display_mode=="hdmi":
        display_size=[1920,1080]
    else:
        display_size=[800,480]
    # 人脸检测模型路径
    face_det_kmodel_path="/sdcard/app/tests/kmodel/face_detection_320.kmodel"
    # 人脸关键标志模型路径
    face_landmark_kmodel_path="/sdcard/app/tests/kmodel/face_landmark.kmodel"
    # 其它参数
    anchors_path="/sdcard/app/tests/utils/prior_data_320.bin"
    rgb888p_size=[1920,1080]
    face_det_input_size=[320,320]
    face_landmark_input_size=[192,192]
    confidence_threshold=0.5
    nms_threshold=0.2
    anchor_len=4200
    det_dim=4
    anchors = np.fromfile(anchors_path, dtype=np.float)
    anchors = anchors.reshape((anchor_len,det_dim))

    # 初始化PipeLine,只关注传给AI的图像分辨率,显示的分辨率
    pl=PipeLine(rgb888p_size=rgb888p_size,display_size=display_size,display_mode=display_mode)
    pl.create()
    flm=FaceLandMark(face_det_kmodel_path,face_landmark_kmodel_path,det_input_size=face_det_input_size,landmark_input_size=face_landmark_input_size,anchors=anchors,confidence_threshold=confidence_threshold,nms_threshold=nms_threshold,rgb888p_size=rgb888p_size,display_size=display_size)
    try:
        while True:
            os.exitpoint()
            with ScopedTiming("total",1):
                img=pl.get_frame()                          # 获取当前帧
                det_boxes,landmark_res=flm.run(img)         # 推理当前帧
                flm.draw_result(pl,det_boxes,landmark_res)  # 绘制推理结果
                pl.show_image()                             # 展示推理效果
                gc.collect()
    except Exception as e:
        sys.print_exception(e)
    finally:
        flm.face_det.deinit()
        flm.face_landmark.deinit()
        pl.destroy()
2.5. 人脸3D网络#
from libs.PipeLine import PipeLine, ScopedTiming
from libs.AIBase import AIBase
from libs.AI2D import Ai2d
import os
import ujson
from media.media import *
from time import *
import nncase_runtime as nn
import ulab.numpy as np
import time
import image
import aidemo
import random
import gc
import sys

# 自定义人脸检测任务类
class FaceDetApp(AIBase):
    def __init__(self,kmodel_path,model_input_size,anchors,confidence_threshold=0.25,nms_threshold=0.3,rgb888p_size=[1280,720],display_size=[1920,1080],debug_mode=0):
        super().__init__(kmodel_path,model_input_size,rgb888p_size,debug_mode)
        # kmodel路径
        self.kmodel_path=kmodel_path
        # 检测模型输入分辨率
        self.model_input_size=model_input_size
        # 置信度阈值
        self.confidence_threshold=confidence_threshold
        # nms阈值
        self.nms_threshold=nms_threshold
        # 检测任务锚框
        self.anchors=anchors
        # sensor给到AI的图像分辨率,宽16字节对齐
        self.rgb888p_size=[ALIGN_UP(rgb888p_size[0],16),rgb888p_size[1]]
        # 视频输出VO分辨率,宽16字节对齐
        self.display_size=[ALIGN_UP(display_size[0],16),display_size[1]]
        # debug模式
        self.debug_mode=debug_mode
        # 实例化Ai2d,用于实现模型预处理
        self.ai2d=Ai2d(debug_mode)
        # 设置Ai2d的输入输出格式和类型
        self.ai2d.set_ai2d_dtype(nn.ai2d_format.NCHW_FMT,nn.ai2d_format.NCHW_FMT,np.uint8, np.uint8)

    # 配置预处理操作,这里使用了pad和resize,Ai2d支持crop/shift/pad/resize/affine,具体代码请打开/sdcard/app/libs/AI2D.py查看
    def config_preprocess(self,input_image_size=None):
        with ScopedTiming("set preprocess config",self.debug_mode > 0):
            # 初始化ai2d预处理配置,默认为sensor给到AI的尺寸,可以通过设置input_image_size自行修改输入尺寸
            ai2d_input_size=input_image_size if input_image_size else self.rgb888p_size
            # 设置padding预处理
            self.ai2d.pad(self.get_pad_param(), 0, [104,117,123])
            # 设置resize预处理
            self.ai2d.resize(nn.interp_method.tf_bilinear, nn.interp_mode.half_pixel)
            # 构建预处理流程,参数为预处理输入tensor的shape和预处理输出的tensor的shape
            self.ai2d.build([1,3,ai2d_input_size[1],ai2d_input_size[0]],[1,3,self.model_input_size[1],self.model_input_size[0]])

    # 自定义后处理,results是模型推理输出的array列表,这里使用了aidemo库的face_det_post_process接口
    def postprocess(self,results):
        with ScopedTiming("postprocess",self.debug_mode > 0):
            res = aidemo.face_det_post_process(self.confidence_threshold,self.nms_threshold,self.model_input_size[0],self.anchors,self.rgb888p_size,results)
            if len(res)==0:
                return res
            else:
                return res[0]

    # padding参数计算
    def get_pad_param(self):
        dst_w = self.model_input_size[0]
        dst_h = self.model_input_size[1]
        # 计算最小的缩放比例,等比例缩放
        ratio_w = dst_w / self.rgb888p_size[0]
        ratio_h = dst_h / self.rgb888p_size[1]
        if ratio_w < ratio_h:
            ratio = ratio_w
        else:
            ratio = ratio_h
        new_w = (int)(ratio * self.rgb888p_size[0])
        new_h = (int)(ratio * self.rgb888p_size[1])
        dw = (dst_w - new_w) / 2
        dh = (dst_h - new_h) / 2
        top = (int)(round(0))
        bottom = (int)(round(dh * 2 + 0.1))
        left = (int)(round(0))
        right = (int)(round(dw * 2 - 0.1))
        return [0,0,0,0,top, bottom, left, right]

# 自定义人脸网格任务类
class FaceMeshApp(AIBase):
    def __init__(self,kmodel_path,model_input_size,rgb888p_size=[1920,1080],display_size=[1920,1080],debug_mode=0):
        super().__init__(kmodel_path,model_input_size,rgb888p_size,debug_mode)
        # kmodel路径
        self.kmodel_path=kmodel_path
        # 人脸网格模型输入分辨率
        self.model_input_size=model_input_size
        # sensor给到AI的图像分辨率,宽16字节对齐
        self.rgb888p_size=[ALIGN_UP(rgb888p_size[0],16),rgb888p_size[1]]
        # 视频输出VO分辨率,宽16字节对齐
        self.display_size=[ALIGN_UP(display_size[0],16),display_size[1]]
        # debug模式
        self.debug_mode=debug_mode
        # 人脸mesh参数均值
        self.param_mean = np.array([0.0003492636315058917,2.52790130161884e-07,-6.875197868794203e-07,60.1679573059082,-6.295513230725192e-07,0.0005757200415246189,-5.085391239845194e-05,74.2781982421875,5.400917189035681e-07,6.574138387804851e-05,0.0003442012530285865,-66.67157745361328,-346603.6875,-67468.234375,46822.265625,-15262.046875,4350.5888671875,-54261.453125,-18328.033203125,-1584.328857421875,-84566.34375,3835.960693359375,-20811.361328125,38094.9296875,-19967.85546875,-9241.3701171875,-19600.71484375,13168.08984375,-5259.14404296875,1848.6478271484375,-13030.662109375,-2435.55615234375,-2254.20654296875,-14396.5615234375,-6176.3291015625,-25621.919921875,226.39447021484375,-6326.12353515625,-10867.2509765625,868.465087890625,-5831.14794921875,2705.123779296875,-3629.417724609375,2043.9901123046875,-2446.6162109375,3658.697021484375,-7645.98974609375,-6674.45263671875,116.38838958740234,7185.59716796875,-1429.48681640625,2617.366455078125,-1.2070955038070679,0.6690792441368103,-0.17760828137397766,0.056725528091192245,0.03967815637588501,-0.13586315512657166,-0.09223993122577667,-0.1726071834564209,-0.015804484486579895,-0.1416848599910736],dtype=np.float)
        # 人脸mesh参数方差
        self.param_std = np.array([0.00017632152594160289,6.737943476764485e-05,0.00044708489440381527,26.55023193359375,0.0001231376954820007,4.493021697271615e-05,7.923670636955649e-05,6.982563018798828,0.0004350444069132209,0.00012314890045672655,0.00017400001524947584,20.80303955078125,575421.125,277649.0625,258336.84375,255163.125,150994.375,160086.109375,111277.3046875,97311.78125,117198.453125,89317.3671875,88493.5546875,72229.9296875,71080.2109375,50013.953125,55968.58203125,47525.50390625,49515.06640625,38161.48046875,44872.05859375,46273.23828125,38116.76953125,28191.162109375,32191.4375,36006.171875,32559.892578125,25551.1171875,24267.509765625,27521.3984375,23166.53125,21101.576171875,19412.32421875,19452.203125,17454.984375,22537.623046875,16174.28125,14671.640625,15115.6884765625,13870.0732421875,13746.3125,12663.1337890625,1.5870834589004517,1.5077009201049805,0.5881357789039612,0.5889744758605957,0.21327851712703705,0.2630201280117035,0.2796429395675659,0.38030216097831726,0.16162841022014618,0.2559692859649658],dtype=np.float)
        # 实例化Ai2d,用于实现模型预处理
        self.ai2d=Ai2d(debug_mode)
        # 设置Ai2d的输入输出格式和类型
        self.ai2d.set_ai2d_dtype(nn.ai2d_format.NCHW_FMT,nn.ai2d_format.NCHW_FMT,np.uint8, np.uint8)

    # 配置预处理操作,这里使用了crop和resize,Ai2d支持crop/shift/pad/resize/affine,具体代码请打开/sdcard/app/libs/AI2D.py查看
    def config_preprocess(self,det,input_image_size=None):
        with ScopedTiming("set preprocess config",self.debug_mode > 0):
            # 初始化ai2d预处理配置,默认为sensor给到AI的尺寸,可以通过设置input_image_size自行修改输入尺寸
            ai2d_input_size=input_image_size if input_image_size else self.rgb888p_size
            # 计算crop参数,并设置crop预处理
            roi = self.parse_roi_box_from_bbox(det)
            self.ai2d.crop(int(roi[0]),int(roi[1]),int(roi[2]),int(roi[3]))
            # 设置resize预处理
            self.ai2d.resize(nn.interp_method.tf_bilinear, nn.interp_mode.half_pixel)
            # 构建预处理流程,参数为预处理输入tensor的shape和预处理输出的tensor的shape
            self.ai2d.build([1,3,ai2d_input_size[1],ai2d_input_size[0]],[1,3,self.model_input_size[1],self.model_input_size[0]])
            return roi

    # 自定义后处理,results是模型输出的array列表
    def postprocess(self,results):
        with ScopedTiming("postprocess",self.debug_mode > 0):
            param = results[0] * self.param_std + self.param_mean
            return param

    def parse_roi_box_from_bbox(self,bbox):
        # 获取人脸roi
        x1, y1, w, h = map(lambda x: int(round(x, 0)), bbox[:4])
        old_size = (w + h) / 2
        center_x = x1 + w / 2
        center_y = y1 + h / 2 + old_size * 0.14
        size = int(old_size * 1.58)
        x0 = center_x - float(size) / 2
        y0 = center_y - float(size) / 2
        x1 = x0 + size
        y1 = y0 + size
        x0 = max(0, min(x0, self.rgb888p_size[0]))
        y0 = max(0, min(y0, self.rgb888p_size[1]))
        x1 = max(0, min(x1, self.rgb888p_size[0]))
        y1 = max(0, min(y1, self.rgb888p_size[1]))
        roi = (x0, y0, x1 - x0, y1 - y0)
        return roi

# 自定义人脸网格后处理任务类
class FaceMeshPostApp(AIBase):
    def __init__(self,kmodel_path,model_input_size,rgb888p_size=[1920,1080],display_size=[1920,1080],debug_mode=0):
        super().__init__(kmodel_path,model_input_size,rgb888p_size,debug_mode)
        # kmodel路径
        self.kmodel_path=kmodel_path
        # 人脸网格模型输入分辨率
        self.model_input_size=model_input_size
        # sensor给到AI的图像分辨率,宽16字节对齐
        self.rgb888p_size=[ALIGN_UP(rgb888p_size[0],16),rgb888p_size[1]]
        # 视频输出VO分辨率,宽16字节对齐
        self.display_size=[ALIGN_UP(display_size[0],16),display_size[1]]
        # debug模式
        self.debug_mode=debug_mode
        # 实例化Ai2d,用于实现模型预处理
        self.ai2d=Ai2d(debug_mode)
        # 设置Ai2d的输入输出格式和类型
        self.ai2d.set_ai2d_dtype(nn.ai2d_format.NCHW_FMT,nn.ai2d_format.NCHW_FMT,np.uint8, np.uint8)

    # 重写预处理函数preprocess,因为该模型的预处理不是单纯调用一个ai2d能实现的,返回模型输入的tensor列表
    def preprocess(self,param):
        with ScopedTiming("set preprocess config",self.debug_mode > 0):
            # face mesh post模型预处理,param解析
            param = param[0]
            trans_dim, shape_dim, exp_dim = 12, 40, 10
            R_ = param[:trans_dim].copy().reshape((3, -1))
            R = R_[:, :3].copy()
            offset = R_[:, 3].copy()
            offset = offset.reshape((3, 1))
            alpha_shp = param[trans_dim:trans_dim + shape_dim].copy().reshape((-1, 1))
            alpha_exp = param[trans_dim + shape_dim:].copy().reshape((-1, 1))
            R_tensor = nn.from_numpy(R)
            offset_tensor = nn.from_numpy(offset)
            alpha_shp_tensor = nn.from_numpy(alpha_shp)
            alpha_exp_tensor = nn.from_numpy(alpha_exp)
            return [R_tensor,offset_tensor,alpha_shp_tensor,alpha_exp_tensor]

    # 自定义模型后处理,这里调用了aidemo的face_mesh_post_process接口
    def postprocess(self,results,roi):
        with ScopedTiming("postprocess",self.debug_mode > 0):
            x, y, w, h = map(lambda x: int(round(x, 0)), roi[:4])
            x = x * self.display_size[0] // self.rgb888p_size[0]
            y = y * self.display_size[1] // self.rgb888p_size[1]
            w = w * self.display_size[0] // self.rgb888p_size[0]
            h = h * self.display_size[1] // self.rgb888p_size[1]
            roi_array = np.array([x,y,w,h],dtype=np.float)
            aidemo.face_mesh_post_process(roi_array,results[0])
            return results[0]

# 3D人脸网格
class FaceMesh:
    def __init__(self,face_det_kmodel,face_mesh_kmodel,mesh_post_kmodel,det_input_size,mesh_input_size,anchors,confidence_threshold=0.25,nms_threshold=0.3,rgb888p_size=[1920,1080],display_size=[1920,1080],debug_mode=0):
        # 人脸检测模型路径
        self.face_det_kmodel=face_det_kmodel
        # 人脸3D网格模型路径
        self.face_mesh_kmodel=face_mesh_kmodel
        # 人脸3D网格后处理模型路径
        self.mesh_post_kmodel=mesh_post_kmodel
        # 人脸检测模型输入分辨率
        self.det_input_size=det_input_size
        # 人脸3D网格模型输入分辨率
        self.mesh_input_size=mesh_input_size
        # anchors
        self.anchors=anchors
        # 置信度阈值
        self.confidence_threshold=confidence_threshold
        # nms阈值
        self.nms_threshold=nms_threshold
        # sensor给到AI的图像分辨率,宽16字节对齐
        self.rgb888p_size=[ALIGN_UP(rgb888p_size[0],16),rgb888p_size[1]]
        # 视频输出VO分辨率,宽16字节对齐
        self.display_size=[ALIGN_UP(display_size[0],16),display_size[1]]
        # debug_mode模式
        self.debug_mode=debug_mode
        # 人脸检测实例
        self.face_det=FaceDetApp(self.face_det_kmodel,model_input_size=self.det_input_size,anchors=self.anchors,confidence_threshold=self.confidence_threshold,nms_threshold=self.nms_threshold,rgb888p_size=self.rgb888p_size,display_size=self.display_size,debug_mode=0)
        # 人脸网格实例
        self.face_mesh=FaceMeshApp(self.face_mesh_kmodel,model_input_size=self.mesh_input_size,rgb888p_size=self.rgb888p_size,display_size=self.display_size)
        # 人脸网格后处理实例
        self.face_mesh_post=FaceMeshPostApp(self.mesh_post_kmodel,model_input_size=self.mesh_input_size,rgb888p_size=self.rgb888p_size,display_size=self.display_size)
        # 人脸检测预处理配置
        self.face_det.config_preprocess()

    # run函数
    def run(self,input_np):
        # 执行人脸检测
        det_boxes=self.face_det.run(input_np)
        mesh_res=[]
        for det_box in det_boxes:
            # 对检测到的每一个人脸配置预处理,执行人脸网格和人脸网格后处理
            roi=self.face_mesh.config_preprocess(det_box)
            param=self.face_mesh.run(input_np)
            tensors=self.face_mesh_post.preprocess(param)
            results=self.face_mesh_post.inference(tensors)
            res=self.face_mesh_post.postprocess(results,roi)
            mesh_res.append(res)
        return det_boxes,mesh_res


    # 绘制人脸解析效果
    def draw_result(self,pl,dets,mesh_res):
        pl.osd_img.clear()
        if dets:
            draw_img_np = np.zeros((self.display_size[1],self.display_size[0],4),dtype=np.uint8)
            draw_img = image.Image(self.display_size[0], self.display_size[1], image.ARGB8888, alloc=image.ALLOC_REF,data = draw_img_np)
            for vertices in mesh_res:
                aidemo.face_draw_mesh(draw_img_np, vertices)
            pl.osd_img.copy_from(draw_img)


if __name__=="__main__":
    # 显示模式,默认"hdmi",可以选择"hdmi"和"lcd"
    display_mode="hdmi"
    if display_mode=="hdmi":
        display_size=[1920,1080]
    else:
        display_size=[800,480]
    # 人脸检测模型路径
    face_det_kmodel_path="/sdcard/app/tests/kmodel/face_detection_320.kmodel"
    # 人脸网格模型路径
    face_mesh_kmodel_path="/sdcard/app/tests/kmodel/face_alignment.kmodel"
    # 人脸网格后处理模型路径
    face_mesh_post_kmodel_path="/sdcard/app/tests/kmodel/face_alignment_post.kmodel"
    # 其他参数
    anchors_path="/sdcard/app/tests/utils/prior_data_320.bin"
    rgb888p_size=[1920,1080]
    face_det_input_size=[320,320]
    face_mesh_input_size=[120,120]
    confidence_threshold=0.5
    nms_threshold=0.2
    anchor_len=4200
    det_dim=4
    anchors = np.fromfile(anchors_path, dtype=np.float)
    anchors = anchors.reshape((anchor_len,det_dim))

    # 初始化PipeLine,只关注传给AI的图像分辨率,显示的分辨率
    pl=PipeLine(rgb888p_size=rgb888p_size,display_size=display_size,display_mode=display_mode)
    pl.create()
    fm=FaceMesh(face_det_kmodel_path,face_mesh_kmodel_path,face_mesh_post_kmodel_path,det_input_size=face_det_input_size,mesh_input_size=face_mesh_input_size,anchors=anchors,confidence_threshold=confidence_threshold,nms_threshold=nms_threshold,rgb888p_size=rgb888p_size,display_size=display_size)
    try:
        while True:
            os.exitpoint()
            with ScopedTiming("total",1):
                img=pl.get_frame()                      # 获取当前帧
                det_boxes,mesh_res=fm.run(img)          # 推理当前帧
                fm.draw_result(pl,det_boxes,mesh_res)   # 绘制推理结果
                pl.show_image()                         # 显示推理效果
                gc.collect()
    except Exception as e:
        sys.print_exception(e)
    finally:
        fm.face_det.deinit()
        fm.face_mesh.deinit()
        fm.face_mesh_post.deinit()
        pl.destroy()
2.6. 人脸解析#
from libs.PipeLine import PipeLine, ScopedTiming
from libs.AIBase import AIBase
from libs.AI2D import Ai2d
import os
import ujson
from media.media import *
from time import *
import nncase_runtime as nn
import ulab.numpy as np
import time
import image
import aidemo
import random
import gc
import sys

# 自定义人脸检测任务类
class FaceDetApp(AIBase):
    def __init__(self,kmodel_path,model_input_size,anchors,confidence_threshold=0.25,nms_threshold=0.3,rgb888p_size=[1280,720],display_size=[1920,1080],debug_mode=0):
        super().__init__(kmodel_path,model_input_size,rgb888p_size,debug_mode)
        # kmodel路径
        self.kmodel_path=kmodel_path
        # 检测模型输入分辨率
        self.model_input_size=model_input_size
        # 置信度阈值
        self.confidence_threshold=confidence_threshold
        # nms阈值
        self.nms_threshold=nms_threshold
        self.anchors=anchors
        # sensor给到AI的图像分辨率,宽16字节对齐
        self.rgb888p_size=[ALIGN_UP(rgb888p_size[0],16),rgb888p_size[1]]
        # 视频输出VO分辨率,宽16字节对齐
        self.display_size=[ALIGN_UP(display_size[0],16),display_size[1]]
        # debug模式
        self.debug_mode=debug_mode
        # 实例化Ai2d,用于实现模型预处理
        self.ai2d=Ai2d(debug_mode)
        # 设置Ai2d的输入输出格式和类型
        self.ai2d.set_ai2d_dtype(nn.ai2d_format.NCHW_FMT,nn.ai2d_format.NCHW_FMT,np.uint8, np.uint8)

    # 配置预处理操作,这里使用了pad和resize,Ai2d支持crop/shift/pad/resize/affine,具体代码请打开/sdcard/app/libs/AI2D.py查看
    def config_preprocess(self,input_image_size=None):
        with ScopedTiming("set preprocess config",self.debug_mode > 0):
            # 初始化ai2d预处理配置,默认为sensor给到AI的尺寸,可以通过设置input_image_size自行修改输入尺寸
            ai2d_input_size=input_image_size if input_image_size else self.rgb888p_size
            # 计算padding参数,并设置padding预处理
            self.ai2d.pad(self.get_pad_param(), 0, [104,117,123])
            # 设置resize预处理
            self.ai2d.resize(nn.interp_method.tf_bilinear, nn.interp_mode.half_pixel)
            # 构建预处理流程,参数为预处理输入tensor的shape和预处理输出的tensor的shape
            self.ai2d.build([1,3,ai2d_input_size[1],ai2d_input_size[0]],[1,3,self.model_input_size[1],self.model_input_size[0]])

    # 自定义后处理,results是模型输出的array列表,这里调用了aidemo库的face_det_post_process接口
    def postprocess(self,results):
        with ScopedTiming("postprocess",self.debug_mode > 0):
            res = aidemo.face_det_post_process(self.confidence_threshold,self.nms_threshold,self.model_input_size[0],self.anchors,self.rgb888p_size,results)
            if len(res)==0:
                return res
            else:
                return res[0]

    # 计算padding参数
    def get_pad_param(self):
        dst_w = self.model_input_size[0]
        dst_h = self.model_input_size[1]
        # 计算最小的缩放比例,等比例缩放
        ratio_w = dst_w / self.rgb888p_size[0]
        ratio_h = dst_h / self.rgb888p_size[1]
        if ratio_w < ratio_h:
            ratio = ratio_w
        else:
            ratio = ratio_h
        new_w = (int)(ratio * self.rgb888p_size[0])
        new_h = (int)(ratio * self.rgb888p_size[1])
        dw = (dst_w - new_w) / 2
        dh = (dst_h - new_h) / 2
        top = (int)(round(0))
        bottom = (int)(round(dh * 2 + 0.1))
        left = (int)(round(0))
        right = (int)(round(dw * 2 - 0.1))
        return [0,0,0,0,top, bottom, left, right]

# 自定义人脸解析任务类
class FaceParseApp(AIBase):
    def __init__(self,kmodel_path,model_input_size,rgb888p_size=[1920,1080],display_size=[1920,1080],debug_mode=0):
        super().__init__(kmodel_path,model_input_size,rgb888p_size,debug_mode)
        # kmodel路径
        self.kmodel_path=kmodel_path
        # 检测模型输入分辨率
        self.model_input_size=model_input_size
        # sensor给到AI的图像分辨率,宽16字节对齐
        self.rgb888p_size=[ALIGN_UP(rgb888p_size[0],16),rgb888p_size[1]]
        # 视频输出VO分辨率,宽16字节对齐
        self.display_size=[ALIGN_UP(display_size[0],16),display_size[1]]
        # debug模式
        self.debug_mode=debug_mode
        # 实例化Ai2d,用于实现模型预处理
        self.ai2d=Ai2d(debug_mode)
        # 设置Ai2d的输入输出格式和类型
        self.ai2d.set_ai2d_dtype(nn.ai2d_format.NCHW_FMT,nn.ai2d_format.NCHW_FMT,np.uint8, np.uint8)

    # 配置预处理操作,这里使用了affine,Ai2d支持crop/shift/pad/resize/affine,具体代码请打开/sdcard/app/libs/AI2D.py查看
    def config_preprocess(self,det,input_image_size=None):
        with ScopedTiming("set preprocess config",self.debug_mode > 0):
            # 初始化ai2d预处理配置,默认为sensor给到AI的尺寸,可以通过设置input_image_size自行修改输入尺寸
            ai2d_input_size=input_image_size if input_image_size else self.rgb888p_size
            # 计算仿射变换矩阵并设置affine预处理
            matrix_dst = self.get_affine_matrix(det)
            self.ai2d.affine(nn.interp_method.cv2_bilinear,0, 0, 127, 1,matrix_dst)
            # 构建预处理流程,参数为预处理输入tensor的shape和预处理输出的tensor的shape
            self.ai2d.build([1,3,ai2d_input_size[1],ai2d_input_size[0]],[1,3,self.model_input_size[1],self.model_input_size[0]])

    # 自定义后处理,results是模型输出的array列表,这里将第一个输出返回
    def postprocess(self,results):
        with ScopedTiming("postprocess",self.debug_mode > 0):
            return results[0]

    def get_affine_matrix(self,bbox):
        # 获取仿射矩阵,用于将边界框映射到模型输入空间
        with ScopedTiming("get_affine_matrix", self.debug_mode > 1):
            # 设置缩放因子
            factor = 2.7
            # 从边界框提取坐标和尺寸
            x1, y1, w, h = map(lambda x: int(round(x, 0)), bbox[:4])
            # 模型输入大小
            edge_size = self.model_input_size[1]
            # 平移距离,使得模型输入空间的中心对准原点
            trans_distance = edge_size / 2.0
            # 计算边界框中心点的坐标
            center_x = x1 + w / 2.0
            center_y = y1 + h / 2.0
            # 计算最大边长
            maximum_edge = factor * (h if h > w else w)
            # 计算缩放比例
            scale = edge_size * 2.0 / maximum_edge
            # 计算平移参数
            cx = trans_distance - scale * center_x
            cy = trans_distance - scale * center_y
            # 创建仿射矩阵
            affine_matrix = [scale, 0, cx, 0, scale, cy]
            return affine_matrix

# 人脸解析任务
class FaceParse:
    def __init__(self,face_det_kmodel,face_parse_kmodel,det_input_size,parse_input_size,anchors,confidence_threshold=0.25,nms_threshold=0.3,rgb888p_size=[1920,1080],display_size=[1920,1080],debug_mode=0):
        # 人脸检测模型路径
        self.face_det_kmodel=face_det_kmodel
        # 人脸解析模型路径
        self.face_pose_kmodel=face_parse_kmodel
        # 人脸检测模型输入分辨率
        self.det_input_size=det_input_size
        # 人脸解析模型输入分辨率
        self.parse_input_size=parse_input_size
        # anchors
        self.anchors=anchors
        # 置信度阈值
        self.confidence_threshold=confidence_threshold
        # nms阈值
        self.nms_threshold=nms_threshold
        # sensor给到AI的图像分辨率,宽16字节对齐
        self.rgb888p_size=[ALIGN_UP(rgb888p_size[0],16),rgb888p_size[1]]
        # 视频输出VO分辨率,宽16字节对齐
        self.display_size=[ALIGN_UP(display_size[0],16),display_size[1]]
        # debug_mode模式
        self.debug_mode=debug_mode
        # 人脸检测任务类实例
        self.face_det=FaceDetApp(self.face_det_kmodel,model_input_size=self.det_input_size,anchors=self.anchors,confidence_threshold=self.confidence_threshold,nms_threshold=self.nms_threshold,rgb888p_size=self.rgb888p_size,display_size=self.display_size,debug_mode=0)
        # 人脸解析实例
        self.face_parse=FaceParseApp(self.face_pose_kmodel,model_input_size=self.parse_input_size,rgb888p_size=self.rgb888p_size,display_size=self.display_size)
        # 人脸检测预处理配置
        self.face_det.config_preprocess()

    # run函数
    def run(self,input_np):
        # 执行人脸检测
        det_boxes=self.face_det.run(input_np)
        parse_res=[]
        for det_box in det_boxes:
            # 对检测到每一个人脸进行人脸解析
            self.face_parse.config_preprocess(det_box)
            res=self.face_parse.run(input_np)
            parse_res.append(res)
        return det_boxes,parse_res


    # 绘制人脸解析效果
    def draw_result(self,pl,dets,parse_res):
        pl.osd_img.clear()
        if dets:
            draw_img_np = np.zeros((self.display_size[1],self.display_size[0],4),dtype=np.uint8)
            draw_img=image.Image(self.display_size[0], self.display_size[1], image.ARGB8888,alloc=image.ALLOC_REF,data=draw_img_np)
            for i,det in enumerate(dets):
                # (1)将人脸检测框画到draw_img
                x, y, w, h = map(lambda x: int(round(x, 0)), det[:4])
                x = x * self.display_size[0] // self.rgb888p_size[0]
                y = y * self.display_size[1] // self.rgb888p_size[1]
                w = w * self.display_size[0] // self.rgb888p_size[0]
                h = h * self.display_size[1] // self.rgb888p_size[1]
                aidemo.face_parse_post_process(draw_img_np,self.rgb888p_size,self.display_size,self.parse_input_size[0],det.tolist(),parse_res[i])
            pl.osd_img.copy_from(draw_img)


if __name__=="__main__":
    # 显示模式,默认"hdmi",可以选择"hdmi"和"lcd"
    display_mode="hdmi"
    if display_mode=="hdmi":
        display_size=[1920,1080]
    else:
        display_size=[800,480]
    # 人脸检测模型路径
    face_det_kmodel_path="/sdcard/app/tests/kmodel/face_detection_320.kmodel"
    # 人脸解析模型路径
    face_parse_kmodel_path="/sdcard/app/tests/kmodel/face_parse.kmodel"
    # 其他参数
    anchors_path="/sdcard/app/tests/utils/prior_data_320.bin"
    rgb888p_size=[1920,1080]
    face_det_input_size=[320,320]
    face_parse_input_size=[320,320]
    confidence_threshold=0.5
    nms_threshold=0.2
    anchor_len=4200
    det_dim=4
    anchors = np.fromfile(anchors_path, dtype=np.float)
    anchors = anchors.reshape((anchor_len,det_dim))

    # 初始化PipeLine,只关注传给AI的图像分辨率,显示的分辨率
    pl=PipeLine(rgb888p_size=rgb888p_size,display_size=display_size,display_mode=display_mode)
    pl.create()
    fp=FaceParse(face_det_kmodel_path,face_parse_kmodel_path,det_input_size=face_det_input_size,parse_input_size=face_parse_input_size,anchors=anchors,confidence_threshold=confidence_threshold,nms_threshold=nms_threshold,rgb888p_size=rgb888p_size,display_size=display_size)
    try:
        while True:
            os.exitpoint()
            with ScopedTiming("total",1):
                img=pl.get_frame()                      # 获取当前帧
                det_boxes,parse_res=fp.run(img)         # 推理当前帧
                fp.draw_result(pl,det_boxes,parse_res)  # 绘制当前帧推理结果
                pl.show_image()                         # 展示推理效果
                gc.collect()
    except Exception as e:
        sys.print_exception(e)
    finally:
        fp.face_det.deinit()
        fp.face_parse.deinit()
        pl.destroy()
2.7. 人脸姿态#
from libs.PipeLine import PipeLine, ScopedTiming
from libs.AIBase import AIBase
from libs.AI2D import Ai2d
import os
import ujson
from media.media import *
from time import *
import nncase_runtime as nn
import ulab.numpy as np
import time
import image
import aidemo
import random
import gc
import sys

# 自定义人脸检测任务类
class FaceDetApp(AIBase):
    def __init__(self,kmodel_path,model_input_size,anchors,confidence_threshold=0.25,nms_threshold=0.3,rgb888p_size=[1280,720],display_size=[1920,1080],debug_mode=0):
        super().__init__(kmodel_path,model_input_size,rgb888p_size,debug_mode)
        # kmodel路径
        self.kmodel_path=kmodel_path
        # 检测模型输入分辨率
        self.model_input_size=model_input_size
        # 置信度阈值
        self.confidence_threshold=confidence_threshold
        # nms阈值
        self.nms_threshold=nms_threshold
        self.anchors=anchors
        # sensor给到AI的图像分辨率,宽16字节对齐
        self.rgb888p_size=[ALIGN_UP(rgb888p_size[0],16),rgb888p_size[1]]
        # 视频输出VO分辨率,宽16字节对齐
        self.display_size=[ALIGN_UP(display_size[0],16),display_size[1]]
        # debug模式
        self.debug_mode=debug_mode
        # 实例化Ai2d,用于实现模型预处理
        self.ai2d=Ai2d(debug_mode)
        # 设置Ai2d的输入输出格式和类型
        self.ai2d.set_ai2d_dtype(nn.ai2d_format.NCHW_FMT,nn.ai2d_format.NCHW_FMT,np.uint8, np.uint8)

    # 配置预处理操作,这里使用了pad和resize,Ai2d支持crop/shift/pad/resize/affine,具体代码请打开/sdcard/app/libs/AI2D.py查看
    def config_preprocess(self,input_image_size=None):
        with ScopedTiming("set preprocess config",self.debug_mode > 0):
            # 初始化ai2d预处理配置,默认为sensor给到AI的尺寸,可以通过设置input_image_size自行修改输入尺寸
            ai2d_input_size=input_image_size if input_image_size else self.rgb888p_size
            # 计算padding参数,并设置padding预处理
            self.ai2d.pad(self.get_pad_param(), 0, [104,117,123])
            # 设置resize预处理
            self.ai2d.resize(nn.interp_method.tf_bilinear, nn.interp_mode.half_pixel)
            # 构建预处理流程,参数为预处理输入tensor的shape和预处理输出的tensor的shape
            self.ai2d.build([1,3,ai2d_input_size[1],ai2d_input_size[0]],[1,3,self.model_input_size[1],self.model_input_size[0]])

    # 自定义后处理,results是模型输出的array列表,这里使用了aidemo库的face_det_post_process接口
    def postprocess(self,results):
        with ScopedTiming("postprocess",self.debug_mode > 0):
            res = aidemo.face_det_post_process(self.confidence_threshold,self.nms_threshold,self.model_input_size[0],self.anchors,self.rgb888p_size,results)
            if len(res)==0:
                return res
            else:
                return res[0]

    # 计算padding参数
    def get_pad_param(self):
        dst_w = self.model_input_size[0]
        dst_h = self.model_input_size[1]
        # 计算最小的缩放比例,等比例缩放
        ratio_w = dst_w / self.rgb888p_size[0]
        ratio_h = dst_h / self.rgb888p_size[1]
        if ratio_w < ratio_h:
            ratio = ratio_w
        else:
            ratio = ratio_h
        new_w = (int)(ratio * self.rgb888p_size[0])
        new_h = (int)(ratio * self.rgb888p_size[1])
        dw = (dst_w - new_w) / 2
        dh = (dst_h - new_h) / 2
        top = (int)(round(0))
        bottom = (int)(round(dh * 2 + 0.1))
        left = (int)(round(0))
        right = (int)(round(dw * 2 - 0.1))
        return [0,0,0,0,top, bottom, left, right]

# 自定义人脸姿态任务类
class FacePoseApp(AIBase):
    def __init__(self,kmodel_path,model_input_size,rgb888p_size=[1920,1080],display_size=[1920,1080],debug_mode=0):
        super().__init__(kmodel_path,model_input_size,rgb888p_size,debug_mode)
        # kmodel路径
        self.kmodel_path=kmodel_path
        # 人脸姿态模型输入分辨率
        self.model_input_size=model_input_size
        # sensor给到AI的图像分辨率,宽16字节对齐
        self.rgb888p_size=[ALIGN_UP(rgb888p_size[0],16),rgb888p_size[1]]
        # 视频输出VO分辨率,宽16字节对齐
        self.display_size=[ALIGN_UP(display_size[0],16),display_size[1]]
        # debug模式
        self.debug_mode=debug_mode
        # 实例化Ai2d,用于实现模型预处理
        self.ai2d=Ai2d(debug_mode)
        # 设置Ai2d的输入输出格式和类型
        self.ai2d.set_ai2d_dtype(nn.ai2d_format.NCHW_FMT,nn.ai2d_format.NCHW_FMT,np.uint8, np.uint8)

    # 配置预处理操作,这里使用了affine,Ai2d支持crop/shift/pad/resize/affine,具体代码请打开/sdcard/app/libs/AI2D.py查看
    def config_preprocess(self,det,input_image_size=None):
        with ScopedTiming("set preprocess config",self.debug_mode > 0):
            # 初始化ai2d预处理配置,默认为sensor给到AI的尺寸,可以通过设置input_image_size自行修改输入尺寸
            ai2d_input_size=input_image_size if input_image_size else self.rgb888p_size
            # 计算affine矩阵并设置affine预处理
            matrix_dst = self.get_affine_matrix(det)
            self.ai2d.affine(nn.interp_method.cv2_bilinear,0, 0, 127, 1,matrix_dst)
            # 构建预处理流程,参数为预处理输入tensor的shape和预处理输出的tensor的shape
            self.ai2d.build([1,3,ai2d_input_size[1],ai2d_input_size[0]],[1,3,self.model_input_size[1],self.model_input_size[0]])

    # 自定义后处理,results是模型输出的array列表,计算欧拉角
    def postprocess(self,results):
        with ScopedTiming("postprocess",self.debug_mode > 0):
            R,eular = self.get_euler(results[0][0])
            return R,eular

    def get_affine_matrix(self,bbox):
        # 获取仿射矩阵,用于将边界框映射到模型输入空间
        with ScopedTiming("get_affine_matrix", self.debug_mode > 1):
            # 设置缩放因子
            factor = 2.7
            # 从边界框提取坐标和尺寸
            x1, y1, w, h = map(lambda x: int(round(x, 0)), bbox[:4])
            # 模型输入大小
            edge_size = self.model_input_size[1]
            # 平移距离,使得模型输入空间的中心对准原点
            trans_distance = edge_size / 2.0
            # 计算边界框中心点的坐标
            center_x = x1 + w / 2.0
            center_y = y1 + h / 2.0
            # 计算最大边长
            maximum_edge = factor * (h if h > w else w)
            # 计算缩放比例
            scale = edge_size * 2.0 / maximum_edge
            # 计算平移参数
            cx = trans_distance - scale * center_x
            cy = trans_distance - scale * center_y
            # 创建仿射矩阵
            affine_matrix = [scale, 0, cx, 0, scale, cy]
            return affine_matrix

    def rotation_matrix_to_euler_angles(self,R):
        # 将旋转矩阵(3x3 矩阵)转换为欧拉角(pitch、yaw、roll)
        # 计算 sin(yaw)
        sy = np.sqrt(R[0, 0] ** 2 + R[1, 0] ** 2)
        if sy < 1e-6:
            # 若 sin(yaw) 过小,说明 pitch 接近 ±90 度
            pitch = np.arctan2(-R[1, 2], R[1, 1]) * 180 / np.pi
            yaw = np.arctan2(-R[2, 0], sy) * 180 / np.pi
            roll = 0
        else:
            # 计算 pitch、yaw、roll 的角度
            pitch = np.arctan2(R[2, 1], R[2, 2]) * 180 / np.pi
            yaw = np.arctan2(-R[2, 0], sy) * 180 / np.pi
            roll = np.arctan2(R[1, 0], R[0, 0]) * 180 / np.pi
        return [pitch,yaw,roll]

    def get_euler(self,data):
        # 获取旋转矩阵和欧拉角
        R = data[:3, :3].copy()
        eular = self.rotation_matrix_to_euler_angles(R)
        return R,eular

# 人脸姿态任务类
class FacePose:
    def __init__(self,face_det_kmodel,face_pose_kmodel,det_input_size,pose_input_size,anchors,confidence_threshold=0.25,nms_threshold=0.3,rgb888p_size=[1280,720],display_size=[1920,1080],debug_mode=0):
        # 人脸检测模型路径
        self.face_det_kmodel=face_det_kmodel
        # 人脸姿态模型路径
        self.face_pose_kmodel=face_pose_kmodel
        # 人脸检测模型输入分辨率
        self.det_input_size=det_input_size
        # 人脸姿态模型输入分辨率
        self.pose_input_size=pose_input_size
        # anchors
        self.anchors=anchors
        # 置信度阈值
        self.confidence_threshold=confidence_threshold
        # nms阈值
        self.nms_threshold=nms_threshold
        # sensor给到AI的图像分辨率,宽16字节对齐
        self.rgb888p_size=[ALIGN_UP(rgb888p_size[0],16),rgb888p_size[1]]
        # 视频输出VO分辨率,宽16字节对齐
        self.display_size=[ALIGN_UP(display_size[0],16),display_size[1]]
        # debug_mode模式
        self.debug_mode=debug_mode
        self.face_det=FaceDetApp(self.face_det_kmodel,model_input_size=self.det_input_size,anchors=self.anchors,confidence_threshold=self.confidence_threshold,nms_threshold=self.nms_threshold,rgb888p_size=self.rgb888p_size,display_size=self.display_size,debug_mode=0)
        self.face_pose=FacePoseApp(self.face_pose_kmodel,model_input_size=self.pose_input_size,rgb888p_size=self.rgb888p_size,display_size=self.display_size)
        self.face_det.config_preprocess()

    # run函数
    def run(self,input_np):
        # 人脸检测
        det_boxes=self.face_det.run(input_np)
        pose_res=[]
        for det_box in det_boxes:
            # 对检测到的每一个人脸做人脸姿态估计
            self.face_pose.config_preprocess(det_box)
            R,eular=self.face_pose.run(input_np)
            pose_res.append((R,eular))
        return det_boxes,pose_res


    # 绘制人脸姿态角效果
    def draw_result(self,pl,dets,pose_res):
        pl.osd_img.clear()
        if dets:
            draw_img_np = np.zeros((self.display_size[1],self.display_size[0],4),dtype=np.uint8)
            draw_img=image.Image(self.display_size[0], self.display_size[1], image.ARGB8888,alloc=image.ALLOC_REF,data=draw_img_np)
            line_color = np.array([255, 0, 0 ,255],dtype=np.uint8)    #bgra
            for i,det in enumerate(dets):
                # (1)获取人脸姿态矩阵和欧拉角
                projections,center_point = self.build_projection_matrix(det)
                R,euler = pose_res[i]
                # (2)遍历人脸投影矩阵的关键点,进行投影,并将结果画在图像上
                first_points = []
                second_points = []
                for pp in range(8):
                    sum_x, sum_y = 0.0, 0.0
                    for cc in range(3):
                        sum_x += projections[pp][cc] * R[cc][0]
                        sum_y += projections[pp][cc] * (-R[cc][1])
                    center_x,center_y = center_point[0],center_point[1]
                    x = (sum_x + center_x) / self.rgb888p_size[0] * self.display_size[0]
                    y = (sum_y + center_y) / self.rgb888p_size[1] * self.display_size[1]
                    x = max(0, min(x, self.display_size[0]))
                    y = max(0, min(y, self.display_size[1]))
                    if pp < 4:
                        first_points.append((x, y))
                    else:
                        second_points.append((x, y))
                first_points = np.array(first_points,dtype=np.float)
                aidemo.polylines(draw_img_np,first_points,True,line_color,2,8,0)
                second_points = np.array(second_points,dtype=np.float)
                aidemo.polylines(draw_img_np,second_points,True,line_color,2,8,0)
                for ll in range(4):
                    x0, y0 = int(first_points[ll][0]),int(first_points[ll][1])
                    x1, y1 = int(second_points[ll][0]),int(second_points[ll][1])
                    draw_img.draw_line(x0, y0, x1, y1, color = (255, 0, 0 ,255), thickness = 2)
            pl.osd_img.copy_from(draw_img)

    def build_projection_matrix(self,det):
        x1, y1, w, h = map(lambda x: int(round(x, 0)), det[:4])
        # 计算边界框中心坐标
        center_x = x1 + w / 2.0
        center_y = y1 + h / 2.0
        # 定义后部(rear)和前部(front)的尺寸和深度
        rear_width = 0.5 * w
        rear_height = 0.5 * h
        rear_depth = 0
        factor = np.sqrt(2.0)
        front_width = factor * rear_width
        front_height = factor * rear_height
        front_depth = factor * rear_width  # 使用宽度来计算深度,也可以使用高度,取决于需求
        # 定义立方体的顶点坐标
        temp = [
            [-rear_width, -rear_height, rear_depth],
            [-rear_width, rear_height, rear_depth],
            [rear_width, rear_height, rear_depth],
            [rear_width, -rear_height, rear_depth],
            [-front_width, -front_height, front_depth],
            [-front_width, front_height, front_depth],
            [front_width, front_height, front_depth],
            [front_width, -front_height, front_depth]
        ]
        projections = np.array(temp)
        # 返回投影矩阵和中心坐标
        return projections, (center_x, center_y)


if __name__=="__main__":
    # 显示模式,默认"hdmi",可以选择"hdmi"和"lcd"
    display_mode="hdmi"
    if display_mode=="hdmi":
        display_size=[1920,1080]
    else:
        display_size=[800,480]
    # 人脸检测模型路径
    face_det_kmodel_path="/sdcard/app/tests/kmodel/face_detection_320.kmodel"
    # 人脸姿态模型路径
    face_pose_kmodel_path="/sdcard/app/tests/kmodel/face_pose.kmodel"
    # 其它参数
    anchors_path="/sdcard/app/tests/utils/prior_data_320.bin"
    rgb888p_size=[1920,1080]
    face_det_input_size=[320,320]
    face_pose_input_size=[120,120]
    confidence_threshold=0.5
    nms_threshold=0.2
    anchor_len=4200
    det_dim=4
    anchors = np.fromfile(anchors_path, dtype=np.float)
    anchors = anchors.reshape((anchor_len,det_dim))

    # 初始化PipeLine,只关注传给AI的图像分辨率,显示的分辨率
    pl=PipeLine(rgb888p_size=rgb888p_size,display_size=display_size,display_mode=display_mode)
    pl.create()
    fp=FacePose(face_det_kmodel_path,face_pose_kmodel_path,det_input_size=face_det_input_size,pose_input_size=face_pose_input_size,anchors=anchors,confidence_threshold=confidence_threshold,nms_threshold=nms_threshold,rgb888p_size=rgb888p_size,display_size=display_size)
    try:
        while True:
            os.exitpoint()
            with ScopedTiming("total",1):
                img=pl.get_frame()                      # 获取当前帧
                det_boxes,pose_res=fp.run(img)          # 推理当前帧
                fp.draw_result(pl,det_boxes,pose_res)   # 绘制推理效果
                pl.show_image()                         # 展示推理效果
                gc.collect()
    except Exception as e:
        sys.print_exception(e)
    finally:
        fp.face_det.deinit()
        fp.face_pose.deinit()
        pl.destroy()
2.8. 人脸识别#
from libs.PipeLine import PipeLine, ScopedTiming
from libs.AIBase import AIBase
from libs.AI2D import Ai2d
import os
import ujson
from media.media import *
from time import *
import nncase_runtime as nn
import ulab.numpy as np
import time
import image
import aidemo
import random
import gc
import sys
import math

# 自定义人脸检测任务类
class FaceDetApp(AIBase):
    def __init__(self,kmodel_path,model_input_size,anchors,confidence_threshold=0.25,nms_threshold=0.3,rgb888p_size=[1920,1080],display_size=[1920,1080],debug_mode=0):
        super().__init__(kmodel_path,model_input_size,rgb888p_size,debug_mode)
        # kmodel路径
        self.kmodel_path=kmodel_path
        # 检测模型输入分辨率
        self.model_input_size=model_input_size
        # 置信度阈值
        self.confidence_threshold=confidence_threshold
        # nms阈值
        self.nms_threshold=nms_threshold
        self.anchors=anchors
        # sensor给到AI的图像分辨率,宽16字节对齐
        self.rgb888p_size=[ALIGN_UP(rgb888p_size[0],16),rgb888p_size[1]]
        # 视频输出VO分辨率,宽16字节对齐
        self.display_size=[ALIGN_UP(display_size[0],16),display_size[1]]
        # debug模式
        self.debug_mode=debug_mode
        # 实例化Ai2d,用于实现模型预处理
        self.ai2d=Ai2d(debug_mode)
        # 设置Ai2d的输入输出格式和类型
        self.ai2d.set_ai2d_dtype(nn.ai2d_format.NCHW_FMT,nn.ai2d_format.NCHW_FMT,np.uint8, np.uint8)

    # 配置预处理操作,这里使用了pad和resize,Ai2d支持crop/shift/pad/resize/affine,具体代码请打开/sdcard/app/libs/AI2D.py查看
    def config_preprocess(self,input_image_size=None):
        with ScopedTiming("set preprocess config",self.debug_mode > 0):
            # 初始化ai2d预处理配置,默认为sensor给到AI的尺寸,可以通过设置input_image_size自行修改输入尺寸
            ai2d_input_size=input_image_size if input_image_size else self.rgb888p_size
            # 计算padding参数,并设置padding预处理
            self.ai2d.pad(self.get_pad_param(), 0, [104,117,123])
            # 设置resize预处理
            self.ai2d.resize(nn.interp_method.tf_bilinear, nn.interp_mode.half_pixel)
            # 构建预处理流程,参数为预处理输入tensor的shape和预处理输出的tensor的shape
            self.ai2d.build([1,3,ai2d_input_size[1],ai2d_input_size[0]],[1,3,self.model_input_size[1],self.model_input_size[0]])

    # 自定义后处理,results是模型输出的array列表,这里使用了aidemo库的face_det_post_process接口
    def postprocess(self,results):
        with ScopedTiming("postprocess",self.debug_mode > 0):
            res = aidemo.face_det_post_process(self.confidence_threshold,self.nms_threshold,self.model_input_size[0],self.anchors,self.rgb888p_size,results)
            if len(res)==0:
                return res,res
            else:
                return res[0],res[1]

    def get_pad_param(self):
        dst_w = self.model_input_size[0]
        dst_h = self.model_input_size[1]
        # 计算最小的缩放比例,等比例缩放
        ratio_w = dst_w / self.rgb888p_size[0]
        ratio_h = dst_h / self.rgb888p_size[1]
        if ratio_w < ratio_h:
            ratio = ratio_w
        else:
            ratio = ratio_h
        new_w = (int)(ratio * self.rgb888p_size[0])
        new_h = (int)(ratio * self.rgb888p_size[1])
        dw = (dst_w - new_w) / 2
        dh = (dst_h - new_h) / 2
        top = (int)(round(0))
        bottom = (int)(round(dh * 2 + 0.1))
        left = (int)(round(0))
        right = (int)(round(dw * 2 - 0.1))
        return [0,0,0,0,top, bottom, left, right]

# 自定义人脸注册任务类
class FaceRegistrationApp(AIBase):
    def __init__(self,kmodel_path,model_input_size,rgb888p_size=[1920,1080],display_size=[1920,1080],debug_mode=0):
        super().__init__(kmodel_path,model_input_size,rgb888p_size,debug_mode)
        # kmodel路径
        self.kmodel_path=kmodel_path
        # 检测模型输入分辨率
        self.model_input_size=model_input_size
        # sensor给到AI的图像分辨率,宽16字节对齐
        self.rgb888p_size=[ALIGN_UP(rgb888p_size[0],16),rgb888p_size[1]]
        # 视频输出VO分辨率,宽16字节对齐
        self.display_size=[ALIGN_UP(display_size[0],16),display_size[1]]
        # debug模式
        self.debug_mode=debug_mode
        # 标准5官
        self.umeyama_args_112 = [
            38.2946 , 51.6963 ,
            73.5318 , 51.5014 ,
            56.0252 , 71.7366 ,
            41.5493 , 92.3655 ,
            70.7299 , 92.2041
        ]
        self.ai2d=Ai2d(debug_mode)
        self.ai2d.set_ai2d_dtype(nn.ai2d_format.NCHW_FMT,nn.ai2d_format.NCHW_FMT,np.uint8, np.uint8)

    # 配置预处理操作,这里使用了affine,Ai2d支持crop/shift/pad/resize/affine,具体代码请打开/sdcard/app/libs/AI2D.py查看
    def config_preprocess(self,landm,input_image_size=None):
        with ScopedTiming("set preprocess config",self.debug_mode > 0):
            ai2d_input_size=input_image_size if input_image_size else self.rgb888p_size
            # 计算affine矩阵,并设置仿射变换预处理
            affine_matrix = self.get_affine_matrix(landm)
            self.ai2d.affine(nn.interp_method.cv2_bilinear,0, 0, 127, 1,affine_matrix)
            # 构建预处理流程,参数为预处理输入tensor的shape和预处理输出的tensor的shape
            self.ai2d.build([1,3,ai2d_input_size[1],ai2d_input_size[0]],[1,3,self.model_input_size[1],self.model_input_size[0]])

    # 自定义后处理
    def postprocess(self,results):
        with ScopedTiming("postprocess",self.debug_mode > 0):
            return results[0][0]

    def svd22(self,a):
        # svd
        s = [0.0, 0.0]
        u = [0.0, 0.0, 0.0, 0.0]
        v = [0.0, 0.0, 0.0, 0.0]
        s[0] = (math.sqrt((a[0] - a[3]) ** 2 + (a[1] + a[2]) ** 2) + math.sqrt((a[0] + a[3]) ** 2 + (a[1] - a[2]) ** 2)) / 2
        s[1] = abs(s[0] - math.sqrt((a[0] - a[3]) ** 2 + (a[1] + a[2]) ** 2))
        v[2] = math.sin((math.atan2(2 * (a[0] * a[1] + a[2] * a[3]), a[0] ** 2 - a[1] ** 2 + a[2] ** 2 - a[3] ** 2)) / 2) if \
        s[0] > s[1] else 0
        v[0] = math.sqrt(1 - v[2] ** 2)
        v[1] = -v[2]
        v[3] = v[0]
        u[0] = -(a[0] * v[0] + a[1] * v[2]) / s[0] if s[0] != 0 else 1
        u[2] = -(a[2] * v[0] + a[3] * v[2]) / s[0] if s[0] != 0 else 0
        u[1] = (a[0] * v[1] + a[1] * v[3]) / s[1] if s[1] != 0 else -u[2]
        u[3] = (a[2] * v[1] + a[3] * v[3]) / s[1] if s[1] != 0 else u[0]
        v[0] = -v[0]
        v[2] = -v[2]
        return u, s, v

    def image_umeyama_112(self,src):
        # 使用Umeyama算法计算仿射变换矩阵
        SRC_NUM = 5
        SRC_DIM = 2
        src_mean = [0.0, 0.0]
        dst_mean = [0.0, 0.0]
        for i in range(0,SRC_NUM * 2,2):
            src_mean[0] += src[i]
            src_mean[1] += src[i + 1]
            dst_mean[0] += self.umeyama_args_112[i]
            dst_mean[1] += self.umeyama_args_112[i + 1]
        src_mean[0] /= SRC_NUM
        src_mean[1] /= SRC_NUM
        dst_mean[0] /= SRC_NUM
        dst_mean[1] /= SRC_NUM
        src_demean = [[0.0, 0.0] for _ in range(SRC_NUM)]
        dst_demean = [[0.0, 0.0] for _ in range(SRC_NUM)]
        for i in range(SRC_NUM):
            src_demean[i][0] = src[2 * i] - src_mean[0]
            src_demean[i][1] = src[2 * i + 1] - src_mean[1]
            dst_demean[i][0] = self.umeyama_args_112[2 * i] - dst_mean[0]
            dst_demean[i][1] = self.umeyama_args_112[2 * i + 1] - dst_mean[1]
        A = [[0.0, 0.0], [0.0, 0.0]]
        for i in range(SRC_DIM):
            for k in range(SRC_DIM):
                for j in range(SRC_NUM):
                    A[i][k] += dst_demean[j][i] * src_demean[j][k]
                A[i][k] /= SRC_NUM
        T = [[1, 0, 0], [0, 1, 0], [0, 0, 1]]
        U, S, V = self.svd22([A[0][0], A[0][1], A[1][0], A[1][1]])
        T[0][0] = U[0] * V[0] + U[1] * V[2]
        T[0][1] = U[0] * V[1] + U[1] * V[3]
        T[1][0] = U[2] * V[0] + U[3] * V[2]
        T[1][1] = U[2] * V[1] + U[3] * V[3]
        scale = 1.0
        src_demean_mean = [0.0, 0.0]
        src_demean_var = [0.0, 0.0]
        for i in range(SRC_NUM):
            src_demean_mean[0] += src_demean[i][0]
            src_demean_mean[1] += src_demean[i][1]
        src_demean_mean[0] /= SRC_NUM
        src_demean_mean[1] /= SRC_NUM
        for i in range(SRC_NUM):
            src_demean_var[0] += (src_demean_mean[0] - src_demean[i][0]) * (src_demean_mean[0] - src_demean[i][0])
            src_demean_var[1] += (src_demean_mean[1] - src_demean[i][1]) * (src_demean_mean[1] - src_demean[i][1])
        src_demean_var[0] /= SRC_NUM
        src_demean_var[1] /= SRC_NUM
        scale = 1.0 / (src_demean_var[0] + src_demean_var[1]) * (S[0] + S[1])
        T[0][2] = dst_mean[0] - scale * (T[0][0] * src_mean[0] + T[0][1] * src_mean[1])
        T[1][2] = dst_mean[1] - scale * (T[1][0] * src_mean[0] + T[1][1] * src_mean[1])
        T[0][0] *= scale
        T[0][1] *= scale
        T[1][0] *= scale
        T[1][1] *= scale
        return T

    def get_affine_matrix(self,sparse_points):
        # 获取affine变换矩阵
        with ScopedTiming("get_affine_matrix", self.debug_mode > 1):
            # 使用Umeyama算法计算仿射变换矩阵
            matrix_dst = self.image_umeyama_112(sparse_points)
            matrix_dst = [matrix_dst[0][0],matrix_dst[0][1],matrix_dst[0][2],
                          matrix_dst[1][0],matrix_dst[1][1],matrix_dst[1][2]]
            return matrix_dst

# 人脸识别任务类
class FaceRecognition:
    def __init__(self,face_det_kmodel,face_reg_kmodel,det_input_size,reg_input_size,database_dir,anchors,confidence_threshold=0.25,nms_threshold=0.3,face_recognition_threshold=0.75,rgb888p_size=[1280,720],display_size=[1920,1080],debug_mode=0):
        # 人脸检测模型路径
        self.face_det_kmodel=face_det_kmodel
        # 人脸识别模型路径
        self.face_reg_kmodel=face_reg_kmodel
        # 人脸检测模型输入分辨率
        self.det_input_size=det_input_size
        # 人脸识别模型输入分辨率
        self.reg_input_size=reg_input_size
        self.database_dir=database_dir
        # anchors
        self.anchors=anchors
        # 置信度阈值
        self.confidence_threshold=confidence_threshold
        # nms阈值
        self.nms_threshold=nms_threshold
        self.face_recognition_threshold=face_recognition_threshold
        # sensor给到AI的图像分辨率,宽16字节对齐
        self.rgb888p_size=[ALIGN_UP(rgb888p_size[0],16),rgb888p_size[1]]
        # 视频输出VO分辨率,宽16字节对齐
        self.display_size=[ALIGN_UP(display_size[0],16),display_size[1]]
        # debug_mode模式
        self.debug_mode=debug_mode
        self.max_register_face = 100                  # 数据库最多人脸个数
        self.feature_num = 128                        # 人脸识别特征维度
        self.valid_register_face = 0                  # 已注册人脸数
        self.db_name= []
        self.db_data= []
        self.face_det=FaceDetApp(self.face_det_kmodel,model_input_size=self.det_input_size,anchors=self.anchors,confidence_threshold=self.confidence_threshold,nms_threshold=self.nms_threshold,rgb888p_size=self.rgb888p_size,display_size=self.display_size,debug_mode=0)
        self.face_reg=FaceRegistrationApp(self.face_reg_kmodel,model_input_size=self.reg_input_size,rgb888p_size=self.rgb888p_size,display_size=self.display_size)
        self.face_det.config_preprocess()
        # 人脸数据库初始化
        self.database_init()

    # run函数
    def run(self,input_np):
        # 执行人脸检测
        det_boxes,landms=self.face_det.run(input_np)
        recg_res = []
        for landm in landms:
            # 针对每个人脸五官点,推理得到人脸特征,并计算特征在数据库中相似度
            self.face_reg.config_preprocess(landm)
            feature=self.face_reg.run(input_np)
            res = self.database_search(feature)
            recg_res.append(res)
        return det_boxes,recg_res

    def database_init(self):
        # 数据初始化,构建数据库人名列表和数据库特征列表
        with ScopedTiming("database_init", self.debug_mode > 1):
            db_file_list = os.listdir(self.database_dir)
            for db_file in db_file_list:
                if not db_file.endswith('.bin'):
                    continue
                if self.valid_register_face >= self.max_register_face:
                    break
                valid_index = self.valid_register_face
                full_db_file = self.database_dir + db_file
                with open(full_db_file, 'rb') as f:
                    data = f.read()
                feature = np.frombuffer(data, dtype=np.float)
                self.db_data.append(feature)
                name = db_file.split('.')[0]
                self.db_name.append(name)
                self.valid_register_face += 1

    def database_reset(self):
        # 数据库清空
        with ScopedTiming("database_reset", self.debug_mode > 1):
            print("database clearing...")
            self.db_name = []
            self.db_data = []
            self.valid_register_face = 0
            print("database clear Done!")

    def database_search(self,feature):
        # 数据库查询
        with ScopedTiming("database_search", self.debug_mode > 1):
            v_id = -1
            v_score_max = 0.0
            # 将当前人脸特征归一化
            feature /= np.linalg.norm(feature)
            # 遍历当前人脸数据库,统计最高得分
            for i in range(self.valid_register_face):
                db_feature = self.db_data[i]
                db_feature /= np.linalg.norm(db_feature)
                # 计算数据库特征与当前人脸特征相似度
                v_score = np.dot(feature, db_feature)/2 + 0.5
                if v_score > v_score_max:
                    v_score_max = v_score
                    v_id = i
            if v_id == -1:
                # 数据库中无人脸
                return 'unknown'
            elif v_score_max < self.face_recognition_threshold:
                # 小于人脸识别阈值,未识别
                return 'unknown'
            else:
                # 识别成功
                result = 'name: {}, score:{}'.format(self.db_name[v_id],v_score_max)
                return result

    # 绘制识别结果
    def draw_result(self,pl,dets,recg_results):
        pl.osd_img.clear()
        if dets:
            for i,det in enumerate(dets):
                # (1)画人脸框
                x1, y1, w, h = map(lambda x: int(round(x, 0)), det[:4])
                x1 = x1 * self.display_size[0]//self.rgb888p_size[0]
                y1 = y1 * self.display_size[1]//self.rgb888p_size[1]
                w =  w * self.display_size[0]//self.rgb888p_size[0]
                h = h * self.display_size[1]//self.rgb888p_size[1]
                pl.osd_img.draw_rectangle(x1,y1, w, h, color=(255,0, 0, 255), thickness = 4)
                # (2)写人脸识别结果
                recg_text = recg_results[i]
                pl.osd_img.draw_string_advanced(x1,y1,32,recg_text,color=(255, 255, 0, 0))


if __name__=="__main__":
    # 注意:执行人脸识别任务之前,需要先执行人脸注册任务进行人脸身份注册生成feature数据库
    # 显示模式,默认"hdmi",可以选择"hdmi"和"lcd"
    display_mode="hdmi"
    if display_mode=="hdmi":
        display_size=[1920,1080]
    else:
        display_size=[800,480]
    # 人脸检测模型路径
    face_det_kmodel_path="/sdcard/app/tests/kmodel/face_detection_320.kmodel"
    # 人脸识别模型路径
    face_reg_kmodel_path="/sdcard/app/tests/kmodel/face_recognition.kmodel"
    # 其它参数
    anchors_path="/sdcard/app/tests/utils/prior_data_320.bin"
    database_dir ="/sdcard/app/tests/utils/db/"
    rgb888p_size=[1920,1080]
    face_det_input_size=[320,320]
    face_reg_input_size=[112,112]
    confidence_threshold=0.5
    nms_threshold=0.2
    anchor_len=4200
    det_dim=4
    anchors = np.fromfile(anchors_path, dtype=np.float)
    anchors = anchors.reshape((anchor_len,det_dim))
    face_recognition_threshold = 0.75        # 人脸识别阈值

    # 初始化PipeLine,只关注传给AI的图像分辨率,显示的分辨率
    pl=PipeLine(rgb888p_size=rgb888p_size,display_size=display_size,display_mode=display_mode)
    pl.create()
    fr=FaceRecognition(face_det_kmodel_path,face_reg_kmodel_path,det_input_size=face_det_input_size,reg_input_size=face_reg_input_size,database_dir=database_dir,anchors=anchors,confidence_threshold=confidence_threshold,nms_threshold=nms_threshold,face_recognition_threshold=face_recognition_threshold,rgb888p_size=rgb888p_size,display_size=display_size)
    try:
        while True:
            os.exitpoint()
            with ScopedTiming("total", 1):
                img=pl.get_frame()                      # 获取当前帧
                det_boxes,recg_res=fr.run(img)          # 推理当前帧
                fr.draw_result(pl,det_boxes,recg_res)   # 绘制推理结果
                pl.show_image()                         # 展示推理效果
                gc.collect()
    except Exception as e:
        sys.print_exception(e)
    finally:
        fr.face_det.deinit()
        fr.face_reg.deinit()
        pl.destroy()
2.9. 人脸注册#
from libs.PipeLine import PipeLine, ScopedTiming
from libs.AIBase import AIBase
from libs.AI2D import Ai2d
import os
import ujson
from media.media import *
from time import *
import nncase_runtime as nn
import ulab.numpy as np
import time
import image
import aidemo
import random
import gc
import sys
import math

# 自定义人脸检测任务类
class FaceDetApp(AIBase):
    def __init__(self,kmodel_path,model_input_size,anchors,confidence_threshold=0.25,nms_threshold=0.3,rgb888p_size=[1280,720],display_size=[1920,1080],debug_mode=0):
        super().__init__(kmodel_path,model_input_size,rgb888p_size,debug_mode)
        # kmodel路径
        self.kmodel_path=kmodel_path
        # 检测模型输入分辨率
        self.model_input_size=model_input_size
        # 置信度阈值
        self.confidence_threshold=confidence_threshold
        # nms阈值
        self.nms_threshold=nms_threshold
        self.anchors=anchors
        # sensor给到AI的图像分辨率,宽16字节对齐
        self.rgb888p_size=[ALIGN_UP(rgb888p_size[0],16),rgb888p_size[1]]
        # 视频输出VO分辨率,宽16字节对齐
        self.display_size=[ALIGN_UP(display_size[0],16),display_size[1]]
        # debug模式
        self.debug_mode=debug_mode
        # 实例化Ai2d,用于实现模型预处理
        self.ai2d=Ai2d(debug_mode)
        # 设置Ai2d的输入输出格式和类型
        self.ai2d.set_ai2d_dtype(nn.ai2d_format.NCHW_FMT,nn.ai2d_format.NCHW_FMT,np.uint8, np.uint8)
        self.image_size=[]

    # 配置预处理操作,这里使用了pad和resize,Ai2d支持crop/shift/pad/resize/affine,具体代码请打开/sdcard/app/libs/AI2D.py查看
    def config_preprocess(self,input_image_size=None):
        with ScopedTiming("set preprocess config",self.debug_mode > 0):
            # 初始化ai2d预处理配置,默认为sensor给到AI的尺寸,可以通过设置input_image_size自行修改输入尺寸
            ai2d_input_size=input_image_size if input_image_size else self.rgb888p_size
            self.image_size=[input_image_size[1],input_image_size[0]]
            # 计算padding参数,并设置padding预处理
            self.ai2d.pad(self.get_pad_param(ai2d_input_size), 0, [104,117,123])
            # 设置resize预处理
            self.ai2d.resize(nn.interp_method.tf_bilinear, nn.interp_mode.half_pixel)
            # 构建预处理流程,参数为预处理输入tensor的shape和预处理输出的tensor的shape
            self.ai2d.build([1,3,ai2d_input_size[1],ai2d_input_size[0]],[1,3,self.model_input_size[1],self.model_input_size[0]])

    # 自定义后处理,results是模型输出的array列表,这里使用了aidemo库的face_det_post_process接口
    def postprocess(self,results):
        with ScopedTiming("postprocess",self.debug_mode > 0):
            res = aidemo.face_det_post_process(self.confidence_threshold,self.nms_threshold,self.model_input_size[0],self.anchors,self.image_size,results)
            if len(res)==0:
                return res
            else:
                return res[0],res[1]

    def get_pad_param(self,image_input_size):
        dst_w = self.model_input_size[0]
        dst_h = self.model_input_size[1]
        # 计算最小的缩放比例,等比例缩放
        ratio_w = dst_w / image_input_size[0]
        ratio_h = dst_h / image_input_size[1]
        if ratio_w < ratio_h:
            ratio = ratio_w
        else:
            ratio = ratio_h
        new_w = (int)(ratio * image_input_size[0])
        new_h = (int)(ratio * image_input_size[1])
        dw = (dst_w - new_w) / 2
        dh = (dst_h - new_h) / 2
        top = (int)(round(0))
        bottom = (int)(round(dh * 2 + 0.1))
        left = (int)(round(0))
        right = (int)(round(dw * 2 - 0.1))
        return [0,0,0,0,top, bottom, left, right]

# 自定义人脸注册任务类
class FaceRegistrationApp(AIBase):
    def __init__(self,kmodel_path,model_input_size,rgb888p_size=[1920,1080],display_size=[1920,1080],debug_mode=0):
        super().__init__(kmodel_path,model_input_size,rgb888p_size,debug_mode)
        # kmodel路径
        self.kmodel_path=kmodel_path
        # 人脸注册模型输入分辨率
        self.model_input_size=model_input_size
        # sensor给到AI的图像分辨率,宽16字节对齐
        self.rgb888p_size=[ALIGN_UP(rgb888p_size[0],16),rgb888p_size[1]]
        # 视频输出VO分辨率,宽16字节对齐
        self.display_size=[ALIGN_UP(display_size[0],16),display_size[1]]
        # debug模式
        self.debug_mode=debug_mode
        # 标准5官
        self.umeyama_args_112 = [
            38.2946 , 51.6963 ,
            73.5318 , 51.5014 ,
            56.0252 , 71.7366 ,
            41.5493 , 92.3655 ,
            70.7299 , 92.2041
        ]
        self.ai2d=Ai2d(debug_mode)
        self.ai2d.set_ai2d_dtype(nn.ai2d_format.NCHW_FMT,nn.ai2d_format.NCHW_FMT,np.uint8, np.uint8)

    # 配置预处理操作,这里使用了affine,Ai2d支持crop/shift/pad/resize/affine,具体代码请打开/sdcard/app/libs/AI2D.py查看
    def config_preprocess(self,landm,input_image_size=None):
        with ScopedTiming("set preprocess config",self.debug_mode > 0):
            ai2d_input_size=input_image_size if input_image_size else self.rgb888p_size
            # 计算affine矩阵,并设置仿射变换预处理
            affine_matrix = self.get_affine_matrix(landm)
            self.ai2d.affine(nn.interp_method.cv2_bilinear,0, 0, 127, 1,affine_matrix)
            # 构建预处理流程,参数为预处理输入tensor的shape和预处理输出的tensor的shape
            self.ai2d.build([1,3,ai2d_input_size[1],ai2d_input_size[0]],[1,3,self.model_input_size[1],self.model_input_size[0]])

    # 自定义后处理
    def postprocess(self,results):
        with ScopedTiming("postprocess",self.debug_mode > 0):
            return results[0][0]

    def svd22(self,a):
        # svd
        s = [0.0, 0.0]
        u = [0.0, 0.0, 0.0, 0.0]
        v = [0.0, 0.0, 0.0, 0.0]
        s[0] = (math.sqrt((a[0] - a[3]) ** 2 + (a[1] + a[2]) ** 2) + math.sqrt((a[0] + a[3]) ** 2 + (a[1] - a[2]) ** 2)) / 2
        s[1] = abs(s[0] - math.sqrt((a[0] - a[3]) ** 2 + (a[1] + a[2]) ** 2))
        v[2] = math.sin((math.atan2(2 * (a[0] * a[1] + a[2] * a[3]), a[0] ** 2 - a[1] ** 2 + a[2] ** 2 - a[3] ** 2)) / 2) if \
        s[0] > s[1] else 0
        v[0] = math.sqrt(1 - v[2] ** 2)
        v[1] = -v[2]
        v[3] = v[0]
        u[0] = -(a[0] * v[0] + a[1] * v[2]) / s[0] if s[0] != 0 else 1
        u[2] = -(a[2] * v[0] + a[3] * v[2]) / s[0] if s[0] != 0 else 0
        u[1] = (a[0] * v[1] + a[1] * v[3]) / s[1] if s[1] != 0 else -u[2]
        u[3] = (a[2] * v[1] + a[3] * v[3]) / s[1] if s[1] != 0 else u[0]
        v[0] = -v[0]
        v[2] = -v[2]
        return u, s, v

    def image_umeyama_112(self,src):
        # 使用Umeyama算法计算仿射变换矩阵
        SRC_NUM = 5
        SRC_DIM = 2
        src_mean = [0.0, 0.0]
        dst_mean = [0.0, 0.0]
        for i in range(0,SRC_NUM * 2,2):
            src_mean[0] += src[i]
            src_mean[1] += src[i + 1]
            dst_mean[0] += self.umeyama_args_112[i]
            dst_mean[1] += self.umeyama_args_112[i + 1]
        src_mean[0] /= SRC_NUM
        src_mean[1] /= SRC_NUM
        dst_mean[0] /= SRC_NUM
        dst_mean[1] /= SRC_NUM
        src_demean = [[0.0, 0.0] for _ in range(SRC_NUM)]
        dst_demean = [[0.0, 0.0] for _ in range(SRC_NUM)]
        for i in range(SRC_NUM):
            src_demean[i][0] = src[2 * i] - src_mean[0]
            src_demean[i][1] = src[2 * i + 1] - src_mean[1]
            dst_demean[i][0] = self.umeyama_args_112[2 * i] - dst_mean[0]
            dst_demean[i][1] = self.umeyama_args_112[2 * i + 1] - dst_mean[1]
        A = [[0.0, 0.0], [0.0, 0.0]]
        for i in range(SRC_DIM):
            for k in range(SRC_DIM):
                for j in range(SRC_NUM):
                    A[i][k] += dst_demean[j][i] * src_demean[j][k]
                A[i][k] /= SRC_NUM
        T = [[1, 0, 0], [0, 1, 0], [0, 0, 1]]
        U, S, V = self.svd22([A[0][0], A[0][1], A[1][0], A[1][1]])
        T[0][0] = U[0] * V[0] + U[1] * V[2]
        T[0][1] = U[0] * V[1] + U[1] * V[3]
        T[1][0] = U[2] * V[0] + U[3] * V[2]
        T[1][1] = U[2] * V[1] + U[3] * V[3]
        scale = 1.0
        src_demean_mean = [0.0, 0.0]
        src_demean_var = [0.0, 0.0]
        for i in range(SRC_NUM):
            src_demean_mean[0] += src_demean[i][0]
            src_demean_mean[1] += src_demean[i][1]
        src_demean_mean[0] /= SRC_NUM
        src_demean_mean[1] /= SRC_NUM
        for i in range(SRC_NUM):
            src_demean_var[0] += (src_demean_mean[0] - src_demean[i][0]) * (src_demean_mean[0] - src_demean[i][0])
            src_demean_var[1] += (src_demean_mean[1] - src_demean[i][1]) * (src_demean_mean[1] - src_demean[i][1])
        src_demean_var[0] /= SRC_NUM
        src_demean_var[1] /= SRC_NUM
        scale = 1.0 / (src_demean_var[0] + src_demean_var[1]) * (S[0] + S[1])
        T[0][2] = dst_mean[0] - scale * (T[0][0] * src_mean[0] + T[0][1] * src_mean[1])
        T[1][2] = dst_mean[1] - scale * (T[1][0] * src_mean[0] + T[1][1] * src_mean[1])
        T[0][0] *= scale
        T[0][1] *= scale
        T[1][0] *= scale
        T[1][1] *= scale
        return T

    def get_affine_matrix(self,sparse_points):
        # 获取affine变换矩阵
        with ScopedTiming("get_affine_matrix", self.debug_mode > 1):
            # 使用Umeyama算法计算仿射变换矩阵
            matrix_dst = self.image_umeyama_112(sparse_points)
            matrix_dst = [matrix_dst[0][0],matrix_dst[0][1],matrix_dst[0][2],
                          matrix_dst[1][0],matrix_dst[1][1],matrix_dst[1][2]]
            return matrix_dst

# 人脸注册任务类
class FaceRegistration:
    def __init__(self,face_det_kmodel,face_reg_kmodel,det_input_size,reg_input_size,database_dir,anchors,confidence_threshold=0.25,nms_threshold=0.3,rgb888p_size=[1280,720],display_size=[1920,1080],debug_mode=0):
        # 人脸检测模型路径
        self.face_det_kmodel=face_det_kmodel
        # 人脸注册模型路径
        self.face_reg_kmodel=face_reg_kmodel
        # 人脸检测模型输入分辨率
        self.det_input_size=det_input_size
        # 人脸注册模型输入分辨率
        self.reg_input_size=reg_input_size
        self.database_dir=database_dir
        # anchors
        self.anchors=anchors
        # 置信度阈值
        self.confidence_threshold=confidence_threshold
        # nms阈值
        self.nms_threshold=nms_threshold
        # sensor给到AI的图像分辨率,宽16字节对齐
        self.rgb888p_size=[ALIGN_UP(rgb888p_size[0],16),rgb888p_size[1]]
        # 视频输出VO分辨率,宽16字节对齐
        self.display_size=[ALIGN_UP(display_size[0],16),display_size[1]]
        # debug_mode模式
        self.debug_mode=debug_mode
        self.face_det=FaceDetApp(self.face_det_kmodel,model_input_size=self.det_input_size,anchors=self.anchors,confidence_threshold=self.confidence_threshold,nms_threshold=self.nms_threshold,debug_mode=0)
        self.face_reg=FaceRegistrationApp(self.face_reg_kmodel,model_input_size=self.reg_input_size,rgb888p_size=self.rgb888p_size)

    # run函数
    def run(self,input_np,img_file):
        self.face_det.config_preprocess(input_image_size=[input_np.shape[3],input_np.shape[2]])
        det_boxes,landms=self.face_det.run(input_np)
        if det_boxes:
            if det_boxes.shape[0] == 1:
                # 若是只检测到一张人脸,则将该人脸注册到数据库
                db_i_name = img_file.split('.')[0]
                for landm in landms:
                    self.face_reg.config_preprocess(landm,input_image_size=[input_np.shape[3],input_np.shape[2]])
                    reg_result = self.face_reg.run(input_np)
                    with open(self.database_dir+'{}.bin'.format(db_i_name), "wb") as file:
                        file.write(reg_result.tobytes())
                        print('Success!')
            else:
                print('Only one person in a picture when you sign up')
        else:
            print('No person detected')

    def image2rgb888array(self,img):   #4维
        # 将Image转换为rgb888格式
        with ScopedTiming("fr_kpu_deinit",self.debug_mode > 0):
            img_data_rgb888=img.to_rgb888()
            # hwc,rgb888
            img_hwc=img_data_rgb888.to_numpy_ref()
            shape=img_hwc.shape
            img_tmp = img_hwc.reshape((shape[0] * shape[1], shape[2]))
            img_tmp_trans = img_tmp.transpose()
            img_res=img_tmp_trans.copy()
            # chw,rgb888
            img_return=img_res.reshape((1,shape[2],shape[0],shape[1]))
        return  img_return


if __name__=="__main__":
    # 人脸检测模型路径
    face_det_kmodel_path="/sdcard/app/tests/kmodel/face_detection_320.kmodel"
    # 人脸注册模型路径
    face_reg_kmodel_path="/sdcard/app/tests/kmodel/face_recognition.kmodel"
    # 其它参数
    anchors_path="/sdcard/app/tests/utils/prior_data_320.bin"
    database_dir="/sdcard/app/tests/utils/db/"
    database_img_dir="/sdcard/app/tests/utils/db_img/"
    face_det_input_size=[320,320]
    face_reg_input_size=[112,112]
    confidence_threshold=0.5
    nms_threshold=0.2
    anchor_len=4200
    det_dim=4
    anchors = np.fromfile(anchors_path, dtype=np.float)
    anchors = anchors.reshape((anchor_len,det_dim))
    max_register_face = 100              #数据库最多人脸个数
    feature_num = 128                    #人脸识别特征维度

    fr=FaceRegistration(face_det_kmodel_path,face_reg_kmodel_path,det_input_size=face_det_input_size,reg_input_size=face_reg_input_size,database_dir=database_dir,anchors=anchors,confidence_threshold=confidence_threshold,nms_threshold=nms_threshold)
    try:
        # 获取图像列表
        img_list = os.listdir(database_img_dir)
        for img_file in img_list:
            #本地读取一张图像
            full_img_file = database_img_dir + img_file
            print(full_img_file)
            img = image.Image(full_img_file)
            img.compress_for_ide()
            # 转rgb888的chw格式
            rgb888p_img_ndarry = fr.image2rgb888array(img)
            # 人脸注册
            fr.run(rgb888p_img_ndarry,img_file)
            gc.collect()
    except Exception as e:
        sys.print_exception(e)
    finally:
        fr.face_det.deinit()
        fr.face_reg.deinit()
2.10. 跌倒检测#
from libs.PipeLine import PipeLine, ScopedTiming
from libs.AIBase import AIBase
from libs.AI2D import Ai2d
import os
import ujson
from media.media import *
from time import *
import nncase_runtime as nn
import ulab.numpy as np
import time
import utime
import image
import random
import gc
import sys
import aicube

# 自定义跌倒检测类,继承自AIBase基类
class FallDetectionApp(AIBase):
    def __init__(self, kmodel_path, model_input_size, labels, anchors, confidence_threshold=0.2, nms_threshold=0.5, nms_option=False, strides=[8,16,32], rgb888p_size=[224,224], display_size=[1920,1080], debug_mode=0):
        super().__init__(kmodel_path, model_input_size, rgb888p_size, debug_mode)  # 调用基类的构造函数
        self.kmodel_path = kmodel_path                      # 模型文件路径
        self.model_input_size = model_input_size            # 模型输入分辨率
        self.labels = labels                                # 分类标签
        self.anchors = anchors                              # 锚点数据,用于跌倒检测
        self.strides = strides                              # 步长设置
        self.confidence_threshold = confidence_threshold    # 置信度阈值
        self.nms_threshold = nms_threshold                  # NMS(非极大值抑制)阈值
        self.nms_option = nms_option                        # NMS选项
        self.rgb888p_size = [ALIGN_UP(rgb888p_size[0], 16), rgb888p_size[1]]  # sensor给到AI的图像分辨率,并对宽度进行16的对齐
        self.display_size = [ALIGN_UP(display_size[0], 16), display_size[1]]  # 显示分辨率,并对宽度进行16的对齐
        self.debug_mode = debug_mode                                          # 是否开启调试模式
        self.color = [(255,0, 0, 255), (255,0, 255, 0), (255,255,0, 0), (255,255,0, 255)]  # 用于绘制不同类别的颜色
        # Ai2d实例,用于实现模型预处理
        self.ai2d = Ai2d(debug_mode)
        # 设置Ai2d的输入输出格式和类型
        self.ai2d.set_ai2d_dtype(nn.ai2d_format.NCHW_FMT, nn.ai2d_format.NCHW_FMT, np.uint8, np.uint8)

    # 配置预处理操作,这里使用了pad和resize,Ai2d支持crop/shift/pad/resize/affine,具体代码请打开/sdcard/app/libs/AI2D.py查看
    def config_preprocess(self, input_image_size=None):
        with ScopedTiming("set preprocess config", self.debug_mode > 0):                    # 计时器,如果debug_mode大于0则开启
            ai2d_input_size = input_image_size if input_image_size else self.rgb888p_size   # 初始化ai2d预处理配置,默认为sensor给到AI的尺寸,可以通过设置input_image_size自行修改输入尺寸
            top, bottom, left, right = self.get_padding_param()                             # 获取padding参数
            self.ai2d.pad([0, 0, 0, 0, top, bottom, left, right], 0, [0,0,0])               # 填充边缘
            self.ai2d.resize(nn.interp_method.tf_bilinear, nn.interp_mode.half_pixel)       # 缩放图像
            self.ai2d.build([1,3,ai2d_input_size[1],ai2d_input_size[0]],[1,3,self.model_input_size[1],self.model_input_size[0]])  # 构建预处理流程

    # 自定义当前任务的后处理,results是模型输出array的列表,这里使用了aicube库的anchorbasedet_post_process接口
    def postprocess(self, results):
        with ScopedTiming("postprocess", self.debug_mode > 0):
            dets = aicube.anchorbasedet_post_process(results[0], results[1], results[2], self.model_input_size, self.rgb888p_size, self.strides, len(self.labels), self.confidence_threshold, self.nms_threshold, self.anchors, self.nms_option)
            return dets

    # 绘制检测结果到画面上
    def draw_result(self, pl, dets):
        with ScopedTiming("display_draw", self.debug_mode > 0):
            if dets:
                pl.osd_img.clear()  # 清除OSD图像
                for det_box in dets:
                    # 计算显示分辨率下的坐标
                    x1, y1, x2, y2 = det_box[2], det_box[3], det_box[4], det_box[5]
                    w = (x2 - x1) * self.display_size[0] // self.rgb888p_size[0]
                    h = (y2 - y1) * self.display_size[1] // self.rgb888p_size[1]
                    x1 = int(x1 * self.display_size[0] // self.rgb888p_size[0])
                    y1 = int(y1 * self.display_size[1] // self.rgb888p_size[1])
                    x2 = int(x2 * self.display_size[0] // self.rgb888p_size[0])
                    y2 = int(y2 * self.display_size[1] // self.rgb888p_size[1])
                    # 绘制矩形框和类别标签
                    pl.osd_img.draw_rectangle(x1, y1, int(w), int(h), color=self.color[det_box[0]], thickness=2)
                    pl.osd_img.draw_string_advanced(x1, y1-50, 32," " + self.labels[det_box[0]] + " " + str(round(det_box[1],2)), color=self.color[det_box[0]])
            else:
                pl.osd_img.clear()

    # 获取padding参数
    def get_padding_param(self):
        dst_w = self.model_input_size[0]
        dst_h = self.model_input_size[1]
        input_width = self.rgb888p_size[0]
        input_high = self.rgb888p_size[1]
        ratio_w = dst_w / input_width
        ratio_h = dst_h / input_high
        if ratio_w < ratio_h:
            ratio = ratio_w
        else:
            ratio = ratio_h
        new_w = int(ratio * input_width)
        new_h = int(ratio * input_high)
        dw = (dst_w - new_w) / 2
        dh = (dst_h - new_h) / 2
        top = int(round(dh - 0.1))
        bottom = int(round(dh + 0.1))
        left = int(round(dw - 0.1))
        right = int(round(dw - 0.1))
        return top, bottom, left, right

if __name__ == "__main__":
    # 显示模式,默认"hdmi",可以选择"hdmi"和"lcd"
    display_mode="hdmi"
    if display_mode=="hdmi":
        display_size=[1920,1080]
    else:
        display_size=[800,480]
    # 设置模型路径和其他参数
    kmodel_path = "/sdcard/app/tests/kmodel/yolov5n-falldown.kmodel"
    confidence_threshold = 0.3
    nms_threshold = 0.45
    rgb888p_size = [1920, 1080]
    labels = ["Fall","NoFall"]  # 模型输出类别名称
    anchors = [10, 13, 16, 30, 33, 23, 30, 61, 62, 45, 59, 119, 116, 90, 156, 198, 373, 326]  # anchor设置

    # 初始化PipeLine,用于图像处理流程
    pl = PipeLine(rgb888p_size=rgb888p_size, display_size=display_size, display_mode=display_mode)
    pl.create()
    # 初始化自定义跌倒检测实例
    fall_det = FallDetectionApp(kmodel_path, model_input_size=[640, 640], labels=labels, anchors=anchors, confidence_threshold=confidence_threshold, nms_threshold=nms_threshold, nms_option=False, strides=[8,16,32], rgb888p_size=rgb888p_size, display_size=display_size, debug_mode=0)
    fall_det.config_preprocess()
    try:
        while True:
            os.exitpoint()                                  # 检查是否有退出信号
            with ScopedTiming("total",1):
                img = pl.get_frame()                        # 获取当前帧数据
                res = fall_det.run(img)                     # 推理当前帧
                fall_det.draw_result(pl, res)               # 绘制结果到PipeLine的osd图像
                pl.show_image()                             # 显示当前的绘制结果
                gc.collect()                                # 垃圾回收
    except Exception as e:
        sys.print_exception(e)                              # 打印异常信息
    finally:
        fall_det.deinit()                                   # 反初始化
        pl.destroy()                                        # 销毁PipeLine实例
2.11. 猜拳游戏#
from libs.PipeLine import PipeLine, ScopedTiming
from libs.AIBase import AIBase
from libs.AI2D import Ai2d
from random import randint
import os
import ujson
from media.media import *
from time import *
import nncase_runtime as nn
import ulab.numpy as np
import time
import image
import aicube
import random
import gc
import sys

# 自定义手掌检测任务类
class HandDetApp(AIBase):
    def __init__(self,kmodel_path,labels,model_input_size,anchors,confidence_threshold=0.2,nms_threshold=0.5,nms_option=False, strides=[8,16,32],rgb888p_size=[1920,1080],display_size=[1920,1080],debug_mode=0):
        super().__init__(kmodel_path,model_input_size,rgb888p_size,debug_mode)
        # kmodel路径
        self.kmodel_path=kmodel_path
        self.labels=labels
        # 检测模型输入分辨率
        self.model_input_size=model_input_size
        # 置信度阈值
        self.confidence_threshold=confidence_threshold
        # nms阈值
        self.nms_threshold=nms_threshold
        self.anchors=anchors            # 锚框,检测任务使用
        self.strides = strides          # 特征下采样倍数
        self.nms_option = nms_option    # NMS选项,如果为True做类间NMS,如果为False做类内NMS
        # sensor给到AI的图像分辨率,宽16字节对齐
        self.rgb888p_size=[ALIGN_UP(rgb888p_size[0],16),rgb888p_size[1]]
        # 视频输出VO分辨率,宽16字节对齐
        self.display_size=[ALIGN_UP(display_size[0],16),display_size[1]]
        # debug模式
        self.debug_mode=debug_mode
        # 实例化Ai2d,用于实现模型预处理
        self.ai2d=Ai2d(debug_mode)
        # 设置Ai2d的输入输出格式和类型
        self.ai2d.set_ai2d_dtype(nn.ai2d_format.NCHW_FMT,nn.ai2d_format.NCHW_FMT,np.uint8, np.uint8)

    # 配置预处理操作,这里使用了pad和resize,Ai2d支持crop/shift/pad/resize/affine,具体代码请打开/sdcard/app/libs/AI2D.py查看
    def config_preprocess(self,input_image_size=None):
        with ScopedTiming("set preprocess config",self.debug_mode > 0):
            # 初始化ai2d预处理配置,默认为sensor给到AI的尺寸,可以通过设置input_image_size自行修改输入尺寸
            ai2d_input_size = input_image_size if input_image_size else self.rgb888p_size
            # 计算padding参数并应用pad操作,以确保输入图像尺寸与模型输入尺寸匹配
            top, bottom, left, right = self.get_padding_param()
            self.ai2d.pad([0, 0, 0, 0, top, bottom, left, right], 0, [114, 114, 114])
            # 使用双线性插值进行resize操作,调整图像尺寸以符合模型输入要求
            self.ai2d.resize(nn.interp_method.tf_bilinear, nn.interp_mode.half_pixel)
            # 构建预处理流程,参数是ai2d预处理的输入tensor的shape和输出tensor的shape
            self.ai2d.build([1,3,ai2d_input_size[1],ai2d_input_size[0]],[1,3,self.model_input_size[1],self.model_input_size[0]])

    # 自定义当前任务的后处理,results是模型输出array的列表,这里使用了aicube库的anchorbasedet_post_process接口
    def postprocess(self,results):
        with ScopedTiming("postprocess",self.debug_mode > 0):
            dets = aicube.anchorbasedet_post_process(results[0], results[1], results[2], self.model_input_size, self.rgb888p_size, self.strides, len(self.labels), self.confidence_threshold, self.nms_threshold, self.anchors, self.nms_option)
            # 返回手掌检测结果
            return dets

    # 计算padding参数,确保输入图像尺寸与模型输入尺寸匹配
    def get_padding_param(self):
        # 根据目标宽度和高度计算比例因子
        dst_w = self.model_input_size[0]
        dst_h = self.model_input_size[1]
        input_width = self.rgb888p_size[0]
        input_high = self.rgb888p_size[1]
        ratio_w = dst_w / input_width
        ratio_h = dst_h / input_high
        # 选择较小的比例因子,以确保图像内容完整
        if ratio_w < ratio_h:
            ratio = ratio_w
        else:
            ratio = ratio_h
        # 计算新的宽度和高度
        new_w = int(ratio * input_width)
        new_h = int(ratio * input_high)
        # 计算宽度和高度的差值,并确定padding的位置
        dw = (dst_w - new_w) / 2
        dh = (dst_h - new_h) / 2
        top = int(round(dh - 0.1))
        bottom = int(round(dh + 0.1))
        left = int(round(dw - 0.1))
        right = int(round(dw + 0.1))
        return top, bottom, left, right

# 自定义手势关键点分类任务类
class HandKPClassApp(AIBase):
    def __init__(self,kmodel_path,model_input_size,rgb888p_size=[1920,1080],display_size=[1920,1080],debug_mode=0):
        super().__init__(kmodel_path,model_input_size,rgb888p_size,debug_mode)
        # kmodel路径
        self.kmodel_path=kmodel_path
        # 检测模型输入分辨率
        self.model_input_size=model_input_size
        # sensor给到AI的图像分辨率,宽16字节对齐
        self.rgb888p_size=[ALIGN_UP(rgb888p_size[0],16),rgb888p_size[1]]
        # 视频输出VO分辨率,宽16字节对齐
        self.display_size=[ALIGN_UP(display_size[0],16),display_size[1]]
        # crop参数列表
        self.crop_params=[]
        # debug模式
        self.debug_mode=debug_mode
        self.ai2d=Ai2d(debug_mode)
        self.ai2d.set_ai2d_dtype(nn.ai2d_format.NCHW_FMT,nn.ai2d_format.NCHW_FMT,np.uint8, np.uint8)

    # 配置预处理操作,这里使用了crop和resize,Ai2d支持crop/shift/pad/resize/affine,具体代码请打开/sdcard/app/libs/AI2D.py查看
    def config_preprocess(self,det,input_image_size=None):
        with ScopedTiming("set preprocess config",self.debug_mode > 0):
            # 初始化ai2d预处理配置,默认为sensor给到AI的尺寸,可以通过设置input_image_size自行修改输入尺寸
            ai2d_input_size=input_image_size if input_image_size else self.rgb888p_size
            # 计算crop参数并设置crop预处理
            self.crop_params = self.get_crop_param(det)
            self.ai2d.crop(self.crop_params[0],self.crop_params[1],self.crop_params[2],self.crop_params[3])
            # 设置resize预处理
            self.ai2d.resize(nn.interp_method.tf_bilinear, nn.interp_mode.half_pixel)
            # 构建预处理流程,参数是ai2d预处理的输入tensor的shape和输出tensor的shape
            self.ai2d.build([1,3,ai2d_input_size[1],ai2d_input_size[0]],[1,3,self.model_input_size[1],self.model_input_size[0]])

    # 自定义后处理,results是模型输出array的列表
    def postprocess(self,results):
        with ScopedTiming("postprocess",self.debug_mode > 0):
            results=results[0].reshape(results[0].shape[0]*results[0].shape[1])
            results_show = np.zeros(results.shape,dtype=np.int16)
            results_show[0::2] = results[0::2] * self.crop_params[3] + self.crop_params[0]
            results_show[1::2] = results[1::2] * self.crop_params[2] + self.crop_params[1]
            gesture=self.hk_gesture(results_show)
            results_show[0::2] = results_show[0::2] * (self.display_size[0] / self.rgb888p_size[0])
            results_show[1::2] = results_show[1::2] * (self.display_size[1] / self.rgb888p_size[1])
            return results_show,gesture

    # 计算crop参数
    def get_crop_param(self,det_box):
        x1, y1, x2, y2 = det_box[2],det_box[3],det_box[4],det_box[5]
        w,h= int(x2 - x1),int(y2 - y1)
        w_det = int(float(x2 - x1) * self.display_size[0] // self.rgb888p_size[0])
        h_det = int(float(y2 - y1) * self.display_size[1] // self.rgb888p_size[1])
        x_det = int(x1*self.display_size[0] // self.rgb888p_size[0])
        y_det = int(y1*self.display_size[1] // self.rgb888p_size[1])
        length = max(w, h)/2
        cx = (x1+x2)/2
        cy = (y1+y2)/2
        ratio_num = 1.26*length
        x1_kp = int(max(0,cx-ratio_num))
        y1_kp = int(max(0,cy-ratio_num))
        x2_kp = int(min(self.rgb888p_size[0]-1, cx+ratio_num))
        y2_kp = int(min(self.rgb888p_size[1]-1, cy+ratio_num))
        w_kp = int(x2_kp - x1_kp + 1)
        h_kp = int(y2_kp - y1_kp + 1)
        return [x1_kp, y1_kp, w_kp, h_kp]

    # 求两个vector之间的夹角
    def hk_vector_2d_angle(self,v1,v2):
        with ScopedTiming("hk_vector_2d_angle",self.debug_mode > 0):
            v1_x,v1_y,v2_x,v2_y = v1[0],v1[1],v2[0],v2[1]
            v1_norm = np.sqrt(v1_x * v1_x+ v1_y * v1_y)
            v2_norm = np.sqrt(v2_x * v2_x + v2_y * v2_y)
            dot_product = v1_x * v2_x + v1_y * v2_y
            cos_angle = dot_product/(v1_norm*v2_norm)
            angle = np.acos(cos_angle)*180/np.pi
            return angle

    # 根据手掌关键点检测结果判断手势类别
    def hk_gesture(self,results):
        with ScopedTiming("hk_gesture",self.debug_mode > 0):
            angle_list = []
            for i in range(5):
                angle = self.hk_vector_2d_angle([(results[0]-results[i*8+4]), (results[1]-results[i*8+5])],[(results[i*8+6]-results[i*8+8]),(results[i*8+7]-results[i*8+9])])
                angle_list.append(angle)
            thr_angle,thr_angle_thumb,thr_angle_s,gesture_str = 65.,53.,49.,None
            if 65535. not in angle_list:
                if (angle_list[0]>thr_angle_thumb)  and (angle_list[1]>thr_angle) and (angle_list[2]>thr_angle) and (angle_list[3]>thr_angle) and (angle_list[4]>thr_angle):
                    gesture_str = "fist"
                elif (angle_list[0]<thr_angle_s)  and (angle_list[1]<thr_angle_s) and (angle_list[2]<thr_angle_s) and (angle_list[3]<thr_angle_s) and (angle_list[4]<thr_angle_s):
                    gesture_str = "five"
                elif (angle_list[0]<thr_angle_s)  and (angle_list[1]<thr_angle_s) and (angle_list[2]>thr_angle) and (angle_list[3]>thr_angle) and (angle_list[4]>thr_angle):
                    gesture_str = "gun"
                elif (angle_list[0]<thr_angle_s)  and (angle_list[1]<thr_angle_s) and (angle_list[2]>thr_angle) and (angle_list[3]>thr_angle) and (angle_list[4]<thr_angle_s):
                    gesture_str = "love"
                elif (angle_list[0]>5)  and (angle_list[1]<thr_angle_s) and (angle_list[2]>thr_angle) and (angle_list[3]>thr_angle) and (angle_list[4]>thr_angle):
                    gesture_str = "one"
                elif (angle_list[0]<thr_angle_s)  and (angle_list[1]>thr_angle) and (angle_list[2]>thr_angle) and (angle_list[3]>thr_angle) and (angle_list[4]<thr_angle_s):
                    gesture_str = "six"
                elif (angle_list[0]>thr_angle_thumb)  and (angle_list[1]<thr_angle_s) and (angle_list[2]<thr_angle_s) and (angle_list[3]<thr_angle_s) and (angle_list[4]>thr_angle):
                    gesture_str = "three"
                elif (angle_list[0]<thr_angle_s)  and (angle_list[1]>thr_angle) and (angle_list[2]>thr_angle) and (angle_list[3]>thr_angle) and (angle_list[4]>thr_angle):
                    gesture_str = "thumbUp"
                elif (angle_list[0]>thr_angle_thumb)  and (angle_list[1]<thr_angle_s) and (angle_list[2]<thr_angle_s) and (angle_list[3]>thr_angle) and (angle_list[4]>thr_angle):
                    gesture_str = "yeah"
            return gesture_str

# 猜拳游戏任务类
class FingerGuess:
    def __init__(self,hand_det_kmodel,hand_kp_kmodel,det_input_size,kp_input_size,labels,anchors,confidence_threshold=0.25,nms_threshold=0.3,nms_option=False,strides=[8,16,32],guess_mode=3,rgb888p_size=[1280,720],display_size=[1920,1080],debug_mode=0):
        # 手掌检测模型路径
        self.hand_det_kmodel=hand_det_kmodel
        # 手掌关键点模型路径
        self.hand_kp_kmodel=hand_kp_kmodel
        # 手掌检测模型输入分辨率
        self.det_input_size=det_input_size
        # 手掌关键点模型输入分辨率
        self.kp_input_size=kp_input_size
        self.labels=labels
        # anchors
        self.anchors=anchors
        # 置信度阈值
        self.confidence_threshold=confidence_threshold
        # nms阈值
        self.nms_threshold=nms_threshold
        # nms选项
        self.nms_option=nms_option
        # 特征图针对输入的下采样倍数
        self.strides=strides
        # sensor给到AI的图像分辨率,宽16字节对齐
        self.rgb888p_size=[ALIGN_UP(rgb888p_size[0],16),rgb888p_size[1]]
        # 视频输出VO分辨率,宽16字节对齐
        self.display_size=[ALIGN_UP(display_size[0],16),display_size[1]]
        # debug_mode模式
        self.debug_mode=debug_mode
        self.guess_mode=guess_mode
        # 石头剪刀布的贴图array
        self.five_image = self.read_file("/sdcard/app/tests/utils/five.bin")
        self.fist_image = self.read_file("/sdcard/app/tests/utils/fist.bin")
        self.shear_image = self.read_file("/sdcard/app/tests/utils/shear.bin")
        self.counts_guess = -1                                                               # 猜拳次数 计数
        self.player_win = 0                                                                  # 玩家 赢次计数
        self.k230_win = 0                                                                    # k230 赢次计数
        self.sleep_end = False                                                               # 是否 停顿
        self.set_stop_id = True                                                              # 是否 暂停猜拳
        self.LIBRARY = ["fist","yeah","five"]                                                # 猜拳 石头剪刀布 三种方案的dict
        self.hand_det=HandDetApp(self.hand_det_kmodel,self.labels,model_input_size=self.det_input_size,anchors=self.anchors,confidence_threshold=self.confidence_threshold,nms_threshold=self.nms_threshold,nms_option=self.nms_option,strides=self.strides,rgb888p_size=self.rgb888p_size,display_size=self.display_size,debug_mode=0)
        self.hand_kp=HandKPClassApp(self.hand_kp_kmodel,model_input_size=self.kp_input_size,rgb888p_size=self.rgb888p_size,display_size=self.display_size)
        self.hand_det.config_preprocess()

    # run函数
    def run(self,input_np):
        # 先进行手掌检测
        det_boxes=self.hand_det.run(input_np)
        boxes=[]
        gesture_res=[]
        for det_box in det_boxes:
            # 对检测的手做手势识别
            x1, y1, x2, y2 = det_box[2],det_box[3],det_box[4],det_box[5]
            w,h= int(x2 - x1),int(y2 - y1)
            if (h<(0.1*self.rgb888p_size[1])):
                continue
            if (w<(0.25*self.rgb888p_size[0]) and ((x1<(0.03*self.rgb888p_size[0])) or (x2>(0.97*self.rgb888p_size[0])))):
                continue
            if (w<(0.15*self.rgb888p_size[0]) and ((x1<(0.01*self.rgb888p_size[0])) or (x2>(0.99*self.rgb888p_size[0])))):
                continue
            self.hand_kp.config_preprocess(det_box)
            results_show,gesture=self.hand_kp.run(input_np)
            boxes.append(det_box)
            gesture_res.append(gesture)
        return boxes,gesture_res

    # 绘制效果
    def draw_result(self,pl,dets,gesture_res):
        pl.osd_img.clear()
        # 手掌的手势分类得到用户的出拳,根据不同模式给出开发板的出拳,并将对应的贴图放到屏幕上显示
        if (len(dets) >= 2):
            pl.osd_img.draw_string_advanced( self.display_size[0]//2-50,self.display_size[1]//2-50,60, "请保证只有一只手入镜!", color=(255,255,0,0))
        elif (self.guess_mode == 0):
            draw_img_np = np.zeros((self.display_size[1],self.display_size[0],4),dtype=np.uint8)
            draw_img = image.Image(self.display_size[0], self.display_size[1], image.ARGB8888, alloc=image.ALLOC_REF,data = draw_img_np)
            if (gesture_res[0] == "fist"):
                draw_img_np[:400,:400,:] = self.shear_image
            elif (gesture_res[0] == "five"):
                draw_img_np[:400,:400,:] = self.fist_image
            elif (gesture_res[0] == "yeah"):
                draw_img_np[:400,:400,:] = self.five_image
            pl.osd_img.copy_from(draw_img)
        elif (self.guess_mode == 1):
            draw_img_np = np.zeros((self.display_size[1],self.display_size[0],4),dtype=np.uint8)
            draw_img = image.Image(self.display_size[0], self.display_size[1], image.ARGB8888, alloc=image.ALLOC_REF,data = draw_img_np)
            if (gesture_res[0] == "fist"):
                draw_img_np[:400,:400,:] = self.five_image
            elif (gesture_res[0] == "five"):
                draw_img_np[:400,:400,:] = self.shear_image
            elif (gesture_res[0] == "yeah"):
                draw_img_np[:400,:400,:] = self.fist_image
            pl.osd_img.copy_from(draw_img)
        else:
            draw_img_np = np.zeros((self.display_size[1],self.display_size[0],4),dtype=np.uint8)
            draw_img = image.Image(self.display_size[0], self.display_size[1], image.ARGB8888, alloc=image.ALLOC_REF,data = draw_img_np)
            if (self.sleep_end):
                time.sleep_ms(2000)
                self.sleep_end = False
            if (len(dets) == 0):
                self.set_stop_id = True
                return
            if (self.counts_guess == -1 and gesture_res[0] != "fist" and gesture_res[0] != "yeah" and gesture_res[0] != "five"):
                draw_img.draw_string_advanced( self.display_size[0]//2-50,self.display_size[1]//2-50,60, "游戏开始", color=(255,255,0,0))
                draw_img.draw_string_advanced( self.display_size[0]//2-50,self.display_size[1]//2-50,60, "第一回合", color=(255,255,0,0))
            elif (self.counts_guess == self.guess_mode):
                draw_img.clear()
                if (self.k230_win > self.player_win):
                    draw_img.draw_string_advanced( self.display_size[0]//2-50,self.display_size[1]//2-50,60, "你输了!", color=(255,255,0,0))
                elif (self.k230_win < self.player_win):
                    draw_img.draw_string_advanced( self.display_size[0]//2-50,self.display_size[1]//2-50,60, "你赢了!", color=(255,255,0,0))
                else:
                    draw_img.draw_string_advanced( self.display_size[0]//2-50,self.display_size[1]//2-50,60, "平局", color=(255,255,0,0))
                self.counts_guess = -1
                self.player_win = 0
                self.k230_win = 0
                self.sleep_end = True
            else:
                if (self.set_stop_id):
                    if (self.counts_guess == -1 and (gesture_res[0] == "fist" or gesture_res[0] == "yeah" or gesture_res[0] == "five")):
                        self.counts_guess = 0
                    if (self.counts_guess != -1 and (gesture_res[0] == "fist" or gesture_res[0] == "yeah" or gesture_res[0] == "five")):
                        k230_guess = randint(1,10000) % 3
                        if (gesture_res[0] == "fist" and self.LIBRARY[k230_guess] == "yeah"):
                            self.player_win += 1
                        elif (gesture_res[0] == "fist" and self.LIBRARY[k230_guess] == "five"):
                            self.k230_win += 1
                        if (gesture_res[0] == "yeah" and self.LIBRARY[k230_guess] == "fist"):
                            self.k230_win += 1
                        elif (gesture_res[0] == "yeah" and self.LIBRARY[k230_guess] == "five"):
                            self.player_win += 1
                        if (gesture_res[0] == "five" and self.LIBRARY[k230_guess] == "fist"):
                            self.player_win += 1
                        elif (gesture_res[0] == "five" and self.LIBRARY[k230_guess] == "yeah"):
                            self.k230_win += 1
                        if (self.LIBRARY[k230_guess] == "fist"):
                            draw_img_np[:400,:400,:] = self.fist_image
                        elif (self.LIBRARY[k230_guess] == "five"):
                            draw_img_np[:400,:400,:] = self.five_image
                        elif (self.LIBRARY[k230_guess] == "yeah"):
                            draw_img_np[:400,:400,:] = self.shear_image
                        self.counts_guess += 1
                        draw_img.draw_string_advanced(self.display_size[0]//2-50,self.display_size[1]//2-50,60,"第" + str(self.counts_guess) + "回合", color=(255,255,0,0))
                        self.set_stop_id = False
                        self.sleep_end = True
                    else:
                        draw_img.draw_string_advanced(self.display_size[0]//2-50,self.display_size[1]//2-50,60,"第" + str(self.counts_guess+1) + "回合", color=(255,255,0,0))
            pl.osd_img.copy_from(draw_img)

    # 读取石头剪刀布的bin文件方法
    def read_file(self,file_name):
        image_arr = np.fromfile(file_name,dtype=np.uint8)
        image_arr = image_arr.reshape((400,400,4))
        return image_arr


if __name__=="__main__":
    # 显示模式,默认"hdmi",可以选择"hdmi"和"lcd"
    display_mode="hdmi"
    if display_mode=="hdmi":
        display_size=[1920,1080]
    else:
        display_size=[800,480]
    # 手掌检测模型路径
    hand_det_kmodel_path="/sdcard/app/tests/kmodel/hand_det.kmodel"
    # 手掌关键点模型路径
    hand_kp_kmodel_path="/sdcard/app/tests/kmodel/handkp_det.kmodel"
    # 其它参数
    anchors_path="/sdcard/app/tests/utils/prior_data_320.bin"
    rgb888p_size=[1920,1080]
    hand_det_input_size=[512,512]
    hand_kp_input_size=[256,256]
    confidence_threshold=0.2
    nms_threshold=0.5
    labels=["hand"]
    anchors = [26,27, 53,52, 75,71, 80,99, 106,82, 99,134, 140,113, 161,172, 245,276]
    # 猜拳模式  0 玩家稳赢 , 1 玩家必输 , n > 2 多局多胜
    guess_mode = 3

    # 初始化PipeLine,只关注传给AI的图像分辨率,显示的分辨率
    pl=PipeLine(rgb888p_size=rgb888p_size,display_size=display_size,display_mode=display_mode)
    pl.create()
    hkc=FingerGuess(hand_det_kmodel_path,hand_kp_kmodel_path,det_input_size=hand_det_input_size,kp_input_size=hand_kp_input_size,labels=labels,anchors=anchors,confidence_threshold=confidence_threshold,nms_threshold=nms_threshold,nms_option=False,strides=[8,16,32],guess_mode=guess_mode,rgb888p_size=rgb888p_size,display_size=display_size)
    try:
        while True:
            os.exitpoint()
            with ScopedTiming("total",1):
                img=pl.get_frame()                          # 获取当前帧
                det_boxes,gesture_res=hkc.run(img)          # 推理当前帧
                hkc.draw_result(pl,det_boxes,gesture_res)   # 绘制推理结果
                pl.show_image()                             # 展示推理结果
                gc.collect()
    except Exception as e:
        sys.print_exception(e)
    finally:
        hkc.hand_det.deinit()
        hkc.hand_kp.deinit()
        pl.destroy()
2.12. 手掌检测#
from libs.PipeLine import PipeLine, ScopedTiming
from libs.AIBase import AIBase
from libs.AI2D import Ai2d
import os
import ujson
from media.media import *
from time import *
import nncase_runtime as nn
import ulab.numpy as np
import time
import utime
import image
import random
import gc
import sys
import aicube

# 自定义手掌检测类,继承自AIBase基类
class HandDetectionApp(AIBase):
    def __init__(self, kmodel_path, model_input_size, labels, anchors, confidence_threshold=0.2, nms_threshold=0.5, nms_option=False, strides=[8,16,32], rgb888p_size=[224,224], display_size=[1920,1080], debug_mode=0):
        super().__init__(kmodel_path, model_input_size, rgb888p_size, debug_mode)  # 调用基类的构造函数,初始化模型文件路径、模型输入分辨率、RGB图像分辨率和调试模式
        self.kmodel_path = kmodel_path  # 模型文件路径
        self.model_input_size = model_input_size  # 模型输入分辨率
        self.labels = labels  # 模型输出的类别标签列表
        self.anchors = anchors  # 用于目标检测的锚点尺寸列表
        self.strides = strides  # 特征下采样倍数
        self.confidence_threshold = confidence_threshold  # 置信度阈值,用于过滤低置信度的检测结果
        self.nms_threshold = nms_threshold  # NMS(非极大值抑制)阈值,用于去除重叠的检测框
        self.nms_option = nms_option  # NMS选项,可能影响NMS的具体实现
        self.rgb888p_size = [ALIGN_UP(rgb888p_size[0], 16), rgb888p_size[1]]  # sensor给到AI的图像分辨率,对齐到最近的16的倍数
        self.display_size = [ALIGN_UP(display_size[0], 16), display_size[1]]  # 显示分辨率,对齐到最近的16的倍数
        self.debug_mode = debug_mode  # 调试模式,用于输出调试信息
        self.ai2d = Ai2d(debug_mode)  # 实例化Ai2d类,用于实现模型预处理
        # 设置Ai2d的输入输出格式和类型,这里使用NCHW格式,数据类型为uint8
        self.ai2d.set_ai2d_dtype(nn.ai2d_format.NCHW_FMT, nn.ai2d_format.NCHW_FMT, np.uint8, np.uint8)

    # 配置预处理操作,这里使用了pad和resize
    def config_preprocess(self, input_image_size=None):
        with ScopedTiming("set preprocess config", self.debug_mode > 0):  # 使用ScopedTiming装饰器来测量预处理配置的时间
            # 初始化ai2d预处理配置,默认为sensor给到AI的尺寸,可以通过设置input_image_size自行修改输入尺寸
            ai2d_input_size = input_image_size if input_image_size else self.rgb888p_size
            # 计算padding参数并应用pad操作,以确保输入图像尺寸与模型输入尺寸匹配
            top, bottom, left, right = self.get_padding_param()
            self.ai2d.pad([0, 0, 0, 0, top, bottom, left, right], 0, [0, 0, 0])
            # 使用双线性插值进行resize操作,调整图像尺寸以符合模型输入要求
            self.ai2d.resize(nn.interp_method.tf_bilinear, nn.interp_mode.half_pixel)
            # 构建预处理流程
            self.ai2d.build([1,3,ai2d_input_size[1],ai2d_input_size[0]],[1,3,self.model_input_size[1],self.model_input_size[0]])

    # 自定义当前任务的后处理,用于处理模型输出结果
    def postprocess(self, results):
        with ScopedTiming("postprocess", self.debug_mode > 0):  # 使用ScopedTiming装饰器来测量后处理的时间
            # 使用aicube库的函数进行后处理,得到最终的检测结果
            dets = aicube.anchorbasedet_post_process(results[0], results[1], results[2], self.model_input_size, self.rgb888p_size, self.strides, len(self.labels), self.confidence_threshold, self.nms_threshold, self.anchors, self.nms_option)
            return dets

    # 绘制检测结果到屏幕上
    def draw_result(self, pl, dets):
        with ScopedTiming("display_draw", self.debug_mode > 0):  # 使用ScopedTiming装饰器来测量绘制结果的时间
            if dets:  # 如果存在检测结果
                pl.osd_img.clear()  # 清除屏幕上的旧内容
                for det_box in dets:  # 遍历每个检测框
                    # 根据模型输出计算检测框的像素坐标,并调整大小以适应显示分辨率
                    x1, y1, x2, y2 = det_box[2], det_box[3], det_box[4], det_box[5]
                    w = float(x2 - x1) * self.display_size[0] // self.rgb888p_size[0]
                    h = float(y2 - y1) * self.display_size[1] // self.rgb888p_size[1]
                    x1 = int(x1 * self.display_size[0] // self.rgb888p_size[0])
                    y1 = int(y1 * self.display_size[1] // self.rgb888p_size[1])
                    x2 = int(x2 * self.display_size[0] // self.rgb888p_size[0])
                    y2 = int(y2 * self.display_size[1] // self.rgb888p_size[1])
                    # 过滤掉太小或者位置不合理的检测框
                    if (h < (0.1 * self.display_size[0])):
                        continue
                    if (w < (0.25 * self.display_size[0]) and ((x1 < (0.03 * self.display_size[0])) or (x2 > (0.97 * self.display_size[0])))):
                        continue
                    if (w < (0.15 * self.display_size[0]) and ((x1 < (0.01 * self.display_size[0])) or (x2 > (0.99 * self.display_size[0])))):
                        continue
                    # 绘制矩形框和类别标签
                    pl.osd_img.draw_rectangle(x1, y1, int(w), int(h), color=(255, 0, 255, 0), thickness=2)
                    pl.osd_img.draw_string_advanced(x1, y1-50,32, " " + self.labels[det_box[0]] + " " + str(round(det_box[1], 2)), color=(255, 0, 255, 0))
            else:
                pl.osd_img.clear()  # 如果没有检测结果,清空屏幕

    # 计算padding参数,确保输入图像尺寸与模型输入尺寸匹配
    def get_padding_param(self):
        # 根据目标宽度和高度计算比例因子
        dst_w = self.model_input_size[0]
        dst_h = self.model_input_size[1]
        input_width = self.rgb888p_size[0]
        input_high = self.rgb888p_size[1]
        ratio_w = dst_w / input_width
        ratio_h = dst_h / input_high
        # 选择较小的比例因子,以确保图像内容完整
        if ratio_w < ratio_h:
            ratio = ratio_w
        else:
            ratio = ratio_h
        # 计算新的宽度和高度
        new_w = int(ratio * input_width)
        new_h = int(ratio * input_high)
        # 计算宽度和高度的差值,并确定padding的位置
        dw = (dst_w - new_w) / 2
        dh = (dst_h - new_h) / 2
        top = int(round(dh - 0.1))
        bottom = int(round(dh + 0.1))
        left = int(round(dw - 0.1))
        right = int(round(dw + 0.1))
        return top, bottom, left, right

if __name__=="__main__":
    # 显示模式,默认"hdmi",可以选择"hdmi"和"lcd"
    display_mode="hdmi"
    if display_mode=="hdmi":
        display_size=[1920,1080]
    else:
        display_size=[800,480]
    # 模型路径
    kmodel_path="/sdcard/app/tests/kmodel/hand_det.kmodel"
    # 其它参数设置
    confidence_threshold = 0.2
    nms_threshold = 0.5
    rgb888p_size=[1920,1080]
    labels = ["hand"]
    anchors = [26,27, 53,52, 75,71, 80,99, 106,82, 99,134, 140,113, 161,172, 245,276]   #anchor设置

    # 初始化PipeLine
    pl=PipeLine(rgb888p_size=rgb888p_size,display_size=display_size,display_mode=display_mode)
    pl.create()
    # 初始化自定义手掌检测实例
    hand_det=HandDetectionApp(kmodel_path,model_input_size=[512,512],labels=labels,anchors=anchors,confidence_threshold=confidence_threshold,nms_threshold=nms_threshold,nms_option=False,strides=[8,16,32],rgb888p_size=rgb888p_size,display_size=display_size,debug_mode=0)
    hand_det.config_preprocess()
    try:
        while True:
            os.exitpoint()                              # 检查是否有退出信号
            with ScopedTiming("total",1):
                img=pl.get_frame()                      # 获取当前帧数据
                res=hand_det.run(img)                   # 推理当前帧
                hand_det.draw_result(pl,res)            # 绘制结果到PipeLine的osd图像
                pl.show_image()                         # 显示当前的绘制结果
                gc.collect()                            # 垃圾回收
    except Exception as e:
        sys.print_exception(e)
    finally:
        hand_det.deinit()                               # 反初始化
        pl.destroy()                                    # 销毁PipeLine实例
2.13. 手掌关键点分类#
from libs.PipeLine import PipeLine, ScopedTiming
from libs.AIBase import AIBase
from libs.AI2D import Ai2d
import os
import ujson
from media.media import *
from time import *
import nncase_runtime as nn
import ulab.numpy as np
import time
import image
import aicube
import random
import gc
import sys

# 自定义手掌检测任务类
class HandDetApp(AIBase):
    def __init__(self,kmodel_path,labels,model_input_size,anchors,confidence_threshold=0.2,nms_threshold=0.5,nms_option=False, strides=[8,16,32],rgb888p_size=[1920,1080],display_size=[1920,1080],debug_mode=0):
        super().__init__(kmodel_path,model_input_size,rgb888p_size,debug_mode)
        # kmodel路径
        self.kmodel_path=kmodel_path
        self.labels=labels
        # 检测模型输入分辨率
        self.model_input_size=model_input_size
        # 置信度阈值
        self.confidence_threshold=confidence_threshold
        # nms阈值
        self.nms_threshold=nms_threshold
        # 锚框,目标检测任务使用
        self.anchors=anchors
        # 特征下采样倍数
        self.strides = strides
        # NMS选项,如果为True做类间NMS,如果为False做类内NMS
        self.nms_option = nms_option
        # sensor给到AI的图像分辨率,宽16字节对齐
        self.rgb888p_size=[ALIGN_UP(rgb888p_size[0],16),rgb888p_size[1]]
        # 视频输出VO分辨率,宽16字节对齐
        self.display_size=[ALIGN_UP(display_size[0],16),display_size[1]]
        # debug模式
        self.debug_mode=debug_mode
        # Ai2d实例用于实现预处理
        self.ai2d=Ai2d(debug_mode)
        # 设置ai2d的输入输出的格式和数据类型
        self.ai2d.set_ai2d_dtype(nn.ai2d_format.NCHW_FMT,nn.ai2d_format.NCHW_FMT,np.uint8, np.uint8)

    # 配置预处理操作,这里使用了pad和resize,Ai2d支持crop/shift/pad/resize/affine,具体代码请打开/sdcard/app/libs/AI2D.py查看
    def config_preprocess(self,input_image_size=None):
        with ScopedTiming("set preprocess config",self.debug_mode > 0):
            # 初始化ai2d预处理配置,默认为sensor给到AI的尺寸,可以通过设置input_image_size自行修改输入尺寸
            ai2d_input_size = input_image_size if input_image_size else self.rgb888p_size
            # 计算padding参数并应用pad操作,以确保输入图像尺寸与模型输入尺寸匹配
            top, bottom, left, right = self.get_padding_param()
            self.ai2d.pad([0, 0, 0, 0, top, bottom, left, right], 0, [114, 114, 114])
            # 使用双线性插值进行resize操作,调整图像尺寸以符合模型输入要求
            self.ai2d.resize(nn.interp_method.tf_bilinear, nn.interp_mode.half_pixel)
            # 构建预处理流程,参数为预处理输入tensor的shape和预处理输出的tensor的shape
            self.ai2d.build([1,3,ai2d_input_size[1],ai2d_input_size[0]],[1,3,self.model_input_size[1],self.model_input_size[0]])

    # 自定义当前任务的后处理,用于处理模型输出结果,这里使用了aicube库的anchorbasedet_post_process接口
    def postprocess(self,results):
        with ScopedTiming("postprocess",self.debug_mode > 0):
            dets = aicube.anchorbasedet_post_process(results[0], results[1], results[2], self.model_input_size, self.rgb888p_size, self.strides, len(self.labels), self.confidence_threshold, self.nms_threshold, self.anchors, self.nms_option)
            # 返回手掌检测结果
            return dets

    # 计算padding参数,确保输入图像尺寸与模型输入尺寸匹配
    def get_padding_param(self):
        # 根据目标宽度和高度计算比例因子
        dst_w = self.model_input_size[0]
        dst_h = self.model_input_size[1]
        input_width = self.rgb888p_size[0]
        input_high = self.rgb888p_size[1]
        ratio_w = dst_w / input_width
        ratio_h = dst_h / input_high
        # 选择较小的比例因子,以确保图像内容完整
        if ratio_w < ratio_h:
            ratio = ratio_w
        else:
            ratio = ratio_h
        # 计算新的宽度和高度
        new_w = int(ratio * input_width)
        new_h = int(ratio * input_high)
        # 计算宽度和高度的差值,并确定padding的位置
        dw = (dst_w - new_w) / 2
        dh = (dst_h - new_h) / 2
        top = int(round(dh - 0.1))
        bottom = int(round(dh + 0.1))
        left = int(round(dw - 0.1))
        right = int(round(dw + 0.1))
        return top, bottom, left, right

# 自定义手势关键点分类任务类
class HandKPClassApp(AIBase):
    def __init__(self,kmodel_path,model_input_size,rgb888p_size=[1920,1080],display_size=[1920,1080],debug_mode=0):
        super().__init__(kmodel_path,model_input_size,rgb888p_size,debug_mode)
        # kmodel路径
        self.kmodel_path=kmodel_path
        # 检测模型输入分辨率
        self.model_input_size=model_input_size
        # sensor给到AI的图像分辨率,宽16字节对齐
        self.rgb888p_size=[ALIGN_UP(rgb888p_size[0],16),rgb888p_size[1]]
        # 视频输出VO分辨率,宽16字节对齐
        self.display_size=[ALIGN_UP(display_size[0],16),display_size[1]]
        self.crop_params=[]
        # debug模式
        self.debug_mode=debug_mode
        # Ai2d实例用于实现预处理
        self.ai2d=Ai2d(debug_mode)
        # 设置ai2d的输入输出的格式和数据类型
        self.ai2d.set_ai2d_dtype(nn.ai2d_format.NCHW_FMT,nn.ai2d_format.NCHW_FMT,np.uint8, np.uint8)

    # 配置预处理操作,这里使用了crop和resize,Ai2d支持crop/shift/pad/resize/affine,具体代码请打开/sdcard/app/libs/AI2D.py查看
    def config_preprocess(self,det,input_image_size=None):
        with ScopedTiming("set preprocess config",self.debug_mode > 0):
            ai2d_input_size=input_image_size if input_image_size else self.rgb888p_size
            self.crop_params = self.get_crop_param(det)
            self.ai2d.crop(self.crop_params[0],self.crop_params[1],self.crop_params[2],self.crop_params[3])
            self.ai2d.resize(nn.interp_method.tf_bilinear, nn.interp_mode.half_pixel)
            self.ai2d.build([1,3,ai2d_input_size[1],ai2d_input_size[0]],[1,3,self.model_input_size[1],self.model_input_size[0]])

    # 自定义后处理,得到手掌手势结果和手掌关键点数据
    def postprocess(self,results):
        with ScopedTiming("postprocess",self.debug_mode > 0):
            results=results[0].reshape(results[0].shape[0]*results[0].shape[1])
            results_show = np.zeros(results.shape,dtype=np.int16)
            results_show[0::2] = results[0::2] * self.crop_params[3] + self.crop_params[0]
            results_show[1::2] = results[1::2] * self.crop_params[2] + self.crop_params[1]
            gesture=self.hk_gesture(results_show)
            results_show[0::2] = results_show[0::2] * (self.display_size[0] / self.rgb888p_size[0])
            results_show[1::2] = results_show[1::2] * (self.display_size[1] / self.rgb888p_size[1])
            return results_show,gesture

    # 计算crop参数
    def get_crop_param(self,det_box):
        x1, y1, x2, y2 = det_box[2],det_box[3],det_box[4],det_box[5]
        w,h= int(x2 - x1),int(y2 - y1)
        w_det = int(float(x2 - x1) * self.display_size[0] // self.rgb888p_size[0])
        h_det = int(float(y2 - y1) * self.display_size[1] // self.rgb888p_size[1])
        x_det = int(x1*self.display_size[0] // self.rgb888p_size[0])
        y_det = int(y1*self.display_size[1] // self.rgb888p_size[1])
        length = max(w, h)/2
        cx = (x1+x2)/2
        cy = (y1+y2)/2
        ratio_num = 1.26*length
        x1_kp = int(max(0,cx-ratio_num))
        y1_kp = int(max(0,cy-ratio_num))
        x2_kp = int(min(self.rgb888p_size[0]-1, cx+ratio_num))
        y2_kp = int(min(self.rgb888p_size[1]-1, cy+ratio_num))
        w_kp = int(x2_kp - x1_kp + 1)
        h_kp = int(y2_kp - y1_kp + 1)
        return [x1_kp, y1_kp, w_kp, h_kp]

    # 求两个vector之间的夹角
    def hk_vector_2d_angle(self,v1,v2):
        with ScopedTiming("hk_vector_2d_angle",self.debug_mode > 0):
            v1_x,v1_y,v2_x,v2_y = v1[0],v1[1],v2[0],v2[1]
            v1_norm = np.sqrt(v1_x * v1_x+ v1_y * v1_y)
            v2_norm = np.sqrt(v2_x * v2_x + v2_y * v2_y)
            dot_product = v1_x * v2_x + v1_y * v2_y
            cos_angle = dot_product/(v1_norm*v2_norm)
            angle = np.acos(cos_angle)*180/np.pi
            return angle

    # 根据手掌关键点检测结果判断手势类别
    def hk_gesture(self,results):
        with ScopedTiming("hk_gesture",self.debug_mode > 0):
            angle_list = []
            for i in range(5):
                angle = self.hk_vector_2d_angle([(results[0]-results[i*8+4]), (results[1]-results[i*8+5])],[(results[i*8+6]-results[i*8+8]),(results[i*8+7]-results[i*8+9])])
                angle_list.append(angle)
            thr_angle,thr_angle_thumb,thr_angle_s,gesture_str = 65.,53.,49.,None
            if 65535. not in angle_list:
                if (angle_list[0]>thr_angle_thumb)  and (angle_list[1]>thr_angle) and (angle_list[2]>thr_angle) and (angle_list[3]>thr_angle) and (angle_list[4]>thr_angle):
                    gesture_str = "fist"
                elif (angle_list[0]<thr_angle_s)  and (angle_list[1]<thr_angle_s) and (angle_list[2]<thr_angle_s) and (angle_list[3]<thr_angle_s) and (angle_list[4]<thr_angle_s):
                    gesture_str = "five"
                elif (angle_list[0]<thr_angle_s)  and (angle_list[1]<thr_angle_s) and (angle_list[2]>thr_angle) and (angle_list[3]>thr_angle) and (angle_list[4]>thr_angle):
                    gesture_str = "gun"
                elif (angle_list[0]<thr_angle_s)  and (angle_list[1]<thr_angle_s) and (angle_list[2]>thr_angle) and (angle_list[3]>thr_angle) and (angle_list[4]<thr_angle_s):
                    gesture_str = "love"
                elif (angle_list[0]>5)  and (angle_list[1]<thr_angle_s) and (angle_list[2]>thr_angle) and (angle_list[3]>thr_angle) and (angle_list[4]>thr_angle):
                    gesture_str = "one"
                elif (angle_list[0]<thr_angle_s)  and (angle_list[1]>thr_angle) and (angle_list[2]>thr_angle) and (angle_list[3]>thr_angle) and (angle_list[4]<thr_angle_s):
                    gesture_str = "six"
                elif (angle_list[0]>thr_angle_thumb)  and (angle_list[1]<thr_angle_s) and (angle_list[2]<thr_angle_s) and (angle_list[3]<thr_angle_s) and (angle_list[4]>thr_angle):
                    gesture_str = "three"
                elif (angle_list[0]<thr_angle_s)  and (angle_list[1]>thr_angle) and (angle_list[2]>thr_angle) and (angle_list[3]>thr_angle) and (angle_list[4]>thr_angle):
                    gesture_str = "thumbUp"
                elif (angle_list[0]>thr_angle_thumb)  and (angle_list[1]<thr_angle_s) and (angle_list[2]<thr_angle_s) and (angle_list[3]>thr_angle) and (angle_list[4]>thr_angle):
                    gesture_str = "yeah"
            return gesture_str

# 手掌关键点分类任务
class HandKeyPointClass:
    def __init__(self,hand_det_kmodel,hand_kp_kmodel,det_input_size,kp_input_size,labels,anchors,confidence_threshold=0.25,nms_threshold=0.3,nms_option=False,strides=[8,16,32],rgb888p_size=[1280,720],display_size=[1920,1080],debug_mode=0):
        # 手掌检测模型路径
        self.hand_det_kmodel=hand_det_kmodel
        # 手掌关键点模型路径
        self.hand_kp_kmodel=hand_kp_kmodel
        # 手掌检测模型输入分辨率
        self.det_input_size=det_input_size
        # 手掌关键点模型输入分辨率
        self.kp_input_size=kp_input_size
        self.labels=labels
        # anchors
        self.anchors=anchors
        # 置信度阈值
        self.confidence_threshold=confidence_threshold
        # nms阈值
        self.nms_threshold=nms_threshold
        self.nms_option=nms_option
        self.strides=strides
        # sensor给到AI的图像分辨率,宽16字节对齐
        self.rgb888p_size=[ALIGN_UP(rgb888p_size[0],16),rgb888p_size[1]]
        # 视频输出VO分辨率,宽16字节对齐
        self.display_size=[ALIGN_UP(display_size[0],16),display_size[1]]
        # debug_mode模式
        self.debug_mode=debug_mode
        self.hand_det=HandDetApp(self.hand_det_kmodel,self.labels,model_input_size=self.det_input_size,anchors=self.anchors,confidence_threshold=self.confidence_threshold,nms_threshold=self.nms_threshold,nms_option=self.nms_option,strides=self.strides,rgb888p_size=self.rgb888p_size,display_size=self.display_size,debug_mode=0)
        self.hand_kp=HandKPClassApp(self.hand_kp_kmodel,model_input_size=self.kp_input_size,rgb888p_size=self.rgb888p_size,display_size=self.display_size)
        self.hand_det.config_preprocess()

    # run函数
    def run(self,input_np):
        # 执行手掌检测
        det_boxes=self.hand_det.run(input_np)
        boxes=[]
        gesture_res=[]
        for det_box in det_boxes:
            # 对于检测到的每一个手掌执行关键点识别
            x1, y1, x2, y2 = det_box[2],det_box[3],det_box[4],det_box[5]
            w,h= int(x2 - x1),int(y2 - y1)
            if (h<(0.1*self.rgb888p_size[1])):
                continue
            if (w<(0.25*self.rgb888p_size[0]) and ((x1<(0.03*self.rgb888p_size[0])) or (x2>(0.97*self.rgb888p_size[0])))):
                continue
            if (w<(0.15*self.rgb888p_size[0]) and ((x1<(0.01*self.rgb888p_size[0])) or (x2>(0.99*self.rgb888p_size[0])))):
                continue
            self.hand_kp.config_preprocess(det_box)
            results_show,gesture=self.hand_kp.run(input_np)
            gesture_res.append((results_show,gesture))
            boxes.append(det_box)
        return boxes,gesture_res

    # 绘制效果,绘制关键点、手掌检测框和识别结果
    def draw_result(self,pl,dets,gesture_res):
        pl.osd_img.clear()
        if len(dets)>0:
            for k in range(len(dets)):
                det_box=dets[k]
                x1, y1, x2, y2 = det_box[2],det_box[3],det_box[4],det_box[5]
                w,h= int(x2 - x1),int(y2 - y1)
                if (h<(0.1*self.rgb888p_size[1])):
                    continue
                if (w<(0.25*self.rgb888p_size[0]) and ((x1<(0.03*self.rgb888p_size[0])) or (x2>(0.97*self.rgb888p_size[0])))):
                    continue
                if (w<(0.15*self.rgb888p_size[0]) and ((x1<(0.01*self.rgb888p_size[0])) or (x2>(0.99*self.rgb888p_size[0])))):
                    continue
                w_det = int(float(x2 - x1) * self.display_size[0] // self.rgb888p_size[0])
                h_det = int(float(y2 - y1) * self.display_size[1] // self.rgb888p_size[1])
                x_det = int(x1*self.display_size[0] // self.rgb888p_size[0])
                y_det = int(y1*self.display_size[1] // self.rgb888p_size[1])
                pl.osd_img.draw_rectangle(x_det, y_det, w_det, h_det, color=(255, 0, 255, 0), thickness = 2)

                results_show=gesture_res[k][0]
                for i in range(len(results_show)/2):
                    pl.osd_img.draw_circle(results_show[i*2], results_show[i*2+1], 1, color=(255, 0, 255, 0),fill=False)
                for i in range(5):
                    j = i*8
                    if i==0:
                        R = 255; G = 0; B = 0
                    if i==1:
                        R = 255; G = 0; B = 255
                    if i==2:
                        R = 255; G = 255; B = 0
                    if i==3:
                        R = 0; G = 255; B = 0
                    if i==4:
                        R = 0; G = 0; B = 255
                    pl.osd_img.draw_line(results_show[0], results_show[1], results_show[j+2], results_show[j+3], color=(255,R,G,B), thickness = 3)
                    pl.osd_img.draw_line(results_show[j+2], results_show[j+3], results_show[j+4], results_show[j+5], color=(255,R,G,B), thickness = 3)
                    pl.osd_img.draw_line(results_show[j+4], results_show[j+5], results_show[j+6], results_show[j+7], color=(255,R,G,B), thickness = 3)
                    pl.osd_img.draw_line(results_show[j+6], results_show[j+7], results_show[j+8], results_show[j+9], color=(255,R,G,B), thickness = 3)

                gesture_str=gesture_res[k][1]
                pl.osd_img.draw_string_advanced( x_det , y_det-50,32, " " + str(gesture_str), color=(255,0, 255, 0))


if __name__=="__main__":
    # 显示模式,默认"hdmi",可以选择"hdmi"和"lcd"
    display_mode="hdmi"
    if display_mode=="hdmi":
        display_size=[1920,1080]
    else:
        display_size=[800,480]
    # 手掌检测模型路径
    hand_det_kmodel_path="/sdcard/app/tests/kmodel/hand_det.kmodel"
    # 手掌关键点模型路径
    hand_kp_kmodel_path="/sdcard/app/tests/kmodel/handkp_det.kmodel"
    # 其他参数
    anchors_path="/sdcard/app/tests/utils/prior_data_320.bin"
    rgb888p_size=[1920,1080]
    hand_det_input_size=[512,512]
    hand_kp_input_size=[256,256]
    confidence_threshold=0.2
    nms_threshold=0.5
    labels=["hand"]
    anchors = [26,27, 53,52, 75,71, 80,99, 106,82, 99,134, 140,113, 161,172, 245,276]

    # 初始化PipeLine,只关注传给AI的图像分辨率,显示的分辨率
    pl=PipeLine(rgb888p_size=rgb888p_size,display_size=display_size,display_mode=display_mode)
    pl.create()
    hkc=HandKeyPointClass(hand_det_kmodel_path,hand_kp_kmodel_path,det_input_size=hand_det_input_size,kp_input_size=hand_kp_input_size,labels=labels,anchors=anchors,confidence_threshold=confidence_threshold,nms_threshold=nms_threshold,nms_option=False,strides=[8,16,32],rgb888p_size=rgb888p_size,display_size=display_size)
    try:
        while True:
            os.exitpoint()
            with ScopedTiming("total",1):
                img=pl.get_frame()                          # 获取当前帧
                det_boxes,gesture_res=hkc.run(img)          # 推理当前帧
                hkc.draw_result(pl,det_boxes,gesture_res)   # 绘制当前帧推理结果
                pl.show_image()                             # 展示推理结果
                gc.collect()
    except Exception as e:
        sys.print_exception(e)
    finally:
        hkc.hand_det.deinit()
        hkc.hand_kp.deinit()
        pl.destroy()
2.14. 手掌关键点检测#
from libs.PipeLine import PipeLine, ScopedTiming
from libs.AIBase import AIBase
from libs.AI2D import Ai2d
import os
import ujson
from media.media import *
from time import *
import nncase_runtime as nn
import ulab.numpy as np
import time
import image
import aicube
import random
import gc
import sys

# 自定义手掌检测任务类
class HandDetApp(AIBase):
    def __init__(self,kmodel_path,labels,model_input_size,anchors,confidence_threshold=0.2,nms_threshold=0.5,nms_option=False, strides=[8,16,32],rgb888p_size=[1920,1080],display_size=[1920,1080],debug_mode=0):
        super().__init__(kmodel_path,model_input_size,rgb888p_size,debug_mode)
        # kmodel路径
        self.kmodel_path=kmodel_path
        self.labels=labels
        # 检测模型输入分辨率
        self.model_input_size=model_input_size
        # 置信度阈值
        self.confidence_threshold=confidence_threshold
        # nms阈值
        self.nms_threshold=nms_threshold
        # 锚框,目标检测任务使用
        self.anchors=anchors
        # 特征下采样倍数
        self.strides = strides
        # NMS选项,如果为True做类间NMS,如果为False做类内NMS
        self.nms_option = nms_option
        # sensor给到AI的图像分辨率,宽16字节对齐
        self.rgb888p_size=[ALIGN_UP(rgb888p_size[0],16),rgb888p_size[1]]
        # 视频输出VO分辨率,宽16字节对齐
        self.display_size=[ALIGN_UP(display_size[0],16),display_size[1]]
        # debug模式
        self.debug_mode=debug_mode
        # Ai2d实例用于实现预处理
        self.ai2d=Ai2d(debug_mode)
        # 设置ai2d的输入输出的格式和数据类型
        self.ai2d.set_ai2d_dtype(nn.ai2d_format.NCHW_FMT,nn.ai2d_format.NCHW_FMT,np.uint8, np.uint8)

    # 配置预处理操作,这里使用了pad和resize,Ai2d支持crop/shift/pad/resize/affine,具体代码请打开/sdcard/app/libs/AI2D.py查看
    def config_preprocess(self,input_image_size=None):
        with ScopedTiming("set preprocess config",self.debug_mode > 0):
            # 初始化ai2d预处理配置,默认为sensor给到AI的尺寸,可以通过设置input_image_size自行修改输入尺寸
            ai2d_input_size = input_image_size if input_image_size else self.rgb888p_size
            # 计算padding参数并应用pad操作,以确保输入图像尺寸与模型输入尺寸匹配
            top, bottom, left, right = self.get_padding_param()
            self.ai2d.pad([0, 0, 0, 0, top, bottom, left, right], 0, [114, 114, 114])
            # 使用双线性插值进行resize操作,调整图像尺寸以符合模型输入要求
            self.ai2d.resize(nn.interp_method.tf_bilinear, nn.interp_mode.half_pixel)
            # 构建预处理流程,参数为预处理输入tensor的shape和预处理输出的tensor的shape
            self.ai2d.build([1,3,ai2d_input_size[1],ai2d_input_size[0]],[1,3,self.model_input_size[1],self.model_input_size[0]])

    # 自定义当前任务的后处理,用于处理模型输出结果,这里使用了aicube库的anchorbasedet_post_process接口
    def postprocess(self,results):
        with ScopedTiming("postprocess",self.debug_mode > 0):
            dets = aicube.anchorbasedet_post_process(results[0], results[1], results[2], self.model_input_size, self.rgb888p_size, self.strides, len(self.labels), self.confidence_threshold, self.nms_threshold, self.anchors, self.nms_option)
            # 返回手掌检测结果
            return dets

    # 计算padding参数,确保输入图像尺寸与模型输入尺寸匹配
    def get_padding_param(self):
        # 根据目标宽度和高度计算比例因子
        dst_w = self.model_input_size[0]
        dst_h = self.model_input_size[1]
        input_width = self.rgb888p_size[0]
        input_high = self.rgb888p_size[1]
        ratio_w = dst_w / input_width
        ratio_h = dst_h / input_high
        # 选择较小的比例因子,以确保图像内容完整
        if ratio_w < ratio_h:
            ratio = ratio_w
        else:
            ratio = ratio_h
        # 计算新的宽度和高度
        new_w = int(ratio * input_width)
        new_h = int(ratio * input_high)
        # 计算宽度和高度的差值,并确定padding的位置
        dw = (dst_w - new_w) / 2
        dh = (dst_h - new_h) / 2
        top = int(round(dh - 0.1))
        bottom = int(round(dh + 0.1))
        left = int(round(dw - 0.1))
        right = int(round(dw + 0.1))
        return top, bottom, left, right

# 自定义手势关键点检测任务类
class HandKPDetApp(AIBase):
    def __init__(self,kmodel_path,model_input_size,rgb888p_size=[1920,1080],display_size=[1920,1080],debug_mode=0):
        super().__init__(kmodel_path,model_input_size,rgb888p_size,debug_mode)
        # kmodel路径
        self.kmodel_path=kmodel_path
        # 检测模型输入分辨率
        self.model_input_size=model_input_size
        # sensor给到AI的图像分辨率,宽16字节对齐
        self.rgb888p_size=[ALIGN_UP(rgb888p_size[0],16),rgb888p_size[1]]
        # 视频输出VO分辨率,宽16字节对齐
        self.display_size=[ALIGN_UP(display_size[0],16),display_size[1]]
        self.crop_params=[]
        # debug模式
        self.debug_mode=debug_mode
        # Ai2d实例用于实现预处理
        self.ai2d=Ai2d(debug_mode)
        # 设置ai2d的输入输出的格式和数据类型
        self.ai2d.set_ai2d_dtype(nn.ai2d_format.NCHW_FMT,nn.ai2d_format.NCHW_FMT,np.uint8, np.uint8)

    # 配置预处理操作,这里使用了crop和resize,Ai2d支持crop/shift/pad/resize/affine,具体代码请打开/sdcard/app/libs/AI2D.py查看
    def config_preprocess(self,det,input_image_size=None):
        with ScopedTiming("set preprocess config",self.debug_mode > 0):
            ai2d_input_size=input_image_size if input_image_size else self.rgb888p_size
            self.crop_params = self.get_crop_param(det)
            self.ai2d.crop(self.crop_params[0],self.crop_params[1],self.crop_params[2],self.crop_params[3])
            self.ai2d.resize(nn.interp_method.tf_bilinear, nn.interp_mode.half_pixel)
            self.ai2d.build([1,3,ai2d_input_size[1],ai2d_input_size[0]],[1,3,self.model_input_size[1],self.model_input_size[0]])

    # 自定义后处理,results是模型输出的array列表
    def postprocess(self,results):
        with ScopedTiming("postprocess",self.debug_mode > 0):
            results=results[0].reshape(results[0].shape[0]*results[0].shape[1])
            results_show = np.zeros(results.shape,dtype=np.int16)
            results_show[0::2] = results[0::2] * self.crop_params[3] + self.crop_params[0]
            results_show[1::2] = results[1::2] * self.crop_params[2] + self.crop_params[1]
            results_show[0::2] = results_show[0::2] * (self.display_size[0] / self.rgb888p_size[0])
            results_show[1::2] = results_show[1::2] * (self.display_size[1] / self.rgb888p_size[1])
            return results_show

    # 计算crop参数
    def get_crop_param(self,det_box):
        x1, y1, x2, y2 = det_box[2],det_box[3],det_box[4],det_box[5]
        w,h= int(x2 - x1),int(y2 - y1)
        w_det = int(float(x2 - x1) * self.display_size[0] // self.rgb888p_size[0])
        h_det = int(float(y2 - y1) * self.display_size[1] // self.rgb888p_size[1])
        x_det = int(x1*self.display_size[0] // self.rgb888p_size[0])
        y_det = int(y1*self.display_size[1] // self.rgb888p_size[1])
        length = max(w, h)/2
        cx = (x1+x2)/2
        cy = (y1+y2)/2
        ratio_num = 1.26*length
        x1_kp = int(max(0,cx-ratio_num))
        y1_kp = int(max(0,cy-ratio_num))
        x2_kp = int(min(self.rgb888p_size[0]-1, cx+ratio_num))
        y2_kp = int(min(self.rgb888p_size[1]-1, cy+ratio_num))
        w_kp = int(x2_kp - x1_kp + 1)
        h_kp = int(y2_kp - y1_kp + 1)
        return [x1_kp, y1_kp, w_kp, h_kp]

# 手掌关键点检测任务
class HandKeyPointDet:
    def __init__(self,hand_det_kmodel,hand_kp_kmodel,det_input_size,kp_input_size,labels,anchors,confidence_threshold=0.25,nms_threshold=0.3,nms_option=False,strides=[8,16,32],rgb888p_size=[1280,720],display_size=[1920,1080],debug_mode=0):
        # 手掌检测模型路径
        self.hand_det_kmodel=hand_det_kmodel
        # 手掌关键点模型路径
        self.hand_kp_kmodel=hand_kp_kmodel
        # 手掌检测模型输入分辨率
        self.det_input_size=det_input_size
        # 手掌关键点模型输入分辨率
        self.kp_input_size=kp_input_size
        self.labels=labels
        # anchors
        self.anchors=anchors
        # 置信度阈值
        self.confidence_threshold=confidence_threshold
        # nms阈值
        self.nms_threshold=nms_threshold
        # nms选项
        self.nms_option=nms_option
        # 特征图对于输入的下采样倍数
        self.strides=strides
        # sensor给到AI的图像分辨率,宽16字节对齐
        self.rgb888p_size=[ALIGN_UP(rgb888p_size[0],16),rgb888p_size[1]]
        # 视频输出VO分辨率,宽16字节对齐
        self.display_size=[ALIGN_UP(display_size[0],16),display_size[1]]
        # debug_mode模式
        self.debug_mode=debug_mode
        self.hand_det=HandDetApp(self.hand_det_kmodel,self.labels,model_input_size=self.det_input_size,anchors=self.anchors,confidence_threshold=self.confidence_threshold,nms_threshold=self.nms_threshold,nms_option=self.nms_option,strides=self.strides,rgb888p_size=self.rgb888p_size,display_size=self.display_size,debug_mode=0)
        self.hand_kp=HandKPDetApp(self.hand_kp_kmodel,model_input_size=self.kp_input_size,rgb888p_size=self.rgb888p_size,display_size=self.display_size)
        self.hand_det.config_preprocess()

    # run函数
    def run(self,input_np):
        # 手掌检测
        det_boxes=self.hand_det.run(input_np)
        hand_res=[]
        boxes=[]
        for det_box in det_boxes:
            # 对检测到的每个手掌执行手势关键点识别
            x1, y1, x2, y2 = det_box[2],det_box[3],det_box[4],det_box[5]
            w,h= int(x2 - x1),int(y2 - y1)
            # 丢弃不合理的框
            if (h<(0.1*self.rgb888p_size[1])):
                continue
            if (w<(0.25*self.rgb888p_size[0]) and ((x1<(0.03*self.rgb888p_size[0])) or (x2>(0.97*self.rgb888p_size[0])))):
                continue
            if (w<(0.15*self.rgb888p_size[0]) and ((x1<(0.01*self.rgb888p_size[0])) or (x2>(0.99*self.rgb888p_size[0])))):
                continue
            self.hand_kp.config_preprocess(det_box)
            results_show=self.hand_kp.run(input_np)
            boxes.append(det_box)
            hand_res.append(results_show)
        return boxes,hand_res

    # 绘制效果,绘制手掌关键点、检测框
    def draw_result(self,pl,dets,hand_res):
        pl.osd_img.clear()
        if dets:
            for k in range(len(dets)):
                det_box=dets[k]
                x1, y1, x2, y2 = det_box[2],det_box[3],det_box[4],det_box[5]
                w,h= int(x2 - x1),int(y2 - y1)
                w_det = int(float(x2 - x1) * self.display_size[0] // self.rgb888p_size[0])
                h_det = int(float(y2 - y1) * self.display_size[1] // self.rgb888p_size[1])
                x_det = int(x1*self.display_size[0] // self.rgb888p_size[0])
                y_det = int(y1*self.display_size[1] // self.rgb888p_size[1])
                pl.osd_img.draw_rectangle(x_det, y_det, w_det, h_det, color=(255, 0, 255, 0), thickness = 2)

                results_show=hand_res[k]
                for i in range(len(results_show)/2):
                    pl.osd_img.draw_circle(results_show[i*2], results_show[i*2+1], 1, color=(255, 0, 255, 0),fill=False)
                for i in range(5):
                    j = i*8
                    if i==0:
                        R = 255; G = 0; B = 0
                    if i==1:
                        R = 255; G = 0; B = 255
                    if i==2:
                        R = 255; G = 255; B = 0
                    if i==3:
                        R = 0; G = 255; B = 0
                    if i==4:
                        R = 0; G = 0; B = 255
                    pl.osd_img.draw_line(results_show[0], results_show[1], results_show[j+2], results_show[j+3], color=(255,R,G,B), thickness = 3)
                    pl.osd_img.draw_line(results_show[j+2], results_show[j+3], results_show[j+4], results_show[j+5], color=(255,R,G,B), thickness = 3)
                    pl.osd_img.draw_line(results_show[j+4], results_show[j+5], results_show[j+6], results_show[j+7], color=(255,R,G,B), thickness = 3)
                    pl.osd_img.draw_line(results_show[j+6], results_show[j+7], results_show[j+8], results_show[j+9], color=(255,R,G,B), thickness = 3)


if __name__=="__main__":
    # 显示模式,默认"hdmi",可以选择"hdmi"和"lcd"
    display_mode="hdmi"
    if display_mode=="hdmi":
        display_size=[1920,1080]
    else:
        display_size=[800,480]
    # 手掌检测模型路径
    hand_det_kmodel_path="/sdcard/app/tests/kmodel/hand_det.kmodel"
    # 手部关键点模型路径
    hand_kp_kmodel_path="/sdcard/app/tests/kmodel/handkp_det.kmodel"
    # 其它参数
    anchors_path="/sdcard/app/tests/utils/prior_data_320.bin"
    rgb888p_size=[1920,1080]
    hand_det_input_size=[512,512]
    hand_kp_input_size=[256,256]
    confidence_threshold=0.2
    nms_threshold=0.5
    labels=["hand"]
    anchors = [26,27, 53,52, 75,71, 80,99, 106,82, 99,134, 140,113, 161,172, 245,276]

    # 初始化PipeLine,只关注传给AI的图像分辨率,显示的分辨率
    pl=PipeLine(rgb888p_size=rgb888p_size,display_size=display_size,display_mode=display_mode)
    pl.create()
    hkd=HandKeyPointDet(hand_det_kmodel_path,hand_kp_kmodel_path,det_input_size=hand_det_input_size,kp_input_size=hand_kp_input_size,labels=labels,anchors=anchors,confidence_threshold=confidence_threshold,nms_threshold=nms_threshold,nms_option=False,strides=[8,16,32],rgb888p_size=rgb888p_size,display_size=display_size)
    try:
        while True:
            os.exitpoint()
            with ScopedTiming("total",1):
                img=pl.get_frame()                      # 获取当前帧
                det_boxes,hand_res=hkd.run(img)         # 推理当前帧
                hkd.draw_result(pl,det_boxes,hand_res)  # 绘制推理结果
                pl.show_image()                         # 展示推理结果
                gc.collect()
    except Exception as e:
        sys.print_exception(e)
    finally:
        hkd.hand_det.deinit()
        hkd.hand_kp.deinit()
        pl.destroy()
2.15. 手势识别#
from libs.PipeLine import PipeLine, ScopedTiming
from libs.AIBase import AIBase
from libs.AI2D import Ai2d
import os
import ujson
from media.media import *
from time import *
import nncase_runtime as nn
import ulab.numpy as np
import time
import image
import aicube
import random
import gc
import sys

# 自定义手掌检测任务类
class HandDetApp(AIBase):
    def __init__(self,kmodel_path,model_input_size,anchors,confidence_threshold=0.2,nms_threshold=0.5,nms_option=False, strides=[8,16,32],rgb888p_size=[1920,1080],display_size=[1920,1080],debug_mode=0):
        super().__init__(kmodel_path,model_input_size,rgb888p_size,debug_mode)
        # kmodel路径
        self.kmodel_path=kmodel_path
        # 检测模型输入分辨率
        self.model_input_size=model_input_size
        # 置信度阈值
        self.confidence_threshold=confidence_threshold
        # nms阈值
        self.nms_threshold=nms_threshold
        # 锚框,目标检测任务使用
        self.anchors=anchors
        # 特征下采样倍数
        self.strides = strides
        # NMS选项,如果为True做类间NMS,如果为False做类内NMS
        self.nms_option = nms_option
        # sensor给到AI的图像分辨率,宽16字节对齐
        self.rgb888p_size=[ALIGN_UP(rgb888p_size[0],16),rgb888p_size[1]]
        # 视频输出VO分辨率,宽16字节对齐
        self.display_size=[ALIGN_UP(display_size[0],16),display_size[1]]
        # debug模式
        self.debug_mode=debug_mode
        # Ai2d实例用于实现预处理
        self.ai2d=Ai2d(debug_mode)
        # 设置ai2d的输入输出的格式和数据类型
        self.ai2d.set_ai2d_dtype(nn.ai2d_format.NCHW_FMT,nn.ai2d_format.NCHW_FMT,np.uint8, np.uint8)

    # 配置预处理操作,这里使用了pad和resize,Ai2d支持crop/shift/pad/resize/affine,具体代码请打开/sdcard/app/libs/AI2D.py查看
    def config_preprocess(self,input_image_size=None):
        with ScopedTiming("set preprocess config",self.debug_mode > 0):
            # 初始化ai2d预处理配置,默认为sensor给到AI的尺寸,可以通过设置input_image_size自行修改输入尺寸
            ai2d_input_size = input_image_size if input_image_size else self.rgb888p_size
            # 计算padding参数并应用pad操作,以确保输入图像尺寸与模型输入尺寸匹配
            top, bottom, left, right = self.get_padding_param()
            self.ai2d.pad([0, 0, 0, 0, top, bottom, left, right], 0, [114, 114, 114])
            # 使用双线性插值进行resize操作,调整图像尺寸以符合模型输入要求
            self.ai2d.resize(nn.interp_method.tf_bilinear, nn.interp_mode.half_pixel)
            # 构建预处理流程,参数为预处理输入tensor的shape和预处理输出的tensor的shape
            self.ai2d.build([1,3,ai2d_input_size[1],ai2d_input_size[0]],[1,3,self.model_input_size[1],self.model_input_size[0]])

    # 自定义当前任务的后处理,用于处理模型输出结果,这里使用了aicube库的anchorbasedet_post_process接口
    def postprocess(self,results):
        with ScopedTiming("postprocess",self.debug_mode > 0):
            dets = aicube.anchorbasedet_post_process(results[0], results[1], results[2], self.model_input_size, self.rgb888p_size, self.strides,1, self.confidence_threshold, self.nms_threshold, self.anchors, self.nms_option)
            # 返回手掌检测结果
            return dets

    # 计算padding参数,确保输入图像尺寸与模型输入尺寸匹配
    def get_padding_param(self):
        # 根据目标宽度和高度计算比例因子
        dst_w = self.model_input_size[0]
        dst_h = self.model_input_size[1]
        input_width = self.rgb888p_size[0]
        input_high = self.rgb888p_size[1]
        ratio_w = dst_w / input_width
        ratio_h = dst_h / input_high
        # 选择较小的比例因子,以确保图像内容完整
        if ratio_w < ratio_h:
            ratio = ratio_w
        else:
            ratio = ratio_h
        # 计算新的宽度和高度
        new_w = int(ratio * input_width)
        new_h = int(ratio * input_high)
        # 计算宽度和高度的差值,并确定padding的位置
        dw = (dst_w - new_w) / 2
        dh = (dst_h - new_h) / 2
        top = int(round(dh - 0.1))
        bottom = int(round(dh + 0.1))
        left = int(round(dw - 0.1))
        right = int(round(dw + 0.1))
        return top, bottom, left, right

# 自定义手势识别任务类
class HandRecognitionApp(AIBase):
    def __init__(self,kmodel_path,model_input_size,labels,rgb888p_size=[1920,1080],display_size=[1920,1080],debug_mode=0):
        super().__init__(kmodel_path,model_input_size,rgb888p_size,debug_mode)
        # kmodel路径
        self.kmodel_path=kmodel_path
        # 检测模型输入分辨率
        self.model_input_size=model_input_size
        self.labels=labels
        # sensor给到AI的图像分辨率,宽16字节对齐
        self.rgb888p_size=[ALIGN_UP(rgb888p_size[0],16),rgb888p_size[1]]
        # 视频输出VO分辨率,宽16字节对齐
        self.display_size=[ALIGN_UP(display_size[0],16),display_size[1]]
        self.crop_params=[]
        # debug模式
        self.debug_mode=debug_mode
        # Ai2d实例用于实现预处理
        self.ai2d=Ai2d(debug_mode)
        # 设置ai2d的输入输出的格式和数据类型
        self.ai2d.set_ai2d_dtype(nn.ai2d_format.NCHW_FMT,nn.ai2d_format.NCHW_FMT,np.uint8, np.uint8)

    # 配置预处理操作,这里使用了crop和resize,Ai2d支持crop/shift/pad/resize/affine,具体代码请打开/sdcard/app/libs/AI2D.py查看
    def config_preprocess(self,det,input_image_size=None):
        with ScopedTiming("set preprocess config",self.debug_mode > 0):
            ai2d_input_size=input_image_size if input_image_size else self.rgb888p_size
            self.crop_params = self.get_crop_param(det)
            self.ai2d.crop(self.crop_params[0],self.crop_params[1],self.crop_params[2],self.crop_params[3])
            self.ai2d.resize(nn.interp_method.tf_bilinear, nn.interp_mode.half_pixel)
            self.ai2d.build([1,3,ai2d_input_size[1],ai2d_input_size[0]],[1,3,self.model_input_size[1],self.model_input_size[0]])

    # 自定义后处理,results是模型输出的array列表
    def postprocess(self,results):
        with ScopedTiming("postprocess",self.debug_mode > 0):
            result=results[0].reshape(results[0].shape[0]*results[0].shape[1])
            x_softmax = self.softmax(result)
            idx = np.argmax(x_softmax)
            text = " " + self.labels[idx] + ": " + str(round(x_softmax[idx],2))
            return text

    # 计算crop参数
    def get_crop_param(self,det_box):
        x1, y1, x2, y2 = det_box[2],det_box[3],det_box[4],det_box[5]
        w,h= int(x2 - x1),int(y2 - y1)
        w_det = int(float(x2 - x1) * self.display_size[0] // self.rgb888p_size[0])
        h_det = int(float(y2 - y1) * self.display_size[1] // self.rgb888p_size[1])
        x_det = int(x1*self.display_size[0] // self.rgb888p_size[0])
        y_det = int(y1*self.display_size[1] // self.rgb888p_size[1])
        length = max(w, h)/2
        cx = (x1+x2)/2
        cy = (y1+y2)/2
        ratio_num = 1.26*length
        x1_kp = int(max(0,cx-ratio_num))
        y1_kp = int(max(0,cy-ratio_num))
        x2_kp = int(min(self.rgb888p_size[0]-1, cx+ratio_num))
        y2_kp = int(min(self.rgb888p_size[1]-1, cy+ratio_num))
        w_kp = int(x2_kp - x1_kp + 1)
        h_kp = int(y2_kp - y1_kp + 1)
        return [x1_kp, y1_kp, w_kp, h_kp]

    # softmax实现
    def softmax(self,x):
        x -= np.max(x)
        x = np.exp(x) / np.sum(np.exp(x))
        return x

class HandRecognition:
    def __init__(self,hand_det_kmodel,hand_kp_kmodel,det_input_size,kp_input_size,labels,anchors,confidence_threshold=0.25,nms_threshold=0.3,nms_option=False,strides=[8,16,32],rgb888p_size=[1280,720],display_size=[1920,1080],debug_mode=0):
        # 手掌检测模型路径
        self.hand_det_kmodel=hand_det_kmodel
        # 手掌关键点模型路径
        self.hand_kp_kmodel=hand_kp_kmodel
        # 手掌检测模型输入分辨率
        self.det_input_size=det_input_size
        # 手掌关键点模型输入分辨率
        self.kp_input_size=kp_input_size
        self.labels=labels
        # anchors
        self.anchors=anchors
        # 置信度阈值
        self.confidence_threshold=confidence_threshold
        # nms阈值
        self.nms_threshold=nms_threshold
        # nms选项
        self.nms_option=nms_option
        # 特征图针对输出的下采样倍数
        self.strides=strides
        # sensor给到AI的图像分辨率,宽16字节对齐
        self.rgb888p_size=[ALIGN_UP(rgb888p_size[0],16),rgb888p_size[1]]
        # 视频输出VO分辨率,宽16字节对齐
        self.display_size=[ALIGN_UP(display_size[0],16),display_size[1]]
        # debug_mode模式
        self.debug_mode=debug_mode
        self.hand_det=HandDetApp(self.hand_det_kmodel,model_input_size=self.det_input_size,anchors=self.anchors,confidence_threshold=self.confidence_threshold,nms_threshold=self.nms_threshold,nms_option=self.nms_option,strides=self.strides,rgb888p_size=self.rgb888p_size,display_size=self.display_size,debug_mode=0)
        self.hand_rec=HandRecognitionApp(self.hand_kp_kmodel,model_input_size=self.kp_input_size,labels=self.labels,rgb888p_size=self.rgb888p_size,display_size=self.display_size)
        self.hand_det.config_preprocess()

    # run函数
    def run(self,input_np):
        # 执行手掌检测
        det_boxes=self.hand_det.run(input_np)
        hand_rec_res=[]
        hand_det_res=[]
        for det_box in det_boxes:
            # 对检测到的每一个手掌执行手势识别
            x1, y1, x2, y2 = det_box[2],det_box[3],det_box[4],det_box[5]
            w,h= int(x2 - x1),int(y2 - y1)
            if (h<(0.1*self.rgb888p_size[1])):
                continue
            if (w<(0.25*self.rgb888p_size[0]) and ((x1<(0.03*self.rgb888p_size[0])) or (x2>(0.97*self.rgb888p_size[0])))):
                continue
            if (w<(0.15*self.rgb888p_size[0]) and ((x1<(0.01*self.rgb888p_size[0])) or (x2>(0.99*self.rgb888p_size[0])))):
                continue
            self.hand_rec.config_preprocess(det_box)
            text=self.hand_rec.run(input_np)
            hand_det_res.append(det_box)
            hand_rec_res.append(text)
        return hand_det_res,hand_rec_res

    # 绘制效果,绘制识别结果和检测框
    def draw_result(self,pl,hand_det_res,hand_rec_res):
        pl.osd_img.clear()
        if hand_det_res:
            for k in range(len(hand_det_res)):
                det_box=hand_det_res[k]
                x1, y1, x2, y2 = det_box[2],det_box[3],det_box[4],det_box[5]
                w,h= int(x2 - x1),int(y2 - y1)
                w_det = int(float(x2 - x1) * self.display_size[0] // self.rgb888p_size[0])
                h_det = int(float(y2 - y1) * self.display_size[1] // self.rgb888p_size[1])
                x_det = int(x1*self.display_size[0] // self.rgb888p_size[0])
                y_det = int(y1*self.display_size[1] // self.rgb888p_size[1])
                pl.osd_img.draw_rectangle(x_det, y_det, w_det, h_det, color=(255, 0, 255, 0), thickness = 2)
                pl.osd_img.draw_string_advanced( x_det, y_det-50, 32,hand_rec_res[k], color=(255,0, 255, 0))


if __name__=="__main__":
    # 显示模式,默认"hdmi",可以选择"hdmi"和"lcd"
    display_mode="hdmi"
    if display_mode=="hdmi":
        display_size=[1920,1080]
    else:
        display_size=[800,480]
    # 手掌检测模型路径
    hand_det_kmodel_path="/sdcard/app/tests/kmodel/hand_det.kmodel"
    # 手势识别模型路径
    hand_rec_kmodel_path="/sdcard/app/tests/kmodel/hand_reco.kmodel"
    # 其它参数
    anchors_path="/sdcard/app/tests/utils/prior_data_320.bin"
    rgb888p_size=[1920,1080]
    hand_det_input_size=[512,512]
    hand_rec_input_size=[224,224]
    confidence_threshold=0.2
    nms_threshold=0.5
    labels=["gun","other","yeah","five"]
    anchors = [26,27, 53,52, 75,71, 80,99, 106,82, 99,134, 140,113, 161,172, 245,276]

    # 初始化PipeLine,只关注传给AI的图像分辨率,显示的分辨率
    pl=PipeLine(rgb888p_size=rgb888p_size,display_size=display_size,display_mode=display_mode)
    pl.create()
    hr=HandRecognition(hand_det_kmodel_path,hand_rec_kmodel_path,det_input_size=hand_det_input_size,kp_input_size=hand_rec_input_size,labels=labels,anchors=anchors,confidence_threshold=confidence_threshold,nms_threshold=nms_threshold,nms_option=False,strides=[8,16,32],rgb888p_size=rgb888p_size,display_size=display_size)
    try:
        while True:
            os.exitpoint()
            with ScopedTiming("total",1):
                img=pl.get_frame()                              # 获取当前帧
                hand_det_res,hand_rec_res=hr.run(img)           # 推理当前帧
                hr.draw_result(pl,hand_det_res,hand_rec_res)    # 绘制推理结果
                pl.show_image()                                 # 展示推理结果
                gc.collect()
    except Exception as e:
        sys.print_exception(e)
    finally:
        hr.hand_det.deinit()
        hr.hand_rec.deinit()
        pl.destroy()
2.16 关键词唤醒#
from libs.PipeLine import ScopedTiming
from libs.AIBase import AIBase
from libs.AI2D import Ai2d
from media.pyaudio import *                     # 音频模块
from media.media import *                       # 软件抽象模块,主要封装媒体数据链路以及媒体缓冲区
import media.wave as wave                       # wav音频处理模块
import nncase_runtime as nn                     # nncase运行模块,封装了kpu(kmodel推理)和ai2d(图片预处理加速)操作
import ulab.numpy as np                         # 类似python numpy操作,但也会有一些接口不同
import aidemo                                   # aidemo模块,封装ai demo相关前处理、后处理等操作
import time                                     # 时间统计
import struct                                   # 字节字符转换模块
import gc                                       # 垃圾回收模块
import os,sys                                   # 操作系统接口模块

# 自定义关键词唤醒类,继承自AIBase基类
class KWSApp(AIBase):
    def __init__(self, kmodel_path, threshold, debug_mode=0):
        super().__init__(kmodel_path)  # 调用基类的构造函数
        self.kmodel_path = kmodel_path  # 模型文件路径
        self.threshold=threshold
        self.debug_mode = debug_mode  # 是否开启调试模式
        self.cache_np = np.zeros((1, 256, 105), dtype=np.float)

    # 自定义预处理,返回模型输入tensor列表
    def preprocess(self,pcm_data):
        pcm_data_list=[]
        # 获取音频流数据
        for i in range(0, len(pcm_data), 2):
            # 每两个字节组织成一个有符号整数,然后将其转换为浮点数,即为一次采样的数据,加入到当前一帧(0.3s)的数据列表中
            int_pcm_data = struct.unpack("<h", pcm_data[i:i+2])[0]
            float_pcm_data = float(int_pcm_data)
            pcm_data_list.append(float_pcm_data)
        # 将pcm数据处理为模型输入的特征向量
        mp_feats = aidemo.kws_preprocess(fp, pcm_data_list)[0]
        mp_feats_np = np.array(mp_feats).reshape((1, 30, 40))
        audio_input_tensor = nn.from_numpy(mp_feats_np)
        cache_input_tensor = nn.from_numpy(self.cache_np)
        return [audio_input_tensor,cache_input_tensor]

    # 自定义当前任务的后处理,results是模型输出array列表
    def postprocess(self, results):
        with ScopedTiming("postprocess", self.debug_mode > 0):
            logits_np = results[0]
            self.cache_np= results[1]
            max_logits = np.max(logits_np, axis=1)[0]
            max_p = np.max(max_logits)
            idx = np.argmax(max_logits)
            # 如果分数大于阈值,且idx==1(即包含唤醒词),播放回复音频
            if max_p > self.threshold and idx == 1:
                return 1
            else:
                return 0


if __name__ == "__main__":
    os.exitpoint(os.EXITPOINT_ENABLE)
    nn.shrink_memory_pool()
    # 设置模型路径和其他参数
    kmodel_path = "/sdcard/app/tests/kmodel/kws.kmodel"
    # 其它参数
    THRESH = 0.5                # 检测阈值
    SAMPLE_RATE = 16000         # 采样率16000Hz,即每秒采样16000次
    CHANNELS = 1                # 通道数 1为单声道,2为立体声
    FORMAT = paInt16            # 音频输入输出格式 paInt16
    CHUNK = int(0.3 * 16000)    # 每次读取音频数据的帧数,设置为0.3s的帧数16000*0.3=4800
    reply_wav_file = "/sdcard/app/tests/utils/wozai.wav"         # kws唤醒词回复音频路径

    # 初始化音频预处理接口
    fp = aidemo.kws_fp_create()
    # 初始化音频流
    p = PyAudio()
    p.initialize(CHUNK)
    MediaManager.init()    #vb buffer初始化
    # 用于采集实时音频数据
    input_stream = p.open(format=FORMAT,channels=CHANNELS,rate=SAMPLE_RATE,input=True,frames_per_buffer=CHUNK)
    # 用于播放回复音频
    output_stream = p.open(format=FORMAT,channels=CHANNELS,rate=SAMPLE_RATE,output=True,frames_per_buffer=CHUNK)
    # 初始化自定义关键词唤醒实例
    kws = KWSApp(kmodel_path,threshold=THRESH,debug_mode=0)

    try:
        while True:
            os.exitpoint()                      # 检查是否有退出信号
            with ScopedTiming("total",1):
                pcm_data=input_stream.read()
                res=kws.run(pcm_data)
                if res:
                    print("====Detected XiaonanXiaonan!====")
                    wf = wave.open(reply_wav_file, "rb")
                    wav_data = wf.read_frames(CHUNK)
                    while wav_data:
                        output_stream.write(wav_data)
                        wav_data = wf.read_frames(CHUNK)
                    time.sleep(1) # 时间缓冲,用于播放回复声音
                    wf.close()
                else:
                    print("Deactivated!")
                gc.collect()                    # 垃圾回收
    except Exception as e:
        sys.print_exception(e)                  # 打印异常信息
    finally:
        input_stream.stop_stream()
        output_stream.stop_stream()
        input_stream.close()
        output_stream.close()
        p.terminate()
        MediaManager.deinit()              #释放vb buffer
        aidemo.kws_fp_destroy(fp)
        kws.deinit()                       # 反初始化
2.17. 车牌检测#
from libs.PipeLine import PipeLine, ScopedTiming
from libs.AIBase import AIBase
from libs.AI2D import Ai2d
import os
import ujson
from media.media import *
from time import *
import nncase_runtime as nn
import ulab.numpy as np
import time
import utime
import image
import random
import gc
import sys
import aidemo

# 自定义车牌检测类
class LicenceDetectionApp(AIBase):
    # 初始化函数,设置车牌检测应用的参数
    def __init__(self, kmodel_path, model_input_size, confidence_threshold=0.5, nms_threshold=0.2, rgb888p_size=[224,224], display_size=[1920,1080], debug_mode=0):
        super().__init__(kmodel_path, model_input_size, rgb888p_size, debug_mode)  # 调用基类的初始化函数
        self.kmodel_path = kmodel_path  # 模型路径
        # 模型输入分辨率
        self.model_input_size = model_input_size
        # 分类阈值
        self.confidence_threshold = confidence_threshold
        self.nms_threshold = nms_threshold
        # sensor给到AI的图像分辨率
        self.rgb888p_size = [ALIGN_UP(rgb888p_size[0], 16), rgb888p_size[1]]
        # 显示分辨率
        self.display_size = [ALIGN_UP(display_size[0], 16), display_size[1]]
        self.debug_mode = debug_mode
        # Ai2d实例,用于实现模型预处理
        self.ai2d = Ai2d(debug_mode)
        # 设置Ai2d的输入输出格式和类型
        self.ai2d.set_ai2d_dtype(nn.ai2d_format.NCHW_FMT, nn.ai2d_format.NCHW_FMT, np.uint8, np.uint8)

    # 配置预处理操作,这里使用了resize,Ai2d支持crop/shift/pad/resize/affine
    def config_preprocess(self, input_image_size=None):
        with ScopedTiming("set preprocess config", self.debug_mode > 0):
            # 初始化ai2d预处理配置,默认为sensor给到AI的尺寸,可以通过设置input_image_size自行修改输入尺寸
            ai2d_input_size = input_image_size if input_image_size else self.rgb888p_size
            self.ai2d.resize(nn.interp_method.tf_bilinear, nn.interp_mode.half_pixel)
            self.ai2d.build([1,3,ai2d_input_size[1],ai2d_input_size[0]],[1,3,self.model_input_size[1],self.model_input_size[0]])

    # 自定义当前任务的后处理
    def postprocess(self, results):
        with ScopedTiming("postprocess", self.debug_mode > 0):
            # 对检测结果进行后处理
            det_res = aidemo.licence_det_postprocess(results, [self.rgb888p_size[1], self.rgb888p_size[0]], self.model_input_size, self.confidence_threshold, self.nms_threshold)
            return det_res

    # 绘制检测结果到屏幕上
    def draw_result(self, pl, dets):
        with ScopedTiming("display_draw", self.debug_mode > 0):
            if dets:
                pl.osd_img.clear()  # 清除屏幕
                point_8 = np.zeros((8), dtype=np.int16)
                for det in dets:
                    # 将检测框坐标从sensor图像分辨率转换为显示分辨率
                    for i in range(4):
                        x = det[i * 2 + 0] / self.rgb888p_size[0] * self.display_size[0]
                        y = det[i * 2 + 1] / self.rgb888p_size[1] * self.display_size[1]
                        point_8[i * 2 + 0] = int(x)
                        point_8[i * 2 + 1] = int(y)
                    # 在屏幕上绘制检测框
                    for i in range(4):
                        pl.osd_img.draw_line(point_8[i * 2 + 0], point_8[i * 2 + 1], point_8[(i + 1) % 4 * 2 + 0], point_8[(i + 1) % 4 * 2 + 1], color=(255, 0, 255, 0), thickness=4)
            else:
                pl.osd_img.clear()  # 如果没有检测结果,则清空屏幕

if __name__=="__main__":
    # 显示模式,默认"hdmi",可以选择"hdmi"和"lcd"
    display_mode="hdmi"
    if display_mode=="hdmi":
        display_size=[1920,1080]
    else:
        display_size=[800,480]
    # 模型路径
    kmodel_path="/sdcard/app/tests/kmodel/LPD_640.kmodel"
    # 其它参数设置
    confidence_threshold = 0.2
    nms_threshold = 0.2
    rgb888p_size=[1920,1080]

    # 初始化PipeLine
    pl=PipeLine(rgb888p_size=rgb888p_size,display_size=display_size,display_mode=display_mode)
    pl.create()
    # 初始化自定义车牌检测实例
    licence_det=LicenceDetectionApp(kmodel_path,model_input_size=[640,640],confidence_threshold=confidence_threshold,nms_threshold=nms_threshold,rgb888p_size=rgb888p_size,display_size=display_size,debug_mode=0)
    licence_det.config_preprocess()
    try:
        while True:
            os.exitpoint()
            with ScopedTiming("total",1):
                # 获取当前帧数据
                img=pl.get_frame()
                # 推理当前帧
                res=licence_det.run(img)
                # 绘制结果到PipeLine的osd图像
                licence_det.draw_result(pl,res)
                # 显示当前的绘制结果
                pl.show_image()
                gc.collect()
    except Exception as e:
        sys.print_exception(e)
    finally:
        licence_det.deinit()
        pl.destroy()
2.18. 车牌识别#
from libs.PipeLine import PipeLine, ScopedTiming
from libs.AIBase import AIBase
from libs.AI2D import Ai2d
import os
import ujson
from media.media import *
from time import *
import nncase_runtime as nn
import ulab.numpy as np
import time
import image
import aidemo
import random
import gc
import sys

# 自定义车牌检测类
class LicenceDetectionApp(AIBase):
    # 初始化函数,设置车牌检测应用的参数
    def __init__(self, kmodel_path, model_input_size, confidence_threshold=0.5, nms_threshold=0.2, rgb888p_size=[224,224], display_size=[1920,1080], debug_mode=0):
        super().__init__(kmodel_path, model_input_size, rgb888p_size, debug_mode)  # 调用基类的初始化函数
        self.kmodel_path = kmodel_path  # 模型路径
        # 模型输入分辨率
        self.model_input_size = model_input_size
        # 分类阈值
        self.confidence_threshold = confidence_threshold
        self.nms_threshold = nms_threshold
        # sensor给到AI的图像分辨率
        self.rgb888p_size = [ALIGN_UP(rgb888p_size[0], 16), rgb888p_size[1]]
        # 显示分辨率
        self.display_size = [ALIGN_UP(display_size[0], 16), display_size[1]]
        self.debug_mode = debug_mode
        # Ai2d实例,用于实现模型预处理
        self.ai2d = Ai2d(debug_mode)
        # 设置Ai2d的输入输出格式和类型
        self.ai2d.set_ai2d_dtype(nn.ai2d_format.NCHW_FMT, nn.ai2d_format.NCHW_FMT, np.uint8, np.uint8)

    # 配置预处理操作,这里使用了resize,Ai2d支持crop/shift/pad/resize/affine
    def config_preprocess(self, input_image_size=None):
        with ScopedTiming("set preprocess config", self.debug_mode > 0):
            # 初始化ai2d预处理配置,默认为sensor给到AI的尺寸,可以通过设置input_image_size自行修改输入尺寸
            ai2d_input_size = input_image_size if input_image_size else self.rgb888p_size
            self.ai2d.resize(nn.interp_method.tf_bilinear, nn.interp_mode.half_pixel)
            self.ai2d.build([1,3,ai2d_input_size[1],ai2d_input_size[0]],[1,3,self.model_input_size[1],self.model_input_size[0]])

    # 自定义当前任务的后处理
    def postprocess(self, results):
        with ScopedTiming("postprocess", self.debug_mode > 0):
            # 对检测结果进行后处理
            det_res = aidemo.licence_det_postprocess(results, [self.rgb888p_size[1], self.rgb888p_size[0]], self.model_input_size, self.confidence_threshold, self.nms_threshold)
            return det_res

# 自定义车牌识别任务类
class LicenceRecognitionApp(AIBase):
    def __init__(self,kmodel_path,model_input_size,rgb888p_size=[1920,1080],display_size=[1920,1080],debug_mode=0):
        super().__init__(kmodel_path,model_input_size,rgb888p_size,debug_mode)
        # kmodel路径
        self.kmodel_path=kmodel_path
        # 检测模型输入分辨率
        self.model_input_size=model_input_size
        # sensor给到AI的图像分辨率,宽16字节对齐
        self.rgb888p_size=[ALIGN_UP(rgb888p_size[0],16),rgb888p_size[1]]
        # 视频输出VO分辨率,宽16字节对齐
        self.display_size=[ALIGN_UP(display_size[0],16),display_size[1]]
        # debug模式
        self.debug_mode=debug_mode
        # 车牌字符字典
        self.dict_rec = ["挂", "使", "领", "澳", "港", "皖", "沪", "津", "渝", "冀", "晋", "蒙", "辽", "吉", "黑", "苏", "浙", "京", "闽", "赣", "鲁", "豫", "鄂", "湘", "粤", "桂", "琼", "川", "贵", "云", "藏", "陕", "甘", "青", "宁", "新", "警", "学", "0", "1", "2", "3", "4", "5", "6", "7", "8", "9", "A", "B", "C", "D", "E", "F", "G", "H", "J", "K", "L", "M", "N", "P", "Q", "R", "S", "T", "U", "V", "W", "X", "Y", "Z", "_", "-"]
        self.dict_size = len(self.dict_rec)
        self.ai2d=Ai2d(debug_mode)
        self.ai2d.set_ai2d_dtype(nn.ai2d_format.NCHW_FMT,nn.ai2d_format.NCHW_FMT,np.uint8, np.uint8)

    # 配置预处理操作,这里使用了resize,Ai2d支持crop/shift/pad/resize/affine
    def config_preprocess(self,input_image_size=None):
        with ScopedTiming("set preprocess config",self.debug_mode > 0):
            ai2d_input_size=input_image_size if input_image_size else self.rgb888p_size
            self.ai2d.resize(nn.interp_method.tf_bilinear, nn.interp_mode.half_pixel)
            self.ai2d.build([1,3,ai2d_input_size[1],ai2d_input_size[0]],[1,3,self.model_input_size[1],self.model_input_size[0]])

    # 自定义后处理,results是模型输出的array列表
    def postprocess(self,results):
        with ScopedTiming("postprocess",self.debug_mode > 0):
            output_data=results[0].reshape((-1,self.dict_size))
            max_indices = np.argmax(output_data, axis=1)
            result_str = ""
            for i in range(max_indices.shape[0]):
                index = max_indices[i]
                if index > 0 and (i == 0 or index != max_indices[i - 1]):
                    result_str += self.dict_rec[index - 1]
            return result_str

# 车牌识别任务类
class LicenceRec:
    def __init__(self,licence_det_kmodel,licence_rec_kmodel,det_input_size,rec_input_size,confidence_threshold=0.25,nms_threshold=0.3,rgb888p_size=[1920,1080],display_size=[1920,1080],debug_mode=0):
        # 车牌检测模型路径
        self.licence_det_kmodel=licence_det_kmodel
        # 车牌识别模型路径
        self.licence_rec_kmodel=licence_rec_kmodel
        # 人脸检测模型输入分辨率
        self.det_input_size=det_input_size
        # 人脸姿态模型输入分辨率
        self.rec_input_size=rec_input_size
        # 置信度阈值
        self.confidence_threshold=confidence_threshold
        # nms阈值
        self.nms_threshold=nms_threshold
        # sensor给到AI的图像分辨率,宽16字节对齐
        self.rgb888p_size=[ALIGN_UP(rgb888p_size[0],16),rgb888p_size[1]]
        # 视频输出VO分辨率,宽16字节对齐
        self.display_size=[ALIGN_UP(display_size[0],16),display_size[1]]
        # debug_mode模式
        self.debug_mode=debug_mode
        self.licence_det=LicenceDetectionApp(self.licence_det_kmodel,model_input_size=self.det_input_size,confidence_threshold=self.confidence_threshold,nms_threshold=self.nms_threshold,rgb888p_size=self.rgb888p_size,display_size=self.display_size,debug_mode=0)
        self.licence_rec=LicenceRecognitionApp(self.licence_rec_kmodel,model_input_size=self.rec_input_size,rgb888p_size=self.rgb888p_size)
        self.licence_det.config_preprocess()

    # run函数
    def run(self,input_np):
        # 执行车牌检测
        det_boxes=self.licence_det.run(input_np)
        # 将车牌部分抠出来
        imgs_array_boxes = aidemo.ocr_rec_preprocess(input_np,[self.rgb888p_size[1],self.rgb888p_size[0]],det_boxes)
        imgs_array = imgs_array_boxes[0]
        boxes = imgs_array_boxes[1]
        rec_res = []
        for img_array in imgs_array:
            # 对每一个检测到的车牌进行识别
            self.licence_rec.config_preprocess(input_image_size=[img_array.shape[3],img_array.shape[2]])
            licence_str=self.licence_rec.run(img_array)
            rec_res.append(licence_str)
            gc.collect()
        return det_boxes,rec_res

    # 绘制车牌检测识别效果
    def draw_result(self,pl,det_res,rec_res):
        pl.osd_img.clear()
        if det_res:
            point_8 = np.zeros((8),dtype=np.int16)
            for det_index in range(len(det_res)):
                for i in range(4):
                    x = det_res[det_index][i * 2 + 0]/self.rgb888p_size[0]*self.display_size[0]
                    y = det_res[det_index][i * 2 + 1]/self.rgb888p_size[1]*self.display_size[1]
                    point_8[i * 2 + 0] = int(x)
                    point_8[i * 2 + 1] = int(y)
                for i in range(4):
                    pl.osd_img.draw_line(point_8[i * 2 + 0],point_8[i * 2 + 1],point_8[(i+1) % 4 * 2 + 0],point_8[(i+1) % 4 * 2 + 1],color=(255, 0, 255, 0),thickness=4)
                pl.osd_img.draw_string_advanced( point_8[6], point_8[7] + 20, 40,rec_res[det_index] , color=(255,255,153,18))


if __name__=="__main__":
    # 显示模式,默认"hdmi",可以选择"hdmi"和"lcd"
    display_mode="hdmi"
    if display_mode=="hdmi":
        display_size=[1920,1080]
    else:
        display_size=[800,480]
    # 车牌检测模型路径
    licence_det_kmodel_path="/sdcard/app/tests/kmodel/LPD_640.kmodel"
    # 车牌识别模型路径
    licence_rec_kmodel_path="/sdcard/app/tests/kmodel/licence_reco.kmodel"
    # 其它参数
    rgb888p_size=[640,360]
    licence_det_input_size=[640,640]
    licence_rec_input_size=[220,32]
    confidence_threshold=0.2
    nms_threshold=0.2

    # 初始化PipeLine,只关注传给AI的图像分辨率,显示的分辨率
    pl=PipeLine(rgb888p_size=rgb888p_size,display_size=display_size,display_mode=display_mode)
    pl.create()
    lr=LicenceRec(licence_det_kmodel_path,licence_rec_kmodel_path,det_input_size=licence_det_input_size,rec_input_size=licence_rec_input_size,confidence_threshold=confidence_threshold,nms_threshold=nms_threshold,rgb888p_size=rgb888p_size,display_size=display_size)
    try:
        while True:
            os.exitpoint()
            with ScopedTiming("total",1):
                img=pl.get_frame()                  # 获取当前帧
                det_res,rec_res=lr.run(img)         # 推理当前帧
                lr.draw_result(pl,det_res,rec_res)  # 绘制当前帧推理结果
                pl.show_image()                     # 展示推理结果
                gc.collect()
    except Exception as e:
        sys.print_exception(e)
    finally:
        lr.licence_det.deinit()
        lr.licence_rec.deinit()
        pl.destroy()
2.19. 单目标跟踪#
from libs.PipeLine import PipeLine, ScopedTiming
from libs.AIBase import AIBase
from libs.AI2D import Ai2d
from random import randint
import os
import ujson
from media.media import *
from time import *
import nncase_runtime as nn
import ulab.numpy as np
import time
import image
import aidemo
import random
import gc
import sys

# 自定义跟踪模版任务类
class TrackCropApp(AIBase):
    def __init__(self,kmodel_path,model_input_size,ratio_src_crop,center_xy_wh,rgb888p_size=[1280,720],display_size=[1920,1080],debug_mode=0):
        super().__init__(kmodel_path,model_input_size,rgb888p_size,debug_mode)
        # kmodel路径
        self.kmodel_path=kmodel_path
        # 跟踪模板输入分辨率
        self.model_input_size=model_input_size
        # sensor给到AI的图像分辨率,宽16字节对齐
        self.rgb888p_size=[ALIGN_UP(rgb888p_size[0],16),rgb888p_size[1]]
        # 视频输出VO分辨率,宽16字节对齐
        self.display_size=[ALIGN_UP(display_size[0],16),display_size[1]]
        # debug模式
        self.debug_mode=debug_mode
        # 跟踪框宽、高调整系数
        self.CONTEXT_AMOUNT = 0.5
        #src模型和crop模型输入比值
        self.ratio_src_crop = ratio_src_crop
        self.center_xy_wh=center_xy_wh
        # padding和crop参数
        self.pad_crop_params=[]
        # 注意:ai2d设置多个预处理时执行的顺序为:crop->shift->resize/affine->pad,如果不符合该顺序,需要配置多个ai2d对象;
        # 如下模型预处理要先做resize+padding再做resize+crop,因此要配置两个Ai2d对象
        self.ai2d_pad=Ai2d(debug_mode)
        self.ai2d_pad.set_ai2d_dtype(nn.ai2d_format.NCHW_FMT,nn.ai2d_format.NCHW_FMT,np.uint8, np.uint8)
        self.ai2d_crop=Ai2d(debug_mode)
        self.ai2d_crop.set_ai2d_dtype(nn.ai2d_format.NCHW_FMT,nn.ai2d_format.NCHW_FMT,np.uint8, np.uint8)
        self.need_pad=False

    # 配置预处理操作,这里使用了crop、pad和resize,Ai2d支持crop/shift/pad/resize/affine,具体代码请打开/sdcard/app/libs/AI2D.py查看
    def config_preprocess(self,input_image_size=None):
        with ScopedTiming("set preprocess config",self.debug_mode > 0):
            # 初始化ai2d预处理配置,默认为sensor给到AI的尺寸,可以通过设置input_image_size自行修改输入尺寸
            ai2d_input_size = input_image_size if input_image_size else self.rgb888p_size
            # 计算padding参数并应用pad操作,以确保输入图像尺寸与模型输入尺寸匹配
            self.pad_crop_params= self.get_padding_crop_param()
            # 如果需要padding,配置padding部分,否则只走crop
            if (self.pad_crop_params[0] != 0 or self.pad_crop_params[1] != 0 or self.pad_crop_params[2] != 0 or self.pad_crop_params[3] != 0):
                self.need_pad=True
                self.ai2d_pad.resize(nn.interp_method.tf_bilinear, nn.interp_mode.half_pixel)
                self.ai2d_pad.pad([0, 0, 0, 0, self.pad_crop_params[0], self.pad_crop_params[1], self.pad_crop_params[2], self.pad_crop_params[3]], 0, [114, 114, 114])
                output_size=[self.rgb888p_size[0]+self.pad_crop_params[2]+self.pad_crop_params[3],self.rgb888p_size[1]+self.pad_crop_params[0]+self.pad_crop_params[1]]
                self.ai2d_pad.build([1,3,ai2d_input_size[1],ai2d_input_size[0]],[1,3,output_size[1],output_size[0]])

                self.ai2d_crop.resize(nn.interp_method.tf_bilinear, nn.interp_mode.half_pixel)
                self.ai2d_crop.crop(int(self.pad_crop_params[4]),int(self.pad_crop_params[6]),int(self.pad_crop_params[5]-self.pad_crop_params[4]+1),int(self.pad_crop_params[7]-self.pad_crop_params[6]+1))
                self.ai2d_crop.build([1,3,output_size[1],output_size[0]],[1,3,self.model_input_size[1],self.model_input_size[0]])
            else:
                self.need_pad=False
                self.ai2d_crop.resize(nn.interp_method.tf_bilinear, nn.interp_mode.half_pixel)
                self.ai2d_crop.crop(int(self.center_xy_wh[0]-self.pad_crop_params[8]/2.0),int(self.center_xy_wh[1]-self.pad_crop_params[8]/2.0),int(self.pad_crop_params[8]),int(self.pad_crop_params[8]))
                self.ai2d_crop.build([1,3,ai2d_input_size[1],ai2d_input_size[0]],[1,3,self.model_input_size[1],self.model_input_size[0]])

    # 重写预处理函数preprocess,因为该部分不是单纯的走一个ai2d做预处理,所以该函数需要重写
    def preprocess(self,input_np):
        if self.need_pad:
            pad_output=self.ai2d_pad.run(input_np).to_numpy()
            return [self.ai2d_crop.run(pad_output)]
        else:
            return [self.ai2d_crop.run(input_np)]

    # 自定义后处理,results是模型输出array的列表
    def postprocess(self,results):
        with ScopedTiming("postprocess",self.debug_mode > 0):
            return results[0]

    # 计算padding和crop参数
    def get_padding_crop_param(self):
        s_z = round(np.sqrt((self.center_xy_wh[2] + self.CONTEXT_AMOUNT * (self.center_xy_wh[2] + self.center_xy_wh[3])) * (self.center_xy_wh[3] + self.CONTEXT_AMOUNT * (self.center_xy_wh[2] + self.center_xy_wh[3]))))
        c = (s_z + 1) / 2
        context_xmin = np.floor(self.center_xy_wh[0] - c + 0.5)
        context_xmax = int(context_xmin + s_z - 1)
        context_ymin = np.floor(self.center_xy_wh[1] - c + 0.5)
        context_ymax = int(context_ymin + s_z - 1)
        left_pad = int(max(0, -context_xmin))
        top_pad = int(max(0, -context_ymin))
        right_pad = int(max(0, int(context_xmax - self.rgb888p_size[0] + 1)))
        bottom_pad = int(max(0, int(context_ymax - self.rgb888p_size[1] + 1)))
        context_xmin = context_xmin + left_pad
        context_xmax = context_xmax + left_pad
        context_ymin = context_ymin + top_pad
        context_ymax = context_ymax + top_pad
        return [top_pad,bottom_pad,left_pad,right_pad,context_xmin,context_xmax,context_ymin,context_ymax,s_z]

    #重写deinit
    def deinit(self):
        with ScopedTiming("deinit",self.debug_mode > 0):
            del self.ai2d_pad
            del self.ai2d_crop
            super().deinit()

# 自定义跟踪实时任务类
class TrackSrcApp(AIBase):
    def __init__(self,kmodel_path,model_input_size,ratio_src_crop,rgb888p_size=[1280,720],display_size=[1920,1080],debug_mode=0):
        super().__init__(kmodel_path,model_input_size,rgb888p_size,debug_mode)
        # kmodel路径
        self.kmodel_path=kmodel_path
        # 检测模型输入分辨率
        self.model_input_size=model_input_size
        # sensor给到AI的图像分辨率,宽16字节对齐
        self.rgb888p_size=[ALIGN_UP(rgb888p_size[0],16),rgb888p_size[1]]
        # 视频输出VO分辨率,宽16字节对齐
        self.display_size=[ALIGN_UP(display_size[0],16),display_size[1]]
        # padding和crop参数列表
        self.pad_crop_params=[]
        # 跟踪框宽、高调整系数
        self.CONTEXT_AMOUNT = 0.5
        # src和crop模型的输入尺寸比例
        self.ratio_src_crop = ratio_src_crop
        # debug模式
        self.debug_mode=debug_mode
        # 注意:ai2d设置多个预处理时执行的顺序为:crop->shift->resize/affine->pad,如果不符合该顺序,需要配置多个ai2d对象;
        # 如下模型预处理要先做resize+padding再做resize+crop,因此要配置两个Ai2d对象
        self.ai2d_pad=Ai2d(debug_mode)
        self.ai2d_pad.set_ai2d_dtype(nn.ai2d_format.NCHW_FMT,nn.ai2d_format.NCHW_FMT,np.uint8, np.uint8)
        self.ai2d_crop=Ai2d(debug_mode)
        self.ai2d_crop.set_ai2d_dtype(nn.ai2d_format.NCHW_FMT,nn.ai2d_format.NCHW_FMT,np.uint8, np.uint8)
        self.need_pad=False

    # 配置预处理操作,这里使用了crop、pad和resize,Ai2d支持crop/shift/pad/resize/affine,具体代码请打开/sdcard/app/libs/AI2D.py查看
    def config_preprocess(self,center_xy_wh,input_image_size=None):
        with ScopedTiming("set preprocess config",self.debug_mode > 0):
            # 初始化ai2d预处理配置,默认为sensor给到AI的尺寸,可以通过设置input_image_size自行修改输入尺寸
            ai2d_input_size=input_image_size if input_image_size else self.rgb888p_size
            # 计算padding参数并应用pad操作,以确保输入图像尺寸与模型输入尺寸匹配
            self.pad_crop_params= self.get_padding_crop_param(center_xy_wh)
            # 如果需要padding,配置padding部分,否则只走crop
            if (self.pad_crop_params[0] != 0 or self.pad_crop_params[1] != 0 or self.pad_crop_params[2] != 0 or self.pad_crop_params[3] != 0):
                self.need_pad=True
                self.ai2d_pad.resize(nn.interp_method.tf_bilinear, nn.interp_mode.half_pixel)
                self.ai2d_pad.pad([0, 0, 0, 0, self.pad_crop_params[0], self.pad_crop_params[1], self.pad_crop_params[2], self.pad_crop_params[3]], 0, [114, 114, 114])
                output_size=[self.rgb888p_size[0]+self.pad_crop_params[2]+self.pad_crop_params[3],self.rgb888p_size[1]+self.pad_crop_params[0]+self.pad_crop_params[1]]

                self.ai2d_pad.build([1,3,ai2d_input_size[1],ai2d_input_size[0]],[1,3,output_size[1],output_size[0]])
                self.ai2d_crop.resize(nn.interp_method.tf_bilinear, nn.interp_mode.half_pixel)
                self.ai2d_crop.crop(int(self.pad_crop_params[4]),int(self.pad_crop_params[6]),int(self.pad_crop_params[5]-self.pad_crop_params[4]+1),int(self.pad_crop_params[7]-self.pad_crop_params[6]+1))
                self.ai2d_crop.build([1,3,output_size[1],output_size[0]],[1,3,self.model_input_size[1],self.model_input_size[0]])
            else:
                self.need_pad=False
                self.ai2d_crop.resize(nn.interp_method.tf_bilinear, nn.interp_mode.half_pixel)
                self.ai2d_crop.crop(int(center_xy_wh[0]-self.pad_crop_params[8]/2.0),int(center_xy_wh[1]-self.pad_crop_params[8]/2.0),int(self.pad_crop_params[8]),int(self.pad_crop_params[8]))
                self.ai2d_crop.build([1,3,ai2d_input_size[1],ai2d_input_size[0]],[1,3,self.model_input_size[1],self.model_input_size[0]])

    # 重写预处理函数preprocess,因为该部分不是单纯的走一个ai2d做预处理,所以该函数需要重写
    def preprocess(self,input_np):
        with ScopedTiming("preprocess",self.debug_mode>0):
            if self.need_pad:
                pad_output=self.ai2d_pad.run(input_np).to_numpy()
                return [self.ai2d_crop.run(pad_output)]
            else:
                return [self.ai2d_crop.run(input_np)]

    # 自定义后处理,results是模型输出array的列表
    def postprocess(self,results):
        with ScopedTiming("postprocess",self.debug_mode > 0):
            return results[0]

    # 计算padding和crop参数
    def get_padding_crop_param(self,center_xy_wh):
        s_z = round(np.sqrt((center_xy_wh[2] + self.CONTEXT_AMOUNT * (center_xy_wh[2] + center_xy_wh[3])) * (center_xy_wh[3] + self.CONTEXT_AMOUNT * (center_xy_wh[2] + center_xy_wh[3])))) * self.ratio_src_crop
        c = (s_z + 1) / 2
        context_xmin = np.floor(center_xy_wh[0] - c + 0.5)
        context_xmax = int(context_xmin + s_z - 1)
        context_ymin = np.floor(center_xy_wh[1] - c + 0.5)
        context_ymax = int(context_ymin + s_z - 1)
        left_pad = int(max(0, -context_xmin))
        top_pad = int(max(0, -context_ymin))
        right_pad = int(max(0, int(context_xmax - self.rgb888p_size[0] + 1)))
        bottom_pad = int(max(0, int(context_ymax - self.rgb888p_size[1] + 1)))
        context_xmin = context_xmin + left_pad
        context_xmax = context_xmax + left_pad
        context_ymin = context_ymin + top_pad
        context_ymax = context_ymax + top_pad
        return [top_pad,bottom_pad,left_pad,right_pad,context_xmin,context_xmax,context_ymin,context_ymax,s_z]

    # 重写deinit
    def deinit(self):
        with ScopedTiming("deinit",self.debug_mode > 0):
            del self.ai2d_pad
            del self.ai2d_crop
            super().deinit()


class TrackerApp(AIBase):
    def __init__(self,kmodel_path,crop_input_size,thresh,rgb888p_size=[1280,720],display_size=[1920,1080],debug_mode=0):
        super().__init__(kmodel_path,rgb888p_size,debug_mode)
        # kmodel路径
        self.kmodel_path=kmodel_path
        # crop模型的输入尺寸
        self.crop_input_size=crop_input_size
        # 跟踪框阈值
        self.thresh=thresh
        # 跟踪框宽、高调整系数
        self.CONTEXT_AMOUNT = 0.5
        # sensor给到AI的图像分辨率,宽16字节对齐
        self.rgb888p_size=[ALIGN_UP(rgb888p_size[0],16),rgb888p_size[1]]
        # 视频输出VO分辨率,宽16字节对齐
        self.display_size=[ALIGN_UP(display_size[0],16),display_size[1]]
        # debug模式
        self.debug_mode=debug_mode
        self.ai2d=Ai2d(debug_mode)
        self.ai2d.set_ai2d_dtype(nn.ai2d_format.NCHW_FMT,nn.ai2d_format.NCHW_FMT,np.uint8, np.uint8)

    def config_preprocess(self,input_image_size=None):
        with ScopedTiming("set preprocess config",self.debug_mode > 0):
            pass

    # 重写run函数,因为没有预处理过程,所以原来run操作中包含的preprocess->inference->postprocess不合适,这里只包含inference->postprocess
    def run(self,input_np_1,input_np_2,center_xy_wh):
        input_tensors=[]
        input_tensors.append(nn.from_numpy(input_np_1))
        input_tensors.append(nn.from_numpy(input_np_2))
        results=self.inference(input_tensors)
        return self.postprocess(results,center_xy_wh)


    # 自定义后处理,results是模型输出array的列表,这里使用了aidemo的nanotracker_postprocess列表
    def postprocess(self,results,center_xy_wh):
        with ScopedTiming("postprocess",self.debug_mode > 0):
            det = aidemo.nanotracker_postprocess(results[0],results[1],[self.rgb888p_size[1],self.rgb888p_size[0]],self.thresh,center_xy_wh,self.crop_input_size[0],self.CONTEXT_AMOUNT)
            return det

class NanoTracker:
    def __init__(self,track_crop_kmodel,track_src_kmodel,tracker_kmodel,crop_input_size,src_input_size,threshold=0.25,rgb888p_size=[1280,720],display_size=[1920,1080],debug_mode=0):
        # 跟踪模版模型路径
        self.track_crop_kmodel=track_crop_kmodel
        # 跟踪实时模型路径
        self.track_src_kmodel=track_src_kmodel
        # 跟踪模型路径
        self.tracker_kmodel=tracker_kmodel
        # 跟踪模版模型输入分辨率
        self.crop_input_size=crop_input_size
        # 跟踪实时模型输入分辨率
        self.src_input_size=src_input_size
        self.threshold=threshold

        self.CONTEXT_AMOUNT=0.5       # 跟踪框宽、高调整系数
        self.ratio_src_crop = 0.0     # src模型和crop模型输入比值
        self.track_x1 = float(600)    # 起始跟踪目标框左上角点x
        self.track_y1 = float(300)    # 起始跟踪目标框左上角点y
        self.track_w = float(100)     # 起始跟踪目标框w
        self.track_h = float(100)     # 起始跟踪目标框h
        self.draw_mean=[]             # 初始目标框位置列表
        self.center_xy_wh = []
        self.track_boxes = []
        self.center_xy_wh_tmp = []
        self.track_boxes_tmp=[]
        self.crop_output=None
        self.src_output=None
        # 跟踪框初始化时间
        self.seconds = 8
        self.endtime = time.time() + self.seconds
        self.enter_init = True

        # sensor给到AI的图像分辨率,宽16字节对齐
        self.rgb888p_size=[ALIGN_UP(rgb888p_size[0],16),rgb888p_size[1]]
        # 视频输出VO分辨率,宽16字节对齐
        self.display_size=[ALIGN_UP(display_size[0],16),display_size[1]]
        self.init_param()

        self.track_crop=TrackCropApp(self.track_crop_kmodel,model_input_size=self.crop_input_size,ratio_src_crop=self.ratio_src_crop,center_xy_wh=self.center_xy_wh,rgb888p_size=self.rgb888p_size,display_size=self.display_size,debug_mode=0)
        self.track_src=TrackSrcApp(self.track_src_kmodel,model_input_size=self.src_input_size,ratio_src_crop=self.ratio_src_crop,rgb888p_size=self.rgb888p_size,display_size=self.display_size,debug_mode=0)
        self.tracker=TrackerApp(self.tracker_kmodel,crop_input_size=self.crop_input_size,thresh=self.threshold,rgb888p_size=self.rgb888p_size,display_size=self.display_size)
        self.track_crop.config_preprocess()

    # run函数
    def run(self,input_np):
        # 在初始化时间内,crop模版部分的到跟踪模版特征,否则,对当前帧进行src推理得到特征并使用tracker对两个特征推理,得到跟踪框的坐标
        nowtime = time.time()
        if (self.enter_init and nowtime <= self.endtime):
            print("倒计时: " + str(self.endtime - nowtime) + " 秒")
            self.crop_output=self.track_crop.run(input_np)
            time.sleep(1)
            return self.draw_mean
        else:
            self.track_src.config_preprocess(self.center_xy_wh)
            self.src_output=self.track_src.run(input_np)
            det=self.tracker.run(self.crop_output,self.src_output,self.center_xy_wh)
            return det

    # 绘制效果,绘制跟踪框位置
    def draw_result(self,pl,box):
        pl.osd_img.clear()
        if self.enter_init:
            pl.osd_img.draw_rectangle(box[0],box[1],box[2],box[3],color=(255, 0, 255, 0),thickness = 4)
            if (time.time() > self.endtime):
                self.enter_init = False
        else:
            self.track_boxes = box[0]
            self.center_xy_wh = box[1]
            track_bool = True
            if (len(self.track_boxes) != 0):
                track_bool = self.track_boxes[0] > 10 and self.track_boxes[1] > 10 and self.track_boxes[0] + self.track_boxes[2] < self.rgb888p_size[0] - 10 and self.track_boxes[1] + self.track_boxes[3] < self.rgb888p_size[1] - 10
            else:
                track_bool = False

            if (len(self.center_xy_wh) != 0):
                track_bool = track_bool and self.center_xy_wh[2] * self.center_xy_wh[3] < 40000
            else:
                track_bool = False
            if (track_bool):
                self.center_xy_wh_tmp = self.center_xy_wh
                self.track_boxes_tmp = self.track_boxes
                x1 = int(float(self.track_boxes[0]) * self.display_size[0] / self.rgb888p_size[0])
                y1 = int(float(self.track_boxes[1]) * self.display_size[1] / self.rgb888p_size[1])
                w = int(float(self.track_boxes[2]) * self.display_size[0] / self.rgb888p_size[0])
                h = int(float(self.track_boxes[3]) * self.display_size[1] / self.rgb888p_size[1])
                pl.osd_img.draw_rectangle(x1, y1, w, h, color=(255, 255, 0, 0),thickness = 4)
            else:
                self.center_xy_wh = self.center_xy_wh_tmp
                self.track_boxes = self.track_boxes_tmp
                x1 = int(float(self.track_boxes[0]) * self.display_size[0] / self.rgb888p_size[0])
                y1 = int(float(self.track_boxes[1]) * self.display_size[1] / self.rgb888p_size[1])
                w = int(float(self.track_boxes[2]) * self.display_size[0] / self.rgb888p_size[0])
                h = int(float(self.track_boxes[3]) * self.display_size[1] / self.rgb888p_size[1])
                pl.osd_img.draw_rectangle(x1, y1, w, h, color=(255, 255, 0, 0),thickness = 4)
                pl.osd_img.draw_string_advanced( x1 , y1-50,32, "请远离摄像头,保持跟踪物体大小基本一致!" , color=(255, 255 ,0 , 0))
                pl.osd_img.draw_string_advanced( x1 , y1-100,32, "请靠近中心!" , color=(255, 255 ,0 , 0))

    # crop参数初始化
    def init_param(self):
        self.ratio_src_crop = float(self.src_input_size[0])/float(self.crop_input_size[0])
        print(self.ratio_src_crop)
        if (self.track_x1 < 50 or self.track_y1 < 50 or self.track_x1+self.track_w >= self.rgb888p_size[0]-50 or self.track_y1+self.track_h >= self.rgb888p_size[1]-50):
                    print("**剪切范围超出图像范围**")
        else:
            track_mean_x = self.track_x1 + self.track_w / 2.0
            track_mean_y = self.track_y1 + self.track_h / 2.0
            draw_mean_w = int(self.track_w / self.rgb888p_size[0] * self.display_size[0])
            draw_mean_h = int(self.track_h / self.rgb888p_size[1] * self.display_size[1])
            draw_mean_x = int(track_mean_x / self.rgb888p_size[0] * self.display_size[0] - draw_mean_w / 2.0)
            draw_mean_y = int(track_mean_y / self.rgb888p_size[1] * self.display_size[1] - draw_mean_h / 2.0)
            self.draw_mean=[draw_mean_x,draw_mean_y,draw_mean_w,draw_mean_h]
            self.center_xy_wh = [track_mean_x,track_mean_y,self.track_w,self.track_h]
            self.center_xy_wh_tmp=[track_mean_x,track_mean_y,self.track_w,self.track_h]

            self.track_boxes = [self.track_x1,self.track_y1,self.track_w,self.track_h,1]
            self.track_boxes_tmp=np.array([self.track_x1,self.track_y1,self.track_w,self.track_h,1])


if __name__=="__main__":
    # 显示模式,默认"hdmi",可以选择"hdmi"和"lcd"
    display_mode="hdmi"
    if display_mode=="hdmi":
        display_size=[1920,1080]
    else:
        display_size=[800,480]
    # 跟踪模板模型路径
    track_crop_kmodel_path="/sdcard/app/tests/kmodel/cropped_test127.kmodel"
    # 跟踪实时模型路径
    track_src_kmodel_path="/sdcard/app/tests/kmodel/nanotrack_backbone_sim.kmodel"
    # 跟踪模型路径
    tracker_kmodel_path="/sdcard/app/tests/kmodel/nanotracker_head_calib_k230.kmodel"
    # 其他参数
    rgb888p_size=[1280,720]
    track_crop_input_size=[127,127]
    track_src_input_size=[255,255]
    threshold=0.1

    # 初始化PipeLine,只关注传给AI的图像分辨率,显示的分辨率
    pl=PipeLine(rgb888p_size=rgb888p_size,display_size=display_size,display_mode=display_mode)
    pl.create()
    track=NanoTracker(track_crop_kmodel_path,track_src_kmodel_path,tracker_kmodel_path,crop_input_size=track_crop_input_size,src_input_size=track_src_input_size,threshold=threshold,rgb888p_size=rgb888p_size,display_size=display_size)
    try:
        while True:
            os.exitpoint()
            with ScopedTiming("total",1):
                img=pl.get_frame()              # 获取当前帧
                output=track.run(img)           # 推理当前帧
                track.draw_result(pl,output)    # 绘制当前帧推理结果
                pl.show_image()                 # 展示推理结果
                gc.collect()
    except Exception as e:
        sys.print_exception(e)
    finally:
        track.track_crop.deinit()
        track.track_src.deinit()
        track.tracker.deinit()
        pl.destroy()
2.20. yolov8n目标检测#
from libs.PipeLine import PipeLine, ScopedTiming
from libs.AIBase import AIBase
from libs.AI2D import Ai2d
import os
import ujson
from media.media import *
from time import *
import nncase_runtime as nn
import ulab.numpy as np
import time
import utime
import image
import random
import gc
import sys
import aidemo

# 自定义YOLOv8检测类
class ObjectDetectionApp(AIBase):
    def __init__(self,kmodel_path,labels,model_input_size,max_boxes_num,confidence_threshold=0.5,nms_threshold=0.2,rgb888p_size=[224,224],display_size=[1920,1080],debug_mode=0):
        super().__init__(kmodel_path,model_input_size,rgb888p_size,debug_mode)
        self.kmodel_path=kmodel_path
        self.labels=labels
        # 模型输入分辨率
        self.model_input_size=model_input_size
        # 阈值设置
        self.confidence_threshold=confidence_threshold
        self.nms_threshold=nms_threshold
        self.max_boxes_num=max_boxes_num
        # sensor给到AI的图像分辨率
        self.rgb888p_size=[ALIGN_UP(rgb888p_size[0],16),rgb888p_size[1]]
        # 显示分辨率
        self.display_size=[ALIGN_UP(display_size[0],16),display_size[1]]
        self.debug_mode=debug_mode
        # 检测框预置颜色值
        self.color_four=[(255, 220, 20, 60), (255, 119, 11, 32), (255, 0, 0, 142), (255, 0, 0, 230),
                         (255, 106, 0, 228), (255, 0, 60, 100), (255, 0, 80, 100), (255, 0, 0, 70),
                         (255, 0, 0, 192), (255, 250, 170, 30), (255, 100, 170, 30), (255, 220, 220, 0),
                         (255, 175, 116, 175), (255, 250, 0, 30), (255, 165, 42, 42), (255, 255, 77, 255),
                         (255, 0, 226, 252), (255, 182, 182, 255), (255, 0, 82, 0), (255, 120, 166, 157)]
        # 宽高缩放比例
        self.x_factor = float(self.rgb888p_size[0])/self.model_input_size[0]
        self.y_factor = float(self.rgb888p_size[1])/self.model_input_size[1]
        # Ai2d实例,用于实现模型预处理
        self.ai2d=Ai2d(debug_mode)
        # 设置Ai2d的输入输出格式和类型
        self.ai2d.set_ai2d_dtype(nn.ai2d_format.NCHW_FMT,nn.ai2d_format.NCHW_FMT,np.uint8, np.uint8)

    # 配置预处理操作,这里使用了resize,Ai2d支持crop/shift/pad/resize/affine,具体代码请打开/sdcard/app/libs/AI2D.py查看
    def config_preprocess(self,input_image_size=None):
        with ScopedTiming("set preprocess config",self.debug_mode > 0):
            # 初始化ai2d预处理配置,默认为sensor给到AI的尺寸,您可以通过设置input_image_size自行修改输入尺寸
            ai2d_input_size=input_image_size if input_image_size else self.rgb888p_size
            self.ai2d.resize(nn.interp_method.tf_bilinear, nn.interp_mode.half_pixel)
            self.ai2d.build([1,3,ai2d_input_size[1],ai2d_input_size[0]],[1,3,self.model_input_size[1],self.model_input_size[0]])

    # 自定义当前任务的后处理
    def postprocess(self,results):
        with ScopedTiming("postprocess",self.debug_mode > 0):
            result=results[0]
            result = result.reshape((result.shape[0] * result.shape[1], result.shape[2]))
            output_data = result.transpose()
            boxes_ori = output_data[:,0:4]
            scores_ori = output_data[:,4:]
            confs_ori = np.max(scores_ori,axis=-1)
            inds_ori = np.argmax(scores_ori,axis=-1)
            boxes,scores,inds = [],[],[]
            for i in range(len(boxes_ori)):
                if confs_ori[i] > confidence_threshold:
                    scores.append(confs_ori[i])
                    inds.append(inds_ori[i])
                    x = boxes_ori[i,0]
                    y = boxes_ori[i,1]
                    w = boxes_ori[i,2]
                    h = boxes_ori[i,3]
                    left = int((x - 0.5 * w) * self.x_factor)
                    top = int((y - 0.5 * h) * self.y_factor)
                    right = int((x + 0.5 * w) * self.x_factor)
                    bottom = int((y + 0.5 * h) * self.y_factor)
                    boxes.append([left,top,right,bottom])
            if len(boxes)==0:
                return []
            boxes = np.array(boxes)
            scores = np.array(scores)
            inds = np.array(inds)
            # NMS过程
            keep = self.nms(boxes,scores,nms_threshold)
            dets = np.concatenate((boxes, scores.reshape((len(boxes),1)), inds.reshape((len(boxes),1))), axis=1)
            dets_out = []
            for keep_i in keep:
                dets_out.append(dets[keep_i])
            dets_out = np.array(dets_out)
            dets_out = dets_out[:self.max_boxes_num, :]
            return dets_out

    # 绘制结果
    def draw_result(self,pl,dets):
        with ScopedTiming("display_draw",self.debug_mode >0):
            if dets:
                pl.osd_img.clear()
                for det in dets:
                    x1, y1, x2, y2 = map(lambda x: int(round(x, 0)), det[:4])
                    x= x1*self.display_size[0] // self.rgb888p_size[0]
                    y= y1*self.display_size[1] // self.rgb888p_size[1]
                    w = (x2 - x1) * self.display_size[0] // self.rgb888p_size[0]
                    h = (y2 - y1) * self.display_size[1] // self.rgb888p_size[1]
                    pl.osd_img.draw_rectangle(x,y, w, h, color=self.get_color(int(det[5])),thickness=4)
                    pl.osd_img.draw_string_advanced( x , y-50,32," " + self.labels[int(det[5])] + " " + str(round(det[4],2)) , color=self.get_color(int(det[5])))
            else:
                pl.osd_img.clear()


    # 多目标检测 非最大值抑制方法实现
    def nms(self,boxes,scores,thresh):
        """Pure Python NMS baseline."""
        x1,y1,x2,y2 = boxes[:, 0],boxes[:, 1],boxes[:, 2],boxes[:, 3]
        areas = (x2 - x1 + 1) * (y2 - y1 + 1)
        order = np.argsort(scores,axis = 0)[::-1]
        keep = []
        while order.size > 0:
            i = order[0]
            keep.append(i)
            new_x1,new_y1,new_x2,new_y2,new_areas = [],[],[],[],[]
            for order_i in order:
                new_x1.append(x1[order_i])
                new_x2.append(x2[order_i])
                new_y1.append(y1[order_i])
                new_y2.append(y2[order_i])
                new_areas.append(areas[order_i])
            new_x1 = np.array(new_x1)
            new_x2 = np.array(new_x2)
            new_y1 = np.array(new_y1)
            new_y2 = np.array(new_y2)
            xx1 = np.maximum(x1[i], new_x1)
            yy1 = np.maximum(y1[i], new_y1)
            xx2 = np.minimum(x2[i], new_x2)
            yy2 = np.minimum(y2[i], new_y2)
            w = np.maximum(0.0, xx2 - xx1 + 1)
            h = np.maximum(0.0, yy2 - yy1 + 1)
            inter = w * h
            new_areas = np.array(new_areas)
            ovr = inter / (areas[i] + new_areas - inter)
            new_order = []
            for ovr_i,ind in enumerate(ovr):
                if ind < thresh:
                    new_order.append(order[ovr_i])
            order = np.array(new_order,dtype=np.uint8)
        return keep

    # 根据当前类别索引获取框的颜色
    def get_color(self, x):
        idx=x%len(self.color_four)
        return self.color_four[idx]


if __name__=="__main__":
    # 显示模式,默认"hdmi",可以选择"hdmi"和"lcd"
    display_mode="hdmi"
    if display_mode=="hdmi":
        display_size=[1920,1080]
    else:
        display_size=[800,480]
    # 模型路径
    kmodel_path="/sdcard/app/tests/kmodel/yolov8n_320.kmodel"
    labels = ["person", "bicycle", "car", "motorcycle", "airplane", "bus", "train", "truck", "boat", "traffic light", "fire hydrant", "stop sign", "parking meter", "bench", "bird", "cat", "dog", "horse", "sheep", "cow", "elephant", "bear", "zebra", "giraffe", "backpack", "umbrella", "handbag", "tie", "suitcase", "frisbee", "skis", "snowboard", "sports ball", "kite", "baseball bat", "baseball glove", "skateboard", "surfboard", "tennis racket", "bottle", "wine glass", "cup", "fork", "knife", "spoon", "bowl", "banana", "apple", "sandwich", "orange", "broccoli", "carrot", "hot dog", "pizza", "donut", "cake", "chair", "couch", "potted plant", "bed", "dining table", "toilet", "tv", "laptop", "mouse", "remote", "keyboard", "cell phone", "microwave", "oven", "toaster", "sink", "refrigerator", "book", "clock", "vase", "scissors", "teddy bear", "hair drier", "toothbrush"]
    # 其它参数设置
    confidence_threshold = 0.2
    nms_threshold = 0.2
    max_boxes_num = 50
    rgb888p_size=[320,320]

    # 初始化PipeLine
    pl=PipeLine(rgb888p_size=rgb888p_size,display_size=display_size,display_mode=display_mode)
    pl.create()
    # 初始化自定义目标检测实例
    ob_det=ObjectDetectionApp(kmodel_path,labels=labels,model_input_size=[320,320],max_boxes_num=max_boxes_num,confidence_threshold=confidence_threshold,nms_threshold=nms_threshold,rgb888p_size=rgb888p_size,display_size=display_size,debug_mode=0)
    ob_det.config_preprocess()
    try:
        while True:
            os.exitpoint()
            with ScopedTiming("total",1):
                # 获取当前帧数据
                img=pl.get_frame()
                # 推理当前帧
                res=ob_det.run(img)
                # 绘制结果到PipeLine的osd图像
                ob_det.draw_result(pl,res)
                # 显示当前的绘制结果
                pl.show_image()
                gc.collect()
    except Exception as e:
        sys.print_exception(e)
    finally:
        ob_det.deinit()
        pl.destroy()
2.21. OCR检测#
from libs.PipeLine import PipeLine, ScopedTiming
from libs.AIBase import AIBase
from libs.AI2D import Ai2d
import os
import ujson
from media.media import *
from time import *
import nncase_runtime as nn
import ulab.numpy as np
import time
import utime
import image
import random
import gc
import sys
import aicube

# 自定义OCR检测类
class OCRDetectionApp(AIBase):
    def __init__(self,kmodel_path,model_input_size,mask_threshold=0.5,box_threshold=0.2,rgb888p_size=[224,224],display_size=[1920,1080],debug_mode=0):
        super().__init__(kmodel_path,model_input_size,rgb888p_size,debug_mode)
        self.kmodel_path=kmodel_path
        # 模型输入分辨率
        self.model_input_size=model_input_size
        # 分类阈值
        self.mask_threshold=mask_threshold
        self.box_threshold=box_threshold
        # sensor给到AI的图像分辨率
        self.rgb888p_size=[ALIGN_UP(rgb888p_size[0],16),rgb888p_size[1]]
        # 显示分辨率
        self.display_size=[ALIGN_UP(display_size[0],16),display_size[1]]
        self.debug_mode=debug_mode
        # Ai2d实例,用于实现模型预处理
        self.ai2d=Ai2d(debug_mode)
        # 设置Ai2d的输入输出格式和类型
        self.ai2d.set_ai2d_dtype(nn.ai2d_format.NCHW_FMT,nn.ai2d_format.NCHW_FMT,np.uint8, np.uint8)

    # 配置预处理操作,这里使用了pad和resize,Ai2d支持crop/shift/pad/resize/affine,具体代码请打开/sdcard/app/libs/AI2D.py查看
    def config_preprocess(self,input_image_size=None):
        with ScopedTiming("set preprocess config",self.debug_mode > 0):
            # 初始化ai2d预处理配置,默认为sensor给到AI的尺寸,您可以通过设置input_image_size自行修改输入尺寸
            ai2d_input_size=input_image_size if input_image_size else self.rgb888p_size
            top,bottom,left,right=self.get_padding_param()
            self.ai2d.pad([0,0,0,0,top,bottom,left,right], 0, [0,0,0])
            self.ai2d.resize(nn.interp_method.tf_bilinear, nn.interp_mode.half_pixel)
            self.ai2d.build([1,3,ai2d_input_size[1],ai2d_input_size[0]],[1,3,self.model_input_size[1],self.model_input_size[0]])

    # 自定义当前任务的后处理
    def postprocess(self,results):
        with ScopedTiming("postprocess",self.debug_mode > 0):
            # chw2hwc
            hwc_array=self.chw2hwc(self.cur_img)
            # 这里使用了aicube封装的接口seg_post_process做后处理,返回一个和display_size相同分辨率的mask图
            # det_boxes结构为[[crop_array_nhwc,[p1_x,p1_y,p2_x,p2_y,p3_x,p3_y,p4_x,p4_y]],...]
            det_boxes = aicube.ocr_post_process(results[0][:,:,:,0].reshape(-1), hwc_array.reshape(-1),self.model_input_size,self.rgb888p_size, self.mask_threshold, self.box_threshold)
            all_boxes_pos=[]
            for det_box in det_boxes:
                all_boxes_pos.append(det_box[1])
            return all_boxes_pos

    # 绘制结果
    def draw_result(self,pl,all_boxes_pos):
        with ScopedTiming("display_draw",self.debug_mode >0):
            pl.osd_img.clear()
            # 一次绘制四条边,得到文本检测的四边形
            for i in range(len(all_boxes_pos)):
                for j in range(4):
                    x1=all_boxes_pos[i][2*j]*self.display_size[0]//self.rgb888p_size[0]
                    y1=all_boxes_pos[i][2*j+1]*self.display_size[1]//self.rgb888p_size[1]
                    x2=all_boxes_pos[i][(2*j+2)%8]*self.display_size[0]//self.rgb888p_size[0]
                    y2=all_boxes_pos[i][(2*j+3)%8]*self.display_size[1]//self.rgb888p_size[1]
                    pl.osd_img.draw_line(int(x1),int(y1),int(x2),int(y2),color=(255,255,0,0),thickness=4)

    # 计算padding参数
    def get_padding_param(self):
        # 右padding或下padding
        dst_w = self.model_input_size[0]
        dst_h = self.model_input_size[1]
        input_width = self.rgb888p_size[0]
        input_high = self.rgb888p_size[1]
        ratio_w = dst_w / input_width
        ratio_h = dst_h / input_high
        if ratio_w < ratio_h:
            ratio = ratio_w
        else:
            ratio = ratio_h
        new_w = (int)(ratio * input_width)
        new_h = (int)(ratio * input_high)
        dw = (dst_w - new_w) / 2
        dh = (dst_h - new_h) / 2
        top = (int)(round(0))
        bottom = (int)(round(dh * 2 + 0.1))
        left = (int)(round(0))
        right = (int)(round(dw * 2 - 0.1))
        return  top, bottom, left, right

    # chw2hwc
    def chw2hwc(self,features):
        ori_shape = (features.shape[0], features.shape[1], features.shape[2])
        c_hw_ = features.reshape((ori_shape[0], ori_shape[1] * ori_shape[2]))
        hw_c_ = c_hw_.transpose()
        new_array = hw_c_.copy()
        hwc_array = new_array.reshape((ori_shape[1], ori_shape[2], ori_shape[0]))
        del c_hw_
        del hw_c_
        del new_array
        return hwc_array

if __name__=="__main__":
    # 显示模式,默认"hdmi",可以选择"hdmi"和"lcd"
    display_mode="hdmi"
    if display_mode=="hdmi":
        display_size=[1920,1080]
    else:
        display_size=[800,480]
    # 模型路径
    kmodel_path="/sdcard/app/tests/kmodel/ocr_det_int16.kmodel"
    # kmodel其它参数设置
    mask_threshold = 0.25
    box_threshold = 0.3
    rgb888p_size=[640,360]

    # 初始化PipeLine
    pl=PipeLine(rgb888p_size=rgb888p_size,display_size=display_size,display_mode=display_mode)
    pl.create()
    # 初始化自定义OCR检测实例
    ocr_det=OCRDetectionApp(kmodel_path,model_input_size=[640,640],mask_threshold=mask_threshold,box_threshold=box_threshold,rgb888p_size=rgb888p_size,display_size=display_size,debug_mode=0)
    ocr_det.config_preprocess()
    try:
        while True:
            os.exitpoint()
            with ScopedTiming("total",1):
                # 获取当前帧数据
                img=pl.get_frame()
                # 推理当前帧
                res=ocr_det.run(img)
                # 绘制结果到PipeLine的osd图像
                ocr_det.draw_result(pl,res)
                # 显示当前的绘制结果
                pl.show_image()
                gc.collect()
    except Exception as e:
        sys.print_exception(e)
    finally:
        ocr_det.deinit()
        pl.destroy()
2.22. OCR识别#
from libs.PipeLine import PipeLine, ScopedTiming
from libs.AIBase import AIBase
from libs.AI2D import Ai2d
import os
import ujson
from media.media import *
from time import *
import nncase_runtime as nn
import ulab.numpy as np
import time
import image
import aicube
import random
import gc
import sys

# 自定义OCR检测类
class OCRDetectionApp(AIBase):
    def __init__(self,kmodel_path,model_input_size,mask_threshold=0.5,box_threshold=0.2,rgb888p_size=[224,224],display_size=[1920,1080],debug_mode=0):
        super().__init__(kmodel_path,model_input_size,rgb888p_size,debug_mode)
        self.kmodel_path=kmodel_path
        # 模型输入分辨率
        self.model_input_size=model_input_size
        # 分类阈值
        self.mask_threshold=mask_threshold
        self.box_threshold=box_threshold
        # sensor给到AI的图像分辨率
        self.rgb888p_size=[ALIGN_UP(rgb888p_size[0],16),rgb888p_size[1]]
        # 显示分辨率
        self.display_size=[ALIGN_UP(display_size[0],16),display_size[1]]
        self.debug_mode=debug_mode
        # Ai2d实例,用于实现模型预处理
        self.ai2d=Ai2d(debug_mode)
        # 设置Ai2d的输入输出格式和类型
        self.ai2d.set_ai2d_dtype(nn.ai2d_format.NCHW_FMT,nn.ai2d_format.NCHW_FMT,np.uint8, np.uint8)

    # 配置预处理操作,这里使用了pad和resize,Ai2d支持crop/shift/pad/resize/affine,具体代码请打开/sdcard/app/libs/AI2D.py查看
    def config_preprocess(self,input_image_size=None):
        with ScopedTiming("set preprocess config",self.debug_mode > 0):
            # 初始化ai2d预处理配置,默认为sensor给到AI的尺寸,您可以通过设置input_image_size自行修改输入尺寸
            ai2d_input_size=input_image_size if input_image_size else self.rgb888p_size
            top,bottom,left,right=self.get_padding_param()
            self.ai2d.pad([0,0,0,0,top,bottom,left,right], 0, [0,0,0])
            self.ai2d.resize(nn.interp_method.tf_bilinear, nn.interp_mode.half_pixel)
            self.ai2d.build([1,3,ai2d_input_size[1],ai2d_input_size[0]],[1,3,self.model_input_size[1],self.model_input_size[0]])

    # 自定义当前任务的后处理
    def postprocess(self,results):
        with ScopedTiming("postprocess",self.debug_mode > 0):
            # chw2hwc
            hwc_array=self.chw2hwc(self.cur_img)
            # 这里使用了aicube封装的接口ocr_post_process做后处理,返回的det_boxes结构为[[crop_array_nhwc,[p1_x,p1_y,p2_x,p2_y,p3_x,p3_y,p4_x,p4_y]],...]
            det_boxes = aicube.ocr_post_process(results[0][:,:,:,0].reshape(-1), hwc_array.reshape(-1),self.model_input_size,self.rgb888p_size, self.mask_threshold, self.box_threshold)
            return det_boxes

    # 计算padding参数
    def get_padding_param(self):
        # 右padding或下padding
        dst_w = self.model_input_size[0]
        dst_h = self.model_input_size[1]
        input_width = self.rgb888p_size[0]
        input_high = self.rgb888p_size[1]
        ratio_w = dst_w / input_width
        ratio_h = dst_h / input_high
        if ratio_w < ratio_h:
            ratio = ratio_w
        else:
            ratio = ratio_h
        new_w = (int)(ratio * input_width)
        new_h = (int)(ratio * input_high)
        dw = (dst_w - new_w) / 2
        dh = (dst_h - new_h) / 2
        top = (int)(round(0))
        bottom = (int)(round(dh * 2 + 0.1))
        left = (int)(round(0))
        right = (int)(round(dw * 2 - 0.1))
        return  top, bottom, left, right

    # chw2hwc
    def chw2hwc(self,features):
        ori_shape = (features.shape[0], features.shape[1], features.shape[2])
        c_hw_ = features.reshape((ori_shape[0], ori_shape[1] * ori_shape[2]))
        hw_c_ = c_hw_.transpose()
        new_array = hw_c_.copy()
        hwc_array = new_array.reshape((ori_shape[1], ori_shape[2], ori_shape[0]))
        del c_hw_
        del hw_c_
        del new_array
        return hwc_array

# 自定义OCR识别任务类
class OCRRecognitionApp(AIBase):
    def __init__(self,kmodel_path,model_input_size,dict_path,rgb888p_size=[1920,1080],display_size=[1920,1080],debug_mode=0):
        super().__init__(kmodel_path,model_input_size,rgb888p_size,debug_mode)
        # kmodel路径
        self.kmodel_path=kmodel_path
        # 识别模型输入分辨率
        self.model_input_size=model_input_size
        self.dict_path=dict_path
        # sensor给到AI的图像分辨率,宽16字节对齐
        self.rgb888p_size=[ALIGN_UP(rgb888p_size[0],16),rgb888p_size[1]]
        # 视频输出VO分辨率,宽16字节对齐
        self.display_size=[ALIGN_UP(display_size[0],16),display_size[1]]
        # debug模式
        self.debug_mode=debug_mode
        self.dict_word=None
        # 读取OCR的字典
        self.read_dict()
        self.ai2d=Ai2d(debug_mode)
        self.ai2d.set_ai2d_dtype(nn.ai2d_format.RGB_packed,nn.ai2d_format.NCHW_FMT,np.uint8, np.uint8)

    # 配置预处理操作,这里使用了pad和resize,Ai2d支持crop/shift/pad/resize/affine,具体代码请打开/sdcard/app/libs/AI2D.py查看
    def config_preprocess(self,input_image_size=None,input_np=None):
        with ScopedTiming("set preprocess config",self.debug_mode > 0):
            ai2d_input_size=input_image_size if input_image_size else self.rgb888p_size
            top,bottom,left,right=self.get_padding_param(ai2d_input_size,self.model_input_size)
            self.ai2d.pad([0,0,0,0,top,bottom,left,right], 0, [0,0,0])
            self.ai2d.resize(nn.interp_method.tf_bilinear, nn.interp_mode.half_pixel)
            # 如果传入input_np,输入shape为input_np的shape,如果不传入,输入shape为[1,3,ai2d_input_size[1],ai2d_input_size[0]]
            self.ai2d.build([input_np.shape[0],input_np.shape[1],input_np.shape[2],input_np.shape[3]],[1,3,self.model_input_size[1],self.model_input_size[0]])

    # 自定义后处理,results是模型输出的array列表
    def postprocess(self,results):
        with ScopedTiming("postprocess",self.debug_mode > 0):
            preds = np.argmax(results[0], axis=2).reshape((-1))
            output_txt = ""
            for i in range(len(preds)):
                # 当前识别字符不是字典的最后一个字符并且和前一个字符不重复(去重),加入识别结果字符串
                if preds[i] != (len(self.dict_word) - 1) and (not (i > 0 and preds[i - 1] == preds[i])):
                    output_txt = output_txt + self.dict_word[preds[i]]
            return output_txt

    # 计算padding参数
    def get_padding_param(self,src_size,dst_size):
        # 右padding或下padding
        dst_w = dst_size[0]
        dst_h = dst_size[1]
        input_width = src_size[0]
        input_high = src_size[1]
        ratio_w = dst_w / input_width
        ratio_h = dst_h / input_high
        if ratio_w < ratio_h:
            ratio = ratio_w
        else:
            ratio = ratio_h
        new_w = (int)(ratio * input_width)
        new_h = (int)(ratio * input_high)
        dw = (dst_w - new_w) / 2
        dh = (dst_h - new_h) / 2
        top = (int)(round(0))
        bottom = (int)(round(dh * 2 + 0.1))
        left = (int)(round(0))
        right = (int)(round(dw * 2 - 0.1))
        return  top, bottom, left, right

    def read_dict(self):
        if self.dict_path!="":
            with open(dict_path, 'r') as file:
                line_one = file.read(100000)
                line_list = line_one.split("\r\n")
            self.dict_word = {num: char.replace("\r", "").replace("\n", "") for num, char in enumerate(line_list)}


class OCRDetRec:
    def __init__(self,ocr_det_kmodel,ocr_rec_kmodel,det_input_size,rec_input_size,dict_path,mask_threshold=0.25,box_threshold=0.3,rgb888p_size=[1920,1080],display_size=[1920,1080],debug_mode=0):
        # OCR检测模型路径
        self.ocr_det_kmodel=ocr_det_kmodel
        # OCR识别模型路径
        self.ocr_rec_kmodel=ocr_rec_kmodel
        # OCR检测模型输入分辨率
        self.det_input_size=det_input_size
        # OCR识别模型输入分辨率
        self.rec_input_size=rec_input_size
        # 字典路径
        self.dict_path=dict_path
        # 置信度阈值
        self.mask_threshold=mask_threshold
        # nms阈值
        self.box_threshold=box_threshold
        # sensor给到AI的图像分辨率,宽16字节对齐
        self.rgb888p_size=[ALIGN_UP(rgb888p_size[0],16),rgb888p_size[1]]
        # 视频输出VO分辨率,宽16字节对齐
        self.display_size=[ALIGN_UP(display_size[0],16),display_size[1]]
        # debug_mode模式
        self.debug_mode=debug_mode
        self.ocr_det=OCRDetectionApp(self.ocr_det_kmodel,model_input_size=self.det_input_size,mask_threshold=self.mask_threshold,box_threshold=self.box_threshold,rgb888p_size=self.rgb888p_size,display_size=self.display_size,debug_mode=0)
        self.ocr_rec=OCRRecognitionApp(self.ocr_rec_kmodel,model_input_size=self.rec_input_size,dict_path=self.dict_path,rgb888p_size=self.rgb888p_size,display_size=self.display_size)
        self.ocr_det.config_preprocess()

    # run函数
    def run(self,input_np):
        # 先进行OCR检测
        det_res=self.ocr_det.run(input_np)
        boxes=[]
        ocr_res=[]
        for det in det_res:
            # 对得到的每个检测框执行OCR识别
            self.ocr_rec.config_preprocess(input_image_size=[det[0].shape[2],det[0].shape[1]],input_np=det[0])
            ocr_str=self.ocr_rec.run(det[0])
            ocr_res.append(ocr_str)
            boxes.append(det[1])
            gc.collect()
        return boxes,ocr_res

    # 绘制OCR检测识别效果
    def draw_result(self,pl,det_res,rec_res):
        pl.osd_img.clear()
        if det_res:
            # 循环绘制所有检测到的框
            for j in range(len(det_res)):
                # 将原图的坐标点转换成显示的坐标点,循环绘制四条直线,得到一个矩形框
                for i in range(4):
                    x1 = det_res[j][(i * 2)] / self.rgb888p_size[0] * self.display_size[0]
                    y1 = det_res[j][(i * 2 + 1)] / self.rgb888p_size[1] * self.display_size[1]
                    x2 = det_res[j][((i + 1) * 2) % 8] / self.rgb888p_size[0] * self.display_size[0]
                    y2 = det_res[j][((i + 1) * 2 + 1) % 8] / self.rgb888p_size[1] * self.display_size[1]
                    pl.osd_img.draw_line((int(x1), int(y1), int(x2), int(y2)), color=(255, 0, 0, 255),thickness=5)
                pl.osd_img.draw_string_advanced(int(x1),int(y1),32,rec_res[j],color=(0,0,255))


if __name__=="__main__":
    # 显示模式,默认"hdmi",可以选择"hdmi"和"lcd"
    display_mode="hdmi"
    if display_mode=="hdmi":
        display_size=[1920,1080]
    else:
        display_size=[800,480]
    # OCR检测模型路径
    ocr_det_kmodel_path="/sdcard/app/tests/kmodel/ocr_det_int16.kmodel"
    # OCR识别模型路径
    ocr_rec_kmodel_path="/sdcard/app/tests/kmodel/ocr_rec_int16.kmodel"
    # 其他参数
    dict_path="/sdcard/app/tests/utils/dict.txt"
    rgb888p_size=[640,360]
    ocr_det_input_size=[640,640]
    ocr_rec_input_size=[512,32]
    mask_threshold=0.25
    box_threshold=0.3

    # 初始化PipeLine,只关注传给AI的图像分辨率,显示的分辨率
    pl=PipeLine(rgb888p_size=rgb888p_size,display_size=display_size,display_mode=display_mode)
    pl.create()
    ocr=OCRDetRec(ocr_det_kmodel_path,ocr_rec_kmodel_path,det_input_size=ocr_det_input_size,rec_input_size=ocr_rec_input_size,dict_path=dict_path,mask_threshold=mask_threshold,box_threshold=box_threshold,rgb888p_size=rgb888p_size,display_size=display_size)
    try:
        while True:
            os.exitpoint()
            with ScopedTiming("total",1):
                img=pl.get_frame()                  # 获取当前帧
                det_res,rec_res=ocr.run(img)        # 推理当前帧
                ocr.draw_result(pl,det_res,rec_res) # 绘制当前帧推理结果
                pl.show_image()                     # 展示当前帧推理结果
                gc.collect()
    except Exception as e:
        sys.print_exception(e)
    finally:
        ocr.ocr_det.deinit()
        ocr.ocr_rec.deinit()
        pl.destroy()
2.23. 人体检测#
from libs.PipeLine import PipeLine, ScopedTiming
from libs.AIBase import AIBase
from libs.AI2D import Ai2d
import os
import ujson
from media.media import *
from time import *
import nncase_runtime as nn
import ulab.numpy as np
import time
import utime
import image
import random
import gc
import sys
import aicube

# 自定义人体检测类
class PersonDetectionApp(AIBase):
    def __init__(self,kmodel_path,model_input_size,labels,anchors,confidence_threshold=0.2,nms_threshold=0.5,nms_option=False,strides=[8,16,32],rgb888p_size=[224,224],display_size=[1920,1080],debug_mode=0):
        super().__init__(kmodel_path,model_input_size,rgb888p_size,debug_mode)
        self.kmodel_path=kmodel_path
        # 模型输入分辨率
        self.model_input_size=model_input_size
        # 标签
        self.labels=labels
        # 检测anchors设置
        self.anchors=anchors
        # 特征图降采样倍数
        self.strides=strides
        # 置信度阈值设置
        self.confidence_threshold=confidence_threshold
        # nms阈值设置
        self.nms_threshold=nms_threshold
        self.nms_option=nms_option
        # sensor给到AI的图像分辨率
        self.rgb888p_size=[ALIGN_UP(rgb888p_size[0],16),rgb888p_size[1]]
        # 显示分辨率
        self.display_size=[ALIGN_UP(display_size[0],16),display_size[1]]
        self.debug_mode=debug_mode
        # Ai2d实例,用于实现模型预处理
        self.ai2d=Ai2d(debug_mode)
        # 设置Ai2d的输入输出格式和类型
        self.ai2d.set_ai2d_dtype(nn.ai2d_format.NCHW_FMT,nn.ai2d_format.NCHW_FMT,np.uint8, np.uint8)

    # 配置预处理操作,这里使用了pad和resize,Ai2d支持crop/shift/pad/resize/affine,具体代码请打开/sdcard/app/libs/AI2D.py查看
    def config_preprocess(self,input_image_size=None):
        with ScopedTiming("set preprocess config",self.debug_mode > 0):
            # 初始化ai2d预处理配置,默认为sensor给到AI的尺寸,您可以通过设置input_image_size自行修改输入尺寸
            ai2d_input_size=input_image_size if input_image_size else self.rgb888p_size
            top,bottom,left,right=self.get_padding_param()
            self.ai2d.pad([0,0,0,0,top,bottom,left,right], 0, [0,0,0])
            self.ai2d.resize(nn.interp_method.tf_bilinear, nn.interp_mode.half_pixel)
            self.ai2d.build([1,3,ai2d_input_size[1],ai2d_input_size[0]],[1,3,self.model_input_size[1],self.model_input_size[0]])

    # 自定义当前任务的后处理
    def postprocess(self,results):
        with ScopedTiming("postprocess",self.debug_mode > 0):
            # 这里使用了aicube模型的后处理接口anchorbasedet_post_preocess
            dets = aicube.anchorbasedet_post_process(results[0], results[1], results[2], self.model_input_size, self.rgb888p_size, self.strides, len(self.labels), self.confidence_threshold, self.nms_threshold, self.anchors, self.nms_option)
            return dets

    # 绘制结果
    def draw_result(self,pl,dets):
        with ScopedTiming("display_draw",self.debug_mode >0):
            if dets:
                pl.osd_img.clear()
                for det_box in dets:
                    x1, y1, x2, y2 = det_box[2],det_box[3],det_box[4],det_box[5]
                    w = float(x2 - x1) * self.display_size[0] // self.rgb888p_size[0]
                    h = float(y2 - y1) * self.display_size[1] // self.rgb888p_size[1]
                    x1 = int(x1 * self.display_size[0] // self.rgb888p_size[0])
                    y1 = int(y1 * self.display_size[1] // self.rgb888p_size[1])
                    x2 = int(x2 * self.display_size[0] // self.rgb888p_size[0])
                    y2 = int(y2 * self.display_size[1] // self.rgb888p_size[1])
                    if (h<(0.1*self.display_size[0])):
                        continue
                    if (w<(0.25*self.display_size[0]) and ((x1<(0.03*self.display_size[0])) or (x2>(0.97*self.display_size[0])))):
                        continue
                    if (w<(0.15*self.display_size[0]) and ((x1<(0.01*self.display_size[0])) or (x2>(0.99*self.display_size[0])))):
                        continue
                    pl.osd_img.draw_rectangle(x1 , y1 , int(w) , int(h), color=(255, 0, 255, 0), thickness = 2)
                    pl.osd_img.draw_string_advanced( x1 , y1-50,32, " " + self.labels[det_box[0]] + " " + str(round(det_box[1],2)), color=(255,0, 255, 0))
            else:
                pl.osd_img.clear()

    # 计算padding参数
    def get_padding_param(self):
        dst_w = self.model_input_size[0]
        dst_h = self.model_input_size[1]
        input_width = self.rgb888p_size[0]
        input_high = self.rgb888p_size[1]
        ratio_w = dst_w / input_width
        ratio_h = dst_h / input_high
        if ratio_w < ratio_h:
            ratio = ratio_w
        else:
            ratio = ratio_h
        new_w = (int)(ratio * input_width)
        new_h = (int)(ratio * input_high)
        dw = (dst_w - new_w) / 2
        dh = (dst_h - new_h) / 2
        top = int(round(dh - 0.1))
        bottom = int(round(dh + 0.1))
        left = int(round(dw - 0.1))
        right = int(round(dw - 0.1))
        return  top, bottom, left, right

if __name__=="__main__":
    # 显示模式,默认"hdmi",可以选择"hdmi"和"lcd"
    display_mode="hdmi"
    if display_mode=="hdmi":
        display_size=[1920,1080]
    else:
        display_size=[800,480]
    # 模型路径
    kmodel_path="/sdcard/app/tests/kmodel/person_detect_yolov5n.kmodel"
    # 其它参数设置
    confidence_threshold = 0.2
    nms_threshold = 0.6
    rgb888p_size=[1920,1080]
    labels = ["person"]
    anchors = [10, 13, 16, 30, 33, 23, 30, 61, 62, 45, 59, 119, 116, 90, 156, 198, 373, 326]

    # 初始化PipeLine
    pl=PipeLine(rgb888p_size=rgb888p_size,display_size=display_size,display_mode=display_mode)
    pl.create()
    # 初始化自定义人体检测实例
    person_det=PersonDetectionApp(kmodel_path,model_input_size=[640,640],labels=labels,anchors=anchors,confidence_threshold=confidence_threshold,nms_threshold=nms_threshold,nms_option=False,strides=[8,16,32],rgb888p_size=rgb888p_size,display_size=display_size,debug_mode=0)
    person_det.config_preprocess()
    try:
        while True:
            os.exitpoint()
            with ScopedTiming("total",1):
                # 获取当前帧数据
                img=pl.get_frame()
                # 推理当前帧
                res=person_det.run(img)
                # 绘制结果到PipeLine的osd图像
                person_det.draw_result(pl,res)
                # 显示当前的绘制结果
                pl.show_image()
                gc.collect()
    except Exception as e:
        sys.print_exception(e)
    finally:
        person_det.deinit()
        pl.destroy()
2.24. 人体关键点检测#
from libs.PipeLine import PipeLine, ScopedTiming
from libs.AIBase import AIBase
from libs.AI2D import Ai2d
import os
import ujson
from media.media import *
from time import *
import nncase_runtime as nn
import ulab.numpy as np
import time
import utime
import image
import random
import gc
import sys
import aidemo

# 自定义人体关键点检测类
class PersonKeyPointApp(AIBase):
    def __init__(self,kmodel_path,model_input_size,confidence_threshold=0.2,nms_threshold=0.5,rgb888p_size=[1280,720],display_size=[1920,1080],debug_mode=0):
        super().__init__(kmodel_path,model_input_size,rgb888p_size,debug_mode)
        self.kmodel_path=kmodel_path
        # 模型输入分辨率
        self.model_input_size=model_input_size
        # 置信度阈值设置
        self.confidence_threshold=confidence_threshold
        # nms阈值设置
        self.nms_threshold=nms_threshold
        # sensor给到AI的图像分辨率
        self.rgb888p_size=[ALIGN_UP(rgb888p_size[0],16),rgb888p_size[1]]
        # 显示分辨率
        self.display_size=[ALIGN_UP(display_size[0],16),display_size[1]]
        self.debug_mode=debug_mode
        #骨骼信息
        self.SKELETON = [(16, 14),(14, 12),(17, 15),(15, 13),(12, 13),(6,  12),(7,  13),(6,  7),(6,  8),(7,  9),(8,  10),(9,  11),(2,  3),(1,  2),(1,  3),(2,  4),(3,  5),(4,  6),(5,  7)]
        #肢体颜色
        self.LIMB_COLORS = [(255, 51,  153, 255),(255, 51,  153, 255),(255, 51,  153, 255),(255, 51,  153, 255),(255, 255, 51,  255),(255, 255, 51,  255),(255, 255, 51,  255),(255, 255, 128, 0),(255, 255, 128, 0),(255, 255, 128, 0),(255, 255, 128, 0),(255, 255, 128, 0),(255, 0,   255, 0),(255, 0,   255, 0),(255, 0,   255, 0),(255, 0,   255, 0),(255, 0,   255, 0),(255, 0,   255, 0),(255, 0,   255, 0)]
        #关键点颜色,共17个
        self.KPS_COLORS = [(255, 0,   255, 0),(255, 0,   255, 0),(255, 0,   255, 0),(255, 0,   255, 0),(255, 0,   255, 0),(255, 255, 128, 0),(255, 255, 128, 0),(255, 255, 128, 0),(255, 255, 128, 0),(255, 255, 128, 0),(255, 255, 128, 0),(255, 51,  153, 255),(255, 51,  153, 255),(255, 51,  153, 255),(255, 51,  153, 255),(255, 51,  153, 255),(255, 51,  153, 255)]

        # Ai2d实例,用于实现模型预处理
        self.ai2d=Ai2d(debug_mode)
        # 设置Ai2d的输入输出格式和类型
        self.ai2d.set_ai2d_dtype(nn.ai2d_format.NCHW_FMT,nn.ai2d_format.NCHW_FMT,np.uint8, np.uint8)

    # 配置预处理操作,这里使用了pad和resize,Ai2d支持crop/shift/pad/resize/affine,具体代码请打开/sdcard/app/libs/AI2D.py查看
    def config_preprocess(self,input_image_size=None):
        with ScopedTiming("set preprocess config",self.debug_mode > 0):
            # 初始化ai2d预处理配置,默认为sensor给到AI的尺寸,您可以通过设置input_image_size自行修改输入尺寸
            ai2d_input_size=input_image_size if input_image_size else self.rgb888p_size
            top,bottom,left,right=self.get_padding_param()
            self.ai2d.pad([0,0,0,0,top,bottom,left,right], 0, [0,0,0])
            self.ai2d.resize(nn.interp_method.tf_bilinear, nn.interp_mode.half_pixel)
            self.ai2d.build([1,3,ai2d_input_size[1],ai2d_input_size[0]],[1,3,self.model_input_size[1],self.model_input_size[0]])

    # 自定义当前任务的后处理
    def postprocess(self,results):
        with ScopedTiming("postprocess",self.debug_mode > 0):
            # 这里使用了aidemo库的person_kp_postprocess接口
            results = aidemo.person_kp_postprocess(results[0],[self.rgb888p_size[1],self.rgb888p_size[0]],self.model_input_size,self.confidence_threshold,self.nms_threshold)
            return results

    #绘制结果,绘制人体关键点
    def draw_result(self,pl,res):
        with ScopedTiming("display_draw",self.debug_mode >0):
            if res[0]:
                pl.osd_img.clear()
                kpses = res[1]
                for i in range(len(res[0])):
                    for k in range(17+2):
                        if (k < 17):
                            kps_x,kps_y,kps_s = round(kpses[i][k][0]),round(kpses[i][k][1]),kpses[i][k][2]
                            kps_x1 = int(float(kps_x) * self.display_size[0] // self.rgb888p_size[0])
                            kps_y1 = int(float(kps_y) * self.display_size[1] // self.rgb888p_size[1])
                            if (kps_s > 0):
                                pl.osd_img.draw_circle(kps_x1,kps_y1,5,self.KPS_COLORS[k],4)
                        ske = self.SKELETON[k]
                        pos1_x,pos1_y= round(kpses[i][ske[0]-1][0]),round(kpses[i][ske[0]-1][1])
                        pos1_x_ = int(float(pos1_x) * self.display_size[0] // self.rgb888p_size[0])
                        pos1_y_ = int(float(pos1_y) * self.display_size[1] // self.rgb888p_size[1])

                        pos2_x,pos2_y = round(kpses[i][(ske[1] -1)][0]),round(kpses[i][(ske[1] -1)][1])
                        pos2_x_ = int(float(pos2_x) * self.display_size[0] // self.rgb888p_size[0])
                        pos2_y_ = int(float(pos2_y) * self.display_size[1] // self.rgb888p_size[1])

                        pos1_s,pos2_s = kpses[i][(ske[0] -1)][2],kpses[i][(ske[1] -1)][2]
                        if (pos1_s > 0.0 and pos2_s >0.0):
                            pl.osd_img.draw_line(pos1_x_,pos1_y_,pos2_x_,pos2_y_,self.LIMB_COLORS[k],4)
                    gc.collect()
            else:
                pl.osd_img.clear()

    # 计算padding参数
    def get_padding_param(self):
        dst_w = self.model_input_size[0]
        dst_h = self.model_input_size[1]
        input_width = self.rgb888p_size[0]
        input_high = self.rgb888p_size[1]
        ratio_w = dst_w / input_width
        ratio_h = dst_h / input_high
        if ratio_w < ratio_h:
            ratio = ratio_w
        else:
            ratio = ratio_h
        new_w = (int)(ratio * input_width)
        new_h = (int)(ratio * input_high)
        dw = (dst_w - new_w) / 2
        dh = (dst_h - new_h) / 2
        top = int(round(dh - 0.1))
        bottom = int(round(dh + 0.1))
        left = int(round(dw - 0.1))
        right = int(round(dw - 0.1))
        return  top, bottom, left, right

if __name__=="__main__":
    # 显示模式,默认"hdmi",可以选择"hdmi"和"lcd"
    display_mode="hdmi"
    if display_mode=="hdmi":
        display_size=[1920,1080]
    else:
        display_size=[800,480]
    # 模型路径
    kmodel_path="/sdcard/app/tests/kmodel/yolov8n-pose.kmodel"
    # 其它参数设置
    confidence_threshold = 0.2
    nms_threshold = 0.5
    rgb888p_size=[1920,1080]
    # 初始化PipeLine
    pl=PipeLine(rgb888p_size=rgb888p_size,display_size=display_size,display_mode=display_mode)
    pl.create()
    # 初始化自定义人体关键点检测实例
    person_kp=PersonKeyPointApp(kmodel_path,model_input_size=[320,320],confidence_threshold=confidence_threshold,nms_threshold=nms_threshold,rgb888p_size=rgb888p_size,display_size=display_size,debug_mode=0)
    person_kp.config_preprocess()
    try:
        while True:
            os.exitpoint()
            with ScopedTiming("total",1):
                # 获取当前帧数据
                img=pl.get_frame()
                # 推理当前帧
                res=person_kp.run(img)
                # 绘制结果到PipeLine的osd图像
                person_kp.draw_result(pl,res)
                # 显示当前的绘制结果
                pl.show_image()
                gc.collect()
    except Exception as e:
        sys.print_exception(e)
    finally:
        person_kp.deinit()
        pl.destroy()
2.25. 拼图游戏#
from libs.PipeLine import PipeLine, ScopedTiming
from libs.AIBase import AIBase
from libs.AI2D import Ai2d
import os
import ujson
from media.media import *
from time import *
import nncase_runtime as nn
import ulab.numpy as np
import time
import image
import aicube
import random
import gc
import sys

# 自定义手掌检测任务类
class HandDetApp(AIBase):
    def __init__(self,kmodel_path,labels,model_input_size,anchors,confidence_threshold=0.2,nms_threshold=0.5,nms_option=False, strides=[8,16,32],rgb888p_size=[1920,1080],display_size=[1920,1080],debug_mode=0):
        super().__init__(kmodel_path,model_input_size,rgb888p_size,debug_mode)
        # kmodel路径
        self.kmodel_path=kmodel_path
        self.labels=labels
        # 检测模型输入分辨率
        self.model_input_size=model_input_size
        # 置信度阈值
        self.confidence_threshold=confidence_threshold
        # nms阈值
        self.nms_threshold=nms_threshold
        self.anchors=anchors
        self.strides = strides  # 特征下采样倍数
        self.nms_option = nms_option  # NMS选项,如果为True做类间NMS,如果为False做类内NMS
        # sensor给到AI的图像分辨率,宽16字节对齐
        self.rgb888p_size=[ALIGN_UP(rgb888p_size[0],16),rgb888p_size[1]]
        # 视频输出VO分辨率,宽16字节对齐
        self.display_size=[ALIGN_UP(display_size[0],16),display_size[1]]
        # debug模式
        self.debug_mode=debug_mode
        self.ai2d=Ai2d(debug_mode)
        self.ai2d.set_ai2d_dtype(nn.ai2d_format.NCHW_FMT,nn.ai2d_format.NCHW_FMT,np.uint8, np.uint8)

    def config_preprocess(self,input_image_size=None):
        with ScopedTiming("set preprocess config",self.debug_mode > 0):
            # 初始化ai2d预处理配置,默认为sensor给到AI的尺寸,可以通过设置input_image_size自行修改输入尺寸
            ai2d_input_size = input_image_size if input_image_size else self.rgb888p_size
            # 计算padding参数并应用pad操作,以确保输入图像尺寸与模型输入尺寸匹配
            top, bottom, left, right = self.get_padding_param()
            self.ai2d.pad([0, 0, 0, 0, top, bottom, left, right], 0, [114, 114, 114])
            # 使用双线性插值进行resize操作,调整图像尺寸以符合模型输入要求
            self.ai2d.resize(nn.interp_method.tf_bilinear, nn.interp_mode.half_pixel)
            # 构建预处理流程
            self.ai2d.build([1,3,ai2d_input_size[1],ai2d_input_size[0]],[1,3,self.model_input_size[1],self.model_input_size[0]])

    # 自定义后处理,results是模型的输出array列表,这里使用了aicube库的anchorbasedet_post_process
    def postprocess(self,results):
        with ScopedTiming("postprocess",self.debug_mode > 0):
            dets = aicube.anchorbasedet_post_process(results[0], results[1], results[2], self.model_input_size, self.rgb888p_size, self.strides, len(self.labels), self.confidence_threshold, self.nms_threshold, self.anchors, self.nms_option)
            # 返回手掌检测结果
            return dets

    # 计算padding参数,确保输入图像尺寸与模型输入尺寸匹配
    def get_padding_param(self):
        # 根据目标宽度和高度计算比例因子
        dst_w = self.model_input_size[0]
        dst_h = self.model_input_size[1]
        input_width = self.rgb888p_size[0]
        input_high = self.rgb888p_size[1]
        ratio_w = dst_w / input_width
        ratio_h = dst_h / input_high
        # 选择较小的比例因子,以确保图像内容完整
        if ratio_w < ratio_h:
            ratio = ratio_w
        else:
            ratio = ratio_h
        # 计算新的宽度和高度
        new_w = int(ratio * input_width)
        new_h = int(ratio * input_high)
        # 计算宽度和高度的差值,并确定padding的位置
        dw = (dst_w - new_w) / 2
        dh = (dst_h - new_h) / 2
        top = int(round(dh - 0.1))
        bottom = int(round(dh + 0.1))
        left = int(round(dw - 0.1))
        right = int(round(dw + 0.1))
        return top, bottom, left, right

# 自定义手势关键点分类任务类
class HandKPClassApp(AIBase):
    def __init__(self,kmodel_path,model_input_size,rgb888p_size=[1920,1080],display_size=[1920,1080],debug_mode=0):
        super().__init__(kmodel_path,model_input_size,rgb888p_size,debug_mode)
        # kmodel路径
        self.kmodel_path=kmodel_path
        # 检测模型输入分辨率
        self.model_input_size=model_input_size
        # sensor给到AI的图像分辨率,宽16字节对齐
        self.rgb888p_size=[ALIGN_UP(rgb888p_size[0],16),rgb888p_size[1]]
        # 视频输出VO分辨率,宽16字节对齐
        self.display_size=[ALIGN_UP(display_size[0],16),display_size[1]]
        self.crop_params=[]
        # debug模式
        self.debug_mode=debug_mode
        self.ai2d=Ai2d(debug_mode)
        self.ai2d.set_ai2d_dtype(nn.ai2d_format.NCHW_FMT,nn.ai2d_format.NCHW_FMT,np.uint8, np.uint8)

    # 配置预处理操作,这里使用了crop和resize,Ai2d支持crop/shift/pad/resize/affine
    def config_preprocess(self,det,input_image_size=None):
        with ScopedTiming("set preprocess config",self.debug_mode > 0):
            ai2d_input_size=input_image_size if input_image_size else self.rgb888p_size
            self.crop_params = self.get_crop_param(det)
            self.ai2d.crop(self.crop_params[0],self.crop_params[1],self.crop_params[2],self.crop_params[3])
            self.ai2d.resize(nn.interp_method.tf_bilinear, nn.interp_mode.half_pixel)
            self.ai2d.build([1,3,ai2d_input_size[1],ai2d_input_size[0]],[1,3,self.model_input_size[1],self.model_input_size[0]])

    # 自定义后处理,results是模型的输出array列表
    def postprocess(self,results):
        with ScopedTiming("postprocess",self.debug_mode > 0):
            results=results[0].reshape(results[0].shape[0]*results[0].shape[1])
            results_show = np.zeros(results.shape,dtype=np.int16)
            results_show[0::2] = (results[0::2] * self.crop_params[3] + self.crop_params[0])
            results_show[1::2] = (results[1::2] * self.crop_params[2] + self.crop_params[1])
            return results_show

    # 计算crop参数
    def get_crop_param(self,det_box):
        x1, y1, x2, y2 = det_box[2],det_box[3],det_box[4],det_box[5]
        w,h= int(x2 - x1),int(y2 - y1)
        w_det = int(float(x2 - x1) * self.display_size[0] // self.rgb888p_size[0])
        h_det = int(float(y2 - y1) * self.display_size[1] // self.rgb888p_size[1])
        x_det = int(x1*self.display_size[0] // self.rgb888p_size[0])
        y_det = int(y1*self.display_size[1] // self.rgb888p_size[1])
        length = max(w, h)/2
        cx = (x1+x2)/2
        cy = (y1+y2)/2
        ratio_num = 1.26*length
        x1_kp = int(max(0,cx-ratio_num))
        y1_kp = int(max(0,cy-ratio_num))
        x2_kp = int(min(self.rgb888p_size[0]-1, cx+ratio_num))
        y2_kp = int(min(self.rgb888p_size[1]-1, cy+ratio_num))
        w_kp = int(x2_kp - x1_kp + 1)
        h_kp = int(y2_kp - y1_kp + 1)
        return [x1_kp, y1_kp, w_kp, h_kp]

# 拼图游戏任务类
class PuzzleGame:
    def __init__(self,hand_det_kmodel,hand_kp_kmodel,det_input_size,kp_input_size,labels,anchors,confidence_threshold=0.25,nms_threshold=0.3,nms_option=False,strides=[8,16,32],rgb888p_size=[1280,720],display_size=[1920,1080],debug_mode=0):
        # 手掌检测模型路径
        self.hand_det_kmodel=hand_det_kmodel
        # 手掌关键点模型路径
        self.hand_kp_kmodel=hand_kp_kmodel
        # 手掌检测模型输入分辨率
        self.det_input_size=det_input_size
        # 手掌关键点模型输入分辨率
        self.kp_input_size=kp_input_size
        self.labels=labels
        # anchors
        self.anchors=anchors
        # 置信度阈值
        self.confidence_threshold=confidence_threshold
        # nms阈值
        self.nms_threshold=nms_threshold
        self.nms_option=nms_option
        self.strides=strides
        # sensor给到AI的图像分辨率,宽16字节对齐
        self.rgb888p_size=[ALIGN_UP(rgb888p_size[0],16),rgb888p_size[1]]
        # 视频输出VO分辨率,宽16字节对齐
        self.display_size=[ALIGN_UP(display_size[0],16),display_size[1]]
        # debug_mode模式
        self.debug_mode=debug_mode

        self.level = 3                                                              # 游戏级别 目前只支持设置为 3
        self.puzzle_width = self.display_size[1]                                    # 设定 拼图宽
        self.puzzle_height = self.display_size[1]                                   # 设定 拼图高
        self.puzzle_ori_width = self.display_size[0] - self.puzzle_width - 50       # 设定 原始拼图宽
        self.puzzle_ori_height = self.display_size[0] - self.puzzle_height - 50     # 设定 原始拼图高

        self.every_block_width = int(self.puzzle_width/self.level)                  # 设定 拼图块宽
        self.every_block_height = int(self.puzzle_height/self.level)                # 设定 拼图块高
        self.ori_every_block_width = int(self.puzzle_ori_width/self.level)          # 设定 原始拼图宽
        self.ori_every_block_height = int(self.puzzle_ori_height/self.level)        # 设定 原始拼图高
        self.ratio_num = self.every_block_width/360.0                               # 字体比例
        self.blank_x = 0                                                            # 空白块 角点x
        self.blank_y = 0                                                            # 空白块 角点y
        self.direction_vec = [-1,1,-1,1]                                            # 空白块四种移动方向
        self.exact_division_x = 0                                                   # 交换块 角点x
        self.exact_division_y = 0                                                   # 交换块 角点y
        self.distance_tow_points = self.display_size[0]                             # 两手指距离
        self.distance_thred = self.every_block_width*0.4                            # 两手指距离阈值
        self.osd_frame_tmp = np.zeros((self.display_size[1],self.display_size[0],4),dtype=np.uint8)
        self.osd_frame_tmp_img = image.Image(self.display_size[0], self.display_size[1], image.ARGB8888,alloc=image.ALLOC_REF,data=self.osd_frame_tmp)
        self.move_mat = np.zeros((self.every_block_height,self.every_block_width,4),dtype=np.uint8)
        self.init_osd_frame()
        self.hand_det=HandDetApp(self.hand_det_kmodel,self.labels,model_input_size=self.det_input_size,anchors=self.anchors,confidence_threshold=self.confidence_threshold,nms_threshold=self.nms_threshold,nms_option=self.nms_option,strides=self.strides,rgb888p_size=self.rgb888p_size,display_size=self.display_size,debug_mode=0)
        self.hand_kp=HandKPClassApp(self.hand_kp_kmodel,model_input_size=self.kp_input_size,rgb888p_size=self.rgb888p_size,display_size=self.display_size)
        self.hand_det.config_preprocess()

    # 初始化拼图界面,绘制两个3*3的拼图
    def init_osd_frame(self):
        self.osd_frame_tmp[0:self.puzzle_height,0:self.puzzle_width,3] = 100
        self.osd_frame_tmp[0:self.puzzle_height,0:self.puzzle_width,2] = 150
        self.osd_frame_tmp[0:self.puzzle_height,0:self.puzzle_width,1] = 130
        self.osd_frame_tmp[0:self.puzzle_height,0:self.puzzle_width,0] = 127
        self.osd_frame_tmp[(self.display_size[1]-self.puzzle_ori_height)//2:(self.display_size[1]-self.puzzle_ori_height)//2+self.puzzle_ori_width,self.puzzle_width+25:self.puzzle_width+25+self.puzzle_ori_height,3] = 100
        self.osd_frame_tmp[(self.display_size[1]-self.puzzle_ori_height)//2:(self.display_size[1]-self.puzzle_ori_height)//2+self.puzzle_ori_width,self.puzzle_width+25:self.puzzle_width+25+self.puzzle_ori_height,2] = 150
        self.osd_frame_tmp[(self.display_size[1]-self.puzzle_ori_height)//2:(self.display_size[1]-self.puzzle_ori_height)//2+self.puzzle_ori_width,self.puzzle_width+25:self.puzzle_width+25+self.puzzle_ori_height,1] = 130
        self.osd_frame_tmp[(self.display_size[1]-self.puzzle_ori_height)//2:(self.display_size[1]-self.puzzle_ori_height)//2+self.puzzle_ori_width,self.puzzle_width+25:self.puzzle_width+25+self.puzzle_ori_height,0] = 127
        for i in range(self.level*self.level):
            self.osd_frame_tmp_img.draw_rectangle((i%self.level)*self.every_block_width,(i//self.level)*self.every_block_height,self.every_block_width,self.every_block_height,(255,0,0,0),5)
            self.osd_frame_tmp_img.draw_string_advanced((i%self.level)*self.every_block_width + 55,(i//self.level)*self.every_block_height + 45,int(60*self.ratio_num),str(i),color=(255,0,0,255))
            self.osd_frame_tmp_img.draw_rectangle(self.puzzle_width+25 + (i%self.level)*self.ori_every_block_width,(self.display_size[1]-self.puzzle_ori_height)//2 + (i//self.level)*self.ori_every_block_height,self.ori_every_block_width,self.ori_every_block_height,(255,0,0,0),5)
            self.osd_frame_tmp_img.draw_string_advanced(self.puzzle_width+25 + (i%self.level)*self.ori_every_block_width + 50,(self.display_size[1]-self.puzzle_ori_height)//2 + (i//self.level)*self.ori_every_block_height + 25,int(50*self.ratio_num),str(i),color=(255,0,0,255))
        self.osd_frame_tmp[0:self.every_block_height,0:self.every_block_width,3] = 114
        self.osd_frame_tmp[0:self.every_block_height,0:self.every_block_width,2] = 114
        self.osd_frame_tmp[0:self.every_block_height,0:self.every_block_width,1] = 114
        self.osd_frame_tmp[0:self.every_block_height,0:self.every_block_width,0] = 220
        self.osd_frame_tmp[(self.display_size[1]-self.puzzle_ori_height)//2:(self.display_size[1]-self.puzzle_ori_height)//2+self.ori_every_block_width,self.puzzle_width+25:self.puzzle_width+25+self.ori_every_block_height,3] = 114
        self.osd_frame_tmp[(self.display_size[1]-self.puzzle_ori_height)//2:(self.display_size[1]-self.puzzle_ori_height)//2+self.ori_every_block_width,self.puzzle_width+25:self.puzzle_width+25+self.ori_every_block_height,2] = 114
        self.osd_frame_tmp[(self.display_size[1]-self.puzzle_ori_height)//2:(self.display_size[1]-self.puzzle_ori_height)//2+self.ori_every_block_width,self.puzzle_width+25:self.puzzle_width+25+self.ori_every_block_height,1] = 114
        self.osd_frame_tmp[(self.display_size[1]-self.puzzle_ori_height)//2:(self.display_size[1]-self.puzzle_ori_height)//2+self.ori_every_block_width,self.puzzle_width+25:self.puzzle_width+25+self.ori_every_block_height,0] = 220

        for i in range(self.level*10):
            k230_random = int(random.random() * 100) % 4
            blank_x_tmp = self.blank_x
            blank_y_tmp = self.blank_y
            if (k230_random < 2):
                blank_x_tmp = self.blank_x + self.direction_vec[k230_random]
            else:
                blank_y_tmp = self.blank_y + self.direction_vec[k230_random]

            if ((blank_x_tmp >= 0 and blank_x_tmp < self.level) and (blank_y_tmp >= 0 and blank_y_tmp < self.level) and (abs(self.blank_x - blank_x_tmp) <= 1 and abs(self.blank_y - blank_y_tmp) <= 1)):
                move_rect = [blank_x_tmp*self.every_block_width,blank_y_tmp*self.every_block_height,self.every_block_width,self.every_block_height]
                blank_rect = [self.blank_x*self.every_block_width,self.blank_y*self.every_block_height,self.every_block_width,self.every_block_height]
                self.move_mat[:] = self.osd_frame_tmp[move_rect[1]:move_rect[1]+move_rect[3],move_rect[0]:move_rect[0]+move_rect[2],:]
                self.osd_frame_tmp[move_rect[1]:move_rect[1]+move_rect[3],move_rect[0]:move_rect[0]+move_rect[2],:] = self.osd_frame_tmp[blank_rect[1]:blank_rect[1]+blank_rect[3],blank_rect[0]:blank_rect[0]+blank_rect[2],:]
                self.osd_frame_tmp[blank_rect[1]:blank_rect[1]+blank_rect[3],blank_rect[0]:blank_rect[0]+blank_rect[2],:] = self.move_mat[:]
                self.blank_x = blank_x_tmp
                self.blank_y = blank_y_tmp

    # run函数
    def run(self,input_np):
        # 先进行手掌检测
        det_boxes=self.hand_det.run(input_np)
        det_res=[]
        two_point = np.zeros((4),dtype=np.int16)
        # 对于每一个检测到的手掌做筛选
        for det_box in det_boxes:
            x1, y1, x2, y2 = det_box[2],det_box[3],det_box[4],det_box[5]
            w,h= int(x2 - x1),int(y2 - y1)
            if (h<(0.1*self.rgb888p_size[1])):
                continue
            if (w<(0.25*self.rgb888p_size[0]) and ((x1<(0.03*self.rgb888p_size[0])) or (x2>(0.97*self.rgb888p_size[0])))):
                continue
            if (w<(0.15*self.rgb888p_size[0]) and ((x1<(0.01*self.rgb888p_size[0])) or (x2>(0.99*self.rgb888p_size[0])))):
                continue
            det_res.append(det_box)
        if len(det_res)!=0:
            # 对第一个手掌做手掌关键点检测
            det_box=det_res[0]
            self.hand_kp.config_preprocess(det_box)
            results_show=self.hand_kp.run(input_np)
            two_point[0],two_point[1],two_point[2],two_point[3] = results_show[8],results_show[9],results_show[16+8],results_show[16+9]
        return det_res,two_point

    # 绘制效果,手指拇指和中指位置判断拼图移动位置,并与周边空白位置做交换
    def draw_result(self,pl,det_res,two_point):
        pl.osd_img.clear()
        if len(det_res)==1:
            if (two_point[1] <= self.rgb888p_size[0]):
                self.distance_tow_points = np.sqrt(pow((two_point[0]-two_point[2]),2) + pow((two_point[1] - two_point[3]),2))* 1.0 / self.rgb888p_size[0] * self.display_size[0]
                self.exact_division_x = int((two_point[0] * 1.0 / self.rgb888p_size[0] * self.display_size[0])//self.every_block_width)
                self.exact_division_y = int((two_point[1] * 1.0 / self.rgb888p_size[1] * self.display_size[1])//self.every_block_height)


                if (self.distance_tow_points < self.distance_thred and self.exact_division_x >= 0 and self.exact_division_x < self.level and self.exact_division_y >= 0 and self.exact_division_y < self.level):
                    if (abs(self.blank_x - self.exact_division_x) == 1 and abs(self.blank_y - self.exact_division_y) == 0):
                        move_rect = [self.exact_division_x*self.every_block_width,self.exact_division_y*self.every_block_height,self.every_block_width,self.every_block_height]
                        blank_rect = [self.blank_x*self.every_block_width,self.blank_y*self.every_block_height,self.every_block_width,self.every_block_height]

                        self.move_mat[:] = self.osd_frame_tmp[move_rect[1]:move_rect[1]+move_rect[3],move_rect[0]:move_rect[0]+move_rect[2],:]
                        self.osd_frame_tmp[move_rect[1]:move_rect[1]+move_rect[3],move_rect[0]:move_rect[0]+move_rect[2],:] = self.osd_frame_tmp[blank_rect[1]:blank_rect[1]+blank_rect[3],blank_rect[0]:blank_rect[0]+blank_rect[2],:]
                        self.osd_frame_tmp[blank_rect[1]:blank_rect[1]+blank_rect[3],blank_rect[0]:blank_rect[0]+blank_rect[2],:] = self.move_mat[:]

                        self.blank_x = self.exact_division_x
                    elif (abs(self.blank_y - self.exact_division_y) == 1 and abs(self.blank_x - self.exact_division_x) == 0):
                        move_rect = [self.exact_division_x*self.every_block_width,self.exact_division_y*self.every_block_height,self.every_block_width,self.every_block_height]
                        blank_rect = [self.blank_x*self.every_block_width,self.blank_y*self.every_block_height,self.every_block_width,self.every_block_height]

                        self.move_mat[:] = self.osd_frame_tmp[move_rect[1]:move_rect[1]+move_rect[3],move_rect[0]:move_rect[0]+move_rect[2],:]
                        self.osd_frame_tmp[move_rect[1]:move_rect[1]+move_rect[3],move_rect[0]:move_rect[0]+move_rect[2],:] = self.osd_frame_tmp[blank_rect[1]:blank_rect[1]+blank_rect[3],blank_rect[0]:blank_rect[0]+blank_rect[2],:]
                        self.osd_frame_tmp[blank_rect[1]:blank_rect[1]+blank_rect[3],blank_rect[0]:blank_rect[0]+blank_rect[2],:] = self.move_mat[:]

                        self.blank_y = self.exact_division_y

                    pl.osd_img.copy_from(self.osd_frame_tmp)
                    x1 = int(two_point[0] * 1.0 * self.display_size[0] // self.rgb888p_size[0])
                    y1 = int(two_point[1] * 1.0 * self.display_size[1] // self.rgb888p_size[1])
                    pl.osd_img.draw_circle(x1, y1, 1, color=(255, 0, 255, 255),thickness=4,fill=False)
                else:
                    pl.osd_img.copy_from(self.osd_frame_tmp)
                    x1 = int(two_point[0] * 1.0 * self.display_size[0] // self.rgb888p_size[0])
                    y1 = int(two_point[1] * 1.0 * self.display_size[1] // self.rgb888p_size[1])
                    pl.osd_img.draw_circle(x1, y1, 1, color=(255, 255, 255, 0),thickness=4,fill=False)
        else:
            pl.osd_img.copy_from(self.osd_frame_tmp)
            pl.osd_img.draw_string_advanced((self.display_size[0]//2),(self.display_size[1]//2),32,"请保证一只手入镜!",color=(255,0,0))


if __name__=="__main__":
    # 显示模式,默认"hdmi",可以选择"hdmi"和"lcd"
    display_mode="hdmi"
    if display_mode=="hdmi":
        display_size=[1920,1080]
    else:
        display_size=[800,480]
    # 手掌检测模型路径
    hand_det_kmodel_path="/sdcard/app/tests/kmodel/hand_det.kmodel"
    # 手掌关键点模型路径
    hand_kp_kmodel_path="/sdcard/app/tests/kmodel/handkp_det.kmodel"
    # 其他参数
    anchors_path="/sdcard/app/tests/utils/prior_data_320.bin"
    rgb888p_size=[1920,1080]
    hand_det_input_size=[512,512]
    hand_kp_input_size=[256,256]
    confidence_threshold=0.2
    nms_threshold=0.5
    labels=["hand"]
    anchors = [26,27, 53,52, 75,71, 80,99, 106,82, 99,134, 140,113, 161,172, 245,276]

    # 初始化PipeLine,只关注传给AI的图像分辨率,显示的分辨率
    pl=PipeLine(rgb888p_size=rgb888p_size,display_size=display_size,display_mode=display_mode)
    pl.create()
    pg=PuzzleGame(hand_det_kmodel_path,hand_kp_kmodel_path,det_input_size=hand_det_input_size,kp_input_size=hand_kp_input_size,labels=labels,anchors=anchors,confidence_threshold=confidence_threshold,nms_threshold=nms_threshold,nms_option=False,strides=[8,16,32],rgb888p_size=rgb888p_size,display_size=display_size)
    try:
        while True:
            os.exitpoint()
            with ScopedTiming("total",1):
                img=pl.get_frame()                      # 获取当前帧
                det_res,two_point=pg.run(img)           # 推理当前帧
                pg.draw_result(pl,det_res,two_point)    # 绘制当前帧推理结果
                pl.show_image()                         # 展示推理结果
                gc.collect()
    except Exception as e:
        sys.print_exception(e)
    finally:
        pg.hand_det.deinit()
        pg.hand_kp.deinit()
        pl.destroy()
2.26. yolov8分割#
from libs.PipeLine import PipeLine, ScopedTiming
from libs.AIBase import AIBase
from libs.AI2D import Ai2d
import os
import ujson
from media.media import *
from time import *
import nncase_runtime as nn
import ulab.numpy as np
import time
import utime
import image
import random
import gc
import sys
import aidemo

# 自定义YOLOv8分割类
class SegmentationApp(AIBase):
    def __init__(self,kmodel_path,labels,model_input_size,confidence_threshold=0.2,nms_threshold=0.5,mask_threshold=0.5,rgb888p_size=[224,224],display_size=[1920,1080],debug_mode=0):
        super().__init__(kmodel_path,model_input_size,rgb888p_size,debug_mode)
        # 模型路径
        self.kmodel_path=kmodel_path
        # 分割类别标签
        self.labels=labels
        # 模型输入分辨率
        self.model_input_size=model_input_size
        # 置信度阈值
        self.confidence_threshold=confidence_threshold
        # nms阈值
        self.nms_threshold=nms_threshold
        # mask阈值
        self.mask_threshold=mask_threshold
        # sensor给到AI的图像分辨率
        self.rgb888p_size=[ALIGN_UP(rgb888p_size[0],16),rgb888p_size[1]]
        # 显示分辨率
        self.display_size=[ALIGN_UP(display_size[0],16),display_size[1]]
        self.debug_mode=debug_mode
        # 检测框预置颜色值
        self.color_four=[(255, 220, 20, 60), (255, 119, 11, 32), (255, 0, 0, 142), (255, 0, 0, 230),
                         (255, 106, 0, 228), (255, 0, 60, 100), (255, 0, 80, 100), (255, 0, 0, 70),
                         (255, 0, 0, 192), (255, 250, 170, 30), (255, 100, 170, 30), (255, 220, 220, 0),
                         (255, 175, 116, 175), (255, 250, 0, 30), (255, 165, 42, 42), (255, 255, 77, 255),
                         (255, 0, 226, 252), (255, 182, 182, 255), (255, 0, 82, 0), (255, 120, 166, 157)]
        # 分割结果的numpy.array,用于给到aidemo后处理接口
        self.masks=np.zeros((1,self.display_size[1],self.display_size[0],4))
        # Ai2d实例,用于实现模型预处理
        self.ai2d=Ai2d(debug_mode)
        # 设置Ai2d的输入输出格式和类型
        self.ai2d.set_ai2d_dtype(nn.ai2d_format.NCHW_FMT,nn.ai2d_format.NCHW_FMT,np.uint8, np.uint8)

    # 配置预处理操作,这里使用了pad和resize,Ai2d支持crop/shift/pad/resize/affine,具体代码请打开/sdcard/app/libs/AI2D.py查看
    def config_preprocess(self,input_image_size=None):
        with ScopedTiming("set preprocess config",self.debug_mode > 0):
            # 初始化ai2d预处理配置,默认为sensor给到AI的尺寸,您可以通过设置input_image_size自行修改输入尺寸
            ai2d_input_size=input_image_size if input_image_size else self.rgb888p_size
            top,bottom,left,right=self.get_padding_param()
            self.ai2d.pad([0,0,0,0,top,bottom,left,right], 0, [114,114,114])
            self.ai2d.resize(nn.interp_method.tf_bilinear, nn.interp_mode.half_pixel)
            self.ai2d.build([1,3,ai2d_input_size[1],ai2d_input_size[0]],[1,3,self.model_input_size[1],self.model_input_size[0]])

    # 自定义当前任务的后处理
    def postprocess(self,results):
        with ScopedTiming("postprocess",self.debug_mode > 0):
            # 这里使用了aidemo的segment_postprocess接口
            seg_res = aidemo.segment_postprocess(results,[self.rgb888p_size[1],self.rgb888p_size[0]],self.model_input_size,[self.display_size[1],self.display_size[0]],self.confidence_threshold,self.nms_threshold,self.mask_threshold,self.masks)
            return seg_res

    # 绘制结果
    def draw_result(self,pl,seg_res):
        with ScopedTiming("display_draw",self.debug_mode >0):
            if seg_res[0]:
                pl.osd_img.clear()
                mask_img=image.Image(self.display_size[0], self.display_size[1], image.ARGB8888,alloc=image.ALLOC_REF,data=self.masks)
                pl.osd_img.copy_from(mask_img)
                dets,ids,scores = seg_res[0],seg_res[1],seg_res[2]
                for i, det in enumerate(dets):
                    x1, y1, w, h = map(lambda x: int(round(x, 0)), det)
                    pl.osd_img.draw_string_advanced(x1,y1-50,32, " " + self.labels[int(ids[i])] + " " + str(round(scores[i],2)) , color=self.get_color(int(ids[i])))
            else:
                pl.osd_img.clear()

    # 计算padding参数
    def get_padding_param(self):
        dst_w = self.model_input_size[0]
        dst_h = self.model_input_size[1]
        ratio_w = float(dst_w) / self.rgb888p_size[0]
        ratio_h = float(dst_h) / self.rgb888p_size[1]
        if ratio_w < ratio_h:
            ratio = ratio_w
        else:
            ratio = ratio_h
        new_w = (int)(ratio * self.rgb888p_size[0])
        new_h = (int)(ratio * self.rgb888p_size[1])
        dw = (dst_w - new_w) / 2
        dh = (dst_h - new_h) / 2
        top = (int)(round(dh - 0.1))
        bottom = (int)(round(dh + 0.1))
        left = (int)(round(dw - 0.1))
        right = (int)(round(dw + 0.1))
        return  top, bottom, left, right

    # 根据当前类别索引获取框的颜色
    def get_color(self, x):
        idx=x%len(self.color_four)
        return self.color_four[idx]


if __name__=="__main__":
    # 显示模式,默认"hdmi",可以选择"hdmi"和"lcd"
    display_mode="hdmi"
    if display_mode=="hdmi":
        display_size=[1920,1080]
    else:
        display_size=[800,480]
    # 模型路径
    kmodel_path="/sdcard/app/tests/kmodel/yolov8n_seg_320.kmodel"
    labels = ["person", "bicycle", "car", "motorcycle", "airplane", "bus", "train", "truck", "boat", "traffic light", "fire hydrant", "stop sign", "parking meter", "bench", "bird", "cat", "dog", "horse", "sheep", "cow", "elephant", "bear", "zebra", "giraffe", "backpack", "umbrella", "handbag", "tie", "suitcase", "frisbee", "skis", "snowboard", "sports ball", "kite", "baseball bat", "baseball glove", "skateboard", "surfboard", "tennis racket", "bottle", "wine glass", "cup", "fork", "knife", "spoon", "bowl", "banana", "apple", "sandwich", "orange", "broccoli", "carrot", "hot dog", "pizza", "donut", "cake", "chair", "couch", "potted plant", "bed", "dining table", "toilet", "tv", "laptop", "mouse", "remote", "keyboard", "cell phone", "microwave", "oven", "toaster", "sink", "refrigerator", "book", "clock", "vase", "scissors", "teddy bear", "hair drier", "toothbrush"]
    #其它参数设置
    confidence_threshold = 0.2
    nms_threshold = 0.5
    mask_threshold=0.5
    rgb888p_size=[320,320]

    # 初始化PipeLine
    pl=PipeLine(rgb888p_size=rgb888p_size,display_size=display_size,display_mode=display_mode)
    pl.create()
    # 初始化自定义YOLOV8分割示例
    seg=SegmentationApp(kmodel_path,labels=labels,model_input_size=[320,320],confidence_threshold=confidence_threshold,nms_threshold=nms_threshold,mask_threshold=mask_threshold,rgb888p_size=rgb888p_size,display_size=display_size,debug_mode=0)
    seg.config_preprocess()
    try:
        while True:
            os.exitpoint()
            with ScopedTiming("total",1):
                # 获取当前帧数据
                img=pl.get_frame()
                # 推理当前帧
                seg_res=seg.run(img)
                # 绘制结果到PipeLine的osd图像
                seg.draw_result(pl,seg_res)
                # 显示当前的绘制结果
                pl.show_image()
                gc.collect()
    except Exception as e:
        sys.print_exception(e)
    finally:
        seg.deinit()
        pl.destroy()
2.27. 自学习#
from libs.PipeLine import PipeLine, ScopedTiming
from libs.AIBase import AIBase
from libs.AI2D import Ai2d
import os
import ujson
from media.media import *
from time import *
import nncase_runtime as nn
import ulab.numpy as np
import time
import utime
import image
import random
import gc
import sys
import aicube

# 自定义自学习类
class SelfLearningApp(AIBase):
    def __init__(self,kmodel_path,model_input_size,labels,top_k,threshold,database_path,rgb888p_size=[224,224],display_size=[1920,1080],debug_mode=0):
        super().__init__(kmodel_path,model_input_size,rgb888p_size,debug_mode)
        self.kmodel_path=kmodel_path
        # 模型输入分辨率
        self.model_input_size=model_input_size
        self.labels=labels
        self.database_path=database_path
        # sensor给到AI的图像分辨率
        self.rgb888p_size=[ALIGN_UP(rgb888p_size[0],16),rgb888p_size[1]]
        # 显示分辨率
        self.display_size=[ALIGN_UP(display_size[0],16),display_size[1]]
        self.debug_mode=debug_mode
        # 识别阈值
        self.threshold = threshold
        # 选择top_k个相似度大于阈值的结果类别
        self.top_k = top_k
        #对应类别注册特征数量
        self.features=[2,2]
        #注册单个特征中途间隔帧数
        self.time_one=60
        self.time_all = 0
        self.time_now = 0
        # 类别索引
        self.category_index = 0
        # 特征化部分剪切宽高
        self.crop_w = 400
        self.crop_h = 400
        # crop的位置
        self.crop_x = self.rgb888p_size[0] / 2.0 - self.crop_w / 2.0
        self.crop_y = self.rgb888p_size[1] / 2.0 - self.crop_h / 2.0
        self.crop_x_osd=0
        self.crop_y_osd=0
        self.crop_w_osd=0
        self.crop_h_osd=0
        # Ai2d实例,用于实现模型预处理
        self.ai2d=Ai2d(debug_mode)
        # 设置Ai2d的输入输出格式和类型
        self.ai2d.set_ai2d_dtype(nn.ai2d_format.NCHW_FMT,nn.ai2d_format.NCHW_FMT,np.uint8, np.uint8)
        self.data_init()

    # 配置预处理操作,这里使用了crop和resize,Ai2d支持crop/shift/pad/resize/affine,具体代码请打开/sdcard/app/libs/AI2D.py查看
    def config_preprocess(self,input_image_size=None):
        with ScopedTiming("set preprocess config",self.debug_mode > 0):
            # 初始化ai2d预处理配置,默认为sensor给到AI的尺寸,您可以通过设置input_image_size自行修改输入尺寸
            ai2d_input_size=input_image_size if input_image_size else self.rgb888p_size
            self.ai2d.crop(int(self.crop_x),int(self.crop_y),int(self.crop_w),int(self.crop_h))
            self.ai2d.resize(nn.interp_method.tf_bilinear, nn.interp_mode.half_pixel)
            self.ai2d.build([1,3,ai2d_input_size[1],ai2d_input_size[0]],[1,3,self.model_input_size[1],self.model_input_size[0]])

    # 自定义当前任务的后处理
    def postprocess(self,results):
        with ScopedTiming("postprocess",self.debug_mode > 0):
            return results[0][0]

    # 绘制结果,绘制特征采集框和特征分类框
    def draw_result(self,pl,feature):
        pl.osd_img.clear()
        with ScopedTiming("display_draw",self.debug_mode >0):
            pl.osd_img.draw_rectangle(self.crop_x_osd,self.crop_y_osd, self.crop_w_osd, self.crop_h_osd, color=(255, 255, 0, 255), thickness = 4)
            if (self.category_index < len(self.labels)):
                self.time_now += 1
                pl.osd_img.draw_string_advanced(50, self.crop_y_osd-50, 30,"请将待添加类别放入框内进行特征采集:"+self.labels[self.category_index] + "_" + str(int(self.time_now-1) // self.time_one) + ".bin", color=(255,255,0,0))
                with open(self.database_path + self.labels[self.category_index] + "_" + str(int(self.time_now-1) // self.time_one) + ".bin", 'wb') as f:
                    f.write(feature.tobytes())
                if (self.time_now // self.time_one == self.features[self.category_index]):
                    self.category_index += 1
                    self.time_all -= self.time_now
                    self.time_now = 0
            else:
                results_learn = []
                list_features = os.listdir(self.database_path)
                for feature_name in list_features:
                    with open(self.database_path + feature_name, 'rb') as f:
                        data = f.read()
                    save_vec = np.frombuffer(data, dtype=np.float)
                    score = self.getSimilarity(feature, save_vec)
                    if (score > self.threshold):
                        res = feature_name.split("_")
                        is_same = False
                        for r in results_learn:
                            if (r["category"] ==  res[0]):
                                if (r["score"] < score):
                                    r["bin_file"] = feature_name
                                    r["score"] = score
                                is_same = True
                        if (not is_same):
                            if(len(results_learn) < self.top_k):
                                evec = {}
                                evec["category"] = res[0]
                                evec["score"] = score
                                evec["bin_file"] = feature_name
                                results_learn.append( evec )
                                results_learn = sorted(results_learn, key=lambda x: -x["score"])
                            else:
                                if( score <= results_learn[self.top_k-1]["score"] ):
                                    continue
                                else:
                                    evec = {}
                                    evec["category"] = res[0]
                                    evec["score"] = score
                                    evec["bin_file"] = feature_name
                                    results_learn.append( evec )
                                    results_learn = sorted(results_learn, key=lambda x: -x["score"])
                                    results_learn.pop()
                draw_y = 200
                for r in results_learn:
                    pl.osd_img.draw_string_advanced( 50 , draw_y,50,r["category"] + " : " + str(r["score"]), color=(255,255,0,0))
                    draw_y += 50

    #数据初始化
    def data_init(self):
        os.mkdir(self.database_path)
        self.crop_x_osd = int(self.crop_x / self.rgb888p_size[0] * self.display_size[0])
        self.crop_y_osd = int(self.crop_y / self.rgb888p_size[1] * self.display_size[1])
        self.crop_w_osd = int(self.crop_w / self.rgb888p_size[0] * self.display_size[0])
        self.crop_h_osd = int(self.crop_h / self.rgb888p_size[1] * self.display_size[1])
        for i in range(len(self.labels)):
            for j in range(self.features[i]):
                self.time_all += self.time_one

    # 获取两个特征向量的相似度
    def getSimilarity(self,output_vec,save_vec):
        tmp = sum(output_vec * save_vec)
        mold_out = np.sqrt(sum(output_vec * output_vec))
        mold_save = np.sqrt(sum(save_vec * save_vec))
        return tmp / (mold_out * mold_save)


if __name__=="__main__":
    # 显示模式,默认"hdmi",可以选择"hdmi"和"lcd"
    display_mode="hdmi"
    if display_mode=="hdmi":
        display_size=[1920,1080]
    else:
        display_size=[800,480]
    # 模型路径
    kmodel_path="/sdcard/app/tests/kmodel/recognition.kmodel"
    database_path="/sdcard/app/tests/utils/features/"
    # 其它参数设置
    rgb888p_size=[1920,1080]
    model_input_size=[224,224]
    labels=["苹果","香蕉"]
    top_k=3
    threshold=0.5

    # 初始化PipeLine
    pl=PipeLine(rgb888p_size=rgb888p_size,display_size=display_size,display_mode=display_mode)
    pl.create()
    # 初始化自学习实例
    sl=SelfLearningApp(kmodel_path,model_input_size=model_input_size,labels=labels,top_k=top_k,threshold=threshold,database_path=database_path,rgb888p_size=rgb888p_size,display_size=display_size,debug_mode=0)
    sl.config_preprocess()
    try:
        while True:
            os.exitpoint()
            with ScopedTiming("total",1):
                # 获取当前帧数据
                img=pl.get_frame()
                # 推理当前帧
                res=sl.run(img)
                # 绘制结果到PipeLine的osd图像
                sl.draw_result(pl,res)
                # 显示当前的绘制结果
                pl.show_image()
                gc.collect()
    except Exception as e:
        sys.print_exception(e)
    finally:
        # 删除features文件夹
        stat_info = os.stat(database_path)
        if (stat_info[0] & 0x4000):
            list_files = os.listdir(database_path)
            for l in list_files:
                os.remove(database_path + l)
        os.rmdir(database_path)
        sl.deinit()
        pl.destroy()
2.28. 局部放大器#
from libs.PipeLine import PipeLine, ScopedTiming
from libs.AIBase import AIBase
from libs.AI2D import Ai2d
import os
import ujson
from media.media import *
from time import *
import nncase_runtime as nn
import ulab.numpy as np
import time
import image
import aicube
import random
import gc
import sys

# 自定义手掌检测任务类
class HandDetApp(AIBase):
    def __init__(self,kmodel_path,labels,model_input_size,anchors,confidence_threshold=0.2,nms_threshold=0.5,nms_option=False, strides=[8,16,32],rgb888p_size=[1920,1080],display_size=[1920,1080],debug_mode=0):
        super().__init__(kmodel_path,model_input_size,rgb888p_size,debug_mode)
        # kmodel路径
        self.kmodel_path=kmodel_path
        self.labels=labels
        # 检测模型输入分辨率
        self.model_input_size=model_input_size
        # 置信度阈值
        self.confidence_threshold=confidence_threshold
        # nms阈值
        self.nms_threshold=nms_threshold
        self.anchors=anchors
        self.strides = strides  # 特征下采样倍数
        self.nms_option = nms_option  # NMS选项,如果为True做类间NMS,如果为False做类内NMS
        # sensor给到AI的图像分辨率,宽16字节对齐
        self.rgb888p_size=[ALIGN_UP(rgb888p_size[0],16),rgb888p_size[1]]
        # 视频输出VO分辨率,宽16字节对齐
        self.display_size=[ALIGN_UP(display_size[0],16),display_size[1]]
        # debug模式
        self.debug_mode=debug_mode
        self.ai2d=Ai2d(debug_mode)
        self.ai2d.set_ai2d_dtype(nn.ai2d_format.NCHW_FMT,nn.ai2d_format.NCHW_FMT,np.uint8, np.uint8)

    def config_preprocess(self,input_image_size=None):
        with ScopedTiming("set preprocess config",self.debug_mode > 0):
            # 初始化ai2d预处理配置,默认为sensor给到AI的尺寸,可以通过设置input_image_size自行修改输入尺寸
            ai2d_input_size = input_image_size if input_image_size else self.rgb888p_size
            # 计算padding参数并应用pad操作,以确保输入图像尺寸与模型输入尺寸匹配
            top, bottom, left, right = self.get_padding_param()
            self.ai2d.pad([0, 0, 0, 0, top, bottom, left, right], 0, [114, 114, 114])
            # 使用双线性插值进行resize操作,调整图像尺寸以符合模型输入要求
            self.ai2d.resize(nn.interp_method.tf_bilinear, nn.interp_mode.half_pixel)
            # 构建预处理流程
            self.ai2d.build([1,3,ai2d_input_size[1],ai2d_input_size[0]],[1,3,self.model_input_size[1],self.model_input_size[0]])

    # 自定义后处理,results是模型输出的array列表,这里使用了aicube库的anchorbasedet_post_process接口
    def postprocess(self,results):
        with ScopedTiming("postprocess",self.debug_mode > 0):
            dets = aicube.anchorbasedet_post_process(results[0], results[1], results[2], self.model_input_size, self.rgb888p_size, self.strides, len(self.labels), self.confidence_threshold, self.nms_threshold, self.anchors, self.nms_option)
            # 返回手掌检测结果
            return dets

    # 计算padding参数,确保输入图像尺寸与模型输入尺寸匹配
    def get_padding_param(self):
        # 根据目标宽度和高度计算比例因子
        dst_w = self.model_input_size[0]
        dst_h = self.model_input_size[1]
        input_width = self.rgb888p_size[0]
        input_high = self.rgb888p_size[1]
        ratio_w = dst_w / input_width
        ratio_h = dst_h / input_high
        # 选择较小的比例因子,以确保图像内容完整
        if ratio_w < ratio_h:
            ratio = ratio_w
        else:
            ratio = ratio_h
        # 计算新的宽度和高度
        new_w = int(ratio * input_width)
        new_h = int(ratio * input_high)
        # 计算宽度和高度的差值,并确定padding的位置
        dw = (dst_w - new_w) / 2
        dh = (dst_h - new_h) / 2
        top = int(round(dh - 0.1))
        bottom = int(round(dh + 0.1))
        left = int(round(dw - 0.1))
        right = int(round(dw + 0.1))
        return top, bottom, left, right

# 自定义手势关键点分类任务类
class HandKPClassApp(AIBase):
    def __init__(self,kmodel_path,model_input_size,rgb888p_size=[1920,1080],display_size=[1920,1080],debug_mode=0):
        super().__init__(kmodel_path,model_input_size,rgb888p_size,debug_mode)
        # kmodel路径
        self.kmodel_path=kmodel_path
        # 检测模型输入分辨率
        self.model_input_size=model_input_size
        # sensor给到AI的图像分辨率,宽16字节对齐
        self.rgb888p_size=[ALIGN_UP(rgb888p_size[0],16),rgb888p_size[1]]
        # 视频输出VO分辨率,宽16字节对齐
        self.display_size=[ALIGN_UP(display_size[0],16),display_size[1]]
        self.crop_params=[]
        # debug模式
        self.debug_mode=debug_mode
        self.ai2d=Ai2d(debug_mode)
        self.ai2d.set_ai2d_dtype(nn.ai2d_format.NCHW_FMT,nn.ai2d_format.NCHW_FMT,np.uint8, np.uint8)

    # 配置预处理操作,这里使用了crop和resize,Ai2d支持crop/shift/pad/resize/affine
    def config_preprocess(self,det,input_image_size=None):
        with ScopedTiming("set preprocess config",self.debug_mode > 0):
            # 初始化ai2d预处理配置,默认为sensor给到AI的尺寸,可以通过设置input_image_size自行修改输入尺寸
            ai2d_input_size=input_image_size if input_image_size else self.rgb888p_size
            self.crop_params = self.get_crop_param(det)
            self.ai2d.crop(self.crop_params[0],self.crop_params[1],self.crop_params[2],self.crop_params[3])
            self.ai2d.resize(nn.interp_method.tf_bilinear, nn.interp_mode.half_pixel)
            self.ai2d.build([1,3,ai2d_input_size[1],ai2d_input_size[0]],[1,3,self.model_input_size[1],self.model_input_size[0]])

    # 自定义后处理,results是模型输出的array列表,返回手部关键点
    def postprocess(self,results):
        with ScopedTiming("postprocess",self.debug_mode > 0):
            results=results[0].reshape(results[0].shape[0]*results[0].shape[1])
            results_show = np.zeros(results.shape,dtype=np.int16)
            results_show[0::2] = (results[0::2] * self.crop_params[3] + self.crop_params[0])
            results_show[1::2] = (results[1::2] * self.crop_params[2] + self.crop_params[1])
            return results_show

    # 计算crop参数
    def get_crop_param(self,det_box):
        x1, y1, x2, y2 = det_box[2],det_box[3],det_box[4],det_box[5]
        w,h= int(x2 - x1),int(y2 - y1)
        w_det = int(float(x2 - x1) * self.display_size[0] // self.rgb888p_size[0])
        h_det = int(float(y2 - y1) * self.display_size[1] // self.rgb888p_size[1])
        x_det = int(x1*self.display_size[0] // self.rgb888p_size[0])
        y_det = int(y1*self.display_size[1] // self.rgb888p_size[1])
        length = max(w, h)/2
        cx = (x1+x2)/2
        cy = (y1+y2)/2
        ratio_num = 1.26*length
        x1_kp = int(max(0,cx-ratio_num))
        y1_kp = int(max(0,cy-ratio_num))
        x2_kp = int(min(self.rgb888p_size[0]-1, cx+ratio_num))
        y2_kp = int(min(self.rgb888p_size[1]-1, cy+ratio_num))
        w_kp = int(x2_kp - x1_kp + 1)
        h_kp = int(y2_kp - y1_kp + 1)
        return [x1_kp, y1_kp, w_kp, h_kp]

class SpaceResize:
    def __init__(self,hand_det_kmodel,hand_kp_kmodel,det_input_size,kp_input_size,labels,anchors,confidence_threshold=0.25,nms_threshold=0.3,nms_option=False,strides=[8,16,32],rgb888p_size=[1280,720],display_size=[1920,1080],debug_mode=0):
        # 手掌检测模型路径
        self.hand_det_kmodel=hand_det_kmodel
        # 手掌关键点模型路径
        self.hand_kp_kmodel=hand_kp_kmodel
        # 手掌检测模型输入分辨率
        self.det_input_size=det_input_size
        # 手掌关键点模型输入分辨率
        self.kp_input_size=kp_input_size
        self.labels=labels
        # anchors
        self.anchors=anchors
        # 置信度阈值
        self.confidence_threshold=confidence_threshold
        # nms阈值
        self.nms_threshold=nms_threshold
        self.nms_option=nms_option
        self.strides=strides
        # sensor给到AI的图像分辨率,宽16字节对齐
        self.rgb888p_size=[ALIGN_UP(rgb888p_size[0],16),rgb888p_size[1]]
        # 视频输出VO分辨率,宽16字节对齐
        self.display_size=[ALIGN_UP(display_size[0],16),display_size[1]]
        # debug_mode模式
        self.debug_mode=debug_mode

        self.first_start = True                                              # 首次手掌入镜参数
        self.two_point_left_x = 0                                            # 中指食指包括范围 x
        self.two_point_top_y = 0                                             # 中指食指包括范围 y
        self.two_point_mean_w = 0                                            # 中指食指首次入镜包括范围 w
        self.two_point_mean_h = 0                                            # 中指食指首次入镜包括范围 h
        self.two_point_crop_w = 0                                            # 中指食指包括范围 w
        self.two_point_crop_h = 0                                            # 中指食指包括范围 h
        self.osd_plot_x = 0                                                  # osd 画缩放图起始点 x
        self.osd_plot_y = 0                                                  # osd 画缩放图起始点 y
        self.ori_new_ratio = 0                                               # 缩放比例
        self.new_resize_w = 0                                                # 缩放后 w
        self.new_resize_h = 0                                                # 缩放后 h
        self.crop_area = 0                                                   # 剪切区域
        self.rect_frame_x = 0                                                # osd绘画起始点 x
        self.rect_frame_y = 0                                                # osd绘画起始点 y
        self.masks = np.zeros((self.display_size[1],self.display_size[0],4),dtype=np.uint8)
        self.mask_img=image.Image(self.display_size[0], self.display_size[1], image.ARGB8888,alloc=image.ALLOC_REF,data=self.masks)
        self.hand_det=HandDetApp(self.hand_det_kmodel,self.labels,model_input_size=self.det_input_size,anchors=self.anchors,confidence_threshold=self.confidence_threshold,nms_threshold=self.nms_threshold,nms_option=self.nms_option,strides=self.strides,rgb888p_size=self.rgb888p_size,display_size=self.display_size,debug_mode=0)
        self.hand_kp=HandKPClassApp(self.hand_kp_kmodel,model_input_size=self.kp_input_size,rgb888p_size=self.rgb888p_size,display_size=self.display_size)
        self.ai2d=Ai2d(debug_mode)
        self.ai2d.set_ai2d_dtype(nn.ai2d_format.NCHW_FMT,nn.ai2d_format.RGB_packed,np.uint8, np.uint8)
        self.hand_det.config_preprocess()

    # 对输入数据做预处理,对拇指和中指部分做裁剪并做resize
    def imgprocess(self,input_np,x,y,w,h,out_w,out_h):
        self.ai2d.crop(x, y, w, h)
        self.ai2d.resize(nn.interp_method.tf_bilinear, nn.interp_mode.half_pixel )
        self.ai2d.build([1,3,self.rgb888p_size[1],self.rgb888p_size[0]],[1,out_h, out_w,3])
        return self.ai2d.run(input_np).to_numpy()

    # run函数
    def run(self,input_np):
        # 先进行手掌检测
        det_boxes=self.hand_det.run(input_np)
        det_res=[]
        two_point = np.zeros((4),dtype=np.int16)
        for det_box in det_boxes:
            # 筛选符合要求的手掌
            x1, y1, x2, y2 = det_box[2],det_box[3],det_box[4],det_box[5]
            w,h= int(x2 - x1),int(y2 - y1)
            if (h<(0.1*self.rgb888p_size[1])):
                continue
            if (w<(0.25*self.rgb888p_size[0]) and ((x1<(0.03*self.rgb888p_size[0])) or (x2>(0.97*self.rgb888p_size[0])))):
                continue
            if (w<(0.15*self.rgb888p_size[0]) and ((x1<(0.01*self.rgb888p_size[0])) or (x2>(0.99*self.rgb888p_size[0])))):
                continue
            det_res.append(det_box)
        if len(det_res)!=0:
            # 选择第一个手掌做手掌关键点识别,然后裁剪拇指和中指区域做resize并替换原图中的部分
            det_box=det_res[0]
            self.hand_kp.config_preprocess(det_box)
            results_show=self.hand_kp.run(input_np)
            two_point[0],two_point[1],two_point[2],two_point[3] = results_show[8],results_show[9],results_show[16+8],results_show[16+9]
            if (self.first_start):
                if (two_point[0] > 0 and two_point[0] < self.rgb888p_size[0] and two_point[2] > 0 and two_point[2] < self.rgb888p_size[0] and two_point[1] > 0 and two_point[1] < self.rgb888p_size[1] and two_point[3] > 0 and two_point[3] < self.rgb888p_size[1]):
                    self.two_point_mean_w = np.sqrt(pow(two_point[0] - two_point[2],2) + pow(two_point[1] - two_point[3],2))*0.8
                    self.two_point_mean_h = np.sqrt(pow(two_point[0] - two_point[2],2) + pow(two_point[1] - two_point[3],2))*0.8
                    self.first_start = False
            else:
                self.mask_img.clear()
                self.two_point_left_x = int(max((two_point[0] + two_point[2]) / 2 - self.two_point_mean_w / 2, 0))
                self.two_point_top_y = int(max((two_point[1] + two_point[3]) / 2 - self.two_point_mean_h / 2, 0))
                self.two_point_crop_w = int(min(min((two_point[0] + two_point[2]) / 2 - self.two_point_mean_w / 2 + self.two_point_mean_w , self.two_point_mean_w), self.rgb888p_size[0] - ((two_point[0] + two_point[2]) / 2 - self.two_point_mean_w / 2)))
                self.two_point_crop_h = int(min(min((two_point[1] + two_point[3]) / 2 - self.two_point_mean_h / 2 + self.two_point_mean_h , self.two_point_mean_h), self.rgb888p_size[1] - ((two_point[1] + two_point[3]) / 2 - self.two_point_mean_h / 2)))
                self.ori_new_ratio = np.sqrt(pow((two_point[0] - two_point[2]),2) + pow((two_point[1] - two_point[3]),2))*0.8 / self.two_point_mean_w
                self.new_resize_w = min(int(self.two_point_crop_w * self.ori_new_ratio / self.rgb888p_size[0] * self.display_size[0]),600)
                self.new_resize_h = min(int(self.two_point_crop_h * self.ori_new_ratio / self.rgb888p_size[1] * self.display_size[1]),600)
                self.rect_frame_x = int(self.two_point_left_x * 1.0 / self.rgb888p_size[0] * self.display_size[0])
                self.rect_frame_y = int(self.two_point_top_y * 1.0 / self.rgb888p_size[1] * self.display_size[1])
                self.draw_w = min(self.new_resize_w,self.display_size[0]-self.rect_frame_x-1)
                self.draw_h = min(self.new_resize_h,self.display_size[1]-self.rect_frame_y-1)
                space_np_out = self.imgprocess(input_np, self.two_point_left_x, self.two_point_top_y, self.two_point_crop_w, self.two_point_crop_h, self.new_resize_w, self.new_resize_h)      # 运行 隔空缩放检测 ai2d
                self.masks[self.rect_frame_y:self.rect_frame_y + self.draw_h,self.rect_frame_x:self.rect_frame_x + self.draw_w,0] = 255
                self.masks[self.rect_frame_y:self.rect_frame_y + self.draw_h,self.rect_frame_x:self.rect_frame_x + self.draw_w,1:4] = space_np_out[0][0:self.draw_h,0:self.draw_w,:]
        return det_res

    # 绘制效果
    def draw_result(self,pl,det_res):
        pl.osd_img.clear()
        if len(det_res)==1:
            pl.osd_img.copy_from(self.mask_img)
        else:
            pl.osd_img.draw_string_advanced((self.display_size[0]//2),(self.display_size[1]//2),32,"请保证一只手入镜!",color=(255,0,0))


if __name__=="__main__":
    # 显示模式,默认"hdmi",可以选择"hdmi"和"lcd"
    display_mode="hdmi"
    if display_mode=="hdmi":
        display_size=[1920,1080]
    else:
        display_size=[800,480]
    # 手掌检测模型路径
    hand_det_kmodel_path="/sdcard/app/tests/kmodel/hand_det.kmodel"
    # 手掌关键点模型路径
    hand_kp_kmodel_path="/sdcard/app/tests/kmodel/handkp_det.kmodel"
    anchors_path="/sdcard/app/tests/utils/prior_data_320.bin"
    rgb888p_size=[1920,1080]
    hand_det_input_size=[512,512]
    hand_kp_input_size=[256,256]
    confidence_threshold=0.2
    nms_threshold=0.5
    labels=["hand"]
    anchors = [26,27, 53,52, 75,71, 80,99, 106,82, 99,134, 140,113, 161,172, 245,276]

    # 初始化PipeLine,只关注传给AI的图像分辨率,显示的分辨率
    pl=PipeLine(rgb888p_size=rgb888p_size,display_size=display_size,display_mode=display_mode)
    pl.create()
    sr=SpaceResize(hand_det_kmodel_path,hand_kp_kmodel_path,det_input_size=hand_det_input_size,kp_input_size=hand_kp_input_size,labels=labels,anchors=anchors,confidence_threshold=confidence_threshold,nms_threshold=nms_threshold,nms_option=False,strides=[8,16,32],rgb888p_size=rgb888p_size,display_size=display_size)
    try:
        while True:
            os.exitpoint()
            with ScopedTiming("total",1):
                img=pl.get_frame()          # 获取当前帧
                det_res=sr.run(img)         # 推理当前帧
                sr.draw_result(pl,det_res)  # 绘制当前帧推理结果
                pl.show_image()             # 展示当前帧
                gc.collect()
    except Exception as e:
        sys.print_exception(e)
    finally:
        sr.hand_det.deinit()
        sr.hand_kp.deinit()
        pl.destroy()
2.29. 文本转语音(中文)#
from libs.PipeLine import ScopedTiming
from libs.AIBase import AIBase
from libs.AI2D import Ai2d
from media.pyaudio import *                     # 音频模块
from media.media import *                       # 软件抽象模块,主要封装媒体数据链路以及媒体缓冲区
import media.wave as wave                       # wav音频处理模块
import nncase_runtime as nn                     # nncase运行模块,封装了kpu(kmodel推理)和ai2d(图片预处理加速)操作
import ulab.numpy as np                         # 类似python numpy操作,但也会有一些接口不同
import aidemo                                   # aidemo模块,封装ai demo相关前处理、后处理等操作
import time                                     # 时间统计
import struct                                   # 字节字符转换模块
import gc                                       # 垃圾回收模块
import os,sys                                   # 操作系统接口模块

# 自定义TTS中文编码器类,继承自AIBase基类
class EncoderApp(AIBase):
    def __init__(self, kmodel_path,dict_path,phase_path,mapfile,debug_mode=0):
        super().__init__(kmodel_path)  # 调用基类的构造函数
        self.kmodel_path = kmodel_path  # 模型文件路径
        self.debug_mode = debug_mode  # 是否开启调试模式
        self.ttszh=aidemo.tts_zh_create(dict_path,phase_path,mapfile)
        self.data=None
        self.data_len=0
        self.durition_sum=0

    # 自定义编码器预处理,返回模型输入tensor列表
    def preprocess(self,text):
        with ScopedTiming("encoder preprocess", self.debug_mode > 0):
            preprocess_data=aidemo.tts_zh_preprocess(self.ttszh,text)
            self.data=preprocess_data[0]
            self.data_len=preprocess_data[1]
            # 创建编码器模型输入并和模型绑定,编码器包含两个输入,一个是文字预处理的序列数据,一个是speaker数据
            # 编码器序列数据
            enc_seq_input_tensor = nn.from_numpy(np.array(self.data))
            # 编码器speaker数据
            enc_speaker_input_tensor=nn.from_numpy(np.array([0.0]))
            return [enc_speaker_input_tensor,enc_seq_input_tensor]

    # 自定义编码器的后处理,results是模型输出ndarray列表,编码器后处理也可以视为解码器的前处理
    def postprocess(self, results):
        with ScopedTiming("encoder postprocess", self.debug_mode > 0):
            enc_output_0_np=results[0]
            enc_output_1_np=results[1]
            # 给编码结果添加持续时间属性,每个音素编码向量按照持续时间重复
            duritions=enc_output_1_np[0][:int(self.data_len[0])]
            self.durition_sum=int(np.sum(duritions))
            # 解码器输入维度为(1,600,256),不足部分需要padding
            max_value=13
            while self.durition_sum>600:
                for i in range(len(duritions)):
                    if duritions[i]>max_value:
                        duritions[i]=max_value
                max_value=max_value-1
                self.durition_sum=np.sum(duritions)
            dec_input=np.zeros((1,600,256),dtype=np.float)
            m_pad=600-self.durition_sum
            k=0
            for i in range(len(duritions)):
                for j in range(int(duritions[i])):
                    dec_input[0][k]=enc_output_0_np[0][i]
                    k+=1
            return dec_input,self.durition_sum

# 自定义TTS中文解码器类,继承自AIBase基类
class DecoderApp(AIBase):
    def __init__(self, kmodel_path, debug_mode=0):
        super().__init__(kmodel_path)  # 调用基类的构造函数
        self.kmodel_path = kmodel_path  # 模型文件路径
        self.debug_mode = debug_mode  # 是否开启调试模式

    # 自定义解码器预处理,返回模型输入tensor列表
    def preprocess(self,dec_input):
        with ScopedTiming("decoder preprocess", self.debug_mode > 0):
            dec_input_tensor=nn.from_numpy(dec_input)
            return [dec_input_tensor]

    # 自定义解码器后处理,results是模型输出ndarray列表
    def postprocess(self, results):
        with ScopedTiming("decoder postprocess", self.debug_mode > 0):
            return results[0]

# 自定义HifiGan声码器类,继承自AIBase基类
class HifiGanApp(AIBase):
    def __init__(self, kmodel_path, debug_mode=0):
        super().__init__(kmodel_path)  # 调用基类的构造函数
        self.kmodel_path = kmodel_path  # 模型文件路径
        self.debug_mode = debug_mode  # 是否开启调试模式
        self.mel_data=[]
        self.subvector_num=0
        self.hifi_input=None

    # 自定义声码器预处理,返回模型输入tensor列表
    def preprocess(self,dec_output_np,durition_sum):
        with ScopedTiming("hifigan preprocess", self.debug_mode > 0):
            self.subvector_num=durition_sum//100;
            remaining=durition_sum%100;
            if remaining>0:
                self.subvector_num+=1
            self.hifi_input=np.zeros((1,80,self.subvector_num*100),dtype=np.float)
            for i in range(durition_sum):
                self.hifi_input[:,:,i]=dec_output_np[:,:,i]

    def run(self,dec_output_np,durition_sum):
        self.preprocess(dec_output_np,durition_sum)
        # 依次对每一个子向量进行声码器推理
        for i in range(self.subvector_num):
            hifi_input_tmp=np.zeros((1,80,100),dtype=np.float)
            for j in range(80):
                for k in range(i*100,(i+1)*100):
                    hifi_input_tmp[0][j][k-i*100]=self.hifi_input[0][j][k]
            # 设置模型输入
            hifigan_input_tensor=nn.from_numpy(hifi_input_tmp)
            # 推理
            results=self.inference([hifigan_input_tensor])
            self.postprocess(results)
        return self.mel_data

    # 自定义当前任务的后处理,results是模型输出ndarray列表
    def postprocess(self, results):
        with ScopedTiming("hifigan postprocess", self.debug_mode > 0):
            # 汇总输出数据
            for j in range(25600):
                self.mel_data.append(results[0][0][0][j])

#自定义中文TTS任务类
class TTSZH:
    def __init__(self,encoder_kmodel_path,decoder_kmodel_path,hifigan_kmodel_path,dict_path,phase_path,mapfile,save_wav_file,debug_mode):
        self.save_wav_file=save_wav_file
        self.debug_mode=debug_mode
        self.encoder=EncoderApp(encoder_kmodel_path,dict_path,phase_path,mapfile,debug_mode)
        self.decoder=DecoderApp(decoder_kmodel_path,debug_mode)
        self.hifigan=HifiGanApp(hifigan_kmodel_path,debug_mode)

    def run(self,text):
        encoder_output_0,encoder_output_1=self.encoder.run(text)
        decoder_output_0=self.decoder.run(encoder_output_0)
        hifigan_output=self.hifigan.run(decoder_output_0,encoder_output_1)
        # 将生成的音频数据保存为wav文件
        save_data=hifigan_output[:encoder_output_1*256]
        save_len=len(save_data)
        aidemo.save_wav(save_data,save_len,self.save_wav_file,24000)
        self.play_audio()

    def play_audio(self):
        with ScopedTiming("play audio", self.debug_mode > 0):
            # 有关音频流的宏变量
            SAMPLE_RATE = 24000         # 采样率24000Hz,即每秒采样24000次
            CHANNELS = 1                # 通道数 1为单声道,2为立体声
            FORMAT = paInt16            # 音频输入输出格式 paInt16
            CHUNK = int(0.3 * 24000)    # 每次读取音频数据的帧数,设置为0.3s的帧数24000*0.3=7200
            # 初始化音频流
            p = PyAudio()
            p.initialize(CHUNK)
            ret = MediaManager.init()
            if ret:
                print("record_audio, buffer_init failed")
            # 用于播放音频
            output_stream = p.open(format=FORMAT,channels=CHANNELS,rate=SAMPLE_RATE,output=True,frames_per_buffer=CHUNK)
            wf = wave.open(self.save_wav_file, "rb")
            wav_data = wf.read_frames(CHUNK)
            while wav_data:
                output_stream.write(wav_data)
                wav_data = wf.read_frames(CHUNK)
            time.sleep(2) # 时间缓冲,用于播放声音
            wf.close()
            output_stream.stop_stream()
            output_stream.close()
            p.terminate()
            MediaManager.deinit()

    def deinit(self):
        aidemo.tts_zh_destroy(self.encoder.ttszh)
        tts_zh.encoder.deinit()
        tts_zh.decoder.deinit()
        tts_zh.hifigan.deinit()

if __name__ == "__main__":
    os.exitpoint(os.EXITPOINT_ENABLE)
    nn.shrink_memory_pool()
    # 设置模型路径和其他参数
    # 中文tts encoder模型
    encoder_kmodel_path = "/sdcard/app/tests/kmodel/zh_fastspeech_1_f32.kmodel"
    # 中文tts decoder模型
    decoder_kmodel_path = "/sdcard/app/tests/kmodel/zh_fastspeech_2.kmodel"
    # 中文tts 声码器模型
    hifigan_kmodel_path="/sdcard/app/tests/kmodel/hifigan.kmodel"
    # 拼音字典
    dict_path="/sdcard/app/tests/utils/pinyin.txt"
    # 汉字转拼音字典文件
    phase_path="/sdcard/app/tests/utils/small_pinyin.txt"
    # 拼音转音素映射文件
    mapfile="/sdcard/app/tests/utils/phone_map.txt"
    # 输入中文语句
    text="嘉楠科技研发了最新款的芯片"
    # 生成音频存储路径
    save_wav_file = "/sdcard/app/tests/test.wav"

    # 初始化自定义中文tts实例
    tts_zh = TTSZH(encoder_kmodel_path,decoder_kmodel_path,hifigan_kmodel_path,dict_path,phase_path,mapfile,save_wav_file,debug_mode=0)
    try:
        with ScopedTiming("total",1):
            tts_zh.run(text)
            gc.collect()                        # 垃圾回收
    except Exception as e:
        sys.print_exception(e)                  # 打印异常信息
    finally:
        tts_zh.deinit()