8. Development Using Online Cloud Training Platform#
Note:
This chapter uses SDK version 1.1.0 and nncase version 2.4.0. For future updates, please refer to: Canaan Developer Community (canaan-creative.com) -> Resources -> Tools -> Cloud Training Platform -> Online Training Platform User Guide V2.
Ensure version compatibility during development. For the relationship between k230_sdk and nncase versions, refer to the link: K230 SDK nncase Version Compatibility — K230 Documentation (canaan-creative.com).
For MicroPython development, refer to the version compatibility between k230_canmv (MicroPython development), k230_sdk, and nncase versions: CanMV-K230_SDK_nncase Version Compatibility — K230 CanMV Documentation (canaan-creative.com).
Relevant instructional videos can be found in the reference section links.
This chapter introduces the application of the online training platform and the deployment of models on the K230 development board. Using image classification and object detection as examples, it provides a detailed usage process to help users quickly get started and successfully run tasks on the K230 development board using the online training platform. The online training platform is suitable for users without computational resources and who do not focus on the training process.
8.1 Implementing Image Classification Tasks Using the Online Platform#
8.1.1 Platform Registration#
First, new users need to register at the Canaan Developer Community (canaan-creative.com). After registration, log into the system.
8.1.2 Create a Project#
Click the “Create Project” button to create a vegetable classification project.
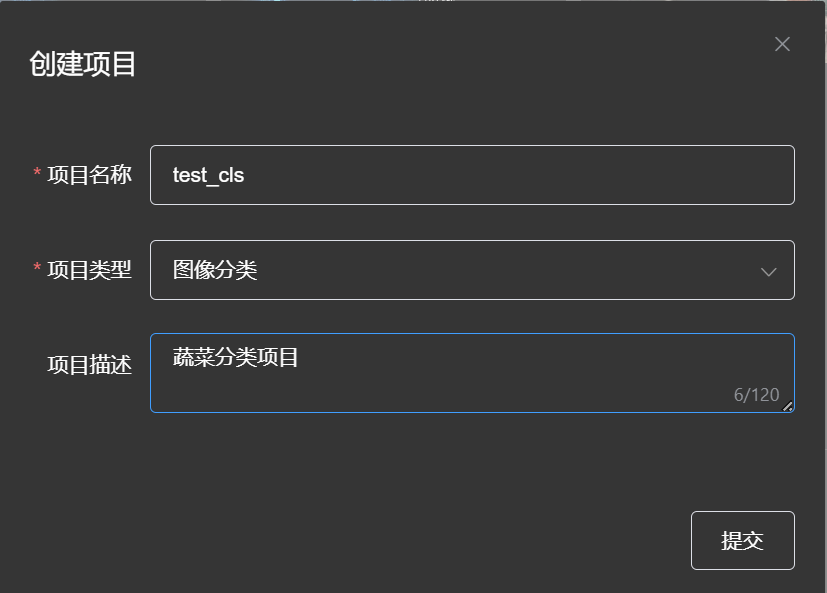
Then select this project as the current project.
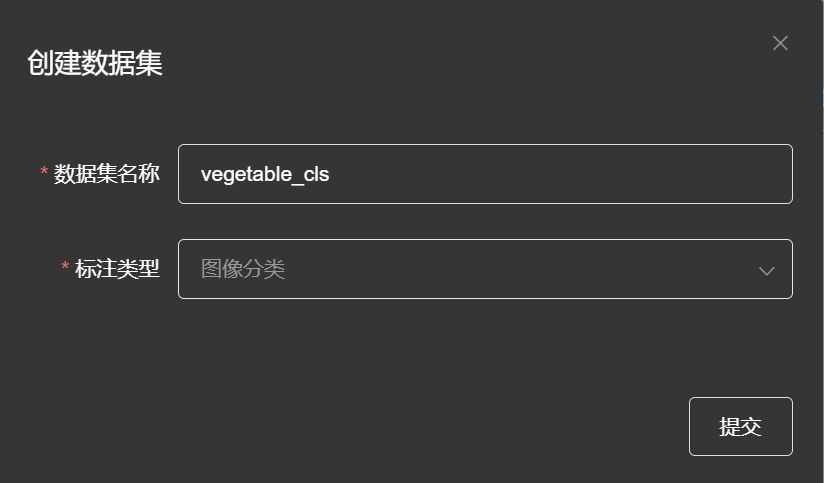
8.1.3 Create a Dataset#
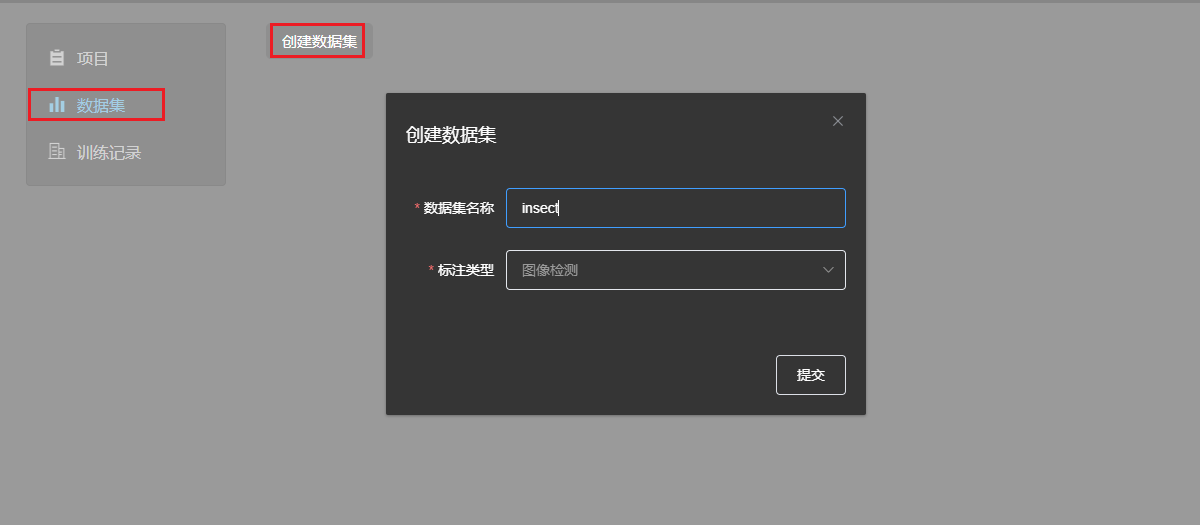
Select the “Dataset” tab and click the “Create Dataset” button.
Click the “Bind” button to bind the newly created dataset to the currently selected project. Then upload images and complete the annotation. Follow the steps shown below.
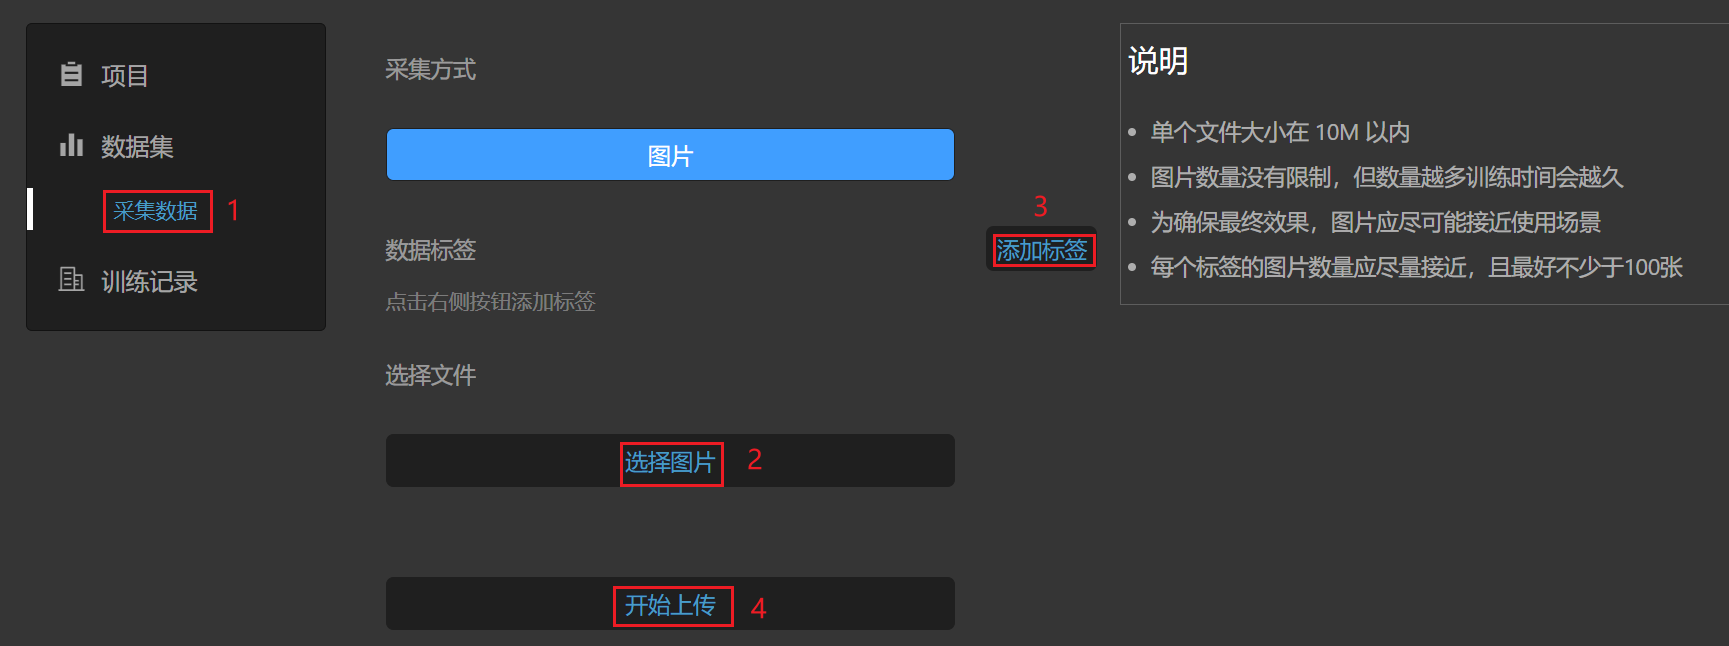
Each time, select all images of one category, add tags, and select them, then click to start uploading. Repeat the above process. An example of data upload is shown below:

After the dataset is uploaded, you can click the “Dataset” tab to preview it.

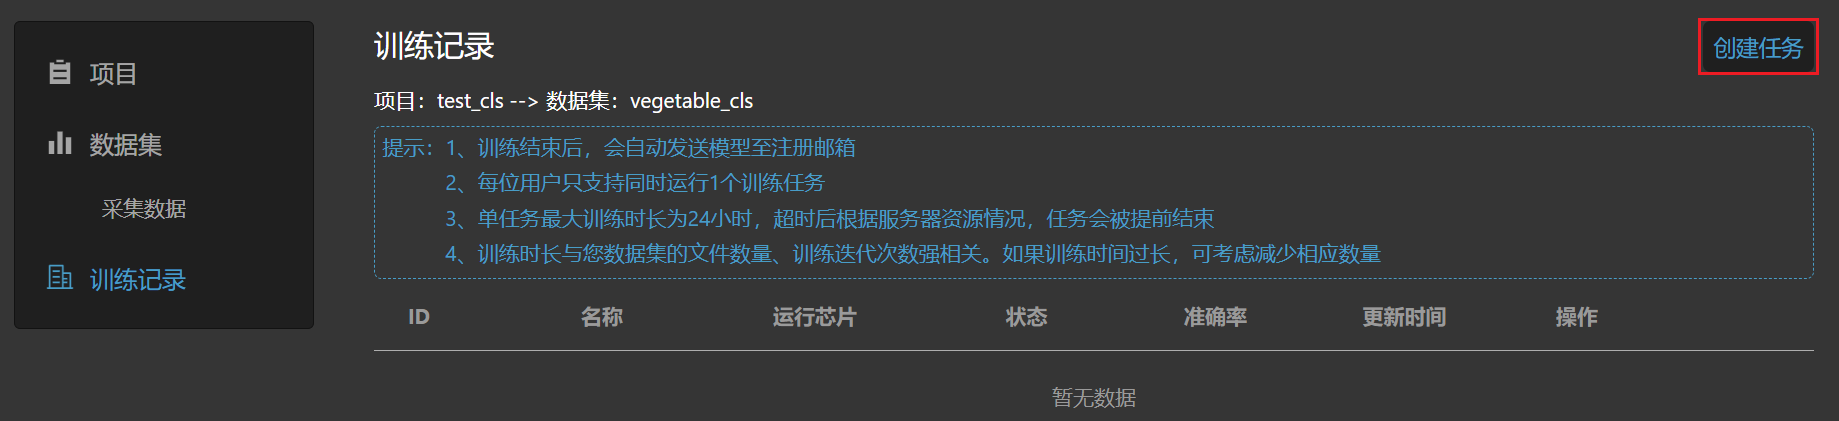
8.1.4 Create a Training Task#
Go to the “Training Records” tab and click the “Create Task” button.
Configure the training parameters and create a new task.
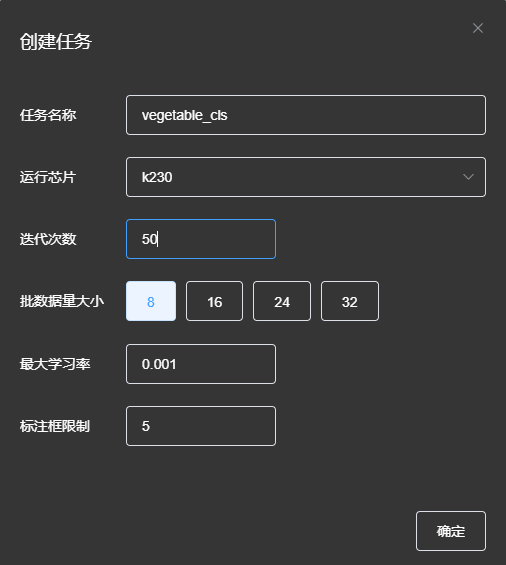
Note: The annotation box limit is a training parameter for object detection tasks and can be set to default when creating image classification parameters.
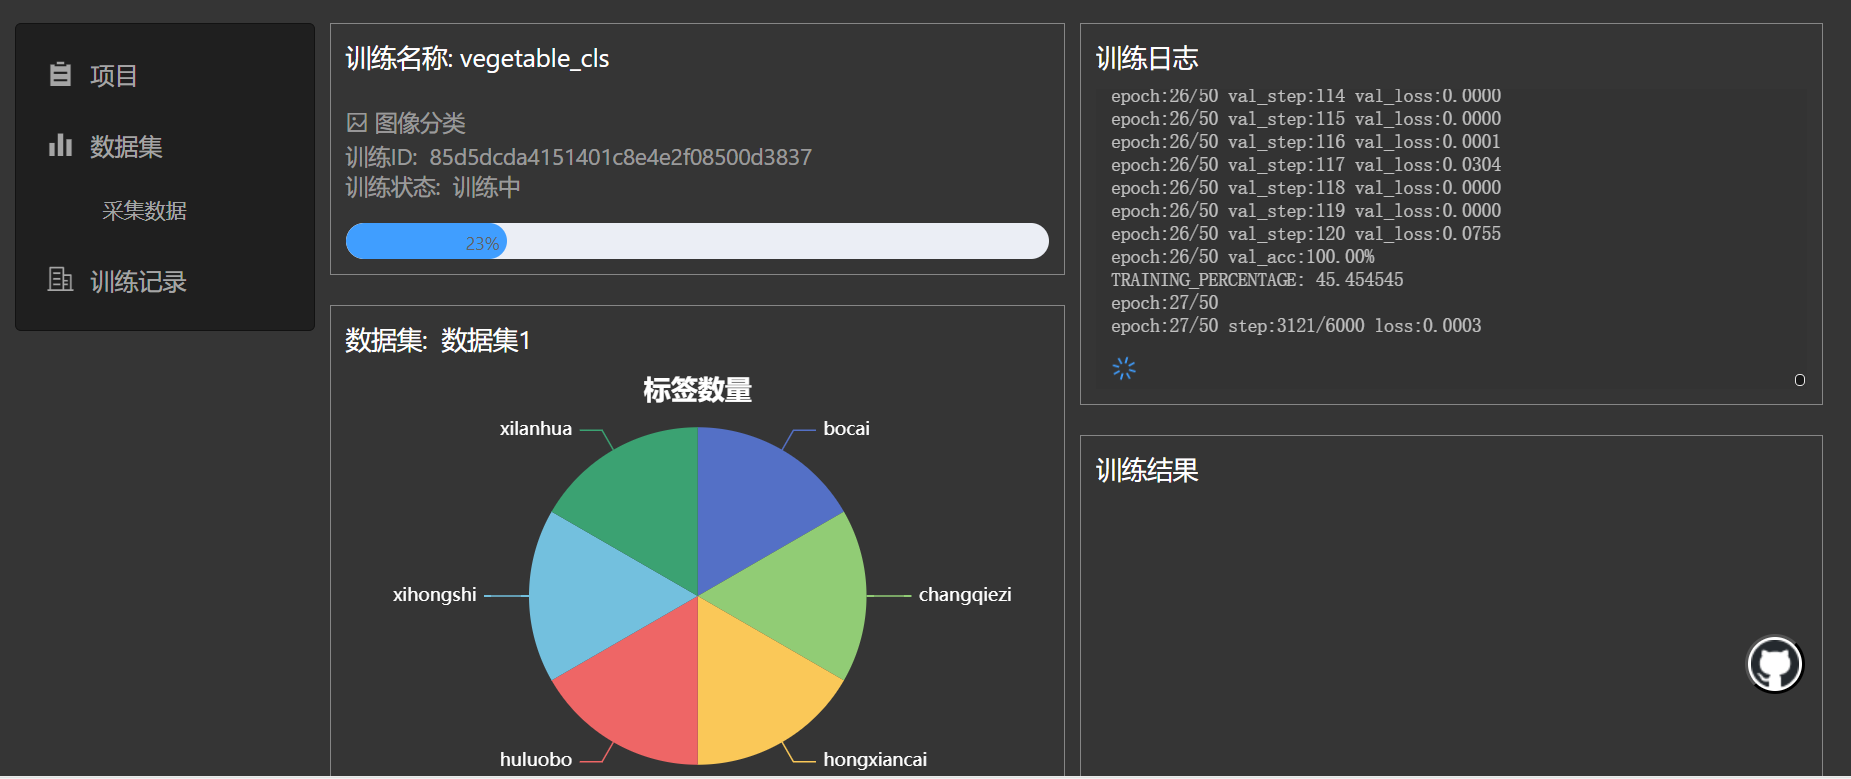
After creating the new task, wait for the training to complete. Click the “Details” button to view the task’s execution status.

When cloud server training resources are available, the task will enter the training phase. Click the “Details” button to view the training status, as shown below.
After training is complete, you can download the deployment package, which will also be sent to your registered email.
After extracting the deployment package, the directory structure is as follows:

Directory description:
|-cls_result # This directory contains example images of correct classifications
|-*.kmodel # kmodel used for deployment on the development board
|-deploy_config.json # Deployment configuration file
|-deployment_source.zip # C++ deployment resources
|-mp_deployment_source.zip # MicroPython deployment resources
8.1.5 Preparing for Deployment#
Now, deploy the obtained kmodel on the CanMV-K230 development board. The CanMV-K230 development board is shown below:
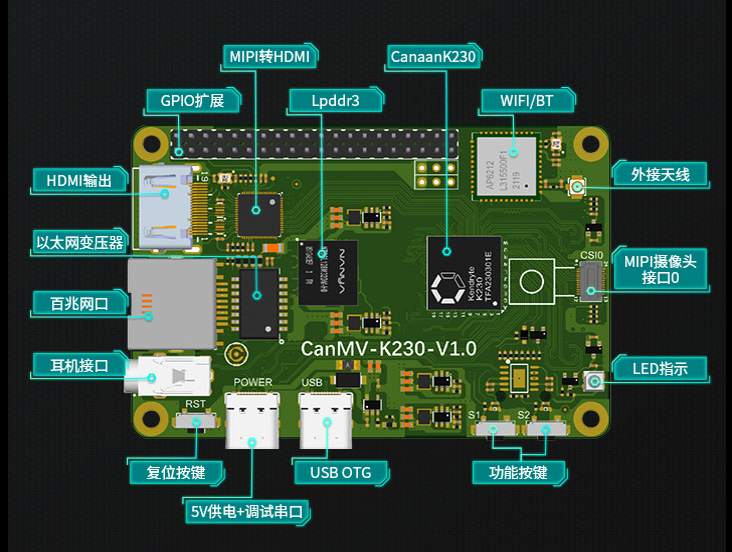
Before deployment, you need to prepare:
One CanMV-K230 development board;
One USB-TypeC data cable;
One SD card;
One card reader;
One HDMI display, supporting 1080P;
One network cable, or you can use an SD card to copy files directly without network transfer.
Before running on the board, you need to install the following software:
MobaXterm: serial port debugging tool, download and install at https://mobaxterm.mobatek.net/download.html.
Rufus: image burning tool, download and install at rufus tool download address.
8.1.5.1 Image Burning#
First, go to the Canaan Developer Community (canaan-creative.com) resource download page, select K230->Images, and choose K230_canmv_sdcard_v##_nncase_v###.img.gz. Select the corresponding version of the image based on the “nncase_version” field in the deploy_config.json obtained in the previous section.
Note:
For the relationship between k230_sdk and nncase versions, please refer to the link:
CanMV-K230_SDK_nncase Version Compatibility — K230 CanMV Documentation (canaan-creative.com)
The deployment package supports Linux+RT-Smart dual systems and pure RT-Smart single systems. You need to compile the single system yourself. For the compilation steps, refer to Compile K230_SDK
Linux:
Before inserting the SD card into the host, enter:
ls -l /dev/sd\*
to view the current storage devices.
Insert the TF card into the host and enter again:
ls -l /dev/sd\*
to view the storage devices. The newly added device is the TF card device node.
Assuming /dev/sdc is the TF card device node, execute the following command to burn the TF card:
sudo dd if=sysimage-sdcard.img of=/dev/sdc bs=1M oflag=sync
Windows:
On Windows, you can use the Rufus tool to burn the TF card. Rufus download link.
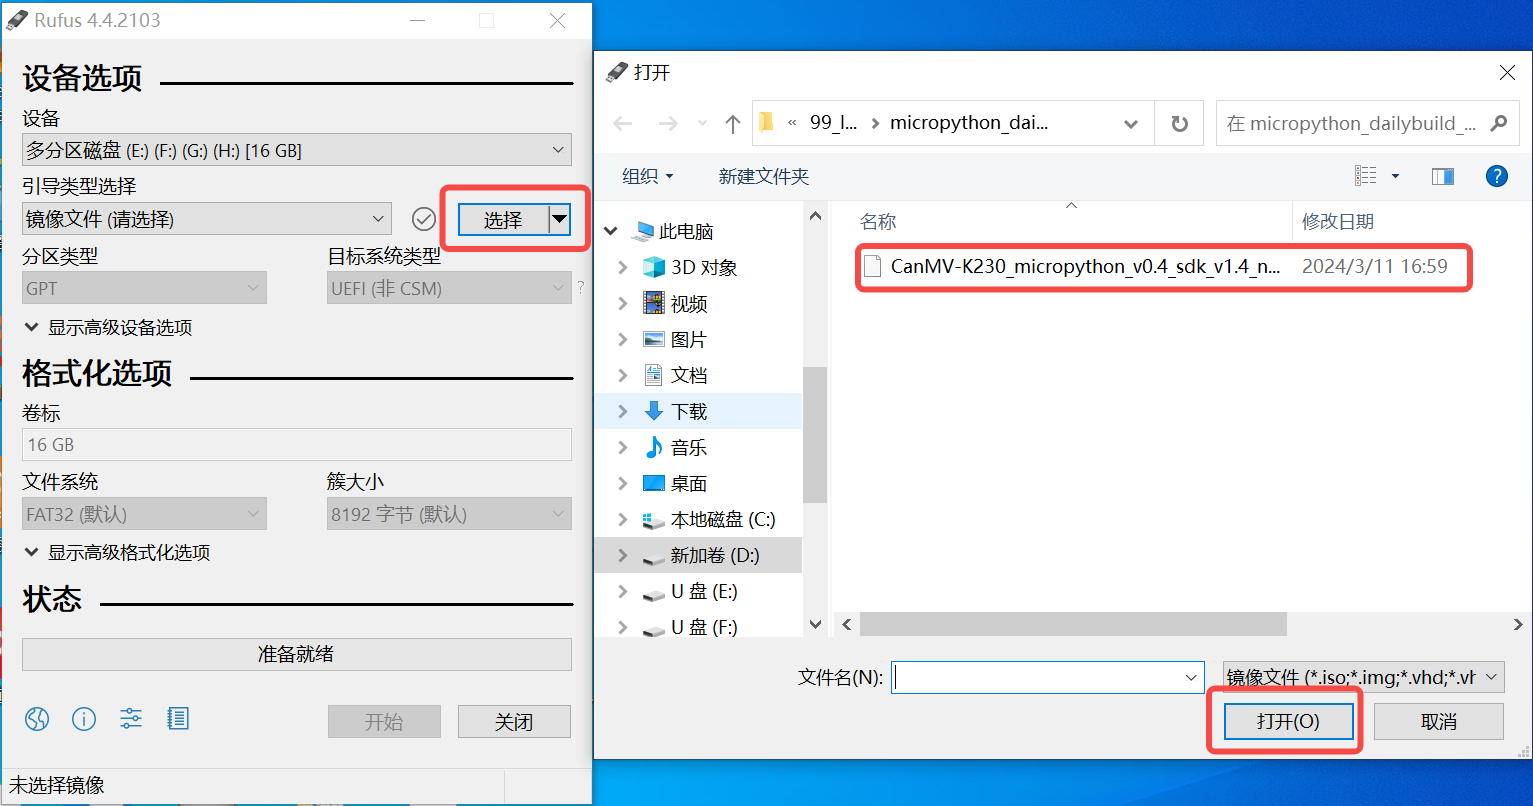
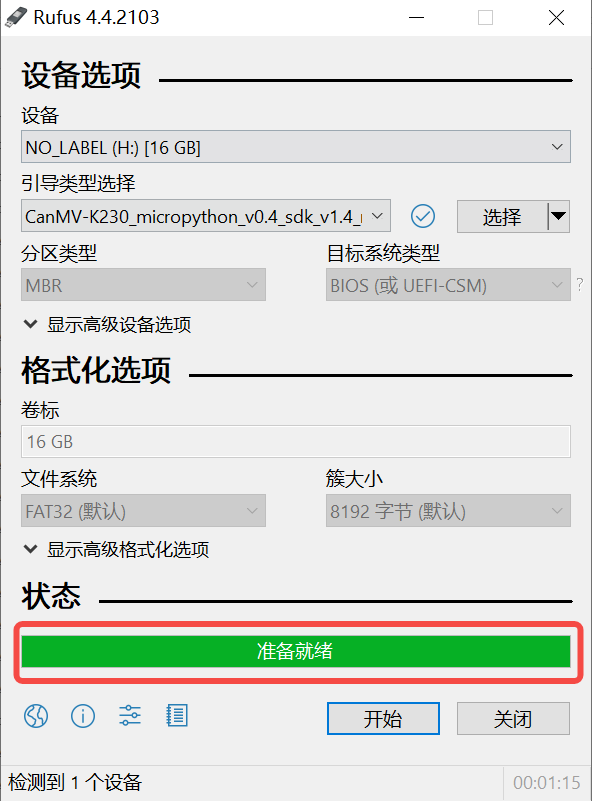
Insert the SD card into the PC, then start the Rufus tool, and click the “Select” button on the tool interface to choose the firmware to be burned.
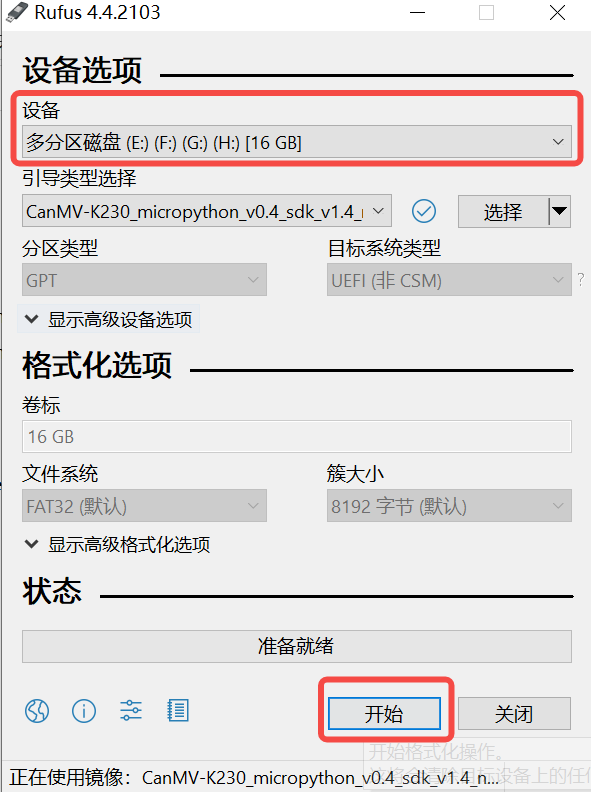
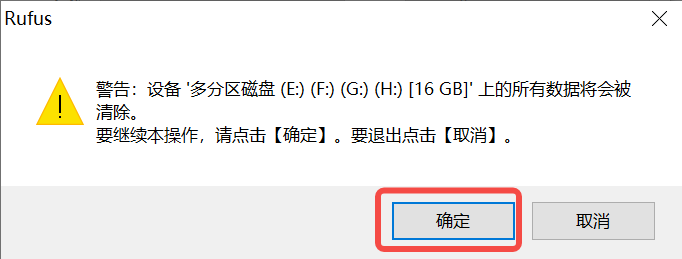
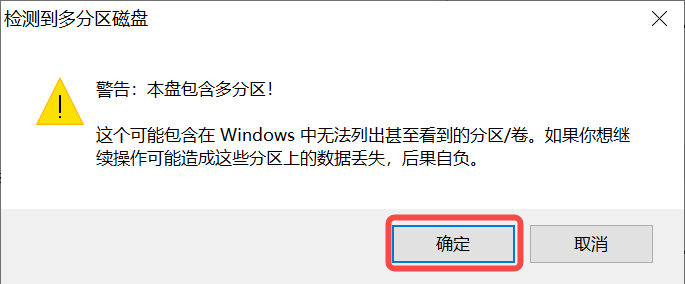
Click the “Start” button to start burning. The burning process will show a progress bar, and it will prompt “Ready” when finished.
After burning, insert the SD card into the development board and power it on:
Connect the display to the HDMI port and, if needed, connect the network cable.
8.1.5.2 Network Configuration#
Note: The following network configuration method is only applicable to Linux+RT-Smart dual system
If you choose to use an offline method with a card reader to copy files, you can skip this step.
Serial Tool Debugging
Install a serial debugging tool: MobaXterm installation: download and install from https://mobaxterm.mobatek.net/download.html.
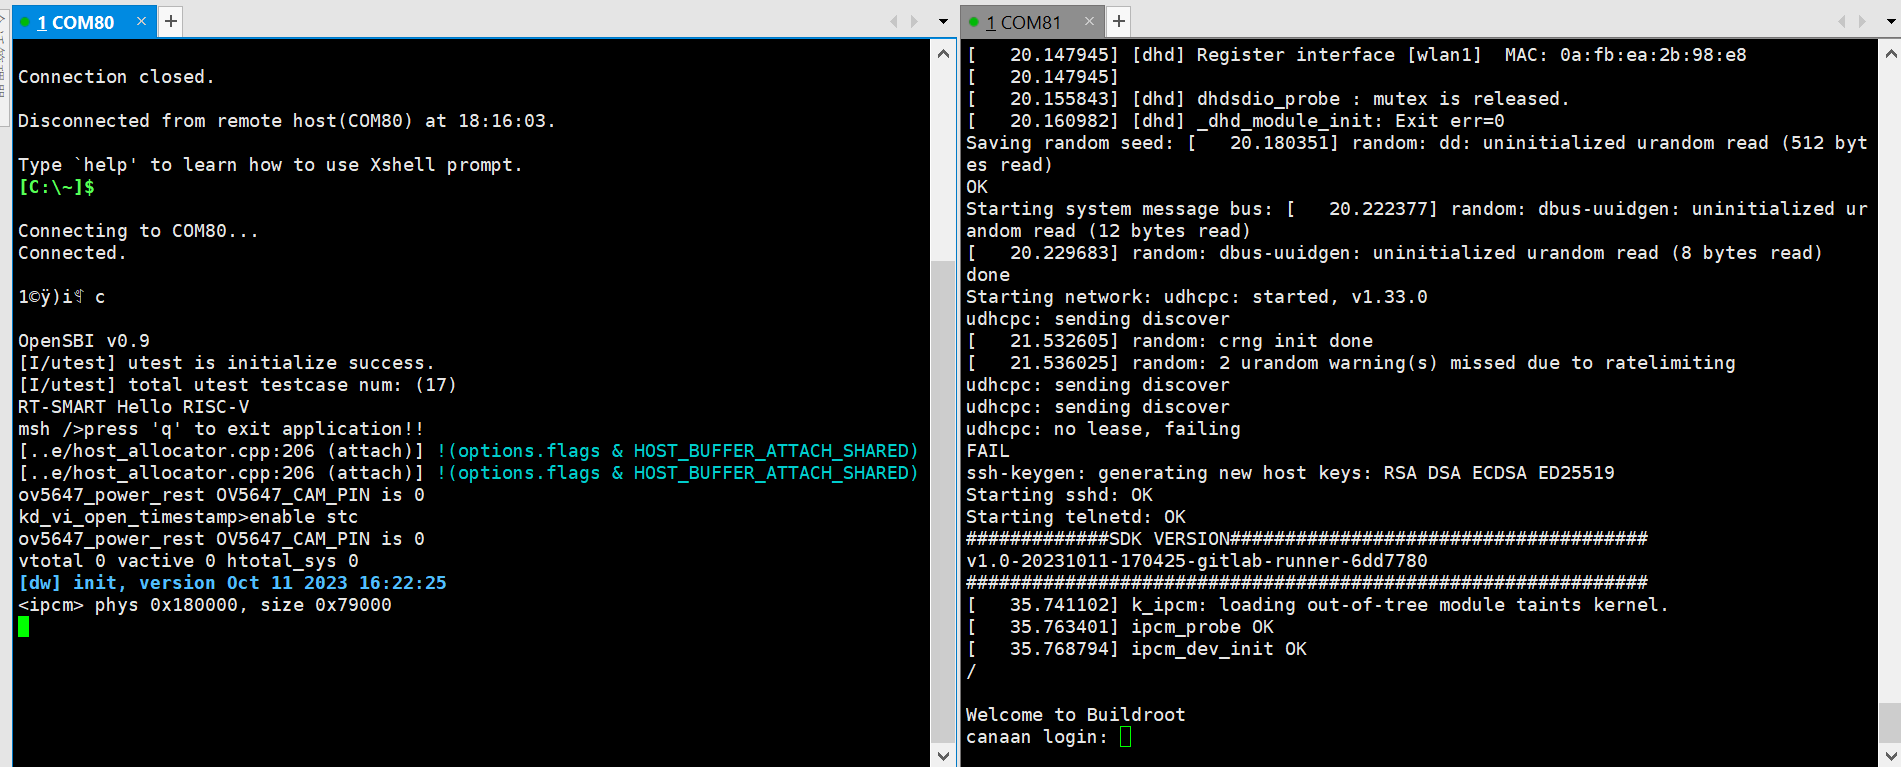
After starting MobaXterm, select Session–>Serial:
Select two consecutive serial ports for Serial Port, and choose 115200 for Speed (bps).
Login to the small core serial port, enter root to log in; no need to log in to the large core serial port, press “q” and enter to exit the self-start face recognition program.
Network Configuration on Windows PC
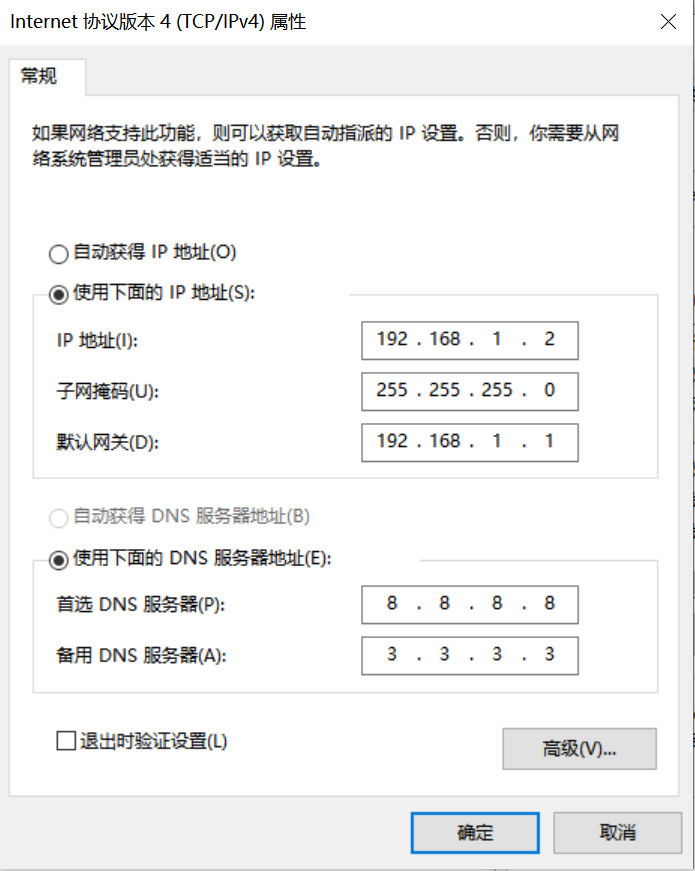
Control Panel -> Network and Sharing Center -> Change Adapter Settings -> Ethernet -> Right-click Properties -> Select (TCP/IPv4) -> Properties
Configure IP address, mask, gateway, and DNS server address:
Development Board Network Configuration
Enter the small core command line and execute:
# Check if eth0 exists
ifconfig
# Configure the development board IP to be on the same subnet as the PC
ifconfig eth0 192.168.1.22
# Check IP configuration
ifconfig
Note: After each power-off, you need to re-execute the network configuration commands.
8.1.5.3 File Copy#
For Linux+RT-Smart dual system image:
sharefs Directory Description
# Enter the root directory of the small core
cd /
# List directories
ls
# The sharefs directory is shared by both small and large cores, so files copied to the sharefs directory from the small core are also visible to the large core
Offline Copy Using a Card Reader
Power off and remove the SD card, use a card reader to copy files from the PC to the shared directory sharefs. The default root directory of the SD card corresponds to the sharefs directory, copy files here.
Local Network TFTP Copy
Install the tftp communication tool, download link: https://bitbucket.org/phjounin/tftpd64/downloads/
Start tftpd64, configure the directory for storing files to be transferred and the service network card.
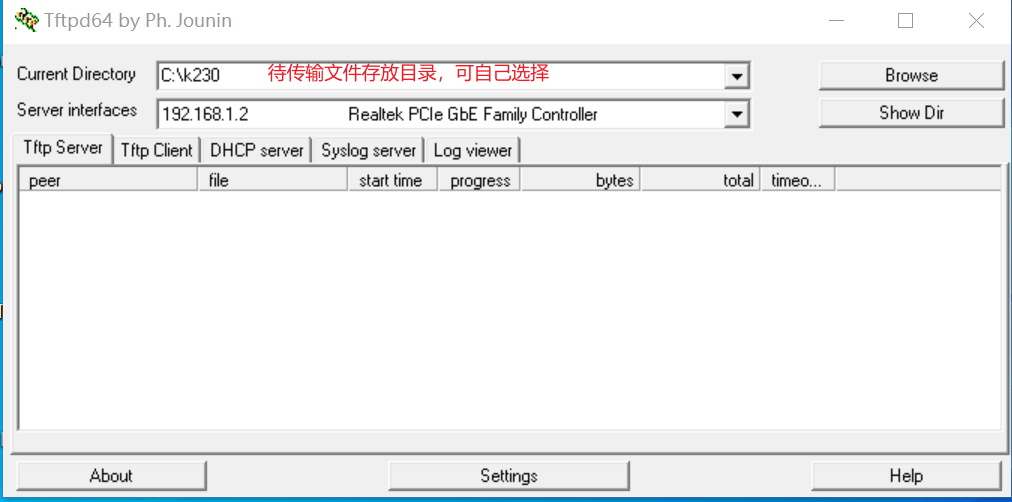
# The following commands are executed on the small core serial port
# Transfer files from the PC's tftpd64 configured directory to the development board's current directory
tftp -g -r your_file 192.168.1.2
# Transfer files from the development board's current directory to the PC's tftpd64 configured directory
tftp -p -r board_file 192.168.1.2
scp Copy
On Linux systems, with the PC connected to the network, the development board can connect to other network ports under the same gateway as the PC via a network cable. Use the scp command to transfer files.
Power on the development board, enter the small and large core COM interfaces, and execute the scp transfer command on the small core:
# Copy files from the PC to the development board
scp username@domain_or_IP:source_directory development_board_destination_directory
# Copy folders
scp -r username@domain_or_IP:source_directory development_board_destination_directory
# Copy files from the development board to the PC
scp development_board_source_directory username@domain_or_IP:PC_destination_directory
# Copy folders
scp -r development_board_source_directory username@domain_or_IP:PC_destination_directory
Files to be copied
File |
Description |
|---|---|
*.kmodel |
kmodel generated by the project |
deploy_config.json |
Deployment configuration file |
deployment_source.zip extracted, elfs/main_canmv.elf |
Compiled executable file |
test.jpg |
Static image for testing |
For the above image classification task, create a subfolder test_cls under the sharefs directory, and copy:
kmodel file, main_canmv.elf, a test sample test.jpg, and deploy_config.json file to the test_cls directory.
For pure RT-Smart single system image:
Only the offline copy method can be used. The root directory of the PC disk corresponds to the sdcard folder in the root directory of the big core. Please search for the copied file in the /sdcard directory through the big core serial port.
Files to be copied
File |
Description |
|---|---|
*.kmodel |
kmodel generated by the project |
deploy_config.json |
Deployment configuration file |
deployment_source.zip extracted, elfs/main_canmv.elf |
Compiled executable file |
test.jpg |
Static image for testing |
8.1.6 Running on the Board#
Static Image Inference
Connect to the large core serial port and execute the following commands:
# Linux+RT-Smart
cd /sharefs/test_cls
# Only RT-Smart
cd /sdcard/test_cls
# .elf <deploy_config.json> <input_path> <debug_mode>
# deploy_config.json: Deployment configuration file;
# input_path: Path to the inference image. For video stream inference, set to None;
# debug_mode: Debug mode, 0 for no debug, 1 for simple debug, 2 for detailed debug;
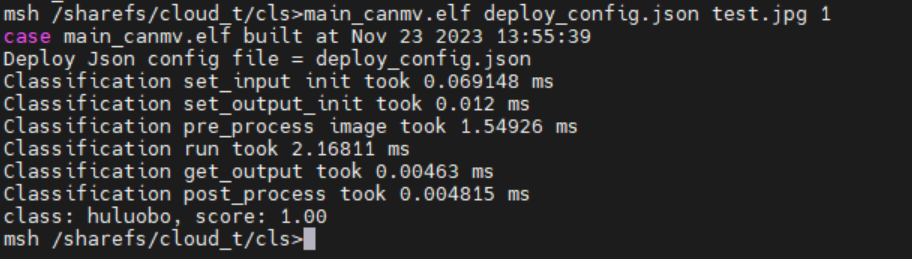
./main_canmv.elf deploy_config.json test.jpg 0
Static image inference result:
Video Stream Inference
Connect to the large core serial port and execute the following commands:
# Linux+RT-Smart
cd /sharefs/test_cls
# Only RT-Smart
cd /sdcard/test_cls
# .elf <deploy_config.json> <input_path> <debug_mode>
# deploy_config.json: Deployment configuration file;
# input_path: Path to the inference image, set to None for video stream inference;
# debug_mode: Debug mode, 0 for no debug, 1 for simple debug, 2 for detailed debug;
./main_canmv.elf deploy_config.json None 0
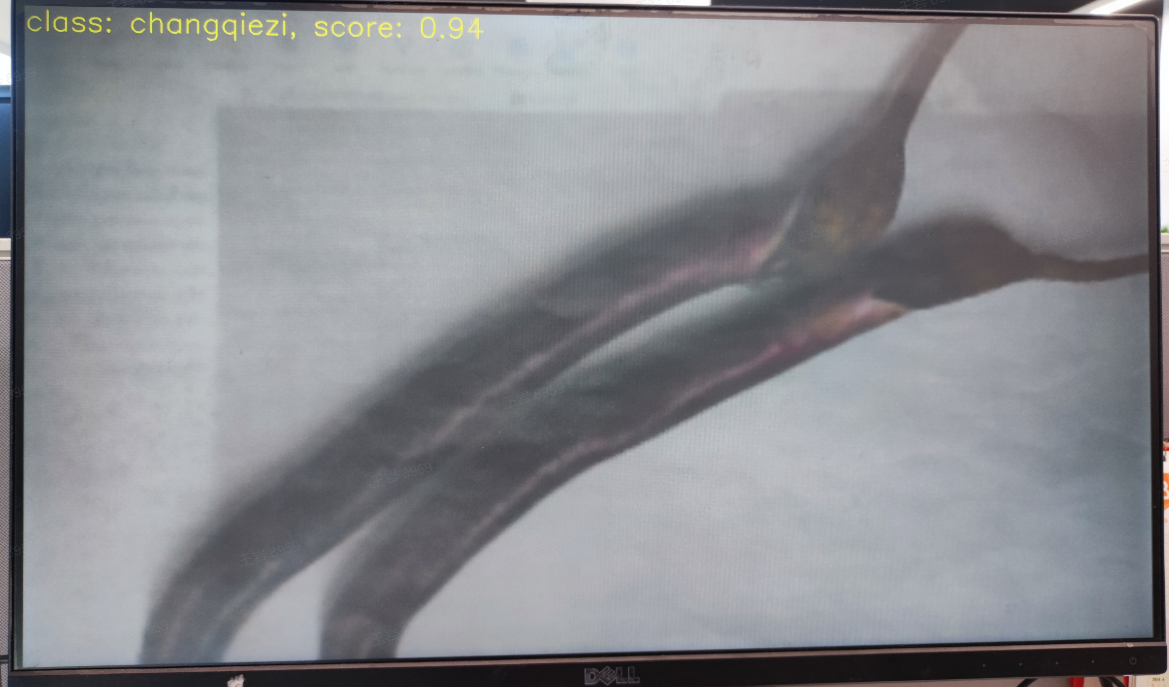
Video stream inference result:
8.1.7 Running with MicroPython#
8.1.7.1 Image Burning#
Burn the MicroPython image. Go to the Canaan Developer Community (canaan-creative.com) resource download page, click on the left side K230/Images, and select CanMV-K230_micropython_v##_sdk_v##__nncase_v###.img.gz to download. Select the version based on the “nncase_version” field in the deploy_config.json file. Use the method described in section 8.1.5.1 to burn the image.
Note:
For the relationship between k230_canmv and k230_sdk, nncase versions, please refer to the link:
CanMV-K230_SDK_nncase Version Compatibility — K230 CanMV Documentation (canaan-creative.com)
8.1.7.2 File Copy#
Use a card reader for offline copying. Copy the kmodel file, deploy_config.json, and test image file to a directory on the SD card and note this directory.
8.1.7.3 Install IDE#
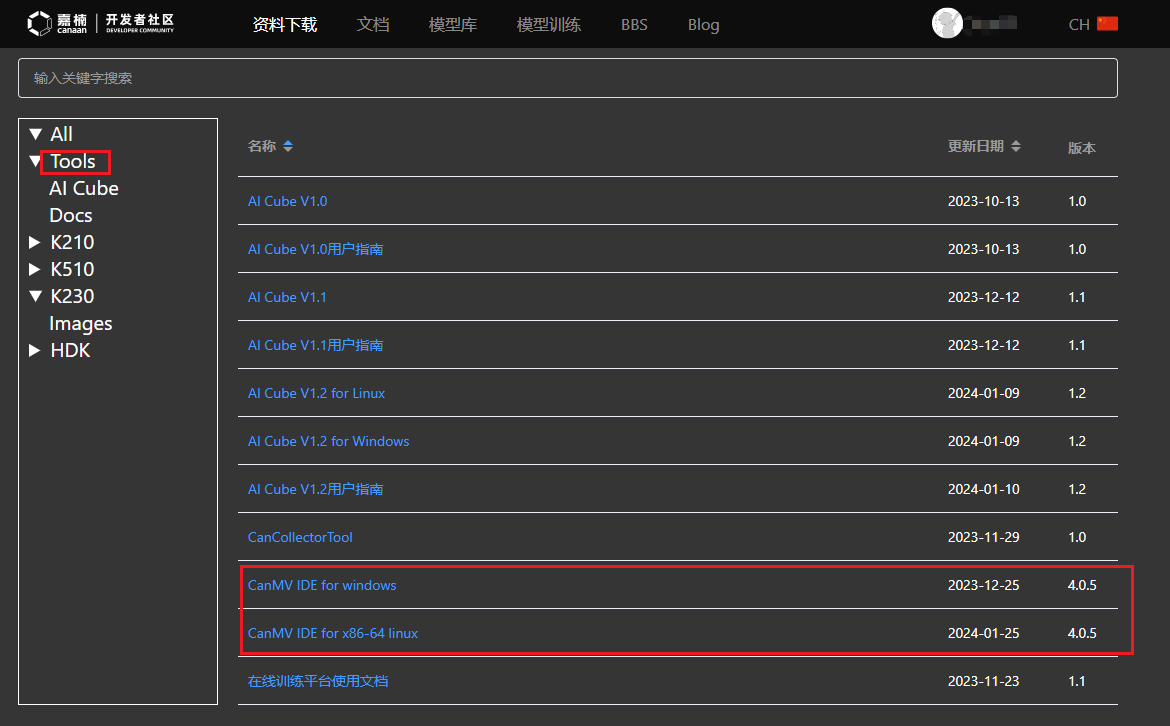
Install CanMV IDE. Go to the Canaan Developer Community (canaan-creative.com) resource download page, click on the left side Tools, and download the appropriate version of CanMV IDE for your system.
8.1.7.4 Power On and Start#
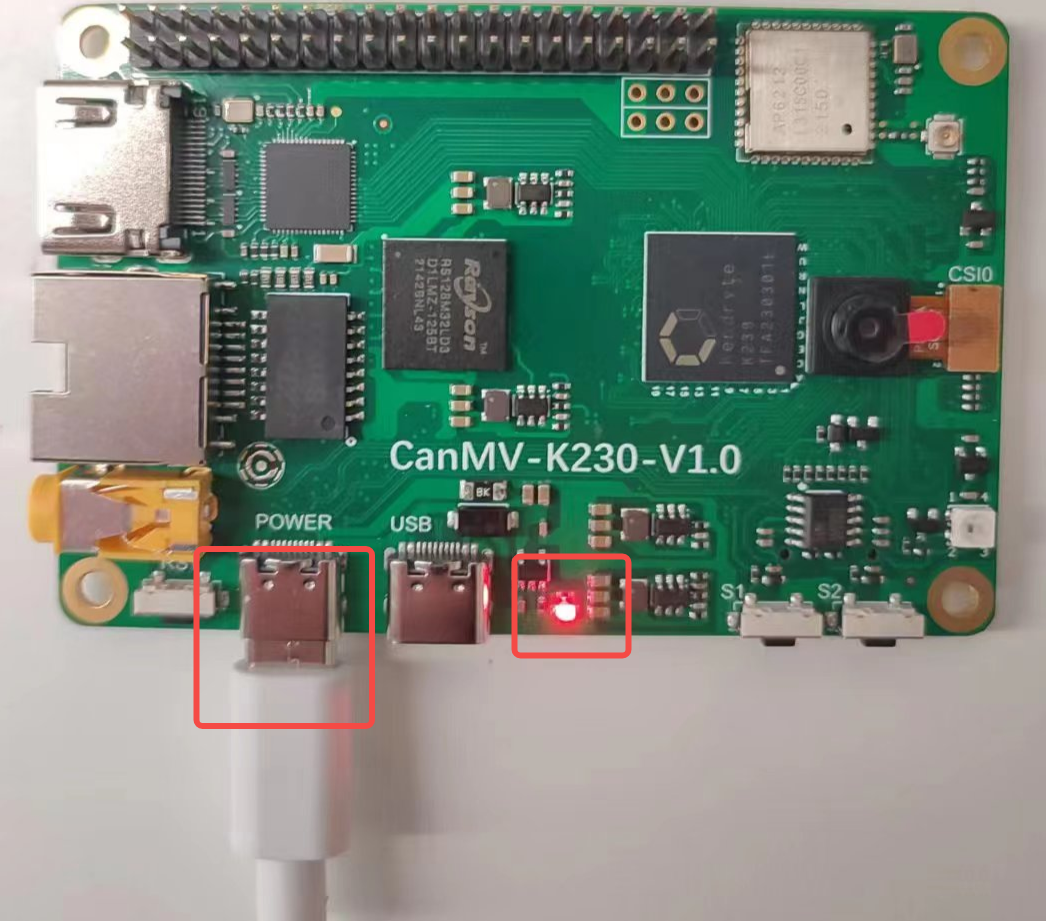
Connect the development board as shown below and power it on:
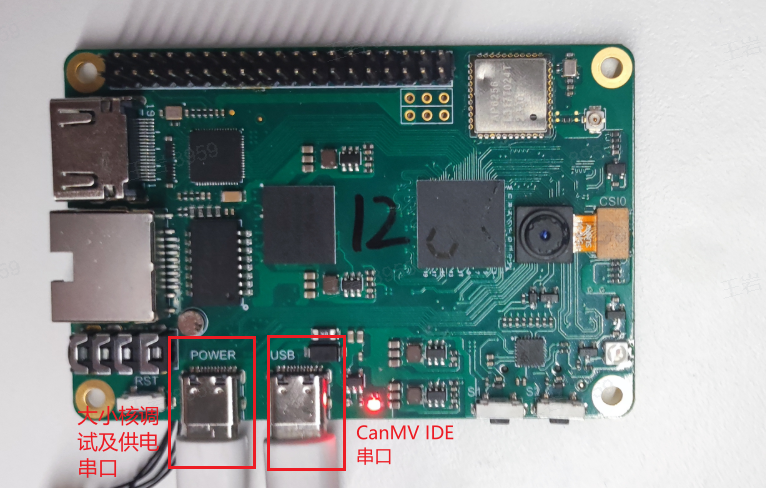
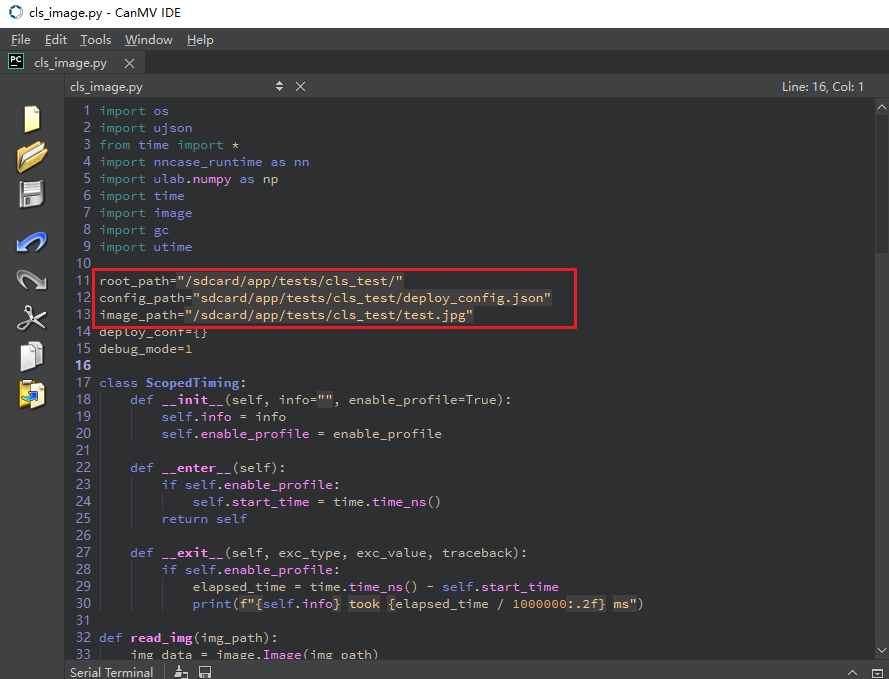
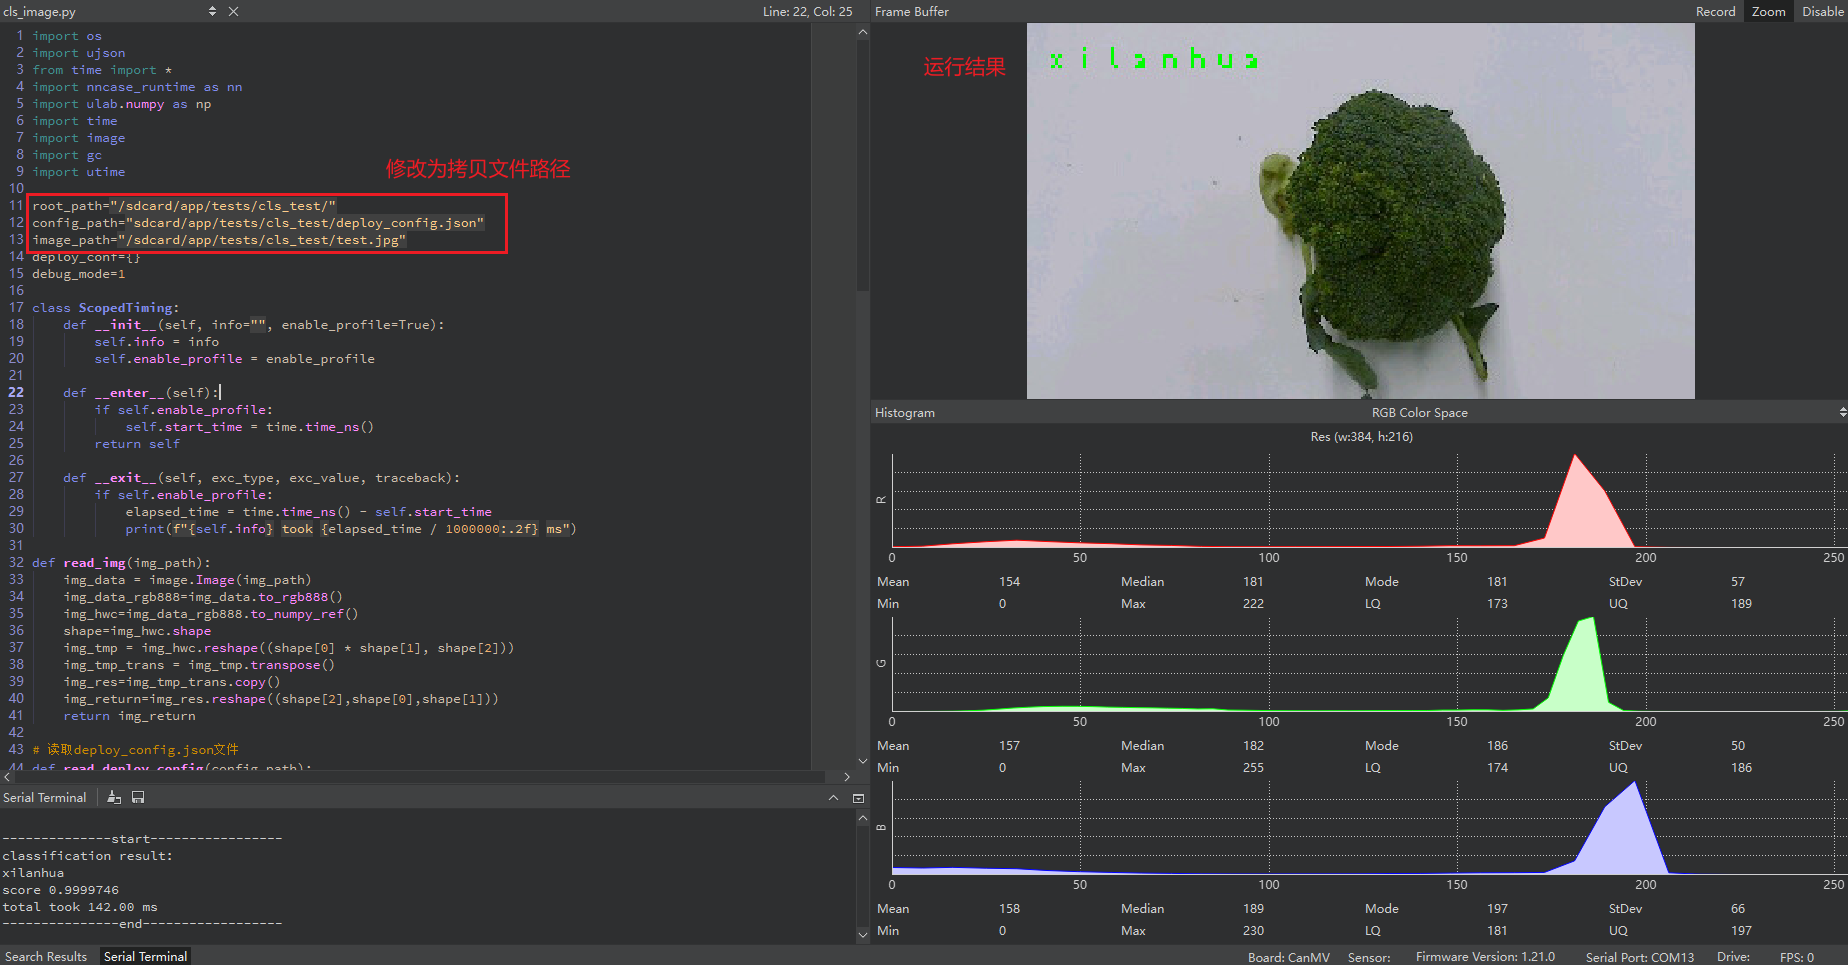
Start CanMV IDE, open the file, select the cls_image.py file from the extracted mp_deployment_source.zip, and modify the file path in the red box below to your copied file path for single image inference:
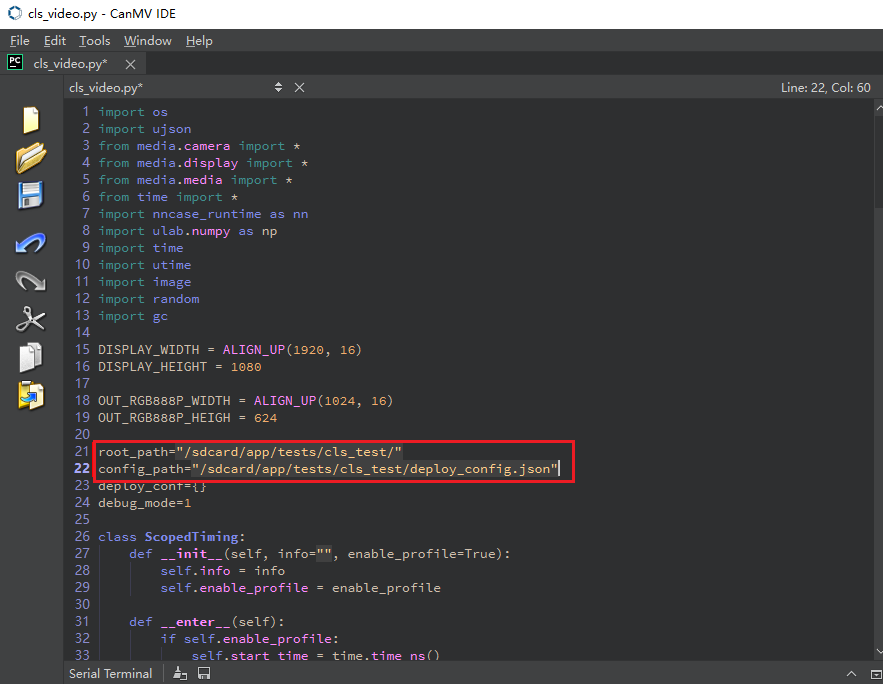
Or open the cls_video.py file, modify the file path to your copied directory for video inference. The video inference result is shown below:
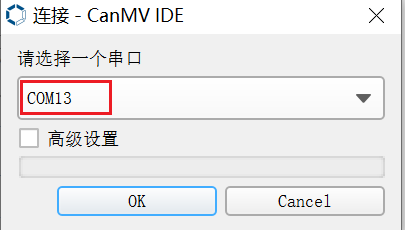
When the connection status at the bottom left changes to the state shown below:
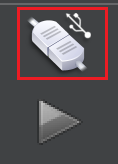
Click the button to connect to the serial port. Select the third serial port besides the large and small core serial ports:
 After connecting, click the green triangle button to run.
The single image inference result is shown below:
The video inference result is shown below:
8.2 Implementing Object Detection Tasks Using the Online Platform#
8.2.1 Platform Registration#
First, new users need to register at the Canaan Developer Community (canaan-creative.com). After registration, log into the system.
8.2.2 Create a Project#
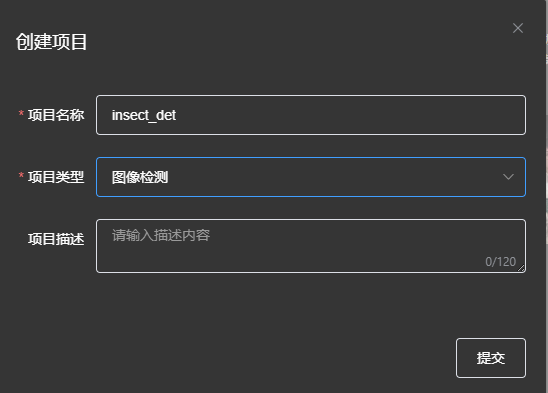
Click the “Create Project” button to create an insect detection project.
Then select this project as the current project.
8.2.3 Create a Dataset#
Select the “Dataset” tab and click the “Create Dataset” button.
Click the “Bind” button to bind the newly created dataset to the currently selected project. Then upload images and complete the annotation. Follow the steps shown below.
Click the “Bind” button to bind the newly created dataset to the currently selected project.

Then proceed with image uploading and annotation. Follow the steps below.
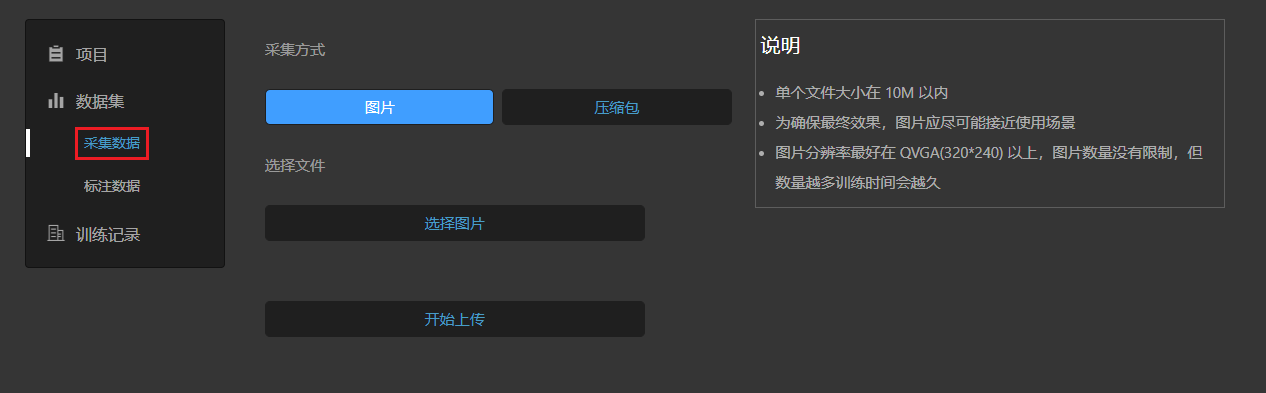
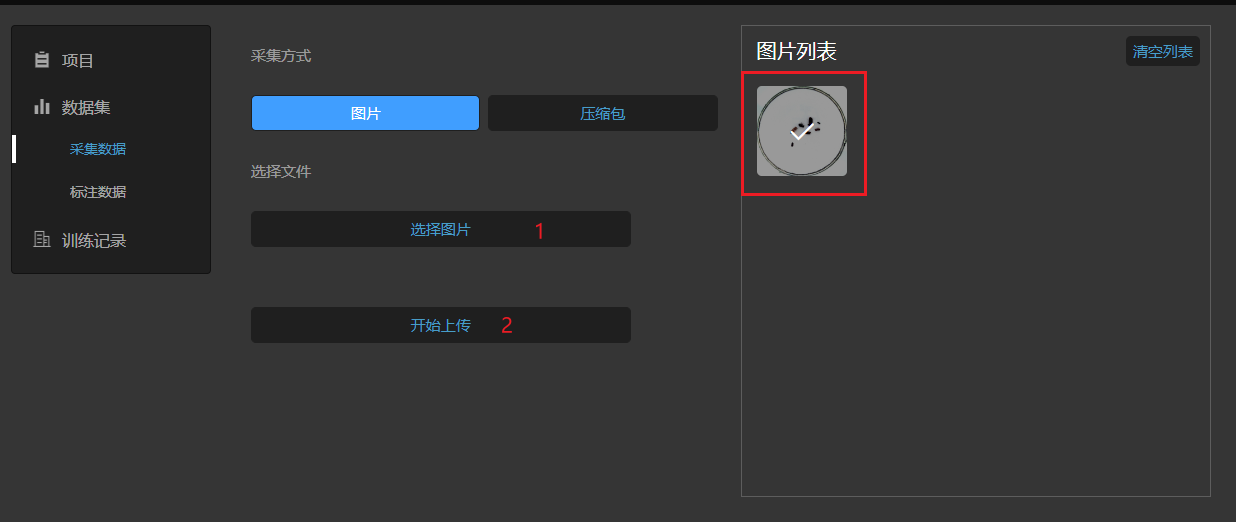
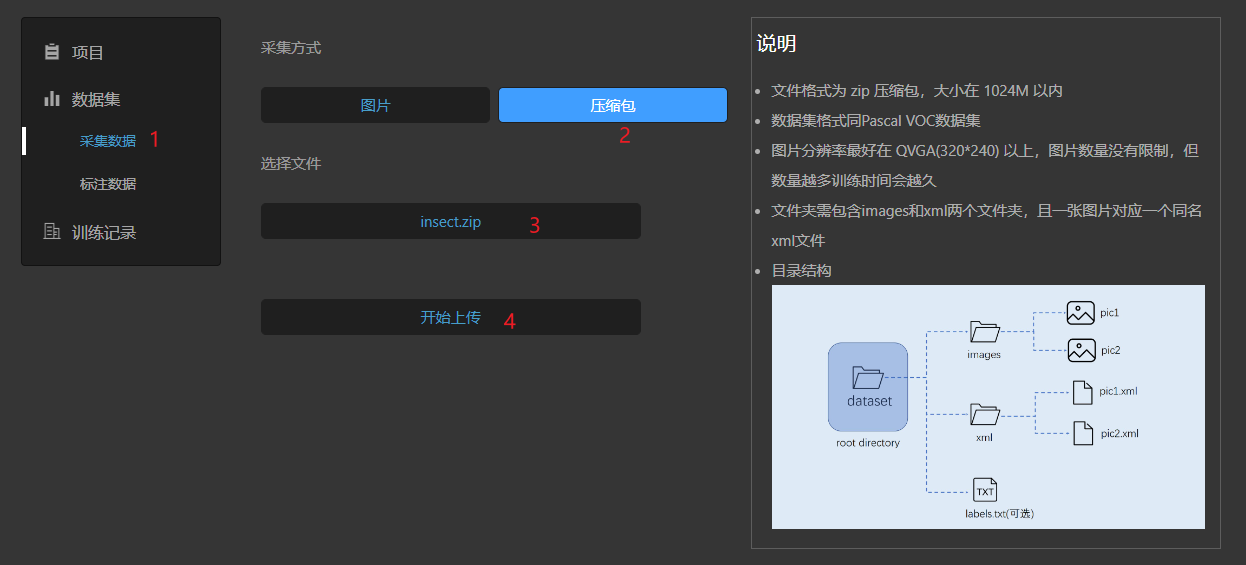
If you choose to upload images, select the images and click “Start Upload”:
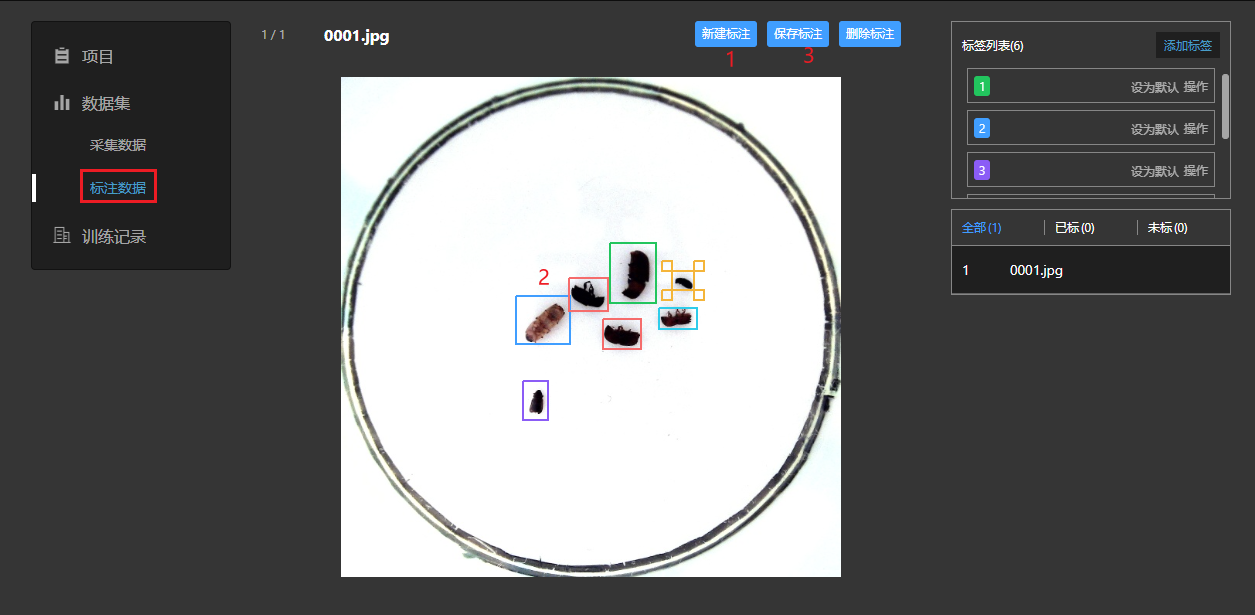
Then click “Annotate Data” to complete the annotation of the uploaded dataset:
If you choose to upload in compressed package format, organize your data as required:
After the dataset is uploaded, you can click the “Dataset” tab to preview it.

8.2.4 Create a Training Task#
Go to the “Training Records” tab and click the “Create Task” button.

Configure the training parameters and create a new task.
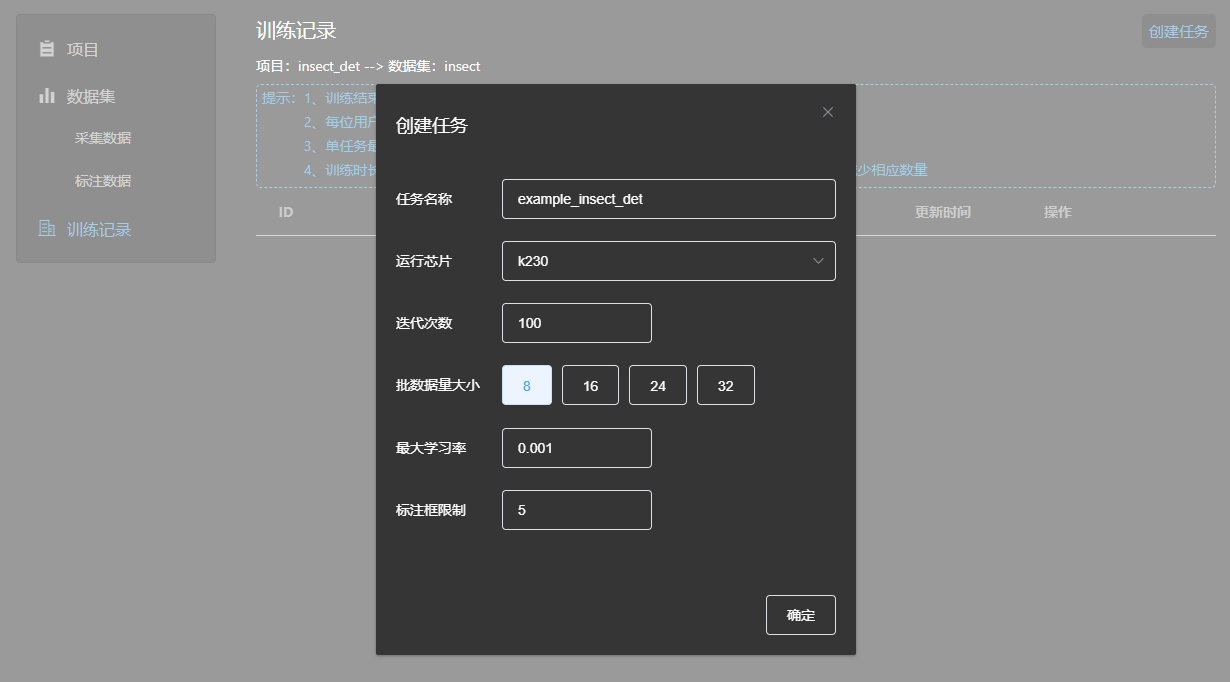
Note: The bounding box limit is a training parameter for object detection tasks, indicating that each bounding box should be at least 5*5 pixels.
After creating the new task, wait for the training to complete. Click the “Details” button to view the task’s execution status.
When cloud server training resources are available, the task will enter the training phase. Click the “Details” button to view the training status, as shown below.
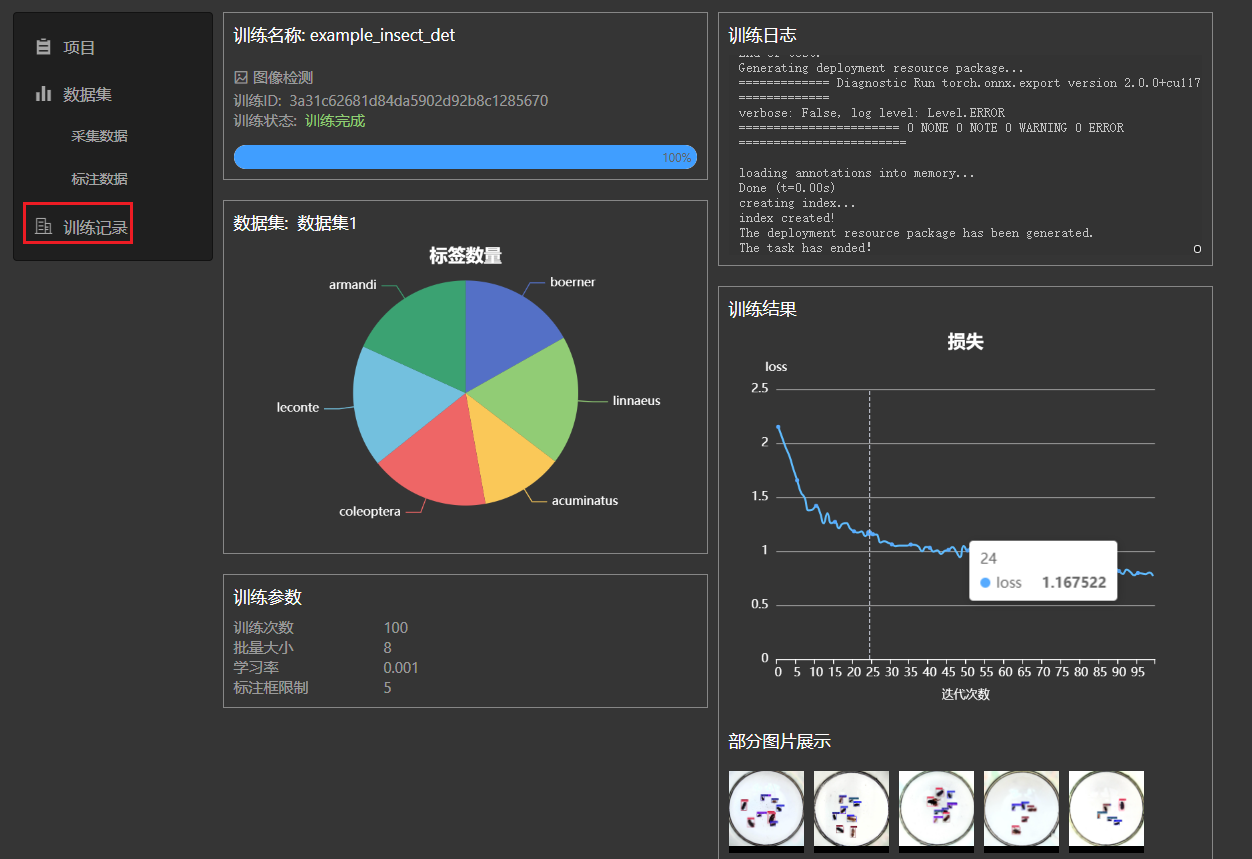
After training is complete, you can download the deployment package, which will also be sent to your registered email.
After extracting the deployment package, the directory structure is as follows:

Directory description:
|-det_result # This directory contains some test sample detection results
|-*.kmodel # kmodel used for deployment on the development board
|-deploy_config.json # Deployment configuration file
|-deployment_source.zip # C++ deployment resources
|-mp_deployment_source.zip # MicroPython deployment resources
8.2.5 Preparing for Deployment#
Now, deploy the obtained kmodel on the CanMV-K230 development board. The CanMV-K230 development board is shown below:
Before deployment, you need to prepare:
One CanMV-K230 development board;
One USB-TypeC data cable;
One SD card;
One card reader;
One HDMI display, supporting 1080P;
One network cable, or you can use an SD card to copy files directly without network transfer.
Before running on the board, you need to install the following software:
MobaXterm: serial port debugging tool, download and install at https://mobaxterm.mobatek.net/download.html.
Rufus: image burning tool, download and install at rufus tool download address.
8.2.5.1 Image Burning#
First, go to the Canaan Developer Community (canaan-creative.com) resource download page, select K230->Images, and choose K230_canmv_sdcard_v##_nncase_v###.img.gz. Select the corresponding version of the image based on the “nncase_version” field in the deploy_config.json obtained in the previous section.
Note:
For the relationship between k230_sdk and nncase versions, please refer to the link:
CanMV-K230_SDK_nncase Version Compatibility — K230 CanMV Documentation (canaan-creative.com)
Linux:
Before inserting the SD card into the host, enter:
ls -l /dev/sd\*
to view the current storage devices.
Insert the TF card into the host and enter again:
ls -l /dev/sd\*
to view the storage devices. The newly added device is the TF card device node.
Assuming /dev/sdc is the TF card device node, execute the following command to burn the TF card:
sudo dd if=sysimage-sdcard.img of=/dev/sdc bs=1M oflag=sync
Windows:
On Windows, you can use the Rufus tool to burn the TF card. Rufus download link.
Insert the SD card into the PC, then start the Rufus tool, and click the “Select” button on the tool interface to choose the firmware to be burned.
Click the “Start” button to start burning. The burning process will show a progress bar, and it will prompt “Ready” when finished.
After burning, insert the SD card into the development board and power it on:
Connect the display to the HDMI port and, if needed, connect the network cable.
8.2.5.2 Network Configuration#
Note: The following network configuration method is only applicable to Linux+RT-Smart dual system
If you choose to use an offline method with a card reader to copy files, you can skip this step.
Serial Tool Debugging
Install a serial debugging tool: MobaXterm installation: download and install from https://mobaxterm.mobatek.net/download.html.
After starting MobaXterm, select Session–>Serial:
Select two consecutive serial ports for Serial Port, and choose 115200 for Speed (bps).
Login to the small core serial port, enter root to log in; no need to log in to the large core serial port, press “q” and enter to exit the self-start face recognition program.
Network Configuration on Windows PC
Control Panel -> Network and Sharing Center -> Change Adapter Settings -> Ethernet -> Right-click Properties -> Select (TCP/IPv4) -> Properties
Configure IP address, mask, gateway, and DNS server address:
Development Board Network Configuration
Enter the small core command line and execute:
# Check if eth0 exists
ifconfig
# Configure the development board IP to be on the same subnet as the PC
ifconfig eth0 192.168.1.22
# Check IP configuration
ifconfig
Note: After each power-off, you need to re-execute the network configuration commands.
8.2.5.3 File Copy#
For Linux+RT-Smart dual system image:
sharefs Directory Description
# Enter the root directory of the small core
cd /
# List directories
ls
# The sharefs directory is shared by both small and large cores, so files copied to the sharefs directory from the small core are also visible to the large core
Offline Copy Using a Card Reader
Power off and remove the SD card, use a card reader to copy files from the PC to the shared directory sharefs. The default root directory of the SD card corresponds to the sharefs directory, copy files here.
Local Network TFTP Copy
Install the tftp communication tool, download link: https://bitbucket.org/phjounin/tftpd64/downloads/
Start tftpd64, configure the directory for storing files to be transferred and the service network card.
# The following commands are executed on the small core serial port
# Transfer files from the PC's tftpd64 configured directory to the development board's current directory
tftp -g -r your_file 192.168.1.2
# Transfer files from the development board's current directory to the PC's tftpd64 configured directory
tftp -p -r board_file 192.168.1.2
scp Copy
On Linux systems, with the PC connected to the network, the development board can connect to other network ports under the same gateway as the PC via a network cable. Use the scp command to transfer files.
Power on the development board, enter the small and large core COM interfaces, and execute the scp transfer command on the small core:
# Copy files from the PC to the development board
scp username@domain_or_IP:source_directory development_board_destination_directory
# Copy folders
scp -r username@domain_or_IP:source_directory development_board_destination_directory
# Copy files from the development board to the PC
scp development_board_source_directory username@domain_or_IP:PC_destination_directory
# Copy folders
scp -r development_board_source_directory username@domain_or_IP:PC_destination_directory
Files to be copied
File |
Description |
|---|---|
*.kmodel |
kmodel generated by the project |
deploy_config.json |
Deployment configuration file |
deployment_source.zip extracted, elfs/main_canmv.elf |
Compiled executable file |
test.jpg |
Static image for testing |
For the above object detection task, create a subfolder test_det under the sharefs directory, and copy:
kmodel file, main_canmv.elf, a test sample test.jpg, and deploy_config.json file to the test_det directory.
For pure RT-Smart single system image:
Only the offline copy method can be used. The root directory of the PC disk corresponds to the sdcard folder in the root directory of the big core. Please search for the copied file in the /sdcard directory through the big core serial port.
Files to be copied
File |
Description |
|---|---|
*.kmodel |
kmodel generated by the project |
deploy_config.json |
Deployment configuration file |
deployment_source.zip extracted, elfs/main_canmv.elf |
Compiled executable file |
test.jpg |
Static image for testing |
8.2.6 Running on the Board#
Static Image Inference
Connect to the large core serial port and execute the following commands:
# Linux+RT-Smart
cd /sharefs/test_det
# Only RT-Smart
cd /sdcard/test_det
# .elf <deploy_config.json> <input_path> <debug_mode>
# deploy_config.json: Deployment configuration file;
# input_path: Path to the inference image. For video stream inference, set to None;
# debug_mode: Debug mode, 0 for no debug, 1 for simple debug, 2 for detailed debug;
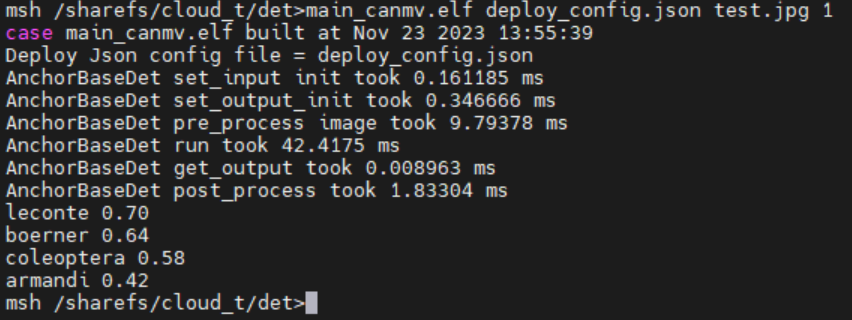
./main_canmv.elf deploy_config.json test.jpg 0
Static image inference result:
Video Stream Inference
Connect to the large core serial port and execute the following commands:
# Linux+RT-Smart
cd /sharefs/test_det
# Only RT-Smart
cd /sdcard/test_det
# .elf <deploy_config.json> <input_path> <debug_mode>
# deploy_config.json: Deployment configuration file;
# input_path: Path to the inference image, set to None for video stream inference;
# debug_mode: Debug mode, 0 for no debug, 1 for simple debug, 2 for detailed debug;
./main_canmv.elf deploy_config.json None 0
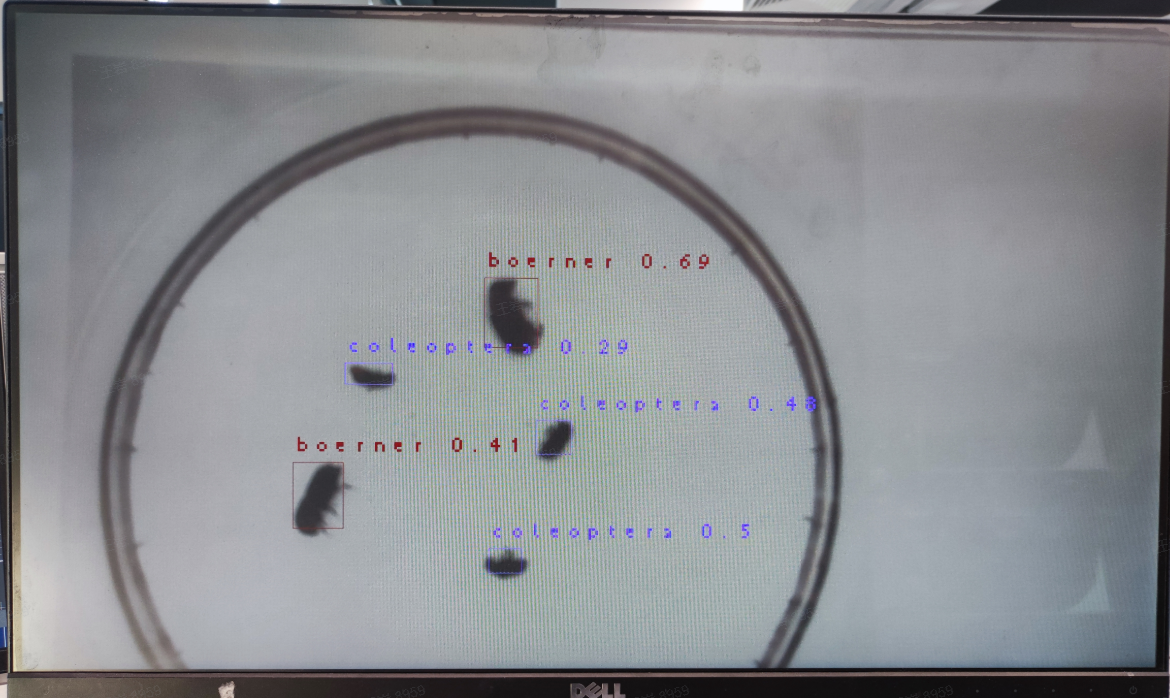
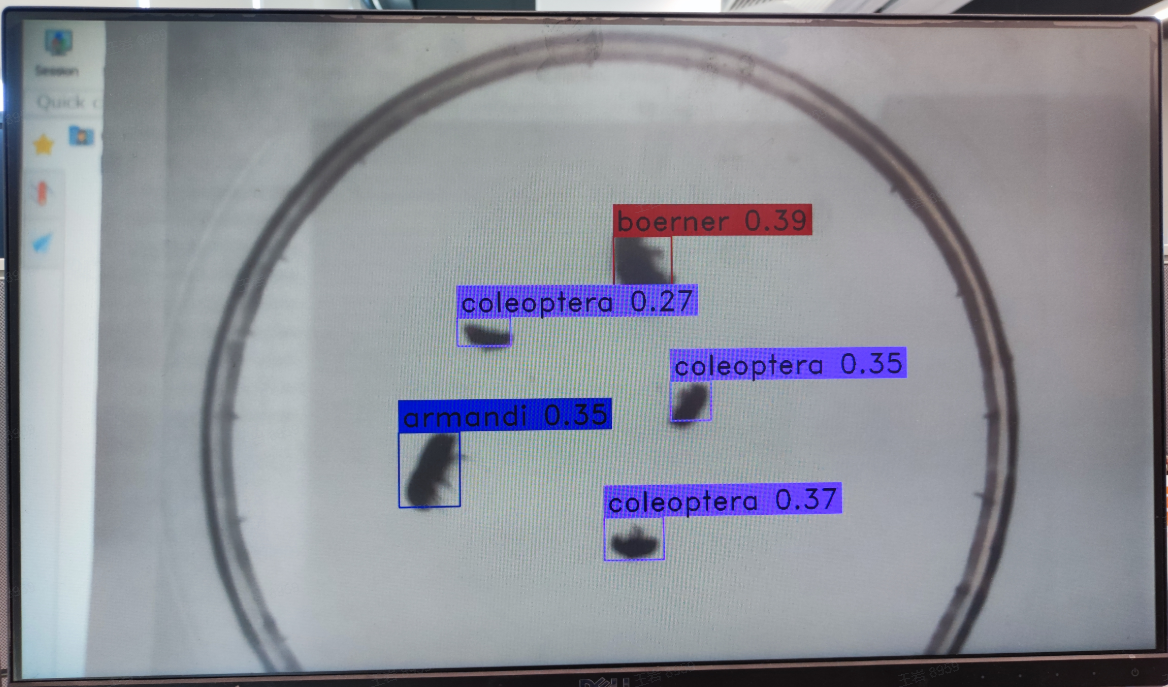
Video stream inference result:
8.2.7 Running with MicroPython#
8.2.7.1 Image Burning#
Burn the MicroPython image. Go to the Canaan Developer Community (canaan-creative.com) resource download page, click on the left side K230/Images, and select CanMV-K230_micropython_v##_sdk_v##__nncase_v###.img.gz to download. Select the version based on the “nncase_version” field in the deploy_config.json file. Use the method described in section 8.2.5.1 to burn the image.
Note:
For the relationship between k230_canmv and k230_sdk, nncase versions, please refer to the link:
CanMV-K230_SDK_nncase Version Compatibility — K230 CanMV Documentation (canaan-creative.com)
8.2.7.2 File Copy#
Use a card reader for offline copying. Copy the kmodel file, deploy_config.json, and test image file to a directory on the SD card and note this directory.
8.2.7.3 Install IDE#
Install CanMV IDE. Go to the Canaan Developer Community (canaan-creative.com) resource download page, click on the left side Tools, and download the appropriate version of CanMV IDE for your system.
8.2.7.4 Power On and Start#
Connect the development board as shown below and power it on:
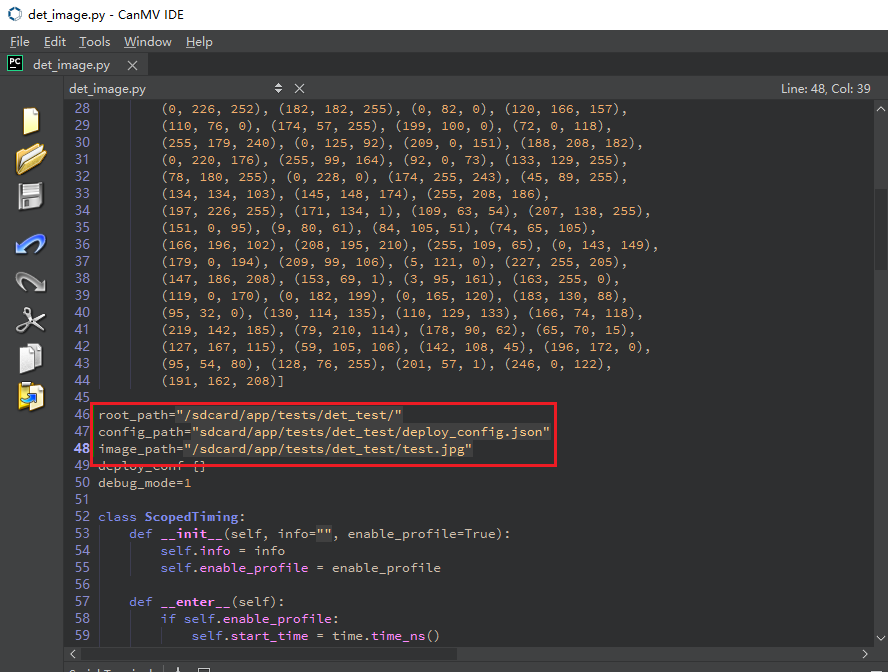
Start CanMV IDE, open the file, select the cls_image.py file from the extracted mp_deployment_source.zip, and modify the file path in the red box below to your copied file path for single image inference:
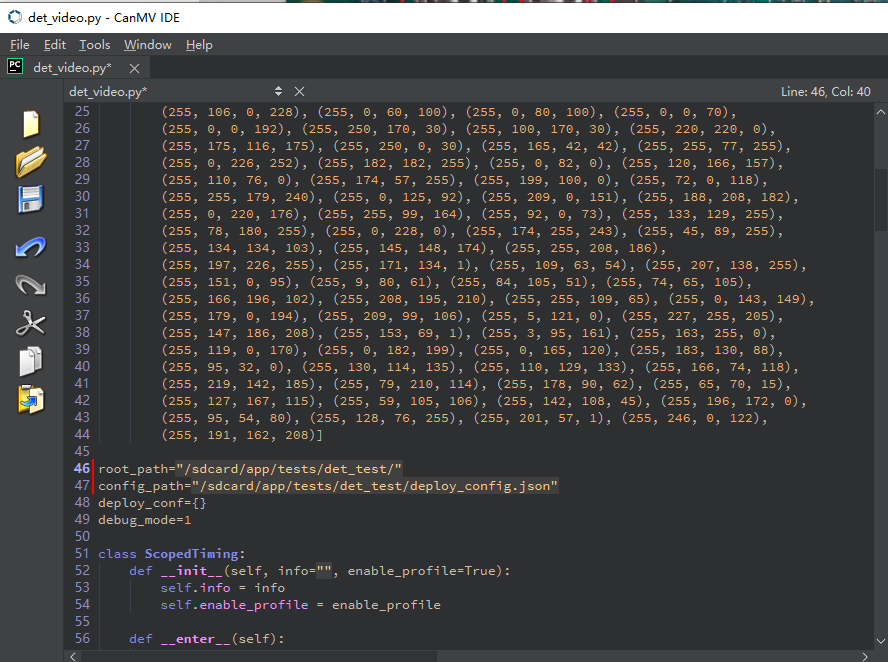
Or open the cls_video.py file, modify the file path to your copied directory for video inference:
When the connection status at the bottom left changes to the state shown below:
Click the button to connect to the serial port. Select the third serial port besides the large and small core serial ports:
After connecting, click the green triangle button to run.
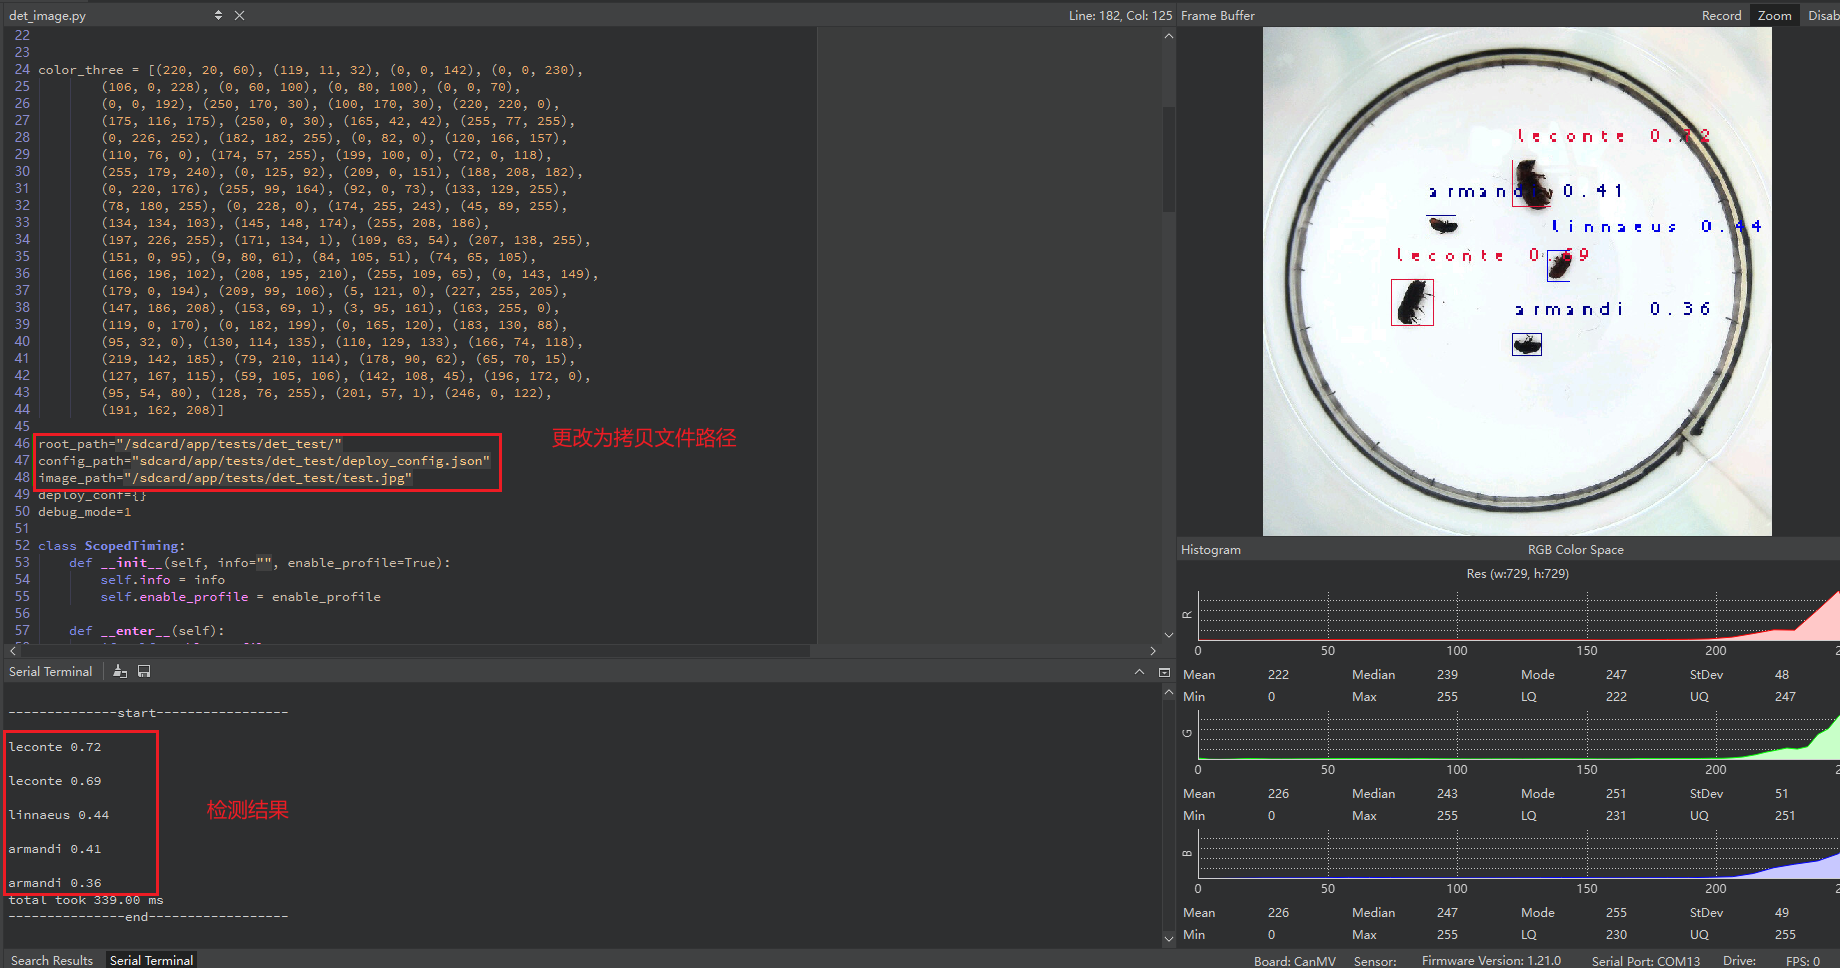
The single image inference result is shown below:
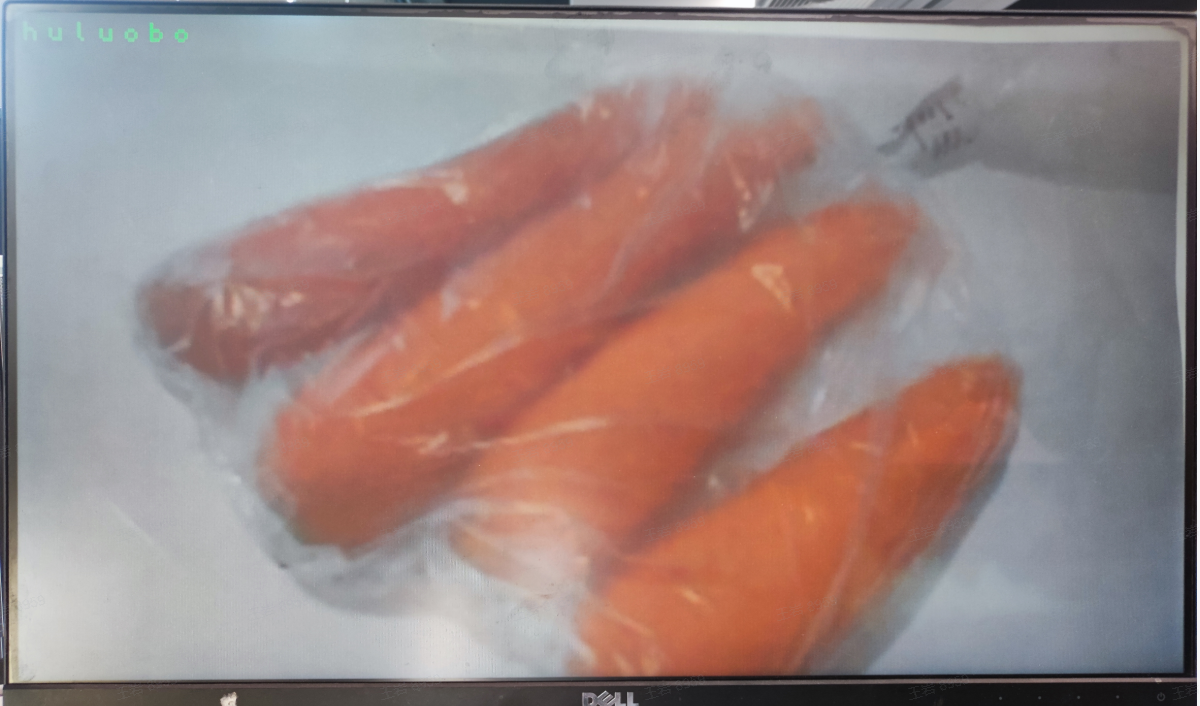
The video inference result is shown below: