6. In-Depth Analysis of AI Development Process#
Chapter video tutorial: Kanji K230 Development Board Tutorial - In-Depth Analysis of AI Development Process_Bilibili
This chapter supports Linux+RT-Smart dual system and pure RT-Smart single system. For the system image compilation process, refer to [Compile K230_SDK](./Development Basics.md#make_image).
6.1 Overview#
1. General AI Development Process#
The AI development process can be divided into two main aspects: training iteration and deployment:
Training iteration involves selecting a specific dataset, model structure, loss function, and evaluation metrics. Through continuous optimization of model parameters, the goal is to achieve results that are as close as possible to or surpass the state-of-the-art (SOTA) techniques in the field.
Deployment refers to the process of running the trained model in a specific environment for inference, focusing more on deployment scenarios, methods, throughput, and latency.
AI models are typically trained using deep learning frameworks such as PyTorch, TensorFlow, and PaddlePaddle. However, there are two issues with directly using these trained models for inference: relying on these training frameworks for inference is complex; different hardware may have different underlying optimizations for operators, resulting in inefficient performance when the same model runs on different hardware, especially in online scenarios with strict latency requirements. After years of exploration by the industry and academia, a mainstream pipeline for AI development has emerged.
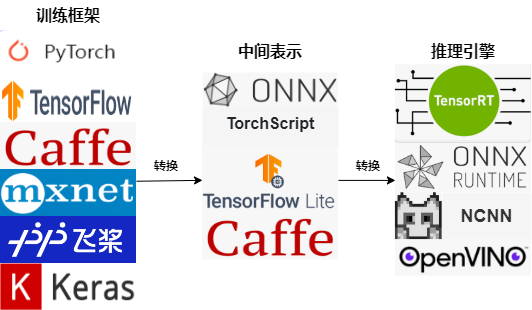
This pipeline addresses two major issues in model deployment: using an intermediate representation that interfaces with deep learning frameworks and inference engines, developers no longer need to worry about running various complex frameworks in new environments; through network structure optimization in the intermediate representation and underlying optimization of operations by the inference engine, the computational efficiency of the model is greatly improved.
2. AI Development Process Based on K230#
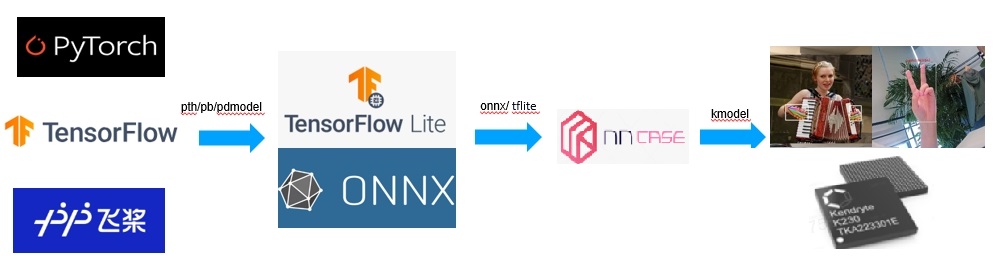
The AI development process based on K230 is similar to the mainstream AI development process, which also involves training followed by deployment. During training, developers can use common deep learning frameworks such as PyTorch, TensorFlow, and PaddlePaddle to define the network structure and determine the parameters through training. Subsequently, the structure and parameters of the model are converted into an intermediate representation that only describes the network structure, such as onnx or tflite. Some optimizations targeting the network structure are performed on this intermediate representation. Finally, the intermediate representation is converted into a specific file format (kmodel), and the model is efficiently run on the K230 hardware platform using the K230 inference engine (K230Runtime).
Since most of you are already familiar with the training process, this article focuses on the deployment process. We will choose open-source repositories for face detection and face recognition (the meanings of these will be explained later). Both repositories provide pre-trained models based on PyTorch. Therefore, this article will use the PyTorch model as an example to describe the deployment process of AI models on K230.
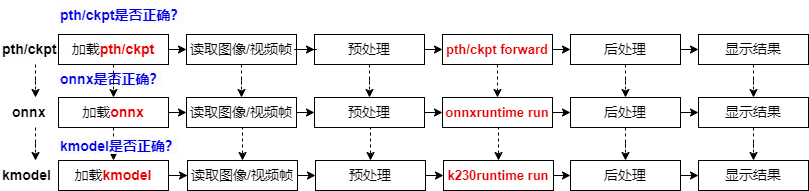
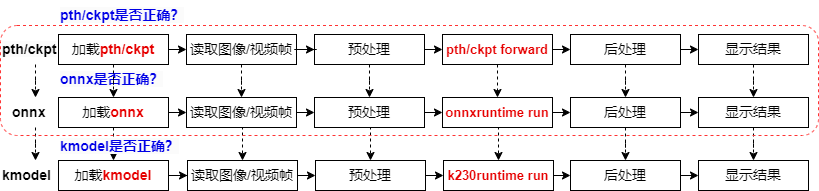
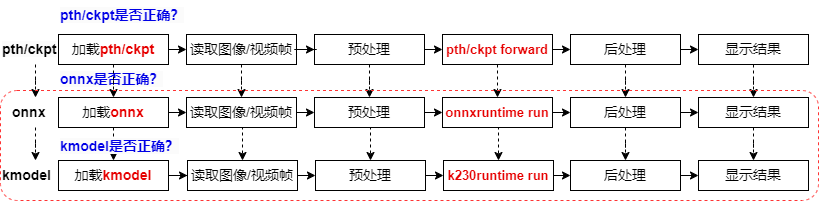
For a PyTorch model, from training to deployment on K230, it goes through three file formats: pth/ckpt -> onnx -> kmodel. After converting to a new file format, we need to verify the correctness of the converted model to ensure successful deployment.
We will use a pth inference script to verify the correctness of the pre-trained PyTorch model.
After verifying pth/ckpt, we convert it to onnx.
After converting to onnx, we verify the correctness of the onnx model using ONNXRuntime. The verification process is similar to PyTorch inference, including loading the onnx model, reading images/video streams, preprocessing images/video frames, running onnx, post-processing, and displaying results.
After verifying the onnx model, we convert it to kmodel.
At this point, we use K230Runtime to verify the correctness of the kmodel. The verification process is similar to ONNXRuntime inference, including loading the kmodel, reading images/video streams, preprocessing images/video frames, running kmodel, post-processing, and displaying results.
Once the kmodel inference process is correct, our AI model can be successfully deployed.
The PyTorch model goes through three stages from training to deployment on K230: pth/ckpt verification (usually already verified), onnx verification (using ONNXRuntime), and finally kmodel verification (using K230Runtime). Each stage requires ensuring the correctness of the model to guarantee successful deployment. The verification process includes loading the model, processing input data, running inference, processing output results, and ultimately ensuring the successful deployment of the AI model on K230.
6.2 Environment Setup#
6.2.1 Quick Start#
Taking the Windows environment as an example, we will explain how to quickly get started.
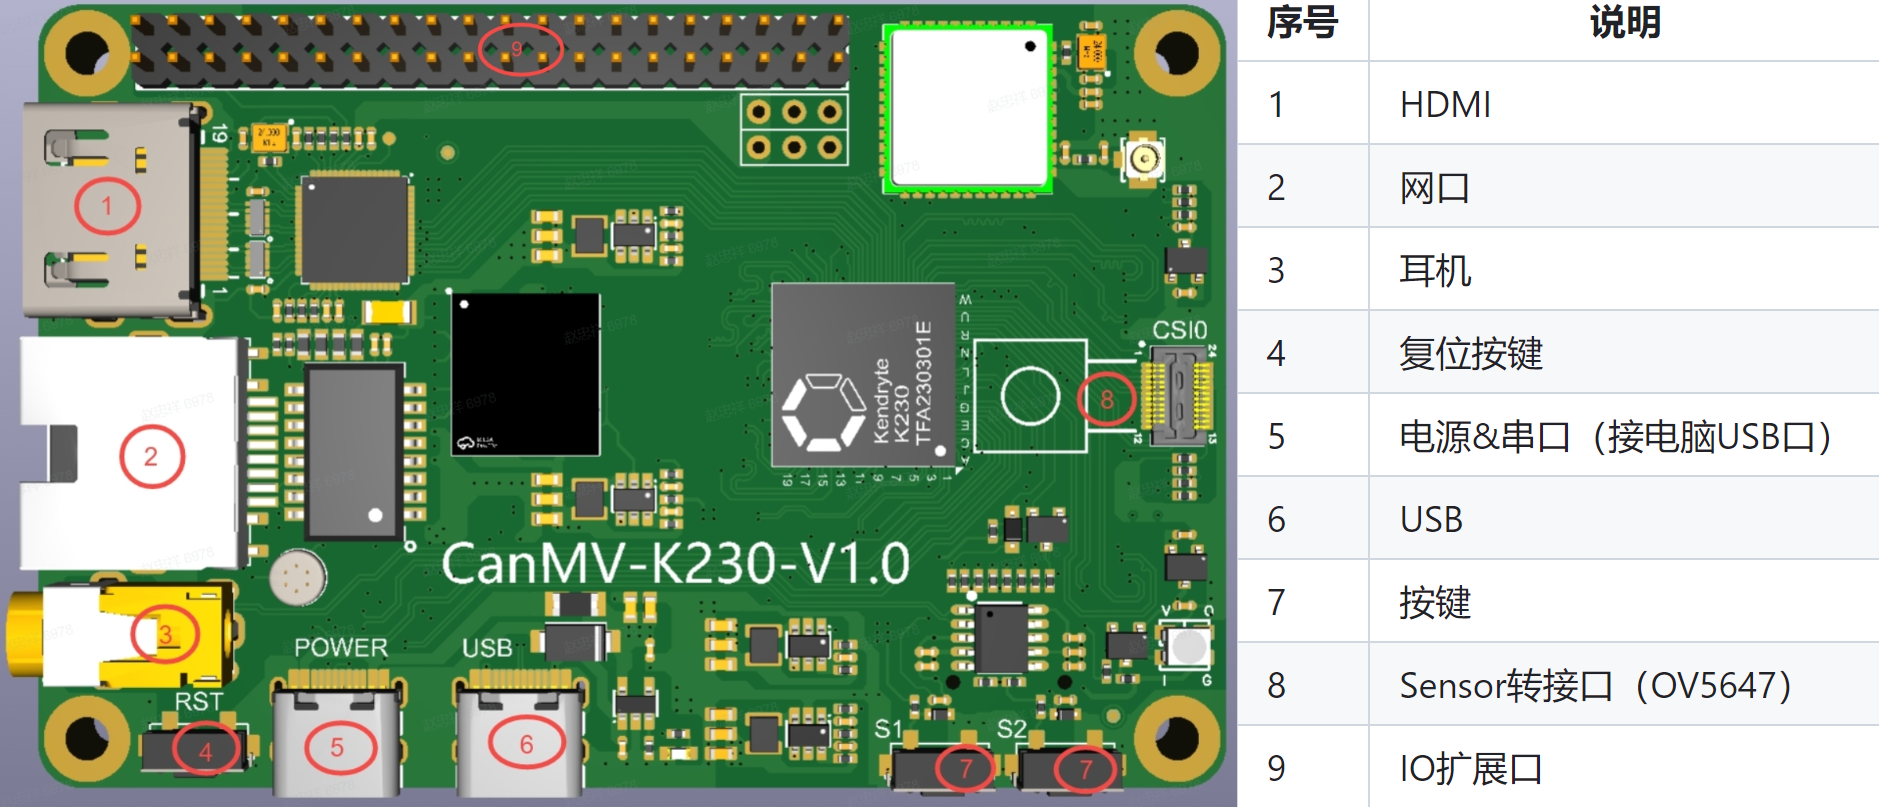
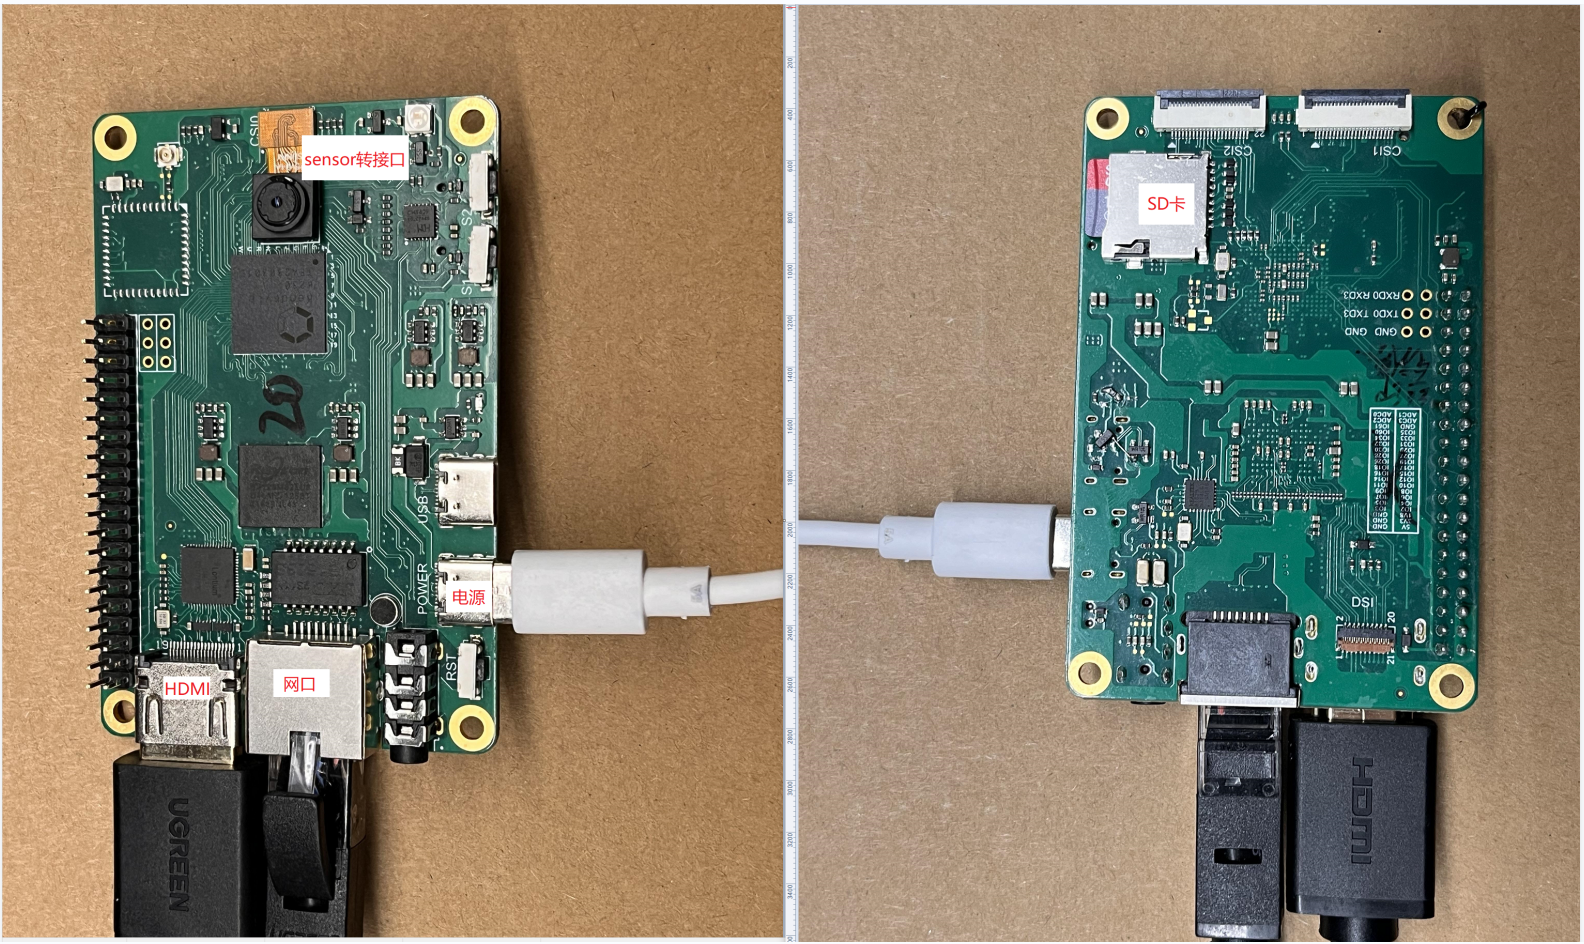
6.2.1.1 CanMV-K230 Interface Description#
Note: The CanMV-K230 mainboard shares a Type-C port for both power and serial communication (with the computer), as shown in position ⑤ in the image below:
6.2.1.2 CanMV-K230 Connection Example#
Prepare the following hardware and connect them as shown in the image:
CanMV-K230
At least one Type-C USB cable
An Ethernet cable (optional)
An HDMI cable
An SD card (if the PC does not have an SD card slot, an SD card reader is needed)
A monitor that supports HDMI
After connecting as shown above, you need to flash an image onto the SD card. The next section will explain how to flash the image.
6.2.1.3 Flashing the Image#
Linux:
Before inserting the TF card into the host machine, input:
ls -l /dev/sd\*
to check the current storage devices.
After inserting the TF card into the host machine, input again:
ls -l /dev/sd\*
to check the storage devices at this time. The newly added device is the TF card device node.
Assuming /dev/sdc is the TF card device node, execute the following command to flash the TF card:
sudo dd if=sysimage-sdcard.img of=/dev/sdc bs=1M oflag=sync
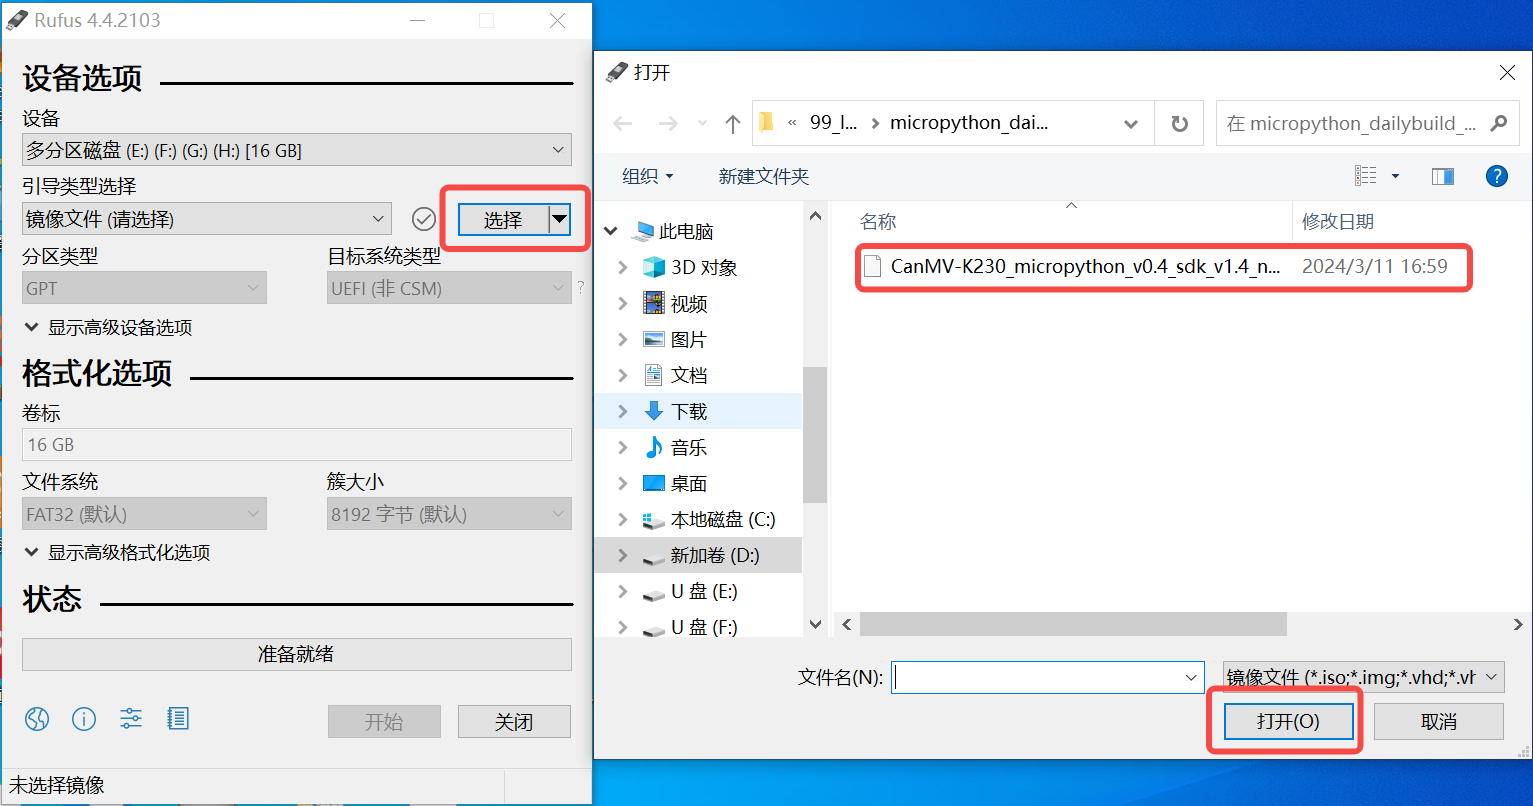
Windows:
On Windows, you can use the rufus tool to flash the TF card. Download rufus tool.
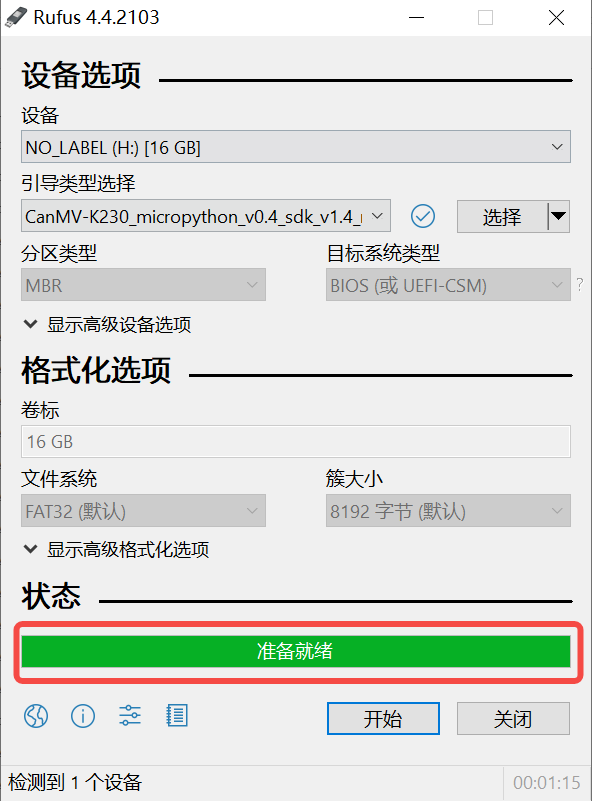
Insert the TF card into the PC, then start the rufus tool and click the “Select” button on the tool interface to choose the firmware to be flashed.
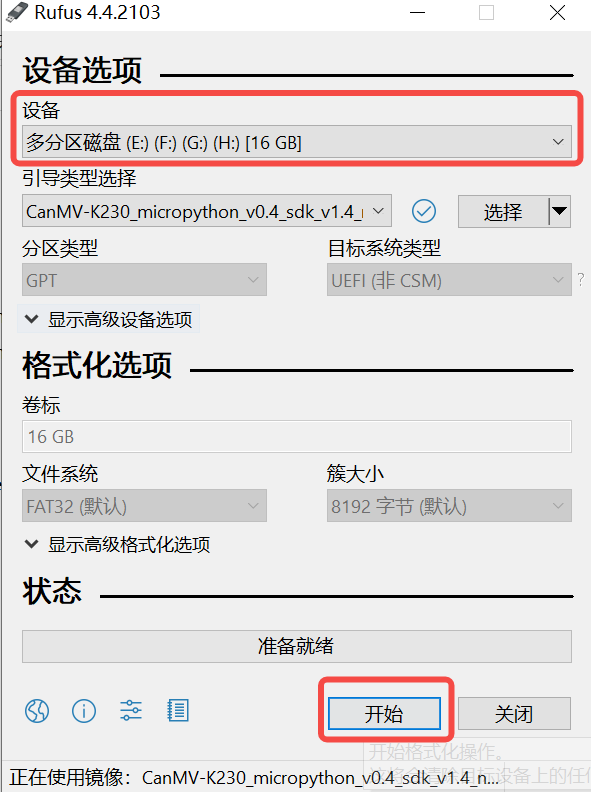
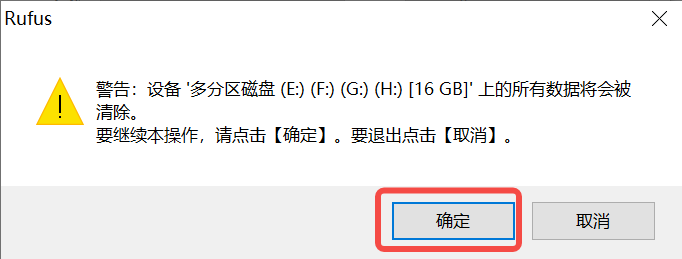
Click the “Start” button to begin flashing. The flashing process will display a progress bar, and upon completion, a “Ready” prompt will appear.
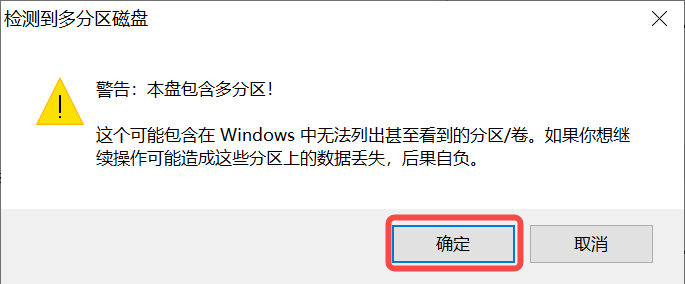
Note 1: It is recommended to decompress the
sysimage-sdcard.img.gzfile before flashing.
6.2.1.4 Serial Port Driver Installation and Power-On Verification#
The K230 mainboard provides two debug serial ports via USB. To use the debug serial ports on Windows, you need to install the USB-to-serial driver. Download the driver.
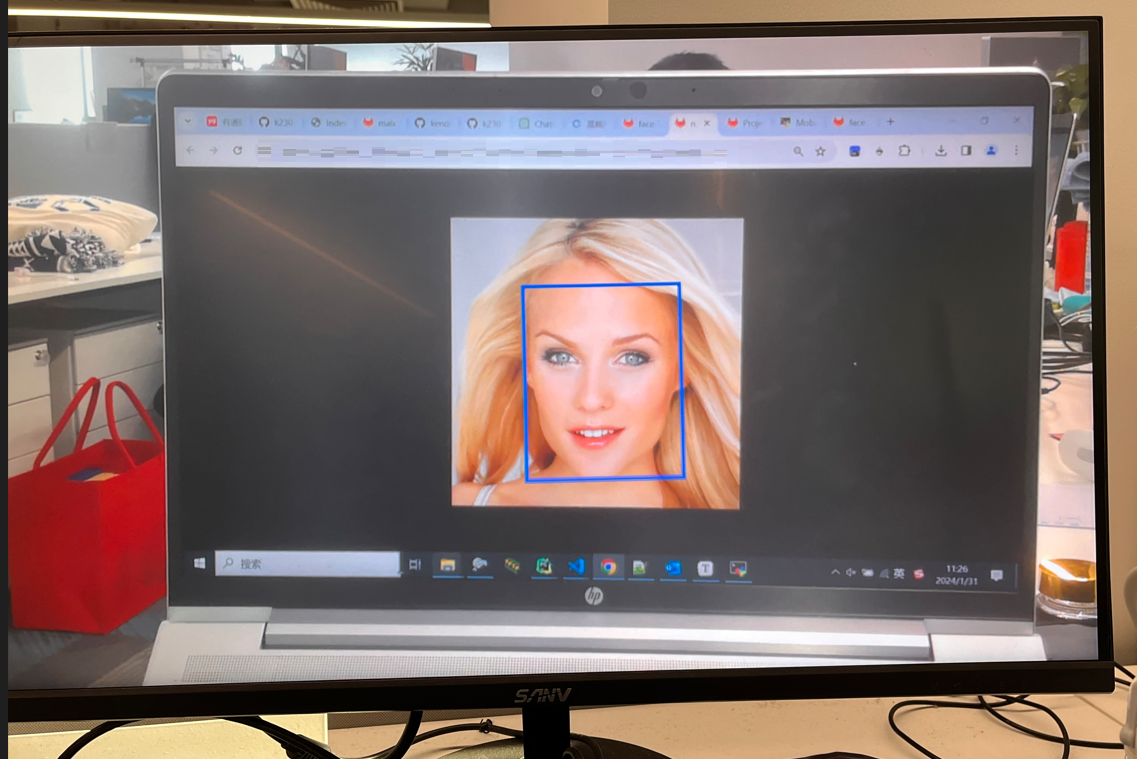
After installing the driver, how do you verify if the driver is installed successfully? First, connect the CanMV-K230 development board as shown in section 6.2.1.2, then connect the Type-C power cable to the PC’s USB port. You should see two USB serial devices, as shown below:

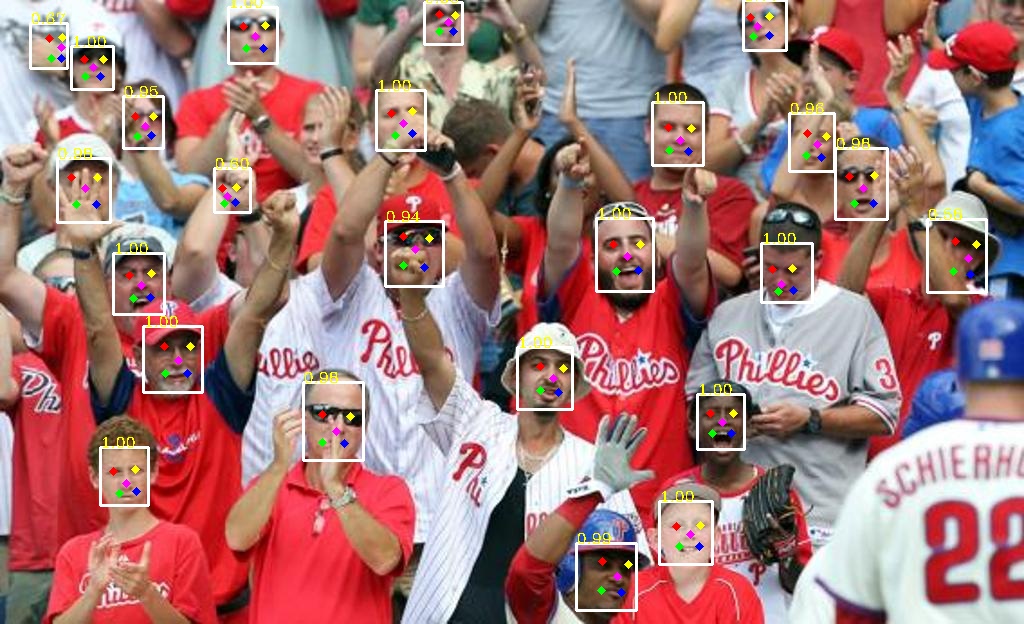
At the same time, the monitor connected via HDMI will display the face detection results.
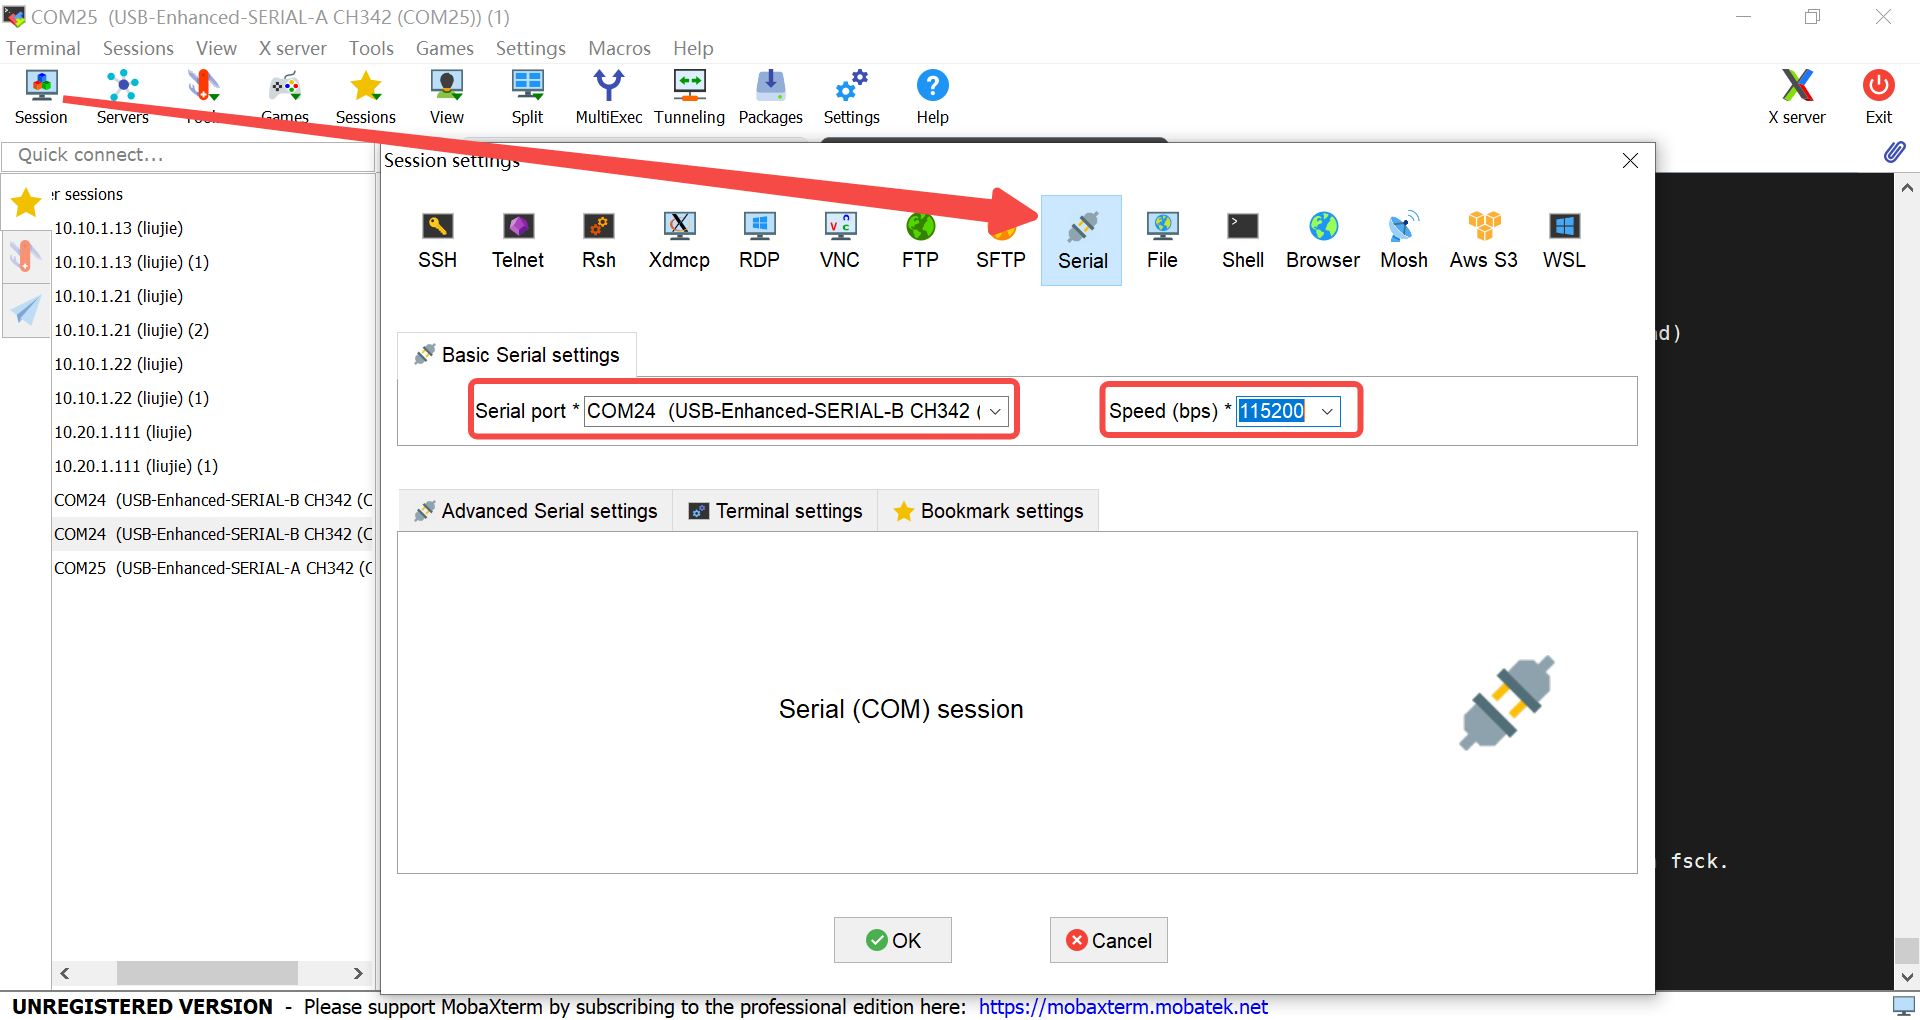
6.2.1.5 Serial Port Debugging#
After installing the driver, download a serial port debugging tool. Install it and create a serial port session.
Connecting to the Small Core: For the AI Demo, the small core mainly handles network-related tasks.

Log in as root to enter the small core.
Connecting to the Big Core: The big core mainly handles AI-related tasks.
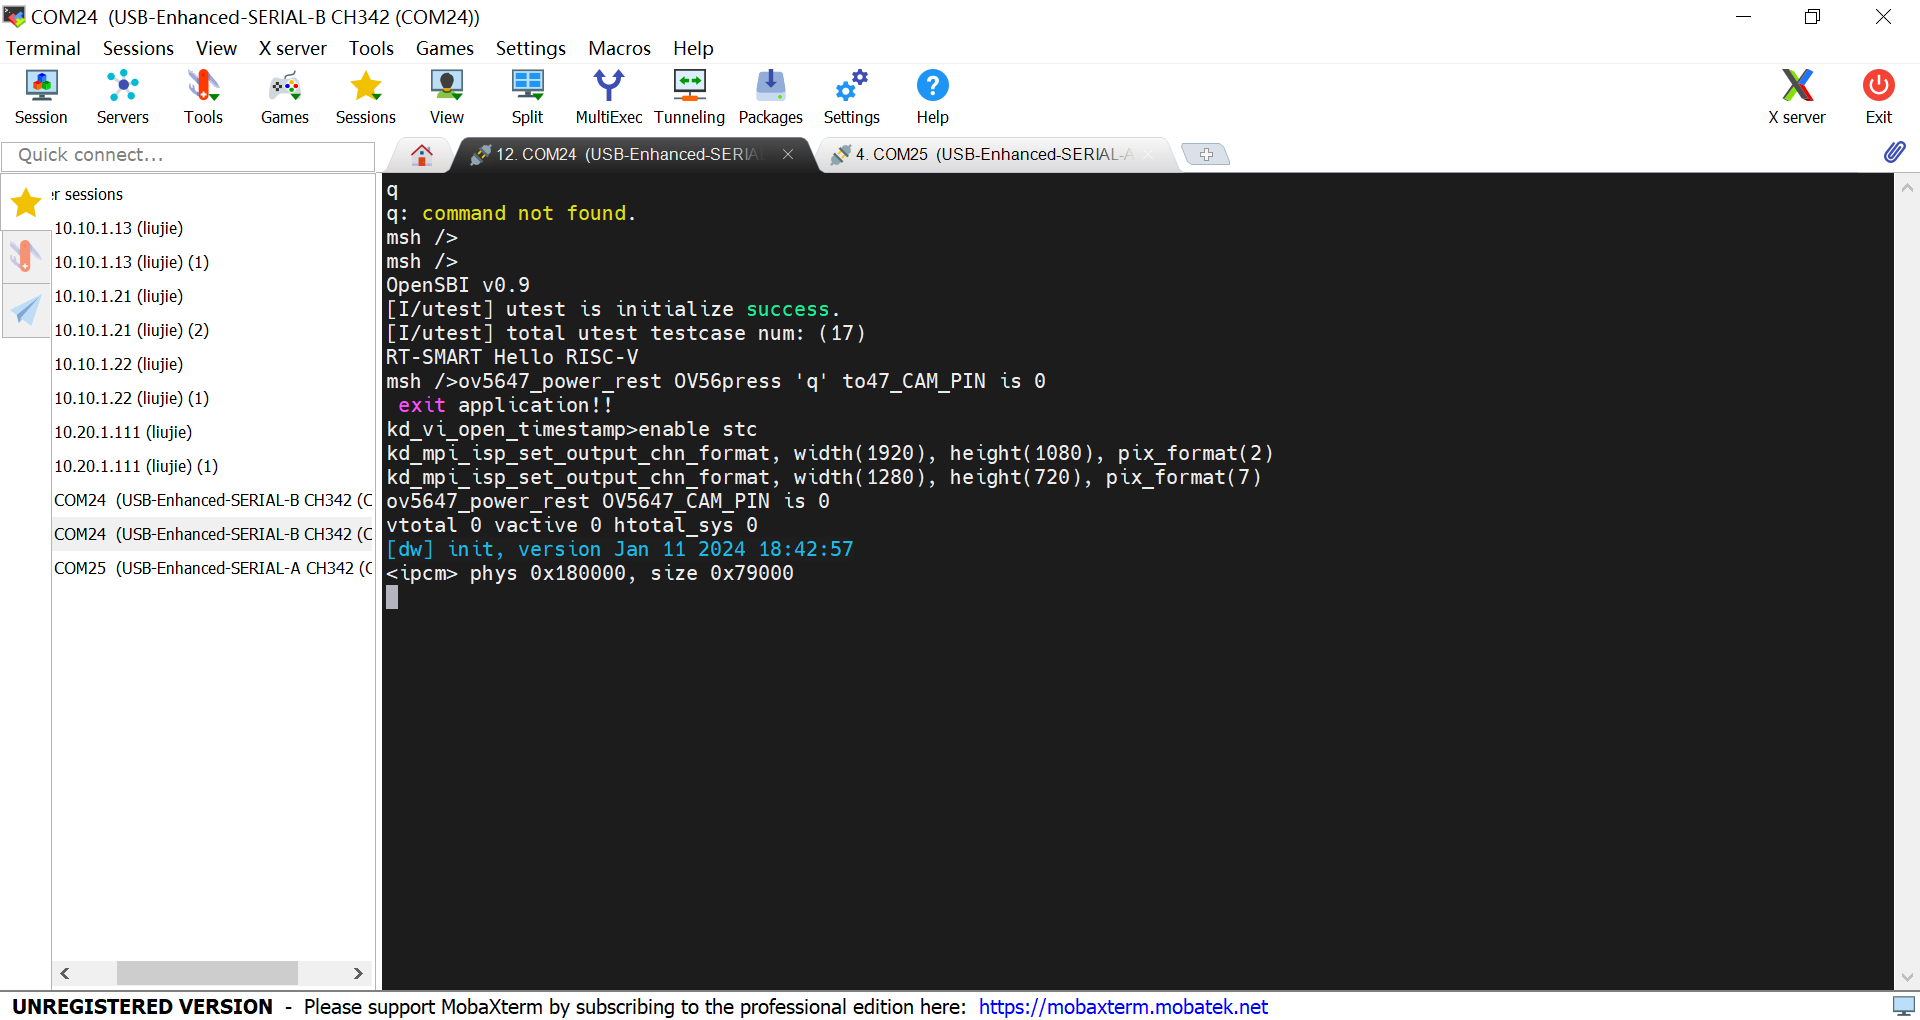
Press ‘q’ and Enter to exit the current face detection demo.
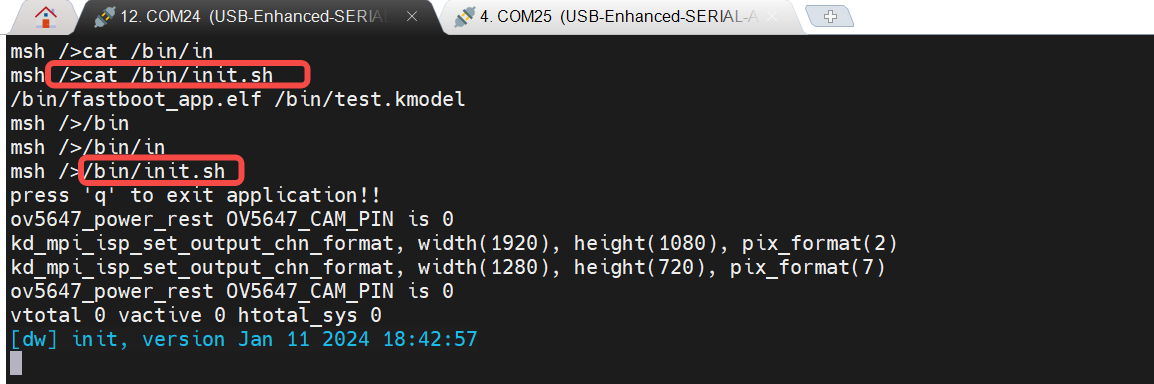
How to restart the face detection demo?
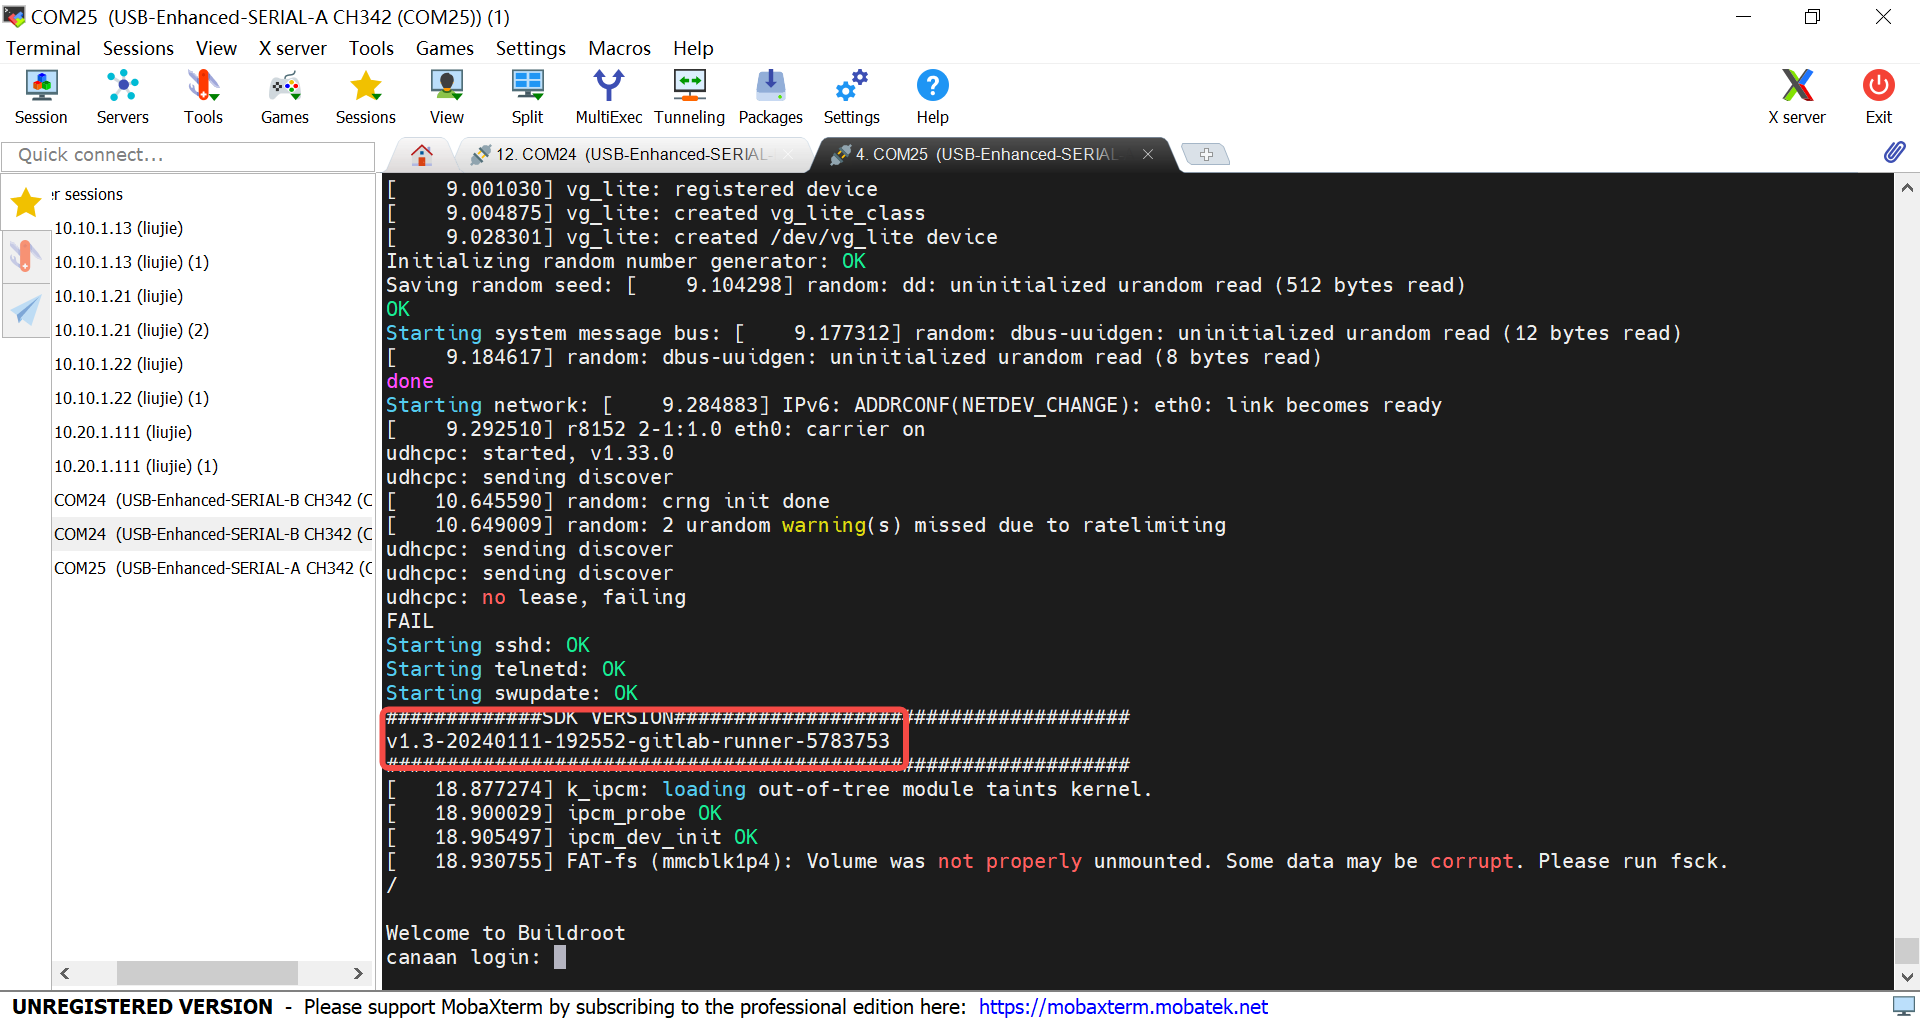
6.2.2 Setting Up the Compilation Environment#
Setting up the compilation environment involves sdk and nncase. There is a certain correspondence between the sdk and nncase versions. Today, we will use sdk v1.3.0 and nncase v2.7.0 as examples for explanation. For the correspondence between k230 sdk and nncase versions, please refer to the following link:
K230 SDK nncase Version Correspondence — K230 Documentation (canaan-creative.com)
6.2.2.1 Building the Docker Container#
Refer to: K230_SDK_Usage_Instructions.md
# Taking sdk v1.3 as an example, set up the software environment
git clone -b v1.3 https://github.com/kendryte/k230_sdk
cd k230_sdk
make prepare_sourcecode
# Manually build a docker image named v1.3_0219
docker build -f tools/docker/Dockerfile -t v1.3_0219 tools/docker
# Create a docker container named v1.3_0219_lj
docker run -u root --name v1.3_0219_lj -it -v $(pwd):$(pwd) -v $(pwd)/toolchain:/opt/toolchain -w $(pwd) v1.3_0219 /bin/bash
Note:
(1) make prepare_sourcecode will automatically download the Linux and RT-Smart toolchain, buildroot packages, AI packages, etc. Ensure that this command executes successfully without any errors. The download time and speed depend on the actual network speed.
Taking the CanMV-K230 development board as an example, manually build the image (or directly use the official v1.3 CanMV-K230 image):
make CONF=k230_canmv_defconfig # Generate the image sysimage-sdcard.img.gz
# ls k230_sdk/output/k230_canmv_defconfig/images/
drwxr-xr-x 4 root root       169 Feb 21 14:57 ./
drwxr-xr-x 6 root root        79 Feb 20 11:53 ../
drwxr-xr-x 5 root root       138 Feb 21 14:57 big-core/
lrwxrwxrwx 1 root root        22 Feb 21 14:57 k230_canmv_sdcard_v1.3_nncase_v2.7.0.img.gz -> sysimage-sdcard.img.gz
drwxr-xr-x 7 root root      4096 Feb 21 14:57 little-core/
-rw-rw-rw- 1 root root 486556160 Feb 21 14:57 sysimage-sdcard.img
-rw-rw-rw- 1 root root  56831464 Feb 21 14:57 sysimage-sdcard.img.gz
6.2.2.2 Installing nncase#
nncase is a neural network compiler designed for AI accelerators, currently supporting AI devices (targets) such as K230, K210, and K510. nncase mainly consists of four parts:
Model Compilation APIs (Python): Used to compile neural network models (onnx, tflite, etc.) on a PC into kmodel, i.e., generating kmodel.
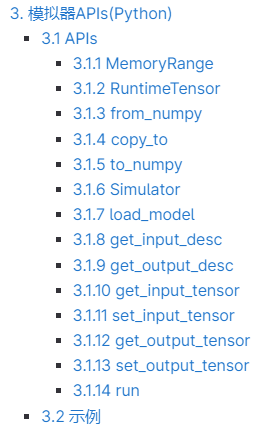
Simulator APIs (Python): Used to simulate inference of kmodel on a PC to verify that the nncase simulation inference results are consistent with the original model (onnx, tflite), i.e., Simulator verification.
KPU Runtime APIs (C++): Used to load kmodel on AI devices, perform inference using KPU Runtime, obtain output data, etc., i.e., On-board inference verification.
AI2D Runtime APIs (C++): Used to configure AI2D parameters on AI devices, generate related register configurations, and perform AI2D calculations. Common AI2D calculations include Affine, Crop, Resize, Padding, etc., which can accelerate image preprocessing operations, i.e., On-board preprocessing.
# Taking sdk v1.3 as an example
# nncase release version: https://github.com/kendryte/nncase/releases
# In the docker container, check the sdk corresponding nncase version
cat src/big/nncase/riscv64/nncase/include/nncase/version.h
# Install the corresponding version of nncase
pip install -i https://pypi.org/simple nncase==2.7.0
pip install nncase-kpu==2.7.0
6.3 Analysis of Demo Construction Process#
In the previous chapter, we demonstrated the face detection demo. So how do you develop your own AI Demo based on K230? Next, we will take the face detection and face recognition demos as examples to describe the AI development process based on K230 in detail.
Since the demos I found are trained based on PyTorch, the overall process will be unfolded using PyTorch as an example. For PyTorch, the AI development process based on K230 consists of two parts: training and deployment. Training includes training the model with PyTorch, while deployment includes converting PyTorch to ONNX, performing inference using ONNXRuntime, converting ONNX to kmodel, and performing inference using K230Runtime.
Training the model with PyTorch:
Use the PyTorch framework to define and train the face detection and face recognition models. After training, save the model parameters to a .pth file.
Converting PyTorch to ONNX:
Use PyTorch tools to convert the trained model to ONNX format. This step involves some optimizations targeting the network structure.
Inference using ONNXRuntime:
Load the ONNX model on a PC and perform inference using ONNXRuntime to verify the correctness and performance of the ONNX model. The main process of ONNXRuntime inference includes preprocessing, running, and post-processing.
Converting ONNX to kmodel:
Use the conversion tool supported by K230 to convert the ONNX model to the kmodel format usable by K230. This step optimizes the model to adapt to K230, generating a model that can run efficiently on K230.
Inference using K230Runtime:
Load the kmodel on K230 and perform inference using K230Runtime. This ensures the model’s performance on K230. The main process of K230Runtime inference includes preprocessing, running, and post-processing.
The entire process involves converting a PyTorch model through the ONNX intermediate format and finally optimizing it into the kmodel format suitable for K230, achieving seamless deployment from the PC to K230. From pth/ckpt -> onnx -> kmodel, the model files have 3 different formats, each corresponding to a specific inference process. Therefore, after conversion, we need to verify the accuracy of the converted model under the corresponding inference process.
The complete code for demo construction has been published on GitHub, and interested parties can download it.
# Runtime environment: General PC environment
├── onnx_related
    ├── onnx_export            # Export onnx
    │   ├── face_detection_convert_to_onnx.py       # Corresponds to 3.1.1
    │   ├── face_recognition_convert_to_onnx.py
    │   └── readme.txt
    └── onnx_inference         # ONNX inference process
        ├── face_detection     # Face detection ONNX inference process   # Corresponds to 3.1.2
        └── face_recognition   # Face recognition ONNX inference process
# Compilation environment: K230 Docker compilation environment, Runtime environment: K230 development board
├── kmodel_related
│   ├── kmodel_export         # Export kmodel
│   │   ├── build_model.sh    # Script to generate kmodel
│   │   ├── face_detection    # Corresponds to 3.1.3+3.1.4.1 (Both are written in Python, for simplicity, they are put together here, but logically, it would be better to put them in 3.1.4)
│   │   ├── face_recognition
│   │   ├── k230_kmodel       # Generate kmodel
│   │   └── k230_utils        # Generate other auxiliary files, such as bin, images, etc.
│   └── kmodel_inference      # kmodel inference
│       ├── build_app.sh      # Script to generate executable files
│       ├── cmake
│       ├── CMakeLists.txt
│       ├── face_detection    # Face detection kmodel inference process, corresponds to 3.1.4.2+3.1.4.3 (Both are written in C++)
│       ├── face_recognition  # Face recognition kmodel inference process
│       ├── k230_bin          # Generated executable files, kmodel, on-board execution scripts, etc.
│       ├── main_nncase       # kmodel on-board verification tool
│       ├── shell
│       └── test_demo
6.3.1 Face Detection Demo#
Face detection refers to the process of searching a given image to determine whether it contains a face, and if so, returning the face detection box and key facial points. Reference link: biubug6/Pytorch_Retinaface
6.3.1.1 PyTorch to ONNX Conversion#
When choosing a face detection model, it is generally advisable to choose a lightweight model, with a backbone smaller than resnet50 in terms of parameters. Therefore, we choose RetinaFace based on MobileNetV1 as the face detection model.
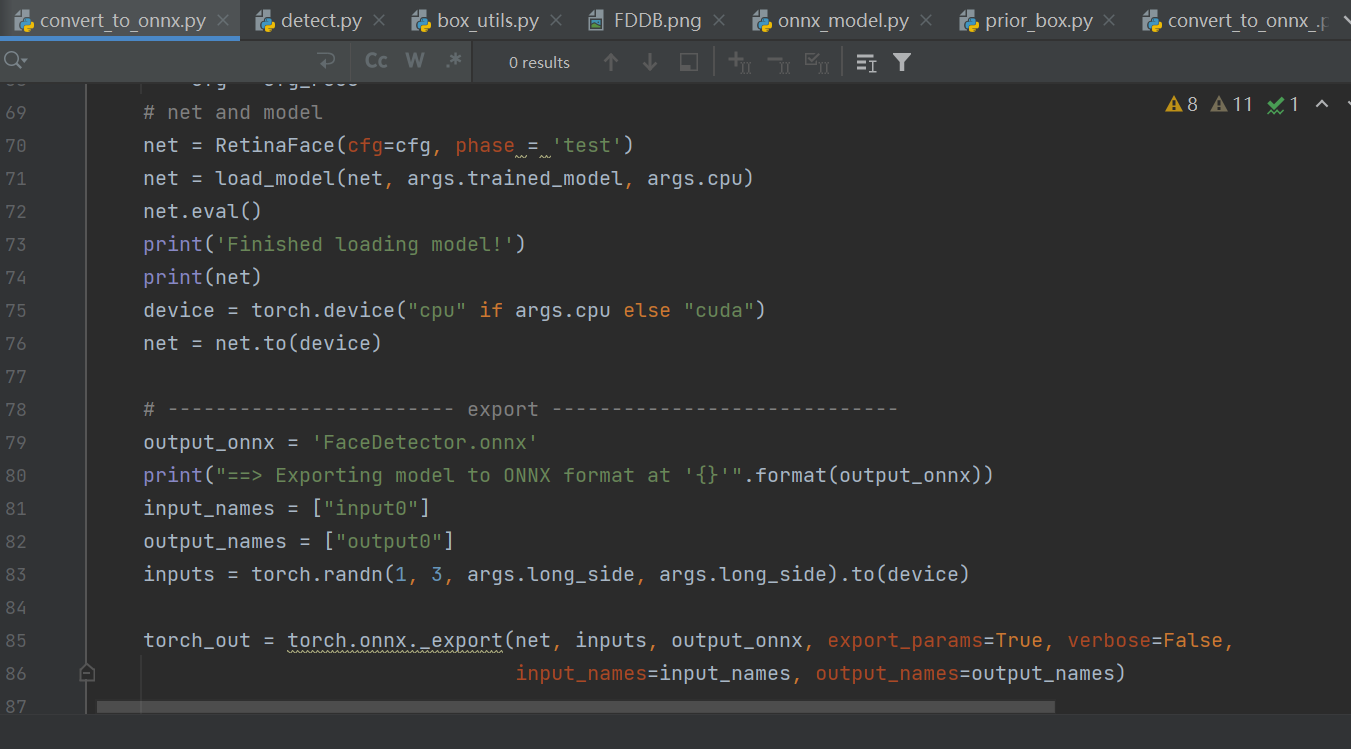
Load the pth or ckpt model to the CPU
Construct random model input
Export the ONNX model
Note: Both pth and onnx support dynamic input, but K230 models currently do not support dynamic input. Therefore, when exporting ONNX, the ONNX input shape is fixed.
Steps to execute:
Clone the code to your PC, install the dependencies, and run the script to convert to ONNX.
git clone https://github.com/JayL323/K230_AI_Demo_Development_Process_Analysis/
cd K230_AI_Demo_Development_Process_Analysis
cd onnx_related/onnx_export
git clone https://github.com/biubug6/Pytorch_Retinaface
cp face_detection_convert_to_onnx.py Pytorch_Retinaface/
cd Pytorch_Retinaface
# Download the pre-trained model according to the Pytorch_Retinaface documentation
python face_detection_convert_to_onnx.py
6.3.1.2 Inference Using ONNXRuntime#
To verify the correctness of the ONNX model, we need to perform inference using ONNXRuntime, ensuring that the processes of reading images, preprocessing, running, post-processing, and displaying results are consistent with the pth/ckpt inference process.
6.3.1.2.1 Reading Images#
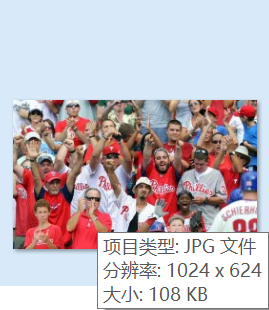
# ori_img (1024, 624, 3), OpenCV reads images in hwc, bgr format by default
ori_img = cv2.imread('bin/test.jpg')
6.3.1.2.2 Image Preprocessing#
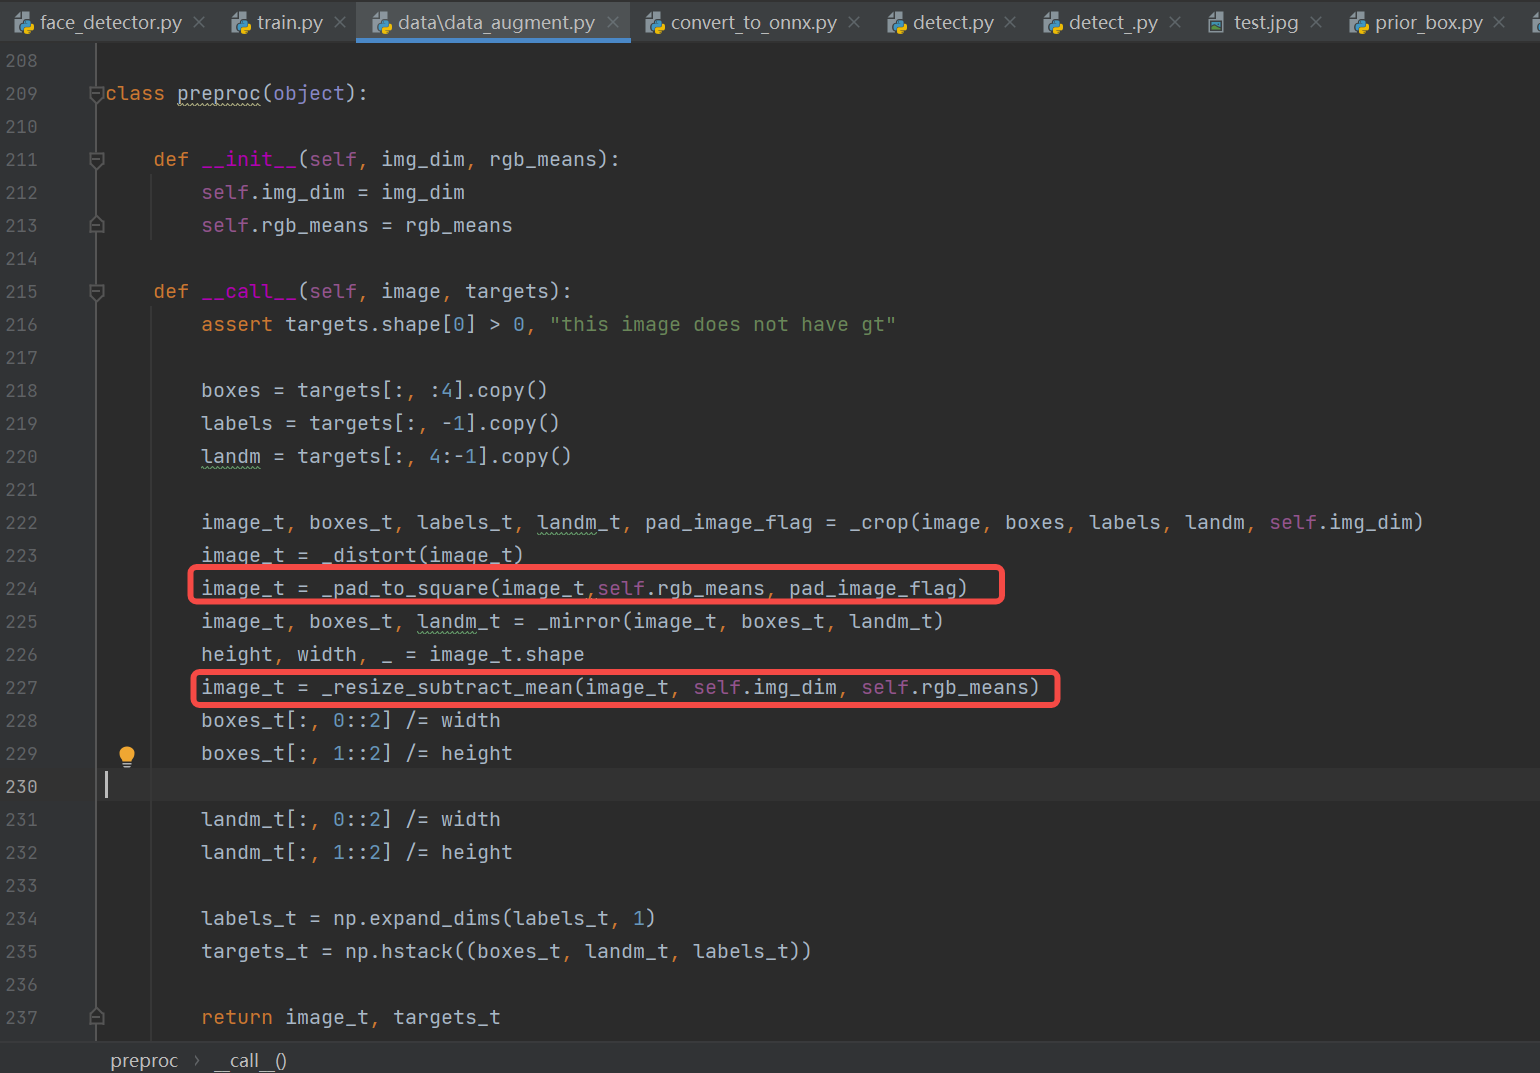
Construct preprocessing (common methods: padding_resize, crop_resize, resize, affine, normalization): refer to train.py, test.py, predict.py, and existing ONNX inference scripts.
Constructing face detection preprocessing code:
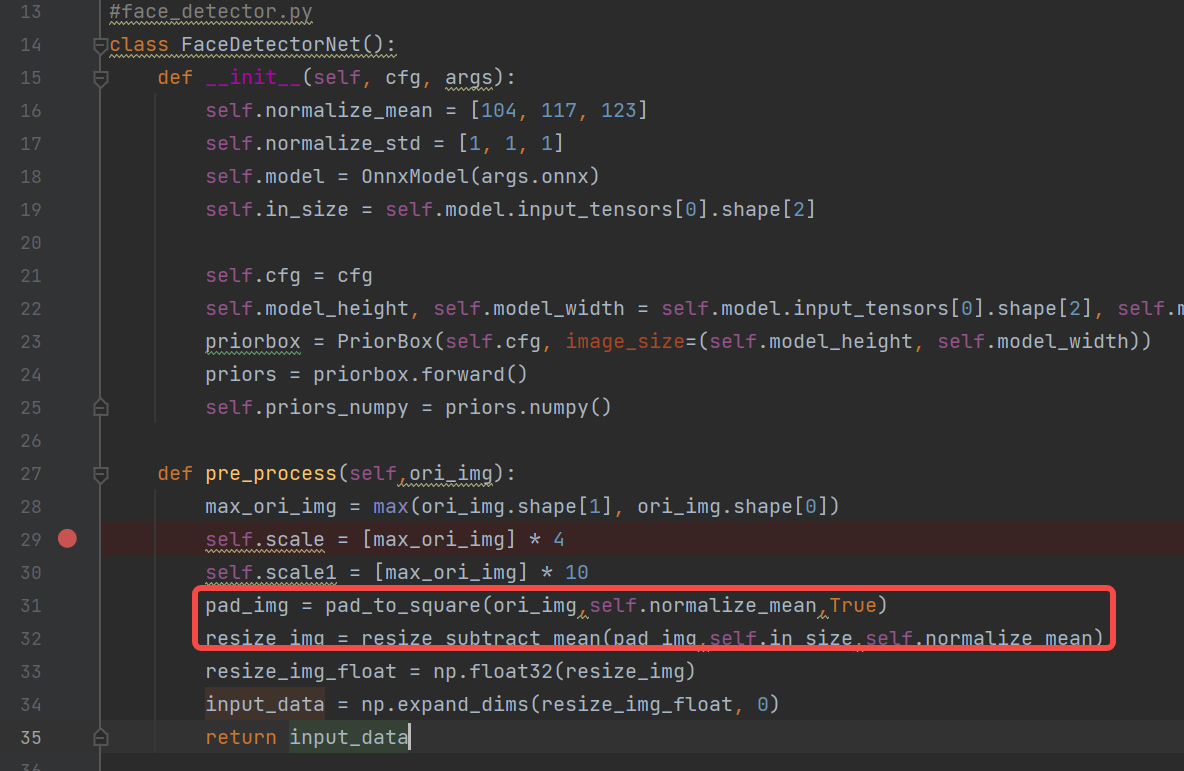
# face_detector.py
def pre_process(self, ori_img):
max_ori_img = max(ori_img.shape[1], ori_img.shape[0])
self.scale = [max_ori_img] * 4
self.scale1 = [max_ori_img] * 10
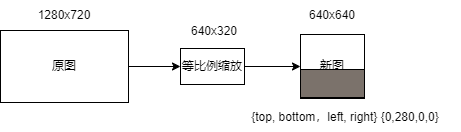
# (1) padding: Pad the original image to a square, pad_img (1024, 1024, 3)
pad_img = pad_to_square(ori_img, self.normalize_mean, True)
# (2) resize + transpose + normalization: Resize the padded image to 640, convert hwc to chw, and normalize, resize_img (3, 640, 640)
resize_img = resize_subtract_mean(pad_img, self.in_size, self.normalize_mean)
# (3) dequantize: Convert the resized image to float32, resize_img_float (3, 640, 640)
resize_img_float = np.float32(resize_img)
# (4) Expand 3 dimensions to 4 dimensions: input_data (1, 3, 640, 640)
input_data = np.expand_dims(resize_img_float, 0)
return input_data
Reference (consistent with pth preprocessing process): The face detection preprocessing code refers to train.py (since the input shape of the K230 model currently only supports fixed input, and training is done with fixed batch input, we can refer to this). Remove unsuitable preprocessing steps for inference such as crop, distort, mirror (data augmentation), and only keep necessary preprocessing steps for ONNX inference like pad_to_square and resize_subtract_mean to ensure consistency between ONNX and pth preprocessing.
6.3.1.2.3 ONNX Run#
Feed the preprocessed data to the model and get the ONNX inference results.
# onnx_model.py
def forward(self, image_tensor):
    '''
    image_tensor = image.transpose(2, 0, 1)
    image_tensor = image_tensor[np.newaxis, :]
    onnx_session.run([output_name], {input_name: x})
    :param image_tensor:
    :return:
    '''
    input_feed = self.get_input_feed(image_tensor)
    output = self.sess.run(self.out_names, input_feed=input_feed)
    return output

# face_detector.py
loc, conf, landms = self.model.forward(input_data)
6.3.1.2.4 Post-processing#
Construct post-processing (common methods: softmax, loc decoding, nms, etc.): refer to test.py or predict.py and existing ONNX inference scripts.
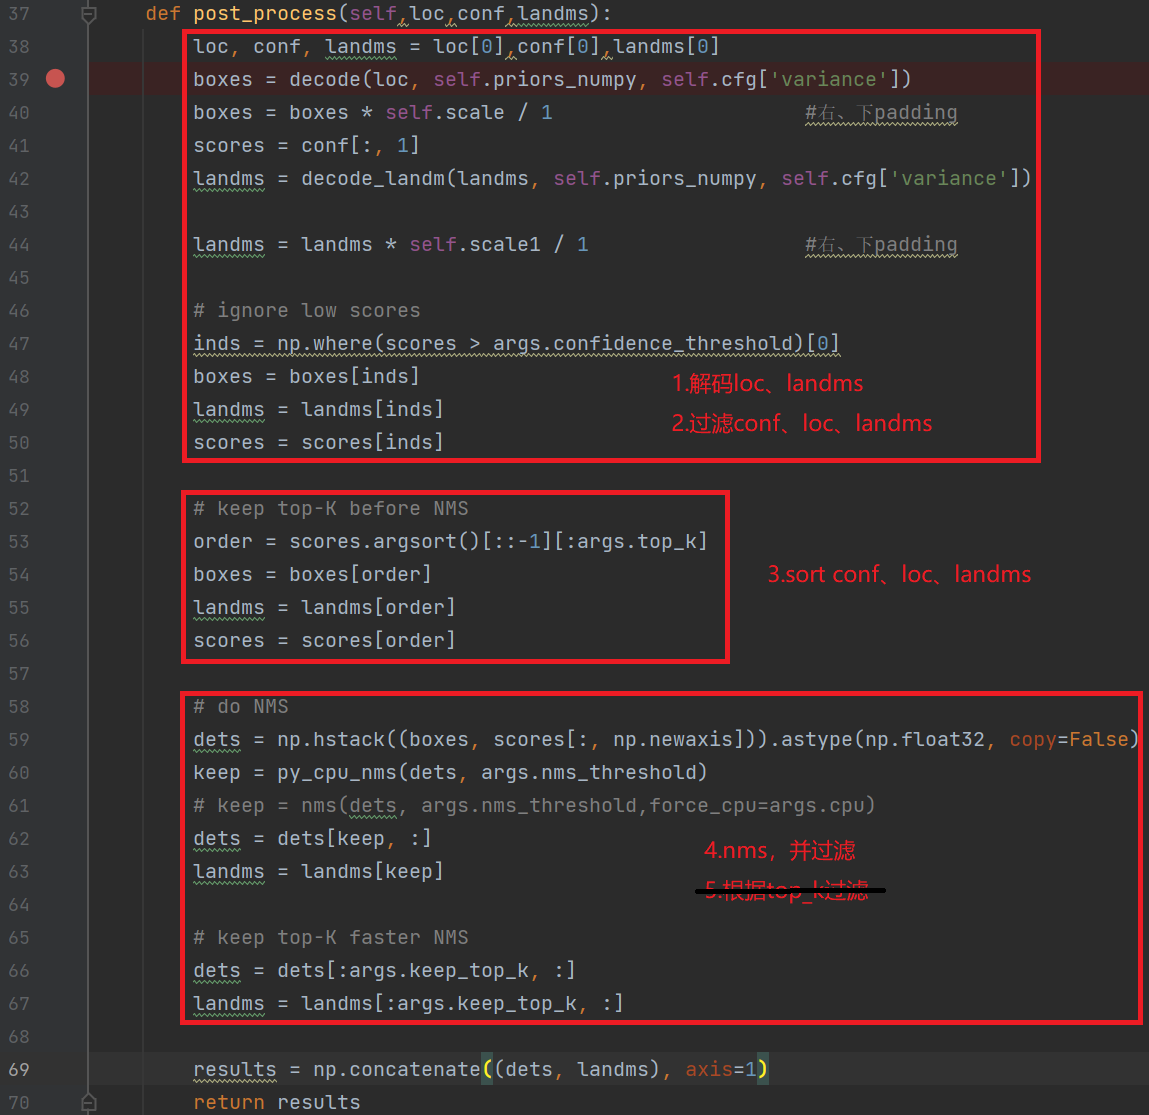
Constructing face detection post-processing code: Includes decoding, nms, etc. Due to the extensive post-processing, we will only show a part of the code. For the complete implementation, refer to the source code.
# face_detector.py
def post_process(self, loc, conf, landms):
    loc, conf, landms = loc[0], conf[0], landms[0]
    boxes = decode(loc, self.priors_numpy, self.cfg['variance'])
    boxes = boxes * self.scale / 1  # Right, bottom padding
    ......
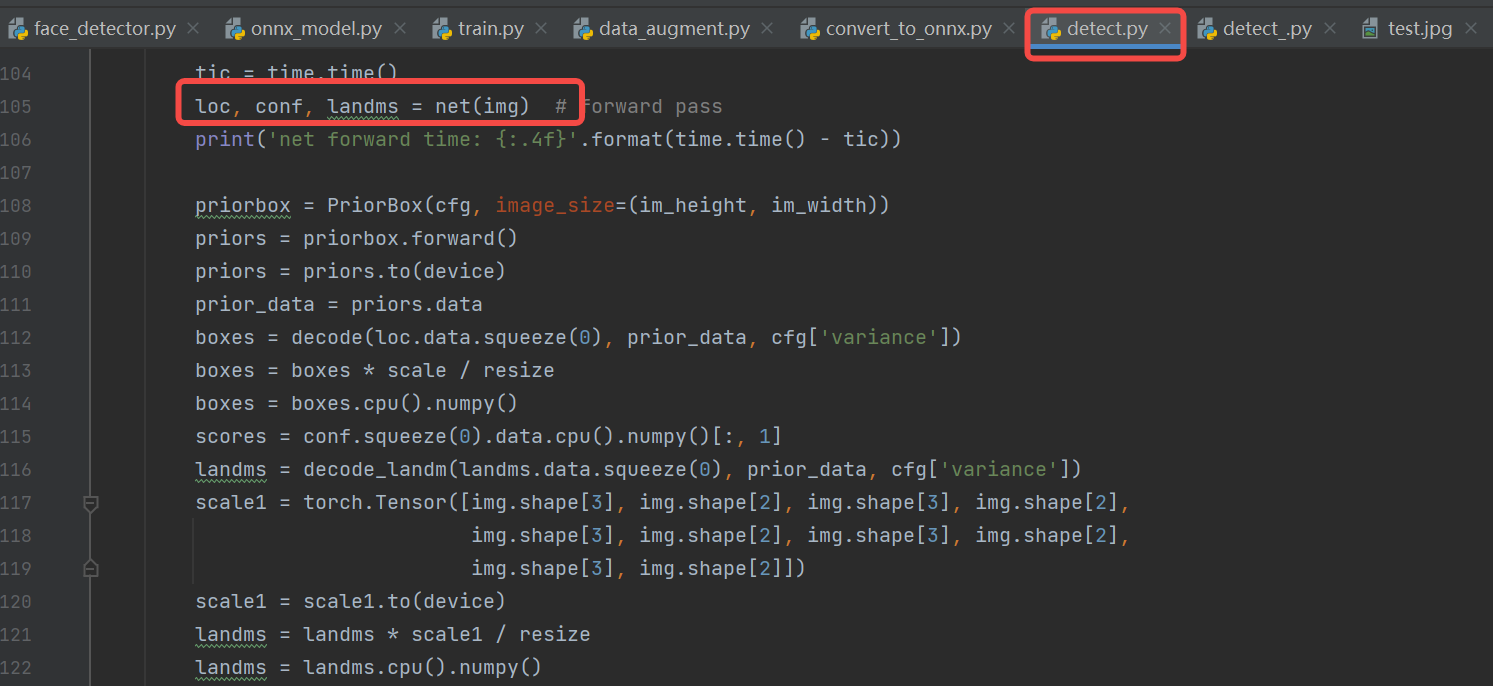
Reference: The detect.py script in the face detection repository processes the model outputs: loc (detection boxes), conf (scores), and landms (landmarks) to obtain the face detection boxes, scores, and key points.
6.3.1.2.5 Displaying Results#
Display the results: Draw the post-processed results on the original image. For the complete implementation, refer to the source code.
6.3.1.2.6 Compiling and Executing#
Clone the source code to your PC, install the dependencies, and execute the face detection inference process. If the detection results are correct, it indicates that the ONNXRuntime inference process for face detection is correct, and the converted ONNX model is also correct.
# If you have already downloaded the code, ignore the clone step
git clone https://github.com/JayL323/K230_AI_Demo_Development_Process_Analysis/
cd K230_AI_Demo_Development_Process_Analysis
cd onnx_related/onnx_inference/face_detection
python face_detector.py
6.3.1.3 ONNX to kmodel Conversion#
The face detection ONNX model can be compiled using nncase to generate a kmodel that can be inferred on K230. Generating the kmodel requires calling nncase’s Model Compilation APIs (Python).
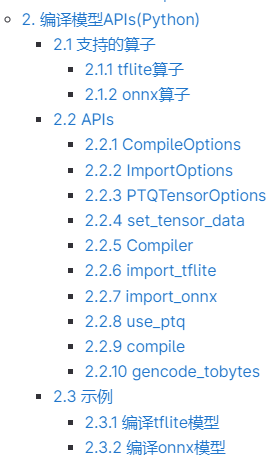
The interface for the Model Compilation API is shown below. If you cannot see the K230_nncase_Development_Guide.md document structure on GitHub, you can download it locally and open it with the Typora tool.
6.3.1.3.1 Configuring Parameters to Generate kmodel#
1. Compilation Parameters: CompileOptions#
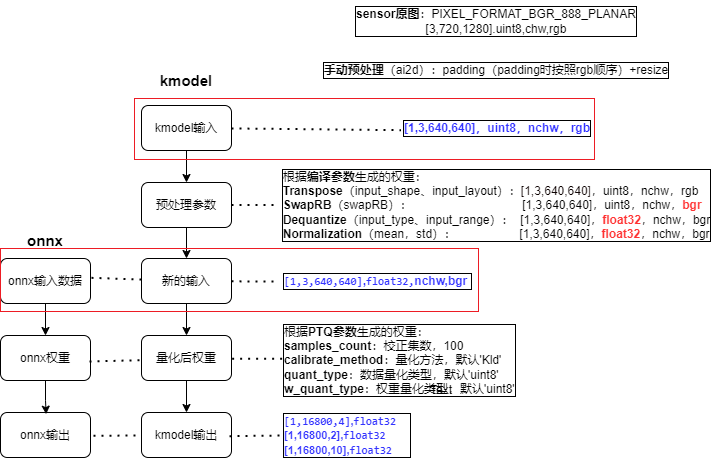
Compilation parameters include target parameters, preprocessing parameters, and post-processing parameters. Target parameters specify the compilation target, such as ‘cpu’ or ‘k230’. Common preprocessing parameters consist of Transpose parameters, SwapRB parameters, Dequantize parameters, and Normalization parameters. Currently, post-processing parameters only support Transpose parameters.
Parameter Category |
Parameter Name |
|---|---|
Target Parameters |
target |
Preprocessing Parameters |
input_shape, input_layout, swapRB, input_type, input_range, mean, std, etc. |
Post-processing Parameters |
output_layout |
Target Parameters:
# Specify the compilation target, such as 'cpu' or 'k230'
compile_options.target = args.target
(1) target = “cpu” generates a kmodel for inference on the CPU, without quantization;
(2) target = “k230” generates a kmodel for inference on K230 (KPU), with quantization (default is uint8 quantization);
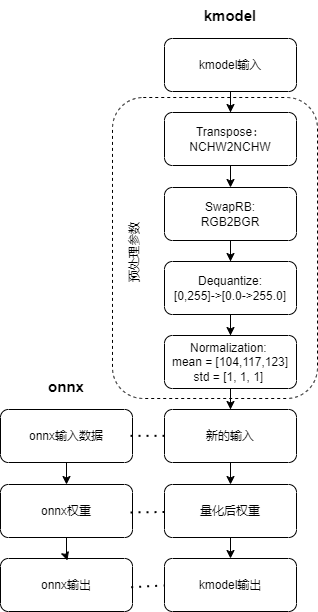
Preprocessing Parameters: Since preprocessing parameters are complex, we will focus on common preprocessing parameters.
# Enable preprocessing, default is False
compile_options.preprocess = True
(1) Preprocessing Parameters (when preprocess = False, no preprocessing is performed, kmodel ≈ onnx)
(2) Preprocessing Parameters (when preprocess = True, kmodel ≈ preprocessing + onnx, at this time kmodel includes the set preprocessing steps, which will be calculated by KPU. KPU calculations are faster, so it is better to put as much preprocessing as possible into the kmodel)
Preprocessing Operation Type |
Related Parameters |
|---|---|
Transpose |
input_shape, input_layout |
SwapRB |
swapRB |
Dequantize |
input_type, input_range |
Normalization |
mean, std |
The format of the [ONNX input data] determines the format of the [new input];
The format of the [actual input of kmodel] determines the format of the [kmodel input];
Transpose Parameters:
# Specify the shape of the input data, the layout of input_shape needs to be consistent with input_layout
compile_options.input_shape = [1, 3, 640, 640]
# When configuring `input_layout` as a string (`"NHWC"`, `"NCHW"`), it indicates the layout of the new input data
compile_options.input_layout = "NCHW"
Related parameters:
input_shape: The shape of the input data. The layout of input_shape needs to be consistent withinput_layout; must be specified when preprocess is True.input_layout: Supports strings ("NHWC","NCHW") and indices. When configured as a string ("NHWC","NCHW"), it indicates the layout of the new input data. When configured as indices, it indicates that the input data will be transposed according to the currentinput_layout, i.e.,input_layoutis thepermparameter of theTranspose; must be specified when preprocess is True.
Analysis (taking string configuration format as an example):
The new input layout is consistent with input_layout; the new input layout is consistent with the ONNX input layout; therefore, input_layout should be consistent with the ONNX input layout.
When input_layout is consistent with the kmodel input layout, the kmodel input, after transposing, will remain consistent with the kmodel input layout.
When input_layout is inconsistent with the kmodel input layout, the kmodel input, after transposing, will become consistent with input_layout.
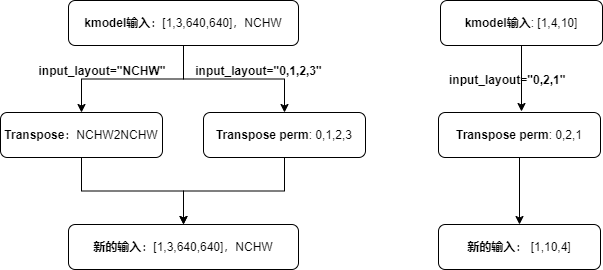
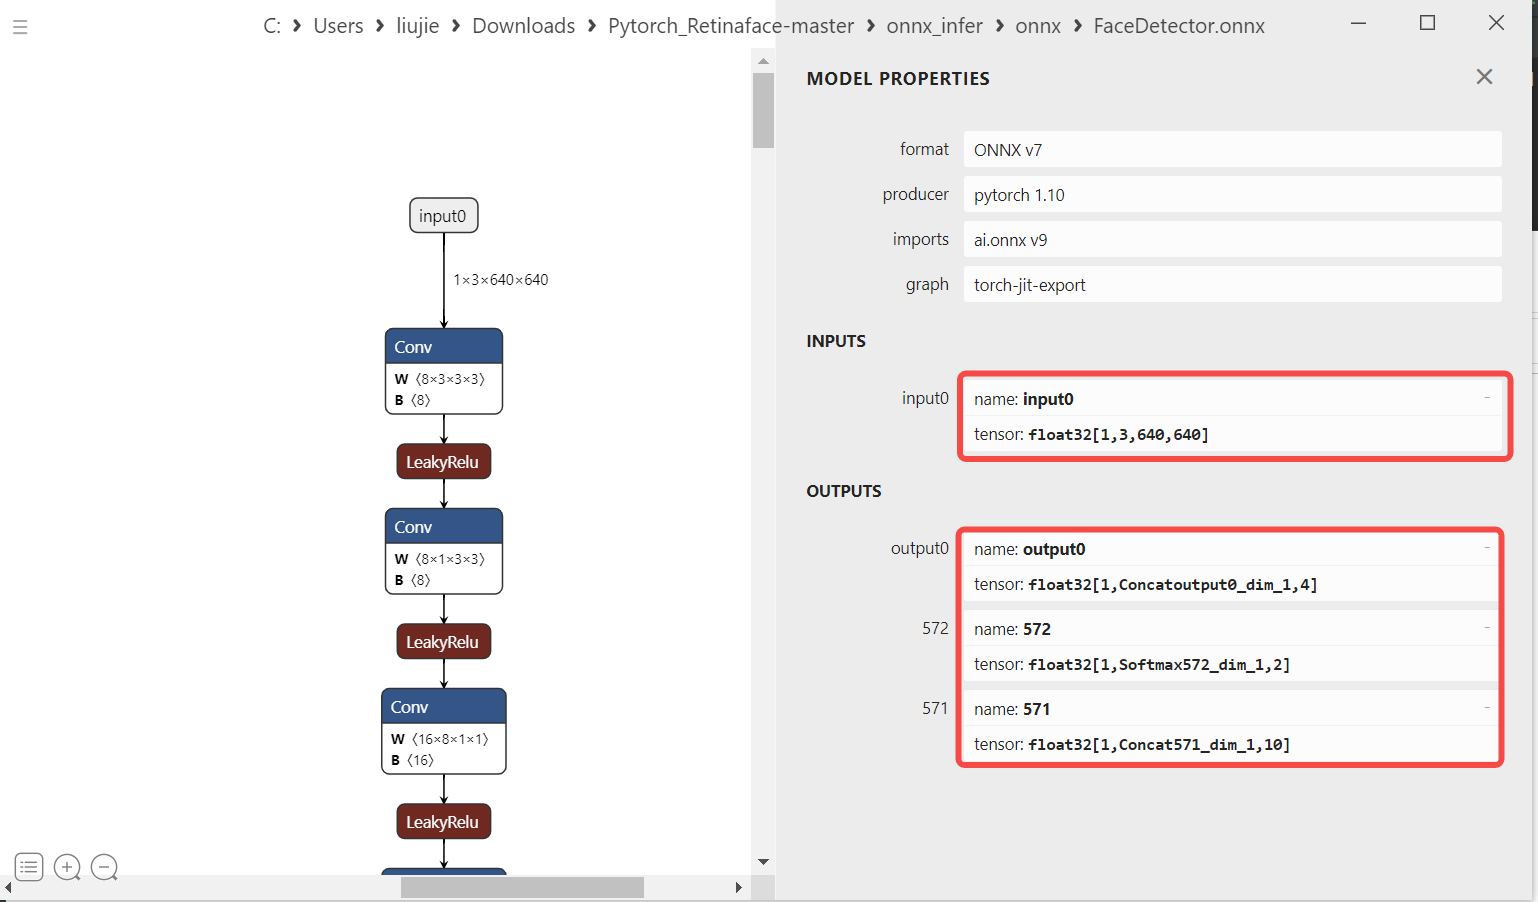
During actual inference, the face detection ONNX input layout is
NCHW, with a shape of[1, 3, 640, 640], soinput_layout = "NCHW", input_shape = [1, 3, 640, 640].
SwapRB Parameters:
compile_options.swapRB = True
Related parameters:
swapRB: Whether to reverse the data in thechanneldimension, default is False.
Analysis:
During actual inference, the kmodel input for face detection is
rgb, while the ONNX input (new input) isbgr. Since the order is different, we need to reverse thechanneldimension, henceswapRB = True.
Dequantize Parameters:
# Must be specified as "uint8" or "float32" when preprocess is True
compile_options.input_type = 'uint8'
# Effective when input_type is 'uint8', specifies the range of dequantized data
compile_options.input_range = [0, 255]
Related parameters:
input_type: Consistent with the actual input data type of the kmodel; must be specified as “uint8” or “float32” when preprocess is True.input_range: Specifies the floating-point range of the dequantized input data; must be specified when preprocess is True and input_type is uint8.
Analysis:
If the kmodel
input_typeis float32, no dequantization is performed.If the kmodel
input_typeis uint8, with a range of [0, 255], wheninput_rangeis [0, 255], dequantization only converts the data type from uint8 to float32.If the kmodel
input_typeis uint8, with a range of [0, 255], wheninput_rangeis [0, 1], dequantization converts the fixed-point data to floating-point data in the range [0.0, 1.0].During actual inference, the kmodel input for face detection is obtained from the sensor, with a data type of
uint8, soinput_type = 'uint8', input_range = [0, 255] or [0, 1]can be used.
Normalization Parameters:
Related parameters:
mean: Mean value for normalization, default is [0, 0, 0].std: Standard deviation for normalization, default is [1, 1, 1].
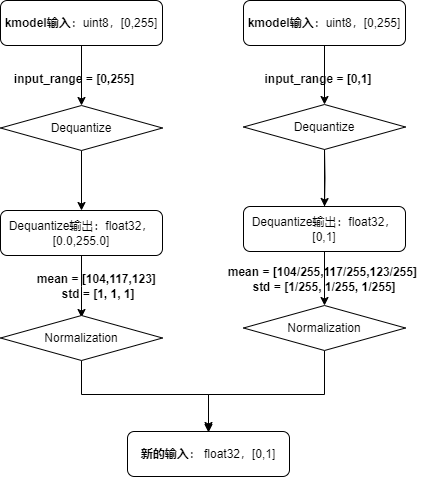
During actual inference, the ONNX mean for face detection is
mean = [104, 117, 123], std = [1, 1, 1]. Clearly, the left-hand settings in the image are more concise. The kmodel for face detection hasinput_range = [0, 255], mean = [104, 117, 123], std = [1, 1, 1].
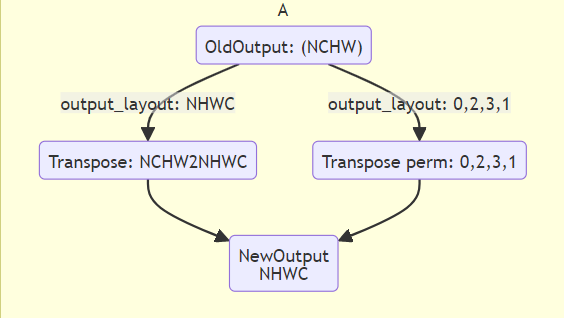
Post-processing Parameters:
# Post-processing
compile_options.output_layout = "NCHW"
Related parameters:
output_layout: Specifies the layout of the output data, such as ‘NCHW’, ‘NHWC’. Default is “”, meaning no transpose is performed.
Similar to the input_layout preprocessing parameter, if the model’s own output layout (oldKmodelOutput) is the same as output_layout, then after transposing, the newKmodelOutput layout will still be consistent with the oldKmodelOutput layout. If the model’s own output layout (oldKmodelOutput) is different from output_layout, then after transposing, the newKmodelOutput layout will become consistent with output_layout.
Generated Face Detection kmodel:
2. Import Parameters: ImportOptions#
The ImportOptions class is used to configure nncase import options, which are rarely set individually and can generally use default parameters.
# 2. Set import parameters, import_options (generally default)
import_options = nncase.ImportOptions()
model_file = onnx_simplify(args.model, dump_dir)
model_content = read_model_file(model_file)
compiler.import_onnx(model_content, import_options)
3. Post-Training Quantization Parameters: PTQTensorOptions#
Post-Training Quantization (PTQ) parameters. PTQ is a method of mapping model weights from float32 to uint8 or int16, reducing the computational resources required for inference while maintaining model accuracy. When target = “k230”, PTQ parameters are mandatory, with default uint8 quantization.
Using uint8 quantization can meet the accuracy requirements for face detection, so we use the default uint8 quantization. The number of calibration sets is 100. If generating the kmodel with 100 calibration sets takes too long, you can reduce the number of calibration sets.
# 3. Set post-training quantization parameters, ptq_options
ptq_options = nncase.PTQTensorOptions()
ptq_options.samples_count = 100
ptq_options.set_tensor_data(generate_data(input_shape, ptq_options.samples_count, args.dataset))
compiler.use_ptq(ptq_options)
6.3.1.3.2 Preparing the Calibration Set#
Since post-processing quantization is used when generating the kmodel, a calibration set is needed. Using a small calibration set to calculate quantization factors can quickly obtain a quantized model. Using this quantized model for prediction can reduce computational load, lower memory usage, and reduce model size while maintaining model accuracy.
Calibration sets usually consist of 100 images from the validation set. For the face detection model, the validation set is WIDER_val, so we select 100 images from WIDER_val as the calibration set.
Note:
(1) If generating the kmodel takes too long or the validation set data is limited, you can try using fewer than 100 data samples.
(2) The generate_data function generates data in a format that should closely match the format of the data fed to the kmodel during actual inference, otherwise, it may cause issues with the generated kmodel.
def generate_data(shape, batch, calib_dir):
    # Get all calibration set image names
    img_paths = [os.path.join(calib_dir, p) for p in os.listdir(calib_dir)]
    data = []
    for i in range(batch):
        assert i < len(img_paths), "calibration images not enough."
        # The preprocessing needed for the generated data ≈ ONNX preprocessing - based on the preprocessing parameters set, included in the kmodel
        # ONNX preprocessing: bgr, padding, resize, transpose, normalization, dequantize, 3D to 4D conversion
        # Preprocessing included in the kmodel: rgb->bgr, dequantize, normalization
        img_data = Image.open(img_paths[i]).convert('RGB')
        # For simplicity, padding is not used here
        img_data = img_data.resize((shape[3], shape[2]), Image.BILINEAR)
        img_data = np.asarray(img_data, dtype=np.uint8)
        img_data = np.transpose(img_data, (2, 0, 1))
        data.append([img_data[np.newaxis, ...]])
    return np.array(data)

input_shape = [1, 3, 640, 640]
......
ptq_options = nncase.PTQTensorOptions()
    ptq_options.samples_count = 100
    # Calibration set data preprocessing, process the original image into the data required by the kmodel
    ptq_options.set_tensor_data(generate_data(input_shape, ptq_options.samples_count, args.dataset))
    # Use 100 calibration data samples to calculate quantization factors
    compiler.use_ptq(ptq_options)
......
6.3.1.3.3 Generating kmodel#
Complete code example for generating the face detection kmodel: mobile_retinaface_data_100_640.py
Generation Environment: The compilation environment built in section 6.2.2.
Generation Steps:
cd src/reference
# If you have already downloaded the code, ignore the clone step
git clone https://github.com/JayL323/K230_AI_Demo_Development_Process_Analysis/
cd K230_AI_Demo_Development_Process_Analysis
cd kmodel_related/kmodel_export
./build_model.sh
-rw-r--r-- 1 root root 715216 Feb 28 16:08 face_detect_640.kmodel # Face detection kmodel
Friendly Reminder: Generating a kmodel requires configuring multiple parameters, and correctly understanding and configuring these parameters is key to successfully generating the kmodel. We understand the complexity of parameter configuration, so we have provided all the correct configurations at once. However, for users who are not familiar with kmodel generation, there is still a possibility of configuration errors. Incorrect parameter configuration will result in issues with the generated kmodel.
To help you better understand this process, it is recommended to try modifying the configuration parameters to different values and observe the changes in the generated kmodel and their impact on the final inference results. Through such practice, you can gain a deeper understanding of the role and interrelationships of each parameter. This approach will make users more familiar with the kmodel generation process, helping to more accurately configure parameters to achieve the desired results.
6.3.1.4 Inference Using K230Runtime#
To verify the correctness of the kmodel, we need to perform inference using K230Runtime, ensuring that the processes of reading images, preprocessing, running, post-processing, and displaying results are consistent with the corresponding processes for ONNX.
Due to the complexity of debugging the K230 development board, we provide some auxiliary tools and share relevant experiences to help users verify the correctness of K230-side inference. Since the main parts of the inference process are run, preprocessing, and post-processing, we will explain the common debugging methods for these three parts separately.
Run:
Simulator: Simulates the kmodel inference process on K230 on a PC to compare whether the kmodel and ONNX outputs are consistent.
main_nncase: Performs kmodel inference on K230 to compare whether the simulated kmodel inference results are consistent with the actual kmodel inference results.
If both are correct, it indicates that the generated kmodel is correct.
Preprocessing:
After preprocessing the original image, dump the preprocessed image to check if the preprocessing is correct.
Post-processing:
If the Simulator is correct, use the Simulator output bin file as the kmodel output and feed it to the post-processing to see if the post-processing results are consistent with the ONNX post-processing results.
6.3.1.4.1 Using Simulator to Verify kmodel#
Simulator: Simulates the kmodel inference process on K230 on a PC to compare whether the kmodel and ONNX outputs are consistent.
1. Generate input.bin#
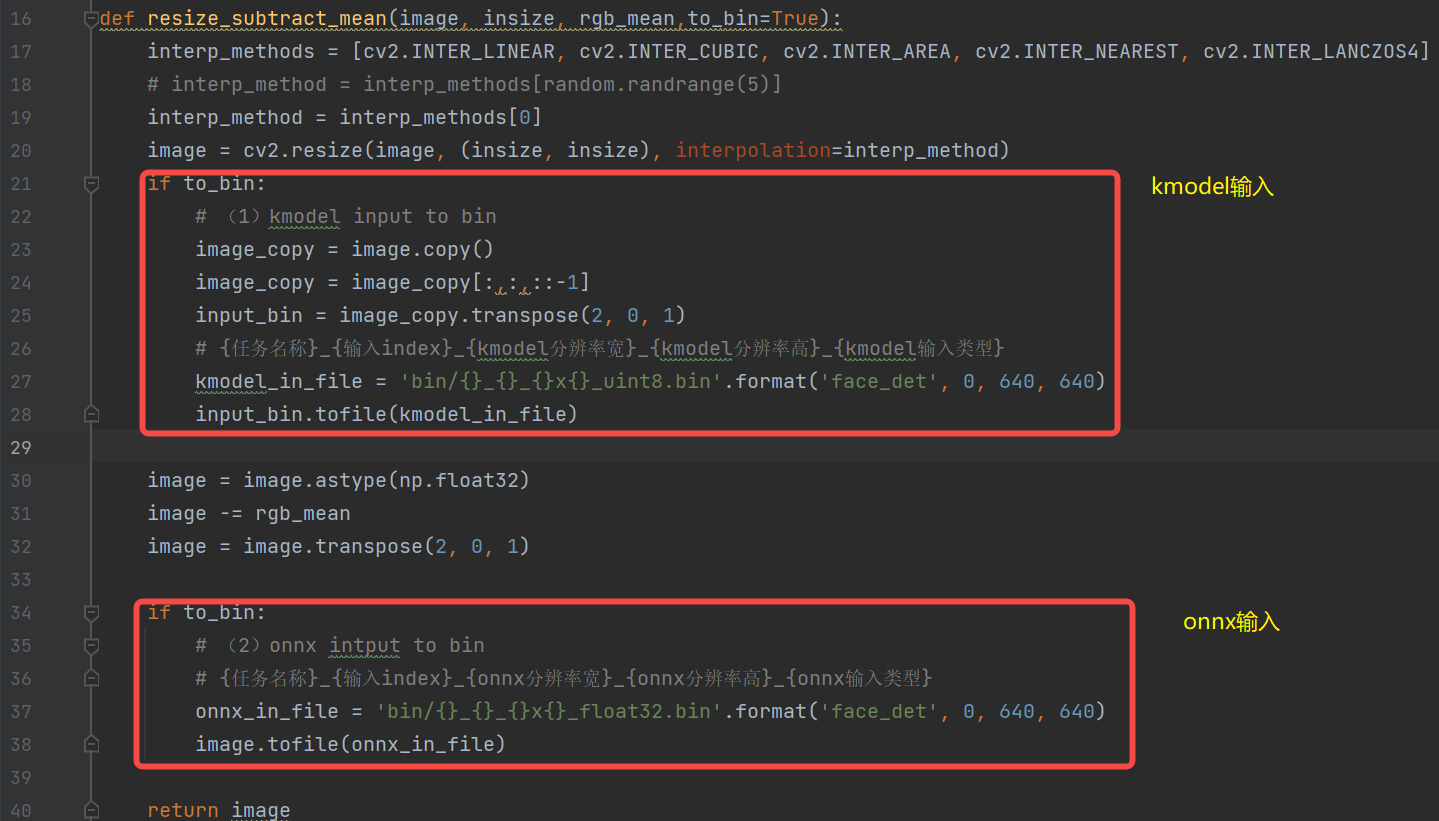
Before using the Simulator to verify the kmodel, you need to prepare the input file. Since the kmodel includes partial preprocessing, for the same image, you need to use different preprocessing to generate onnx_input.bin and kmodel_input.bin respectively.
Name |
onnx_input.bin Construction Process |
kmodel_input.bin Construction Process |
|---|---|---|
Source -> Target |
(uint8, hwc, bgr -> float32, nchw, bgr) |
(uint8, hwc, bgr -> uint8, nchw, rgb) |
Original Image |
(1024, 624, 3), uint8, hwc, bgr |
(1024, 624, 3), uint8, hwc, bgr |
Padding |
(1024, 1024, 3), uint8, hwc, bgr |
(1024, 1024, 3), uint8, hwc, bgr |
Resize |
(640, 640, 3), uint8, hwc, bgr |
(640, 640, 3), uint8, hwc, bgr |
Dequantize |
(640, 640, 3), float32, hwc, bgr |
— |
Normalization |
(640, 640, 3), float32, hwc, bgr |
— |
bgr -> rgb |
— |
(640, 640, 3), uint8, hwc, rgb |
Transpose |
(3, 640, 640), float32, chw, bgr |
(3, 640, 640), uint8, chw, rgb |
Dimension Expansion (optional) |
(1, 3, 640, 640), float32, chw, bgr |
(1, 3, 640, 640), uint8, chw, rgb |
Note: Since the generated kmodel includes partial preprocessing, the preprocessing required to generate kmodel_input.bin ≈ the preprocessing required to generate onnx_input.bin - the preprocessing included in the kmodel (the preprocessing in the face detection kmodel includes transpose, dequantize, normalization, swapRB).
(1) Dimension expansion can be omitted (the bin file can be reshaped during reading, and dimension expansion can be omitted during generation).
(2) Why is dequantize and normalization not required for kmodel_input.bin? Because dequantize and normalization are already included in the kmodel.
(3) Why is bgr -> rgb required for kmodel_input.bin? When generating the face detection kmodel, the swapRB switch was turned on for preprocessing to convert rgb to bgr. Correspondingly, when generating kmodel_input.bin, the data needs to be converted to rgb order first.
(4) Transpose is also included in the kmodel, so why is transpose still needed for kmodel_input.bin? Because when generating the kmodel, if the preprocessing switch is turned on, the transpose-related parameters must be set. The actual input of our face detection kmodel is NCHW, and input_layout is set to NCHW, both are consistent. Therefore, transpose is NCHW2NCHW, and there is no actual conversion.
Process of generating input.bin: (placed in the preprocessing method of ONNX inference)
2. Simulator Verification#
The interface for the Simulator APIs is shown below. If you cannot see the K230_nncase_Development_Guide.md document structure on GitHub, you can download it locally and open it with the Typora tool.
Simulator Process:
For the same image, use different preprocessing to generate different onnx_input.bin and kmodel_input.bin,
Feed onnx_input.bin to ONNX for inference to get cpu_results;
Feed kmodel_input.bin to the kmodel for inference using the Simulator to get nncase_results;
Calculate the cosine similarity between cpu_results and nncase_results to determine whether the generated kmodel is correct based on the similarity.
# mobile_retinaface_onnx_simu_640.py
import os
import copy
import argparse
import numpy as np
import onnx
import onnxruntime as ort
import nncase

def read_model_file(model_file):
    with open(model_file, 'rb') as f:
        model_content = f.read()
    return model_content

def cosine(gt, pred):
    return (gt @ pred) / (np.linalg.norm(gt, 2) * np.linalg.norm(pred, 2))

def main():
    parser = argparse.ArgumentParser(prog="nncase")
    parser.add_argument("--target", type=str, help='target to run')
    parser.add_argument("--model", type=str, help='original model file')
    parser.add_argument("--model_input", type=str, help='input bin file for original model')
    parser.add_argument("--kmodel", type=str, help='kmodel file')
    parser.add_argument("--kmodel_input", type=str, help='input bin file for kmodel')
    args = parser.parse_args()

    # 1. ONNX inference to get cpu_results
    ort_session = ort.InferenceSession(args.model)
    output_names = []
    model_outputs = ort_session.get_outputs()
    for i in range(len(model_outputs)):
        output_names.append(model_outputs[i].name)
    model_input = ort_session.get_inputs()[0]

    model_input_name = model_input.name
    model_input_type = np.float32
    model_input_shape = model_input.shape
    print('onnx_input:', model_input_shape)
    model_input_data = np.fromfile(args.model_input, model_input_type).reshape(model_input_shape)
    cpu_results = []
    cpu_results = ort_session.run(output_names, { model_input_name : model_input_data })


    # 2. Simulator inference to get nncase_results
    # create Simulator
    sim = nncase.Simulator()

    # read kmodel
    kmodel = read_model_file(args.kmodel)

    # load kmodel
    sim.load_model(kmodel)

    # read input.bin
    input_shape = [1, 3, 640, 640]
    dtype = sim.get_input_desc(0).dtype
    input = np.fromfile(args.kmodel_input, dtype).reshape(input_shape)

    # set input for Simulator
    sim.set_input_tensor(0, nncase.RuntimeTensor.from_numpy(input))

    # Simulator inference
    nncase_results = []
    sim.run()
    for i in range(sim.outputs_size):
        nncase_result = sim.get_output_tensor(i).to_numpy()
        # print("nncase_result:", nncase_result)
        input_bin_file = 'bin/face_det_{}_{}_simu.bin'.format(i, args.target)
        nncase_result.tofile(input_bin_file)
        nncase_results.append(copy.deepcopy(nncase_result))

    # 3. Calculate the similarity between ONNX and Simulator
    for i in range(sim.outputs_size):
        cos = cosine(np.reshape(nncase_results[i], (-1)), np.reshape(cpu_results[i], (-1)))
        print('output {0} cosine similarity : {1}'.format(i, cos))

if __name__ == '__main__':
    main()
The above script can meet the verification needs for most ONNX and their kmodels without much modification. Just modify the input_shape according to the actual input size of the model.
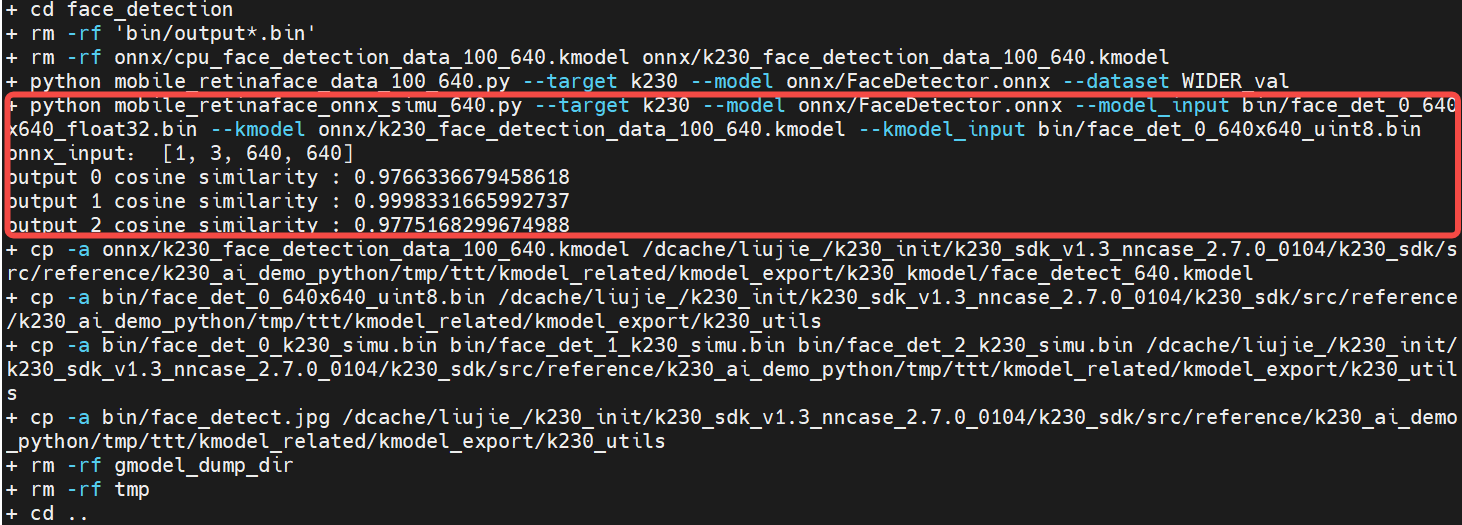
python mobile_retinaface_onnx_simu_640.py \
        --target k230 --model onnx/FaceDetector.onnx \
        --model_input bin/face_det_0_640x640_float32.bin \
        --kmodel onnx/k230_face_detection_data_100_640.kmodel \
        --kmodel_input bin/face_det_0_640x640_uint8.bin
# If you have already downloaded the code, ignore the clone step
git clone https://github.com/JayL323/K230_AI_Demo_Development_Process_Analysis/
cd K230_AI_Demo_Development_Process_Analysis
cd kmodel_related/kmodel_export
./build_model.sh
The higher the cosine similarity between ONNX and Simulator, the better. Generally, a similarity above 0.99 is acceptable. If it is below 0.99 but above 0.95, further on-board verification can be used to determine whether the generated kmodel meets the actual requirements.
Note: When running the simulator, you must first add the following environment variables (included in the build_model.sh file):
export NNCASE_PLUGIN_PATH=$NNCASE_PLUGIN_PATH:/usr/local/lib/python3.8/dist-packages/
export PATH=$PATH:/usr/local/lib/python3.8/dist-packages/
source /etc/profile
6.3.1.4.2 Using main_nncase to Verify kmodel#
Generally, the kmodel inference results from the Simulator and actual on-board inference are consistent, but there may be some differences in certain cases. To verify whether they are consistent, the main_nncase tool is used to assist in verifying whether the kmodel inference results from the Simulator and actual on-board inference are consistent. This tool requires calling the nncase KPU Runtime APIs (C++).
The KPU Runtime APIs provide various interfaces for kmodel on-board inference, as shown below. If you cannot see the K230_nncase_Development_Guide.md document structure on GitHub, you can download it locally and open it with the Typora tool.
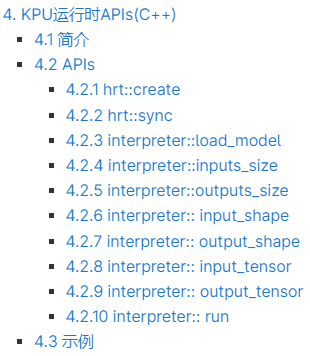
main_nncase Verification Process (to get a general idea of KPU calls on K230):
Load the kmodel
Set kmodel input: read the kmodel_input.bin file
Set kmodel output
Run the kmodel
Get kmodel output
Compare the similarity between the Simulator inferred kmodel and the on-board inferred kmodel results
Note: The main_nncase tool can adapt to the validation of all kmodels without modification. You only need to modify the corresponding parameters in the command line when executing.
// main_nncase.cc
#include <chrono>
#include <fstream>
#include <iostream>
#include <nncase/runtime/runtime_tensor.h>
#include <nncase/runtime/interpreter.h>
#include <nncase/runtime/runtime_op_utility.h>

using namespace nncase;
using namespace nncase::runtime;
using namespace nncase::runtime::detail;

#define USE_CACHE 1

template <class T>
std::vector<T> read_binary_file(const char *file_name)
{
    std::ifstream ifs(file_name, std::ios::binary);
    ifs.seekg(0, ifs.end);
    size_t len = ifs.tellg();
    std::vector<T> vec(len / sizeof(T), 0);
    ifs.seekg(0, ifs.beg);
    ifs.read(reinterpret_cast<char *>(vec.data()), len);
    ifs.close();
    return vec;
}

void read_binary_file(const char *file_name, char *buffer)
{
    std::ifstream ifs(file_name, std::ios::binary);
    ifs.seekg(0, ifs.end);
    size_t len = ifs.tellg();
    ifs.seekg(0, ifs.beg);
    ifs.read(buffer, len);
    ifs.close();
}

template <typename T>
double dot(const T *v1, const T *v2, size_t size)
{
    double ret = 0.f;
    for (size_t i = 0; i < size; i++)
    {
        ret += v1[i] * v2[i];
    }

    return ret;
}

template <typename T>
double cosine(const T *v1, const T *v2, size_t size)
{
    return dot(v1, v2, size) / ((sqrt(dot(v1, v1, size)) * sqrt(dot(v2, v2, size))));
}

void dump(const std::string &info, volatile float *p, size_t size)
{
    std::cout << info << " dump: p = " << std::hex << (void *)p << std::dec << ", size = " << size << std::endl;
    volatile unsigned int *q = reinterpret_cast<volatile unsigned int *>(p);
    for (size_t i = 0; i < size; i++)
    {
        if ((i != 0) && (i % 4 == 0))
        {
            std::cout << std::endl;
        }

        std::cout << std::hex << q[i] << " ";
    }
    std::cout << std::dec << std::endl;
}

int main(int argc, char *argv[])
{
    std::cout << "case " << argv[0] << " build " << __DATE__ << " " << __TIME__ << std::endl;
    if (argc < 4)
    {
        std::cerr << "Usage: " << argv[0] << " <kmodel> <input_0.bin> <input_1.bin> ... <input_N.bin> <output_0.bin> <output_1.bin> ... <output_N.bin>" << std::endl;
        return -1;
    }

    interpreter interp;

    // 1. Load model
    std::ifstream in_before_load_kmodel("/proc/media-mem");
    std::string line_before_load_kmodel;
    // Read file content line by line to check MMZ usage
    while (std::getline(in_before_load_kmodel, line_before_load_kmodel)) {
        std::cout << line_before_load_kmodel << std::endl;
    }

    std::ifstream ifs(argv[1], std::ios::binary);
    interp.load_model(ifs).expect("Invalid kmodel");

    std::ifstream in_after_load_kmodel("/proc/media-mem");
    std::string line_after_load_kmodel;
    // Read file content line by line to check MMZ usage
    while (std::getline(in_after_load_kmodel, line_after_load_kmodel)) {
        std::cout << line_after_load_kmodel << std::endl;
    }

    // 2. Set inputs
    for (size_t i = 2, j = 0; i < 2 + interp.inputs_size(); i++, j++)
    {
        auto desc = interp.input_desc(j);
        auto shape = interp.input_shape(j);
        auto tensor = host_runtime_tensor::create(desc.datatype, shape, hrt::pool_shared).expect("cannot create input tensor");
        auto mapped_buf = std::move(hrt::map(tensor, map_access_::map_write).unwrap());
#if USE_CACHE
        read_binary_file(argv[i], reinterpret_cast<char *>(mapped_buf.buffer().data()));
#else
        auto vec = read_binary_file<unsigned char>(argv[i]);
        memcpy(reinterpret_cast<void *>(mapped_buf.buffer().data()), reinterpret_cast<void *>(vec.data()), vec.size());
        // dump("app dump input vector", (volatile float *)vec.data(), 32);
#endif
        auto ret = mapped_buf.unmap();
        ret = hrt::sync(tensor, sync_op_t::sync_write_back, true);
        if (!ret.is_ok())
        {
            std::cerr << "hrt::sync failed" << std::endl;
            std::abort();
        }

        // dump("app dump input block", (volatile float *)block.virtual_address, 32);
        interp.input_tensor(j, tensor).expect("cannot set input tensor");
    }

    // 3. Set outputs
    for (size_t i = 0; i < interp.outputs_size(); i++)
    {
        auto desc = interp.output_desc(i);
        auto shape = interp.output_shape(i);
        auto tensor = host_runtime_tensor::create(desc.datatype, shape, hrt::pool_shared).expect("cannot create output tensor");
        interp.output_tensor(i, tensor).expect("cannot set output tensor");
    }

    // 4. Run
    auto start = std::chrono::steady_clock::now();
    interp.run().expect("error occurred in running model");
    auto stop = std::chrono::steady_clock::now();
    double duration = std::chrono::duration<double, std::milli>(stop - start).count();
    std::cout << "interp run: " << duration << " ms, fps = " << 1000 / duration << std::endl;

    // 5. Get outputs
    for (int i = 2 + interp.inputs_size(), j = 0; i < argc; i++, j++)
    {
        auto out = interp.output_tensor(j).expect("cannot get output tensor");
        auto mapped_buf = std::move(hrt::map(out, map_access_::map_read).unwrap());
        auto expected = read_binary_file<unsigned char>(argv[i]);

        // 6. Compare
        int ret = memcmp((void *)mapped_buf.buffer().data(), (void *)expected.data(), expected.size());
        if (!ret)
        {
            std::cout << "compare output " << j << " Pass!" << std::endl;
        }
        else
        {
            auto cos = cosine((const float *)mapped_buf.buffer().data(), (const float *)expected.data(), expected.size() / sizeof(float));
            std::cerr << "compare output " << j << " Fail: cosine similarity = " << cos << std::endl;
        }
    }

    return 0;
}
Compile the above C++ code and copy the debug directory under k230_bin to the K230 development board.
# In the Docker container, if you have already downloaded the code, ignore the clone step
docker exec -it v1.3_0219_lj /bin/bash
cd src/reference
git clone https://github.com/JayL323/K230_AI_Demo_Development_Process_Analysis.git
cd K230_AI_Demo_Development_Process_Analysis/kmodel_related/kmodel_inference/
./build_app.sh debug
# On the small core:
# The large and small cores share /sharefs/
cd /sharefs/
# Example: Replace the source directory with your own directory during actual execution
scp liujie@10.10.1.22:/xxx/k230_bin/debug /sharefs/

# On the large core
cd /sharefs/k230_bin/debug
# ./face_detect_main_nncase.sh
./main_nncase.elf face_detect_640.kmodel face_det_0_640x640_uint8.bin face_det_0_k230_simu.bin face_det_1_k230_simu.bin face_det_2_k230_simu.bin

From the execution results, we can observe:
Memory usage of the face detection kmodel: approximately 1MB
Inference speed of the face detection kmodel: 26.6ms
Similarity between Simulator and on-board inference for face detection: Outputs 0 and 2 pass with byte-level exact match; output 1 fails but has a cosine similarity of 1 at the float level. Generally, a similarity above 0.99 is acceptable.
The face detection simulator results roughly meet the requirements, and the main_nncase results also meet the requirements, so the generated face detection kmodel is likely correct.
6.3.1.4.3 Inference Using K230Runtime#
face_detection code. This code only supports the development boards CanMV-K230-V1.0 and CanMV-K230-V2.0. For other models of CanMV-K230 development boards, you can use the latest vi_vo.h to replace the current repo vi_vo.h.
├── ai_base.cc                  # AI base class, encapsulates KPU (K230) runtime APIs, simplifies kmodel-related operations
├── ai_base.h
├── anchors_640.cc              # Anchors for face detection with 640 resolution input
├── CMakeLists.txt
├── face_detection.cc           # Face detection demo, preprocessing, kmodel inference, post-processing
├── face_detection.h
├── main.cc                     # Main process of face detection demo
├── README.md
├── scoped_timing.hpp           # Timing class
├── utils.cc                    # Utility class, encapsulates common functions and AI2D runtime APIs, simplifies preprocessing operations
├── utils.h
└── vi_vo.h                     # Encapsulates sensor and display operations
To use K230Runtime for kmodel inference, you need to thoroughly understand the K230Runtime documentation. To simplify the inference process, we encapsulate the K230Runtime interfaces. The files ai_base.cc, scoped_timing.hpp, utils.cc, and vi_vo.h are pre-encapsulated methods and do not require modification. For different models, users do not need to worry about K230Runtime-related operations. They only need to copy face_detection.cc and main.cc and modify the corresponding constructor, preprocessing (pre_process), and post-processing (post_process).
1. Reading Images or Video Frames#
(1) Reading Images
cv::Mat ori_img = cv::imread(xxx);
(2) Reading Video Frames
Background Knowledge:
(1) Introduction to vi_vo.h: vi_vo.h mainly encapsulates video input and output configurations. We created the test_vi_vo example based on vi_vo.h, which explains how to use the vi and vo parts. This code only supports the development boards CanMV-K230-V1.0 and CanMV-K230-V2.0. For other models of CanMV-K230 development boards, you can use the latest vi_vo.h to replace the current repo vi_vo.h.
vi: Video input, related to the sensor. For detailed information, see K230_VICAP_API Reference.md, K230_VICAP_SENSOR_Parameter Partition Reference.md, K230_Camera_Sensor Adaptation Guide.md.
Start the sensor
Dump a frame of data from the sensor
Save the data from the sensor as a PNG
Release the current frame from the sensor
Stop the sensor
vo: Video output, related to the display. For detailed information, see K230_Video Output_API Reference.md
Draw boxes or text on cv::Mat and insert them into the corresponding channel in the vo osd
Release the osd block
(2) Example of Reading Video Frames: test_vi_vo demo
2. Preprocessing#
Background Knowledge:
(1) Introduction to Utils: Utils mainly encapsulates common functions and nncase AI2D-related operations. AI2D-related parts include Affine, Crop, Resize, and Padding preprocessing operations, which can accelerate image preprocessing.
(2) Preprocessing Example: test_utils demo
If you are interested in AI2D Runtime APIs, please refer to K230_nncase_Development Guide.md. If you cannot see the K230_nncase_Development Guide.md document structure on GitHub, you can download it locally and open it with the Typora tool.

Face Detection Preprocessing:
Background Knowledge: The ai2d_builder_ can be called repeatedly if the parameters remain unchanged; if the parameters change, a new ai2d_builder_ needs to be created.
For image preprocessing: Since the sizes of different images are different, for the padding_resize method, the AI2D parameters will change each time, and a new ai2d_builder_ needs to be created using Utils::padding_resize_one_side for preprocessing.
For video stream preprocessing: Since the sizes of different frames are the same, the padding values do not change. Therefore, for the padding_resize method, the AI2D parameters remain unchanged, and after copying the new frame image to ai2d_in_tensor_, only ai2d_builder_->invoke needs to be called (the ai2d_builder_ is already constructed in the face detection constructor).
// face_detection.cc
// ai2d for image
void FaceDetection::pre_process(cv::Mat ori_img)
{
    ScopedTiming st(model_name_ + " pre_process image", debug_mode_);
    std::vector<uint8_t> chw_vec;
    Utils::bgr2rgb_and_hwc2chw(ori_img, chw_vec);
    Utils::padding_resize_one_side({ori_img.channels(), ori_img.rows, ori_img.cols}, chw_vec, {input_shapes_[0][3], input_shapes_[0][2]}, ai2d_out_tensor_, cv::Scalar(123, 117, 104));
    if (debug_mode_ > 1)  // Verify if preprocessing is correct by checking if the current preprocessing is consistent with ONNX preprocessing: dump the preprocessed image
    {
        auto vaddr_out_buf = ai2d_out_tensor_.impl()->to_host().unwrap()->buffer().as_host().unwrap().map(map_access_::map_read).unwrap().buffer();
        unsigned char *output = reinterpret_cast<unsigned char *>(vaddr_out_buf.data());
        Utils::dump_color_image("FaceDetection_input_padding.png", {input_shapes_[0][3], input_shapes_[0][2]}, output);
    }
}

// ai2d for video
void FaceDetection::pre_process()
{
    ScopedTiming st(model_name_ + " pre_process video", debug_mode_);
    size_t isp_size = isp_shape_.channel * isp_shape_.height * isp_shape_.width;
    auto buf = ai2d_in_tensor_.impl()->to_host().unwrap()->buffer().as_host().unwrap().map(map_access_::map_write).unwrap().buffer();
    memcpy(reinterpret_cast<char *>(buf.data()), (void *)vaddr_, isp_size);
    hrt::sync(ai2d_in_tensor_, sync_op_t::sync_write_back, true).expect("sync write_back failed");
    ai2d_builder_->invoke(ai2d_in_tensor_, ai2d_out_tensor_).expect("error occurred in ai2d running");

    if (debug_mode_ > 1)  // Verify if preprocessing is correct by checking if the current preprocessing is consistent with ONNX preprocessing: dump the preprocessed image
    {
        auto vaddr_out_buf = ai2d_out_tensor_.impl()->to_host().unwrap()->buffer().as_host().unwrap().map(map_access_::map_read).unwrap().buffer();
        unsigned char *output = reinterpret_cast<unsigned char *>(vaddr_out_buf.data());
        Utils::dump_color_image("FaceDetection_input_padding.png", {input_shapes_[0][3], input_shapes_[0][2]}, output);
    }
}
3. kmodel Run#
Background Knowledge:
(1) Introduction to AIBase: AIBase mainly encapsulates KPU-related operations, including loading kmodel on AI devices (such as K230), setting kmodel input data, executing KPU/CPU calculations, and obtaining kmodel output data. The encapsulation of AIBase simplifies the KPU calling process.
(2) kmodel Inference Example (main_nncase modified to be based on the AIBase class): test_aibase demo.
KPU Runtime APIs interface is shown below. For details, please refer to K230_nncase_Development Guide.md. If you cannot see the K230_nncase_Development Guide.md document structure on GitHub, you can download it locally and open it with the Typora tool.
Face Detection kmodel Inference:
// ai_base.cc
void AIBase::run()
{
    ScopedTiming st(model_name_ + " run", debug_mode_);
    kmodel_interp_.run().expect("error occurred in running model");
}

void AIBase::get_output()
{
    ScopedTiming st(model_name_ + " get_output", debug_mode_);
    p_outputs_.clear();
    for (int i = 0; i < kmodel_interp_.outputs_size(); i++)
    {
        auto out = kmodel_interp_.output_tensor(i).expect("cannot get output tensor");
        auto buf = out.impl()->to_host().unwrap()->buffer().as_host().unwrap().map(map_access_::map_read).unwrap().buffer();
        float *p_out = reinterpret_cast<float *>(buf.data());
        p_outputs_.push_back(p_out);
    }
}
// face_detection.cc
void FaceDetection::inference()
{
    this->run();
    this->get_output();
}
// main.cc, verify if kmodel inference is correct: we have already verified using simulator and main_nncase
......
FaceDetection fd;
fd.inference();
......
4. Post-processing#
ONNX Post-processing:
C++ Post-processing (details in the code):
// face_detection.cc
void FaceDetection::post_process(FrameSize frame_size, vector<FaceDetectionInfo> &results)
{
    ScopedTiming st(model_name_ + " post_process", debug_mode_);
    if (debug_mode_ > 3)
    {
        // Verify if the post-processing flow is correct: Exclude preprocessing and model inference, directly use Simulator kmodel data to check the correctness of the post-processing code.
        ......
    }
    else
    {
        filter_confs(p_outputs_[1]);
        filter_locs(p_outputs_[0]);
        filter_landms(p_outputs_[2]);
    }

    std::sort(confs_.begin(), confs_.end(), nms_comparator);
    nms(results);
    transform_result_to_src_size(frame_size, results);
}
ONNX Post-processing Flow |
kmodel Post-processing Flow |
|---|---|
1. Decode loc, landms |
1. Filter conf, loc, landms (magnitude: 16800 -> hundreds) |
2. Filter conf, loc, landms |
2. Sort conf, loc, landms based on conf (reduce sorting time) |
3. Sort conf, loc, landms based on conf |
3. nms + Decode loc, landms |
4. nms |
4. Transform face detection results to original image size |
5. top_k |
The adjusted kmodel inference flow is more suitable for C++ code.
Face Detection Post-processing Code:
// face_detection.cc
void FaceDetection::post_process(FrameSize frame_size, vector<FaceDetectionInfo> &results)
{
    ScopedTiming st(model_name_ + " post_process", debug_mode_);
    if (debug_mode_ > 2)
    {
        // Verify if the post-processing flow is correct: Exclude preprocessing and model inference, directly use Simulator kmodel data to check the correctness of the post-processing code.
        vector<float> out0 = Utils::read_binary_file<float>("../debug/face_det_0_k230_simu.bin");
        vector<float> out1 = Utils::read_binary_file<float>("../debug/face_det_1_k230_simu.bin");
        vector<float> out2 = Utils::read_binary_file<float>("../debug/face_det_2_k230_simu.bin");
        filter_confs(out1.data());
        filter_locs(out0.data());
        filter_landms(out2.data());
    }
    else
    {
        filter_confs(p_outputs_[1]);
        filter_locs(p_outputs_[0]);
        filter_landms(p_outputs_[2]);
    }

    std::sort(confs_.begin(), confs_.end(), nms_comparator);
    nms(results);
    transform_result_to_src_size(frame_size, results);
}

/********************Filter kmodel data results based on detection threshold***********************/
void FaceDetection::filter_confs(float *conf)
{
    NMSRoiObj inter_obj;
    confs_.clear();
    for (uint32_t roi_index = 0; roi_index < objs_num_; roi_index++)
    {
        float score = conf[roi_index * CONF_SIZE + 1];
        if (score > obj_thresh_)
        {
            inter_obj.ori_roi_index = roi_index;
            inter_obj.before_sort_conf_index = confs_.size();
            inter_obj.confidence = score;
            confs_.push_back(inter_obj);
        }
    }
}

void FaceDetection::filter_locs(float *loc)
{
    boxes_.clear();
    boxes_.resize(confs_.size());
    int roi_index = 0;
    for (uint32_t conf_index = 0; conf_index < boxes_.size(); conf_index++)
    {
        roi_index = confs_[conf_index].ori_roi_index;
        int start = roi_index * LOC_SIZE;
        for (int i = 0; i < LOC_SIZE; ++i)
        {
            boxes_[conf_index][i] = loc[start + i];
        }
    }
}

void FaceDetection::filter_landms(float *landms)
{
    landmarks_.clear();
    landmarks_.resize(confs_.size());
    int roi_index = 0;
    for (uint32_t conf_index = 0; conf_index < boxes_.size(); conf_index++)
    {
        roi_index = confs_[conf_index].ori_roi_index;
        int start = roi_index * LAND_SIZE;
        for (int i = 0; i < LAND_SIZE; ++i)
        {
            landmarks_[conf_index][i] = landms[start + i];
        }
    }
}

/********************Decode detection boxes and key points based on anchors***********************/
Bbox FaceDetection::decode_box(int obj_index)
{
    float cx, cy, w, h;

    int box_index = confs_[obj_index].before_sort_conf_index;
    int anchor_index = confs_[obj_index].ori_roi_index;

    cx = boxes_[box_index][0];
    cy = boxes_[box_index][1];
    w = boxes_[box_index][2];
    h = boxes_[box_index][3];
    cx = g_anchors[anchor_index][0] + cx * 0.1 * g_anchors[anchor_index][2];
    cy = g_anchors[anchor_index][1] + cy * 0.1 * g_anchors[anchor_index][3];
    w = g_anchors[anchor_index][2] * std::exp(w * 0.2);
    h = g_anchors[anchor_index][3] * std::exp(h * 0.2);
    Bbox box;
    box.x = cx - w / 2;
    box.y = cy - h / 2;
    box.w = w;
    box.h = h;
    return box;
}

SparseLandmarks FaceDetection::decode_landmark(int obj_index)
{
    SparseLandmarks landmark;
    int landm_index = confs_[obj_index].before_sort_conf_index;
    int anchor_index = confs_[obj_index].ori_roi_index;
    for (uint32_t ll = 0; ll < 5; ll++)
    {
        landmark.points[2 * ll + 0] = g_anchors[anchor_index][0] + landmarks_[landm_index][2 * ll + 0] * 0.1 * g_anchors[anchor_index][2];
        landmark.points[2 * ll + 1] = g_anchors[anchor_index][1] + landmarks_[landm_index][2 * ll + 1] * 0.1 * g_anchors[anchor_index][3];
    }
    return landmark;
}

/********************IOU Calculation***********************/
float FaceDetection::overlap(float x1, float w1, float x2, float w2)
{
    float l1 = x1 - w1 / 2;
    float l2 = x2 - w2 / 2;
    float left = l1 > l2 ? l1 : l2;
    float r1 = x1 + w1 / 2;
    float r2 = x2 + w2 / 2;
    float right = r1 < r2 ? r1 : r2;
r1 : r2;
    return right - left;
}

float FaceDetection::box_intersection(Bbox a, Bbox b)
{
    float w = overlap(a.x, a.w, b.x, b.w);
    float h = overlap(a.y, a.h, b.y, b.h);

    if (w < 0 || h < 0)
        return 0;
    return w * h;
}

float FaceDetection::box_union(Bbox a, Bbox b)
{
    float i = box_intersection(a, b);
    float u = a.w * a.h + b.w * b.h - i;

    return u;
}

float FaceDetection::box_iou(Bbox a, Bbox b)
{
    return box_intersection(a, b) / box_union(a, b);
}

/********************nms***********************/
void FaceDetection::nms(vector<FaceDetectionInfo> &results)
{
    // nms
    for (int conf_index = 0; conf_index < confs_.size(); ++conf_index)
    {
        if (confs_[conf_index].confidence < 0)
            continue;

        FaceDetectionInfo obj;
        obj.bbox = decode_box(conf_index);
        obj.sparse_kps = decode_landmark(conf_index);
        obj.score = confs_[conf_index].confidence;
        results.push_back(obj);

        for (int j = conf_index + 1; j < confs_.size(); ++j)
        {
            if (confs_[j].confidence < 0)
                continue;
            Bbox b = decode_box(j);
            if (box_iou(obj.bbox, b) >= nms_thresh_) // Ignore subsequent loops if IOU is greater than the NMS threshold
                confs_[j].confidence = -1;
        }
    }
}

/********************Transform face detection results to original image size***********************/
void FaceDetection::transform_result_to_src_size(FrameSize &frame_size, vector<FaceDetectionInfo> &results)
{
    // Transform result to display size
    int max_src_size = std::max(frame_size.width, frame_size.height);
    for (int i = 0; i < results.size(); ++i)
    {
        auto &l = results[i].sparse_kps;
        for (uint32_t ll = 0; ll < 5; ll++)
        {
            l.points[2 * ll + 0] = l.points[2 * ll + 0] * max_src_size;
            l.points[2 * ll + 1] = l.points[2 * ll + 1] * max_src_size;
        }

        auto &b = results[i].bbox;
        float x0 = b.x * max_src_size;
        float x1 = (b.x + b.w) * max_src_size;
        float y0 = b.y * max_src_size;
        float y1 = (b.y + b.h) * max_src_size;
        x0 = std::max(float(0), std::min(x0, float(frame_size.width)));
        x1 = std::max(float(0), std::min(x1, float(frame_size.width)));
        y0 = std::max(float(0), std::min(y0, float(frame_size.height)));
        y1 = std::max(float(0), std::min(y1, float(frame_size.height)));
        b.x = x0;
        b.y = y0;
        b.w = x1 - x0;
        b.h = y1 - y0;
    }
}
Extension:
Post-processing for detection is relatively complex, so we provide some sample codes for common detection models.
retinaface: Face Detection post_process
yolov5: Fall Detection post_process
yolov8: Head Detection post_process
5. Displaying Results#
Example of Displaying Results: test_vi_vo demo
6. Compilation and Execution#
Clone the code to the src/reference/ directory of the already started Docker container and execute build_app.sh.
docker exec -it v1.3_0219_lj /bin/bash
cd src/reference
git clone https://github.com/JayL323/K230_AI_Demo_Development_Process_Analysis.git
cd K230_AI_Demo_Development_Process_Analysis/kmodel_related/kmodel_inference/
./build_app.sh debug         # If the debug directory is not needed, execute ./build_app.sh
Copy the face_detect directory under k230_bin to the /sharefs directory on the small core of the K230 development board.
k230_bin
├── debug            # Files used for debugging
│   ├── face_det_0_640x640_uint8.bin    # Face detection kmodel input file
│   ├── face_det_0_k230_simu.bin        # Face detection simulator first output file
│   ├── face_det_1_k230_simu.bin        # Face detection simulator second output file
│   ├── face_det_2_k230_simu.bin        # Face detection simulator third output file
│   ├── face_detect_640.kmodel          # Face detection kmodel
│   ├── face_detect.jpg                 # Input image for face detection based on image inference
│   ├── face_detect_main_nncase.sh      # Script to verify face detection kmodel on board
│   ├── face_detect_main_nncase_with_aibase.sh # Script to verify face detection kmodel on board
│   ├── face_recg_0_112x112_uint8.bin
│   ├── face_recg_0_k230_simu.bin
│   ├── face_recognize.kmodel
│   ├── face_recognize_main_nncase.sh
│   ├── main_nncase.elf                 # Executable file to verify face detection kmodel on board
│   ├── test_aibase.elf                 # Executable file generated by test_aibase demo
│   ├── test_scoped_timing.elf          # Executable file generated by test_scoped_timing demo
│   └── test_vi_vo.elf                  # Executable file generated by test_vi_vo demo
├── face_detect     # Face detection
│   ├── face_detect_640.kmodel
│   ├── face_detect_image.sh
│   ├── face_detection.elf
│   ├── face_detect_isp.sh
│   └── face_detect.jpg
└── face_recognize   # Face recognition, face detection can be ignored
    ├── db
    ├── face_detect_640.kmodel
    ├── face_recognition.elf
    ├── face_recognize_isp.sh
    └── face_recognize.kmodel
(1) Verify if preprocessing is correct
Set debug_mode to 2 to save the preprocessed image.
# The large and small cores share /sharefs/
# On the small core
cd /sharefs/
# Example: Replace the source directory with your own directory during actual execution
scp liujie@10.10.1.22:/xxx/k230_bin /sharefs/

# On the large core (if just started, press q+Enter to exit the auto-start program)
cd /sharefs/k230_bin/face_detect
./face_detection.elf face_detect_640.kmodel 0.5 0.2 face_detect.jpg 2
# On the small core
cd  /sharefs/k230_bin/face_detect
scp FaceDetection_input_padding.png username@ip:dir
The FaceDetection_input_padding.png will be generated. Copy it to the PC to check if the preprocessing code is correct. If there is an issue, check if the original sensor image is correct and if the preprocessing parameters are set correctly.

(2) Verify if post-processing is correct
Set debug_mode to 3 to verify if post-processing is correct.
# The large and small cores share /sharefs/
# On the small core
cd /sharefs/
# Example: Replace the source directory with your own directory during actual execution
scp liujie@10.10.1.22:/xxx/k230_bin /sharefs/

# On the large core (press q+Enter to exit the auto-start program)
cd /sharefs/k230_bin/face_detect
./face_detection.elf face_detect_640.kmodel 0.5 0.2 face_detect.jpg 3
# On the small core
cd  /sharefs/k230_bin/face_detect
scp face_detection_result.jpg username@ip:dir
The face_detection_result.jpg will be generated. Copy it to the PC to check if the post-processing code is correct. If it is incorrect, carefully check the post-processing part of the code and print debug information.
(3) Execution On the large core, execute
face_detect_isp.shto run the inference process based on the video stream.
# On the large core
cd /sharefs/k230_bin/face_detect
./face_detect_isp.sh
6.3.2 Face Recognition Demo#
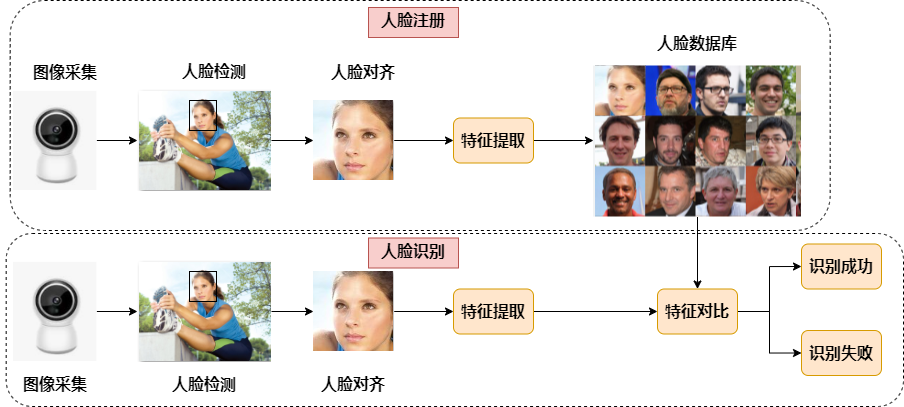
Face recognition is a widely used facial task that compares the current face with a known face identity database to determine if the current face is recognized. Face recognition generally includes 2 steps: face registration and face recognition. Face registration is used to build a face database, and face recognition is used to recognize faces present in the database. Face Registration: Image collection -> Face localization -> Face alignment -> Feature extraction -> Database saving Face Recognition: Image collection -> Face localization -> Face alignment -> Feature extraction -> Feature comparison -> Provide recognition results Face Alignment: For an image, the face detection model outputs the face bounding box coordinates and 5 facial key points. Before face recognition, the detected face box needs to be aligned; that is, the face is rectified in the 2D plane to reduce the differences caused by face rotation, facilitating more accurate subsequent face recognition.
6.3.2.1 PyTorch to ONNX Conversion#
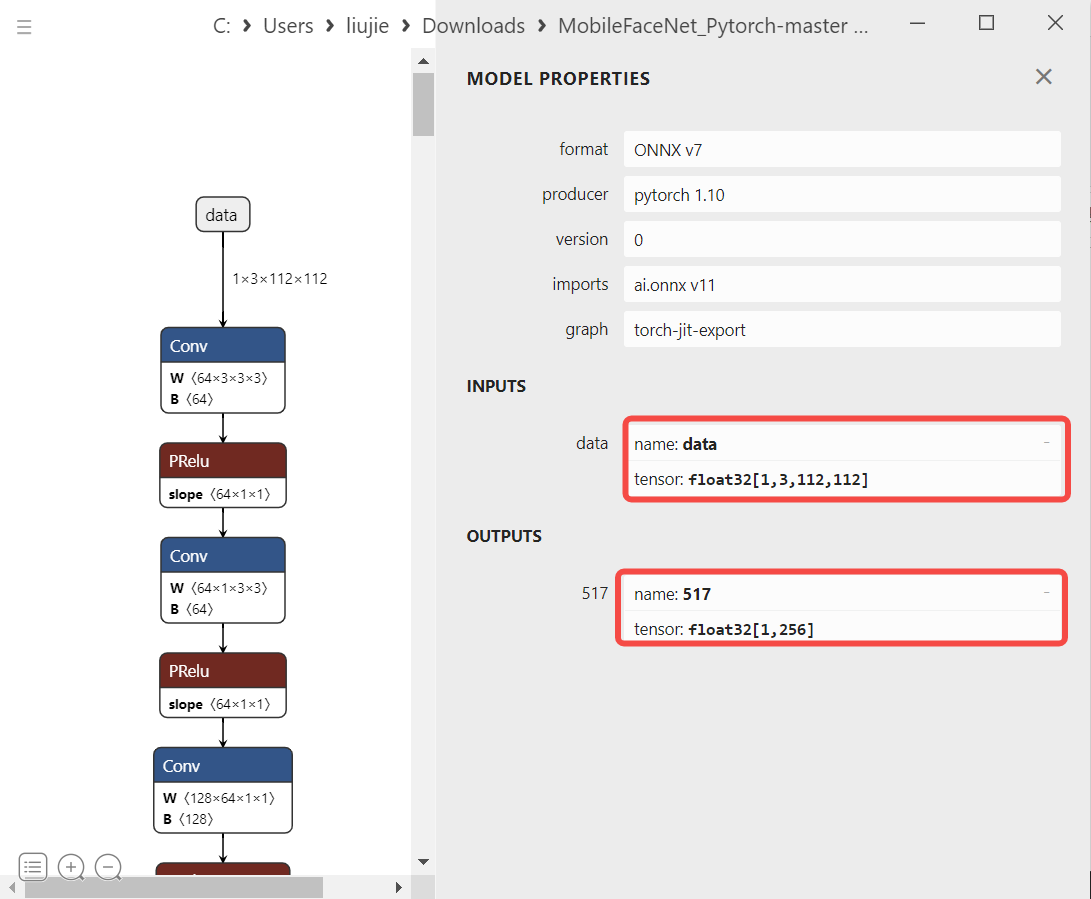
When choosing a face recognition model, it is generally advisable to choose a lightweight model, with a backbone smaller than resnet50 in terms of parameters. Therefore, we choose MobileFaceNet, which is based on MobileNet and has high accuracy, as our face recognition model. Reference link: Xiaoccer/MobileFaceNet_Pytorch
Load the pth or ckpt model to the CPU
Construct random model input
Export the ONNX model
Note: Both pth and onnx support dynamic input, but K230 models currently do not support dynamic input. Therefore, when exporting ONNX, the ONNX input shape is fixed.
# convert_to_onnx.py
import numpy as np
import torch
from core import model               # Varies by model

def convert_onnx(net, path_module, output, opset=11):
    assert isinstance(net, torch.nn.Module)
    img = np.random.randint(0, 255, size=(112, 112, 3), dtype=np.int32)
    img = img.astype(np.float)
    img = (img / 255. - 0.5) / 0.5  # torch style norm
    img = img.transpose((2, 0, 1))
    img = torch.from_numpy(img).unsqueeze(0).float()

    ckpt = torch.load(path_module, map_location='cpu')
    net.load_state_dict(ckpt['net_state_dict'], strict=True)
    net.eval()
    torch.onnx.export(net, img, output, input_names=["data"], keep_initializers_as_inputs=False, verbose=False,
                      opset_version=opset)

if __name__ == '__main__':
    net = model.MobileFacenet()
    input_file = 'model/best/068.ckpt'
    output_file = 'model/best/MobileFaceNet.onnx'
    convert_onnx(net, input_file, output_file)
Steps to Execute:
Clone the code to your PC, install the dependencies, and run the script to convert to ONNX.
git clone https://github.com/JayL323/K230_AI_Demo_Development_Process_Analysis/
cd K230_AI_Demo_Development_Process_Analysis
cd onnx_related/onnx_export
git clone https://github.com/Xiaoccer/MobileFaceNet_Pytorch
cp face_recognition_convert_to_onnx.py MobileFaceNet_Pytorch/
cd MobileFaceNet_Pytorch
# Install dependencies
python face_recognition_convert_to_onnx.py
6.3.2.2 Inference Using ONNXRuntime#
6.3.2.2.1 Face Alignment#
Common face recognition training sets include MS1MV2, MS1MV3, Glint360K. Creating these datasets generally requires preprocessing the full-face original images, i.e., performing face detection first, then aligning each face, and finally saving the aligned face images.
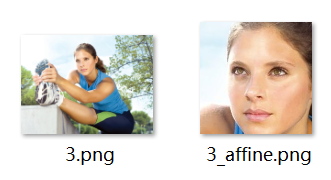
Face Alignment: For an image, the face detection model outputs the face bounding box coordinates and 5 facial key points. Before face recognition, the detected face needs to be aligned; that is, the face is rectified in the 2D plane to reduce the differences caused by face rotation, facilitating more accurate subsequent face recognition.
x.png: Original image, x_affine.png: Aligned face
def st_image(ori_image, landmarks):
    # Standard frontal face key point positions (112x112 resolution)
    le_g = [38.2946, 51.6963]
    re_g = [73.5318, 51.5014]
    nose_g = [56.0252, 71.7366]
    l_mouth_g = [41.5493, 92.3655]
    r_mouth_g = [70.7299, 92.2041]
    # Actual face key point positions
    le = landmarks[0, :]
    re = landmarks[1, :]
    nose = landmarks[2, :]
    l_mouth = landmarks[3, :]
    r_mouth = landmarks[4, :]
    landmark_get = np.float32([le, re, nose, l_mouth, r_mouth])
    landmark_golden = np.float32([le_g, re_g, nose_g, l_mouth_g, r_mouth_g])
    # Calculate the transformation from the actual face to the standard frontal face
    tform = trans.SimilarityTransform()
    tform.estimate(np.array(landmark_get), landmark_golden)
    M = tform.params[0:2, :]
    # Get the transformed face
    affine_output = cv2.warpAffine(ori_image, M, (112, 112), borderValue=0.0)
    return affine_output
6.3.2.2.2 Image Preprocessing#
Construct preprocessing (common methods: padding_resize, crop_resize, resize, affine, normalization): Refer to train.py, test.py, predict.py, and existing ONNX inference scripts.
Construct Face Recognition Preprocessing Code:
# mobile_face_net.py: MobileFaceNet
def pre_process(self, img, to_bin=True):
    # bgr->rgb, uint8, (112,112,3)
    img = img[..., ::-1]
    # Dequantize, float32, (112,112,3)
    img = np.array(img, dtype='float32')
    # Normalization, float32, (112,112,3)
    for i in range(3):
        img[:, :, i] -= self.normalize_mean
        img[:, :, i] /= self.normalize_std
    # transpose, hcw->chw, float32, (3,112,112)
    img = np.transpose(img, [2, 0, 1])
    # Expand 3 dimensions to 4 dimensions, input_data, float32, (1,3,112,112)
    input_data = np.expand_dims(img, 0)
    return input_data
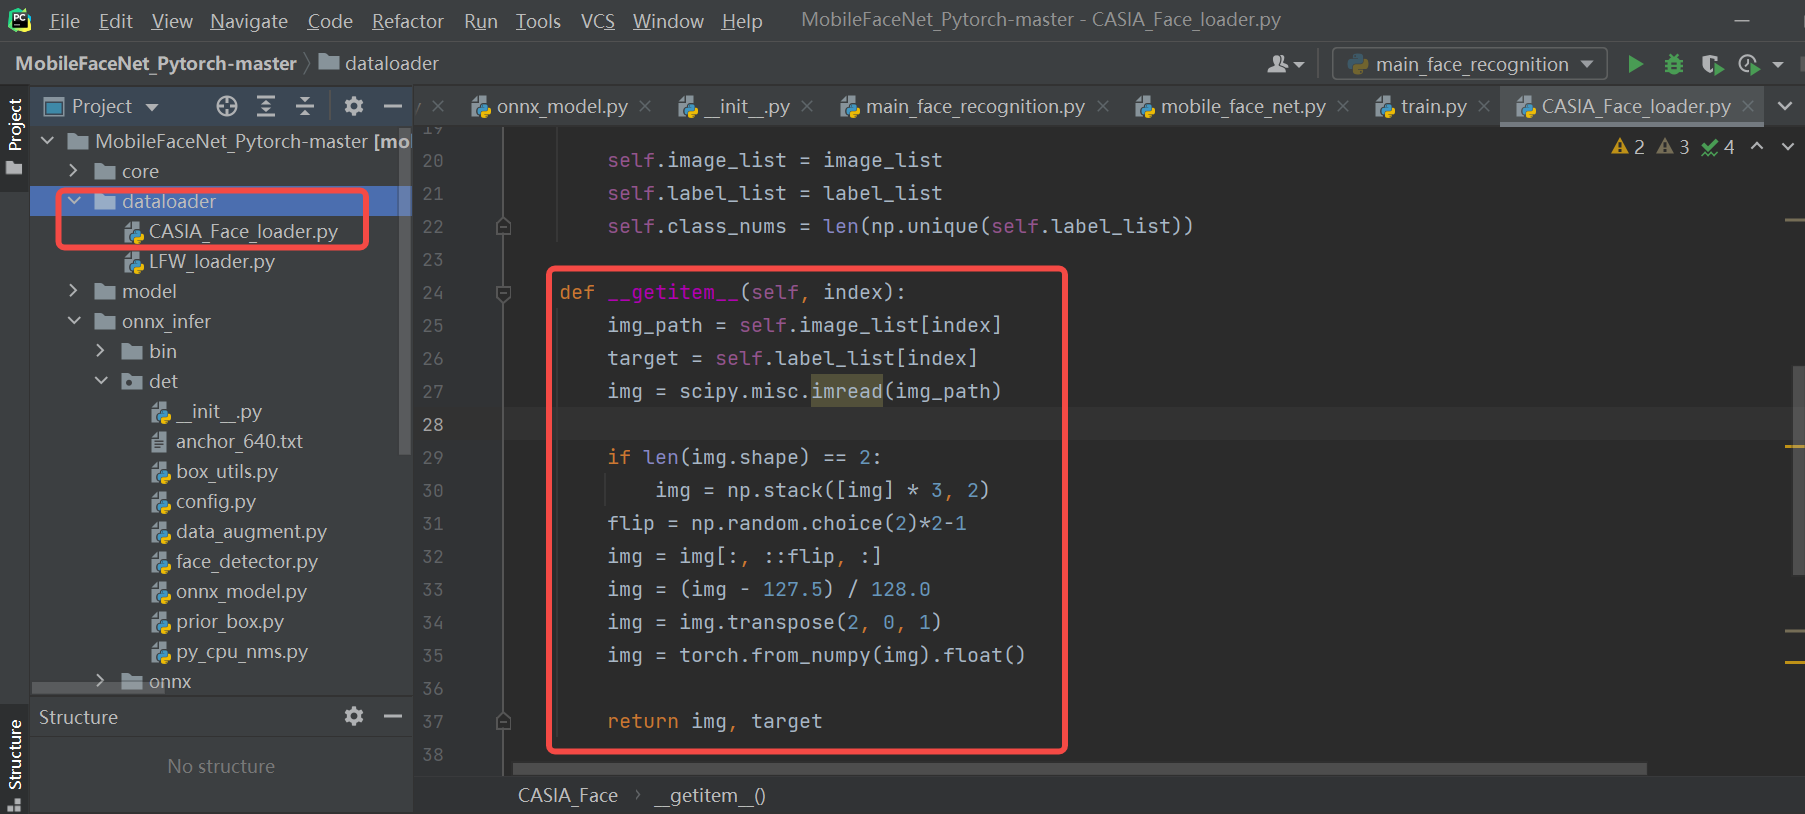
Reference: The face recognition preprocessing code refers to the dataloader called in train.py, removing the flip (data augmentation) that is not suitable for inference, and only keeping the necessary preprocessing steps for ONNX inference: bgr->rgb (scipy.misc.imread reads images in RGB format), Normalization (subtract mean and divide by std), hwc->chw (transpose).
6.3.1.2.3 ONNX Run#
Feed the preprocessed data to the model to get the ONNX inference results.
# onnx_model.py
def forward(self, image_tensor):
    '''
    image_tensor = image.transpose(2, 0, 1)
    image_tensor = image_tensor[np.newaxis, :]
    onnx_session.run([output_name], {input_name: x})
    :param image_tensor:
    :return:
    '''
    input_feed = self.get_input_feed(image_tensor)
    output = self.sess.run(self.out_names, input_feed=input_feed)
    return output

# mobile_face_net.py
def forward(self, input_data):
    embedding = self.model.forward(input_data)
    return embedding[0]
6.3.1.2.4 Post-processing#
After extracting the features, store them in the database for subsequent face comparison. To simplify the code, we will not write the database preparation process for now and will include it in the face comparison process.
6.3.1.2.5 Face Comparison Results#
Read multiple faces, extract features for each face, and save the normalized features to a list. Finally, compare the similarity of the first face in the current list with the others.
face_recg = MobileFaceNet()

embeddings = []
for i, img_file in enumerate(img_lists):
    ori_img = cv2.imread(img_file)
    input_data = face_recg.pre_process(ori_img)
    embedding = face_recg.forward(input_data)
    # Normalize the model features and store them in the database
    embedding_norm = preprocessing.normalize(embedding)
    embeddings.append(embedding_norm)  # Simulate the process of building the database

# Get the features of the first face and compare them with other face features
embedding_one = embeddings[0]
scores = np.array([np.sum(embedding_one * emb_database) / 2 + 0.5 for emb_database in embeddings])
print("scores:", scores)
img_lists:
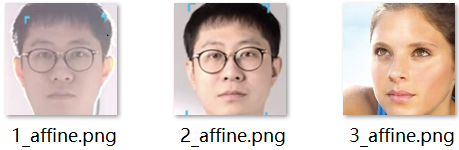
Assuming the threshold is set to 0.75, it indicates that faces 0 and 1 are the same, while faces 0 and 2 are different.

6.3.2.3 ONNX to kmodel Conversion#
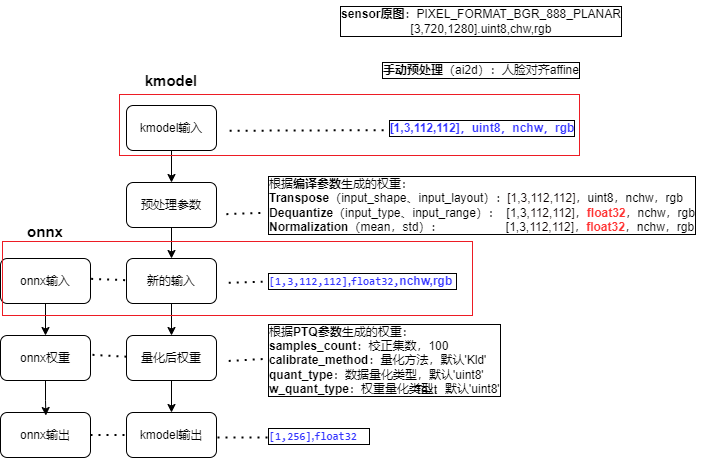
6.3.2.3.1 Configuring Parameters for kmodel Generation#
1. Compilation Parameters: CompileOptions#
For specific settings, refer to the compilation parameter settings method in 6.3.1.3.1.
# 1. Set compilation parameters, compile_options
compile_options = nncase.CompileOptions()
# Specify the compilation target, such as 'cpu', 'k230'. 'cpu' generates a kmodel for inference on the CPU, 'k230' generates a kmodel for inference on K230 (KPU)
compile_options.target = args.target
# Preprocessing
compile_options.preprocess = True
# (1) Preprocessing---Transpose-related parameters
# Must be specified when preprocess is True
input_shape = [1, 3, 112, 112]
compile_options.input_shape = input_shape
# Input data layout, default is ""
# compile_options.input_layout = "NCHW"
compile_options.input_layout = "0,1,2,3"

# (2) Preprocessing---SwapRB-related parameters
compile_options.swapRB = False

# (3) Preprocessing---Dequantize-related parameters
# Specify the input data type when preprocessing is enabled, default is "float"; must be specified as "uint8" or "float32" when preprocess is True
compile_options.input_type = 'uint8'
# Effective when input_type is 'uint8', specifies the range of dequantized data
compile_options.input_range = [0, 255]

# (4) Preprocessing---Normalization-related parameters
compile_options.mean = [127.5, 127.5, 127.5]
compile_options.std = [128.0, 128.0, 128.0]

# Post-processing
# compile_options.output_layout = "NCHW"
# Compiler class, configures the Compiler according to the compilation parameters, used to compile neural network models
compiler = nncase.Compiler(compile_options)
2. Import Parameters: ImportOptions#
The ImportOptions class is used to configure nncase import options, which are rarely set individually and can generally use default parameters.
# 2. Set import parameters, import_options (generally default)
import_options = nncase.ImportOptions()
model_file = onnx_simplify(args.model, dump_dir)
model_content = read_model_file(model_file)
compiler.import_onnx(model_content, import_options)
3. Post-Training Quantization Parameters: PTQTensorOptions#
Post-Training Quantization (PTQ) parameters. PTQ is a method of mapping model weights from float32 to uint8 or int16, reducing the computational resources required for inference while maintaining model accuracy. When target = “k230”, PTQ parameters are mandatory, with default uint8 quantization.
Using uint8 quantization can meet the accuracy requirements for face recognition, so we use the default uint8 quantization. The number of calibration sets is 100. If generating the kmodel with 100 calibration sets takes too long, you can reduce the number of calibration sets.
# 3. Set quantization parameters, ptq_options
ptq_options = nncase.PTQTensorOptions()
ptq_options.samples_count = 100
ptq_options.set_tensor_data(generate_data(input_shape, ptq_options.samples_count, args.dataset))
compiler.use_ptq(ptq_options)
6.3.2.3.2 Preparing the Calibration Set#
Using a small calibration set to calculate quantization factors can quickly obtain a quantized model. Using this quantized model for prediction can reduce computational load, lower memory usage, and reduce model size.
Calibration sets usually consist of 100 images from the validation set. For this face recognition model, the validation set is LFW, so we select 100 images from LFW as the calibration set.
Note:
(1) If generating the kmodel takes too long or the validation set data is limited, you can try using fewer than 100 data samples.
(2) The generate_data function generates data in a format that should closely match the format of the data fed to the kmodel during actual inference, otherwise, it may cause issues with the generated kmodel.
def generate_data(shape, batch, calib_dir):
    # Generate data consistent with the actual kmodel input data, as only the preprocessing set in the parameters will be done when generating the kmodel
    # The preprocessing required for the generated calibration set data ≈ ONNX preprocessing - Preprocessing set in the parameters, included in the kmodel
    # ONNX preprocessing: bgr->rgb, transpose, normalization, dequantize, expand 3 dimensions to 4 dimensions
    # Preprocessing included in the kmodel: dequantize, normalization
    img_paths = [os.path.join(calib_dir, p) for p in os.listdir(calib_dir)]
    data = []
    for i in range(batch):
        assert i < len(img_paths), "calibration images not enough."
        # Read the image and convert it to RGB
        img_data = Image.open(img_paths[i]).convert('RGB')
        # Transpose
        img_data = np.transpose(img_data, (2, 0, 1))
        data.append([img_data[np.newaxis, ...]])
    return np.array(data)

input_shape = [1, 3, 112, 112]
......
ptq_options = nncase.PTQTensorOptions()
    ptq_options.samples_count = 100
    # Preprocess calibration set data, converting the original image to the format required by the kmodel
    ptq_options.set_tensor_data(generate_data(input_shape, ptq_options.samples_count, args.dataset))
    # Use samples_count calibration data to calculate quantization factors
    compiler.use_ptq(ptq_options)
......
6.3.2.3.3 Generate kmodel#
Generation Environment: The compilation environment built in section 6.2.2
Steps to Generate:
cd k230_sdk/src/reference
# If you have already downloaded the code, ignore the clone step
git clone https://github.com/JayL323/K230_AI_Demo_Development_Process_Analysis/
cd K230_AI_Demo_Development_Process_Analysis
cd kmodel_related/kmodel_export
# python mobile_face.py --target k230 --model onnx/MobileFaceNet.onnx --dataset lfw
./build_model.sh
-rw-r--r--+ 1 root root 1319744 Feb 29 14:56 face_recognize.kmodel
6.3.2.4 Inference Using K230Runtime#
6.3.2.4.1 Simulator Verification of kmodel#
After generating the face recognition kmodel, to verify the accuracy of the kmodel, you need to compare the kmodel’s output with the ONNX’s output using the Simulator. This requires calling the Simulator APIs (Python).
1. Generate input.bin#
Before using the simulator to verify the kmodel, you need to prepare the input file. Since the kmodel includes partial preprocessing, for the same image, you need to use different preprocessing to generate different onnx_input.bin and kmodel_input.bin.
Name |
onnx_input.bin Construction Process |
kmodel_input.bin Construction Process |
|---|---|---|
Source -> Target |
(uint8, hwc, bgr -> float32, nchw, bgr) |
(uint8, hwc, bgr -> uint8, nchw, rgb) |
Original Image |
(112, 112, 3), uint8, hwc, bgr |
(112, 112, 3), uint8, hwc, bgr |
bgr -> rgb |
(112, 112, 3), uint8, hwc, rgb |
(112, 112, 3), uint8, hwc, rgb |
Dequantize |
(112, 112, 3), float32, hwc, rgb |
— |
Normalization |
(112, 112, 3), float32, hwc, rgb |
— |
Transpose |
(3, 112, 112), float32, chw, rgb |
(3, 112, 112), uint8, chw, rgb |
Dimension Expansion (optional) |
(1, 3, 112, 112), float32, chw, rgb |
(1, 3, 112, 112), uint8, chw, rgb |
Note: The generated kmodel includes partial preprocessing, so the preprocessing required to generate kmodel_input.bin ≈ the preprocessing required to generate onnx_input.bin - the preprocessing included in the kmodel (the preprocessing in the face recognition kmodel includes transpose, dequantize, normalization)
(1) Dimension expansion can be omitted (the bin file can be reshaped during reading, and dimension expansion can be omitted during generation).
(2) Why is transpose still needed for generating kmodel_input.bin even though it is included in the kmodel? When generating the kmodel, if the preprocessing switch is turned on, the transpose-related parameters must be set. The actual input of our face recognition kmodel is NCHW, and the input_layout is set to NCHW, both are consistent. Therefore, transpose is NCHW2NCHW, and there is no actual conversion.
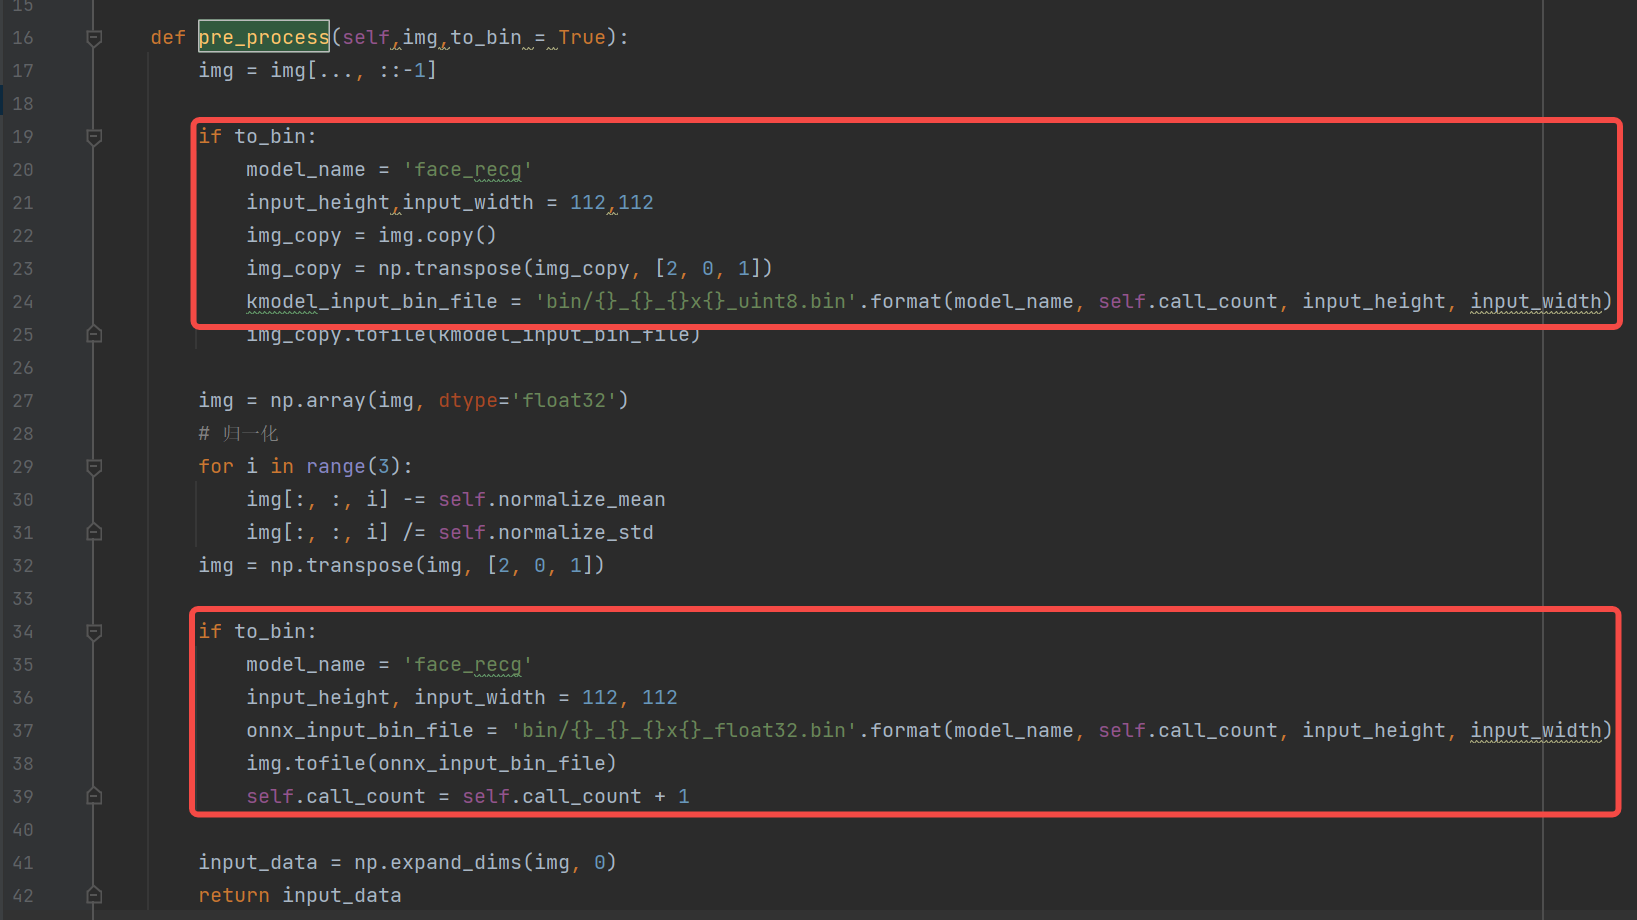
-rw-r--r-- 1 root root 147K Feb 26 16:37 face_recg_0_112x112_float32.bin
-rw-r--r-- 1 root root  37K Feb 26 16:37 face_recg_0_112x112_uint8.bin
2. Simulator Verification#
The interface for the Simulator APIs is shown below. If you cannot see the K230_nncase_Development_Guide.md document structure on GitHub, you can download it locally and open it with the Typora tool.
Simulator Process: (Basically consistent with the face detection process, just modify input_shape and input_bin_file)
For the same image, use different preprocessing to generate different onnx_input.bin and kmodel_input.bin;
Feed onnx_input.bin to ONNX for inference to get cpu_results;
Feed kmodel_input.bin to the kmodel for inference using the Simulator to get nncase_results;
Calculate the cosine similarity between cpu_results and nncase_results to determine whether the simulated kmodel inference results are consistent with the ONNX inference results.
import os
import copy
import argparse
import numpy as np
import onnx
import onnxruntime as ort
import nncase

def read_model_file(model_file):
    with open(model_file, 'rb') as f:
        model_content = f.read()
    return model_content

def cosine(gt, pred):
    return (gt @ pred) / (np.linalg.norm(gt, 2) * np.linalg.norm(pred, 2))

def main():
    parser = argparse.ArgumentParser(prog="nncase")
    parser.add_argument("--target", type=str, help='target to run')
    parser.add_argument("--model", type=str, help='original model file')
    parser.add_argument("--model_input", type=str, help='input bin file for original model')
    parser.add_argument("--kmodel", type=str, help='kmodel file')
    parser.add_argument("--kmodel_input", type=str, help='input bin file for kmodel')
    args = parser.parse_args()

    # 1. ONNX inference to get cpu_results
    ort_session = ort.InferenceSession(args.model)
    output_names = []
    model_outputs = ort_session.get_outputs()
    for i in range(len(model_outputs)):
        output_names.append(model_outputs[i].name)
    model_input = ort_session.get_inputs()[0]

    model_input_name = model_input.name
    model_input_type = np.float32
    model_input_shape = model_input.shape
    print('onnx_input:', model_input_shape)
    model_input_data = np.fromfile(args.model_input, model_input_type).reshape(model_input_shape)
    cpu_results = []
    cpu_results = ort_session.run(output_names, { model_input_name : model_input_data })

    # 2. Simulator inference to get nncase_results
    # Create Simulator
    sim = nncase.Simulator()

    # Read kmodel
    kmodel = read_model_file(args.kmodel)

    # Load kmodel
    sim.load_model(kmodel)

    # Read input.bin
    input_shape = [1, 3, 112, 112]
    dtype = sim.get_input_desc(0).dtype
    input = np.fromfile(args.kmodel_input, dtype).reshape(input_shape)

    # Set input for Simulator
    sim.set_input_tensor(0, nncase.RuntimeTensor.from_numpy(input))

    # Simulator inference
    nncase_results = []
    sim.run()
    for i in range(sim.outputs_size):
        nncase_result = sim.get_output_tensor(i).to_numpy()
        # print("nncase_result:", nncase_result)
        input_bin_file = 'bin/face_recg_{}_{}_simu.bin'.format(i, args.target)
        nncase_result.tofile(input_bin_file)
        nncase_results.append(copy.deepcopy(nncase_result))

    # 3. Calculate the similarity between ONNX and Simulator
    for i in range(sim.outputs_size):
        cos = cosine(np.reshape(nncase_results[i], (-1)), np.reshape(cpu_results[i], (-1)))
        print('output {0} cosine similarity : {1}'.format(i, cos))

if __name__ == '__main__':
    main()
The above script can meet the verification needs for most ONNX and their kmodels without much modification. Just modify the input_shape according to the actual input size of the model.
python mobile_face_onnx_simu.py --target k230 --model onnx/MobileFaceNet.onnx --model_input bin/face_recg_0_112x112_float32.bin --kmodel onnx/k230_mobile_face.kmodel --kmodel_input bin/face_recg_0_112x112_uint8.bin
# If you have already downloaded the code, ignore the clone step
git clone https://github.com/JayL323/K230_AI_Demo_Development_Process_Analysis/
cd K230_AI_Demo_Development_Process_Analysis
cd kmodel_related/kmodel_export
# The above command line has been added to build_model.sh
./build_model.sh
Generally, the higher the cosine similarity between ONNX and Simulator, the better. A similarity above 0.99 is usually acceptable. If it is below 0.99 but above 0.96, you can further verify the generated kmodel through on-board inference verification to see if it meets the actual performance requirements.

Note: When running the Simulator, you must first add the following environment variables (included in the build_model.sh file):
export NNCASE_PLUGIN_PATH=$NNCASE_PLUGIN_PATH:/usr/local/lib/python3.8/dist-packages/
export PATH=$PATH:/usr/local/lib/python3.8/dist-packages/
source /etc/profile
6.3.2.4.2 Using main_nncase to Verify kmodel#
Generally, the kmodel inference results from the Simulator and actual on-board inference are consistent, but there may be some differences in certain cases. To verify whether they are consistent, the main_nncase tool is used to assist in verifying whether the kmodel inference results from the Simulator and actual on-board inference are consistent. This tool requires calling the nncase KPU Runtime APIs (C++).
The KPU Runtime APIs provide various interfaces for kmodel on-board inference, as shown below. If you cannot see the K230_nncase_Development_Guide.md document structure on GitHub, you can download it locally and open it with the Typora tool.
main_nncase Verification Process:
Load the kmodel
Set kmodel input: read the kmodel_input.bin file
Set kmodel output
Run the kmodel
Get kmodel output
Compare the similarity between Simulator inferred kmodel and on-board inferred kmodel results
// main_nncase
#include <chrono>
#include <fstream>
#include <iostream>
#include <nncase/runtime/runtime_tensor.h>
#include <nncase/runtime/interpreter.h>
#include <nncase/runtime/runtime_op_utility.h>

using namespace nncase;
using namespace nncase::runtime;
using namespace nncase::runtime::detail;

#define USE_CACHE 1

template <class T>
std::vector<T> read_binary_file(const char *file_name)
{
    std::ifstream ifs(file_name, std::ios::binary);
    ifs.seekg(0, ifs.end);
    size_t len = ifs.tellg();
    std::vector<T> vec(len / sizeof(T), 0);
    ifs.seekg(0, ifs.beg);
    ifs.read(reinterpret_cast<char *>(vec.data()), len);
    ifs.close();
    return vec;
}

void read_binary_file(const char *file_name, char *buffer)
{
    std::ifstream ifs(file_name, std::ios::binary);
    ifs.seekg(0, ifs.end);
    size_t len = ifs.tellg();
    ifs.seekg(0, ifs.beg);
    ifs.read(buffer, len);
    ifs.close();
}

template <typename T>
double dot(const T *v1, const T *v2, size_t size)
{
    double ret = 0.f;
    for (size_t i = 0; i < size; i++)
    {
        ret += v1[i] * v2[i];
    }

    return ret;
}

template <typename T>
double cosine(const T *v1, const T *v2, size_t size)
{
    return dot(v1, v2, size) / ((sqrt(dot(v1, v1, size)) * sqrt(dot(v2, v2, size))));
}

void dump(const std::string &info, volatile float *p, size_t size)
{
    std::cout << info << " dump: p = " << std::hex << (void *)p << std::dec << ", size = " << size << std::endl;
    volatile unsigned int *q = reinterpret_cast<volatile unsigned int *>(p);
    for (size_t i = 0; i < size; i++)
    {
        if ((i != 0) && (i % 4 == 0))
        {
            std::cout << std::endl;
        }

        std::cout << std::hex << q[i] << " ";
    }
    std::cout << std::dec << std::endl;
}

int main(int argc, char *argv[])
{
    std::cout << "case " << argv[0] << " build " << __DATE__ << " " << __TIME__ << std::endl;
    if (argc < 4)
    {
        std::cerr << "Usage: " << argv[0] << " <kmodel> <input_0.bin> <input_1.bin> ... <input_N.bin> <output_0.bin> <output_1.bin> ... <output_N.bin>" << std::endl;
        return -1;
    }

    interpreter interp;

    // 1. Load model
    std::ifstream in_before_load_kmodel("/proc/media-mem");
    std::string line_before_load_kmodel;
    // Read file content line by line to check MMZ usage
    while (std::getline(in_before_load_kmodel, line_before_load_kmodel)) {
        std::cout << line_before_load_kmodel << std::endl;
    }

    std::ifstream ifs(argv[1], std::ios::binary);
    interp.load_model(ifs).expect("Invalid kmodel");

    std::ifstream in_after_load_kmodel("/proc/media-mem");
    std::string line_after_load_kmodel;
    // Read file content line by line to check MMZ usage
    while (std::getline(in_after_load_kmodel, line_after_load_kmodel)) {
        std::cout << line_after_load_kmodel << std::endl;
    }

    // 2. Set inputs
    for (size_t i = 2, j = 0; i < 2 + interp.inputs_size(); i++, j++)
    {
        auto desc = interp.input_desc(j);
        auto shape = interp.input_shape(j);
        auto tensor = host_runtime_tensor::create(desc.datatype, shape, hrt::pool_shared).expect("cannot create input tensor");
        auto mapped_buf = std::move(hrt::map(tensor, map_access_::map_write).unwrap());
#if USE_CACHE
        read_binary_file(argv[i], reinterpret_cast<char *>(mapped_buf.buffer().data()));
#else
        auto vec = read_binary_file<unsigned char>(argv[i]);
        memcpy(reinterpret_cast<void *>(mapped_buf.buffer().data()), reinterpret_cast<void *>(vec.data()), vec.size());
        // dump("app dump input vector", (volatile float *)vec.data(), 32);
#endif
        auto ret = mapped_buf.unmap();
        ret = hrt::sync(tensor, sync_op_t::sync_write_back, true);
        if (!ret.is_ok())
        {
            std::cerr << "hrt::sync failed" << std::endl;
            std::abort();
        }

        // dump("app dump input block", (volatile float *)block.virtual_address, 32);
        interp.input_tensor(j, tensor).expect("cannot set input tensor");
    }

    // 3. Set outputs
    for (size_t i = 0; i < interp.outputs_size(); i++)
    {
        auto desc = interp.output_desc(i);
        auto shape = interp.output_shape(i);
        auto tensor = host_runtime_tensor::create(desc.datatype, shape, hrt::pool_shared).expect("cannot create output tensor");
        interp.output_tensor(i, tensor).expect("cannot set output tensor");
    }

    // 4. Run
    auto start = std::chrono::steady_clock::now();
    interp.run().expect("error occurred in running model");
    auto stop = std::chrono::steady_clock::now();
    double duration = std::chrono::duration<double, std::milli>(stop - start).count();
    std::cout << "interp run: " << duration << " ms, fps = " << 1000 / duration << std::endl;

    // 5. Get outputs
    for (int i = 2 + interp.inputs_size(), j = 0; i < argc; i++, j++)
    {
        auto out = interp.output_tensor(j).expect("cannot get output tensor");
        auto mapped_buf = std::move(hrt::map(out, map_access_::map_read).unwrap());
        auto expected = read_binary_file<unsigned char>(argv[i]);

        // 6. Compare
        int ret = memcmp((void *)mapped_buf.buffer().data(), (void *)expected.data(), expected.size());
        if (!ret)
        {
            std::cout << "compare output " << j << " Pass!" << std::endl;
        }
        else
        {
            auto cos = cosine((const float *)mapped_buf.buffer().data(), (const float *)expected.data(), expected.size() / sizeof(float));
            std::cerr << "compare output " << j << " Fail: cosine similarity = " << cos << std::endl;
        }
    }

    return 0;
}
Compile the above C++ code and copy the generated k230_bin directory to the CanMV-K230 development board.
# In the Docker container, if you have already downloaded the code, ignore the clone step
docker exec -it v1.3_0219_lj /bin/bash
cd src/reference
git clone https://github.com/JayL323/K230_AI_Demo_Development_Process_Analysis.git
cd K230_AI_Demo_Development_Process_Analysis/kmodel_related/kmodel_inference/
./build_app.sh debug
# On the small core:
# The large and small cores share /sharefs/
cd /sharefs/
# Example: Replace the source directory with your own directory during actual execution
scp liujie@10.10.1.22:/xxx/k230_bin/debug /sharefs/

# On the large core
cd /sharefs/k230_bin/debug
# face_recognize_main_nncase.sh
./main_nncase.elf face_recognize.kmodel face_recg_0_112x112_uint8.bin face_recg_0_k230_simu.bin

From the execution results, we can observe:
Memory usage of the face recognition kmodel: approximately 2MB
Inference speed of the face recognition kmodel: 1.21ms
Similarity between Simulator and on-board inference for face recognition: Outputs are completely consistent (byte-level consistency)
6.3.2.4.3 Inference Using K230Runtime#
Overall Process:

Recognition Process:
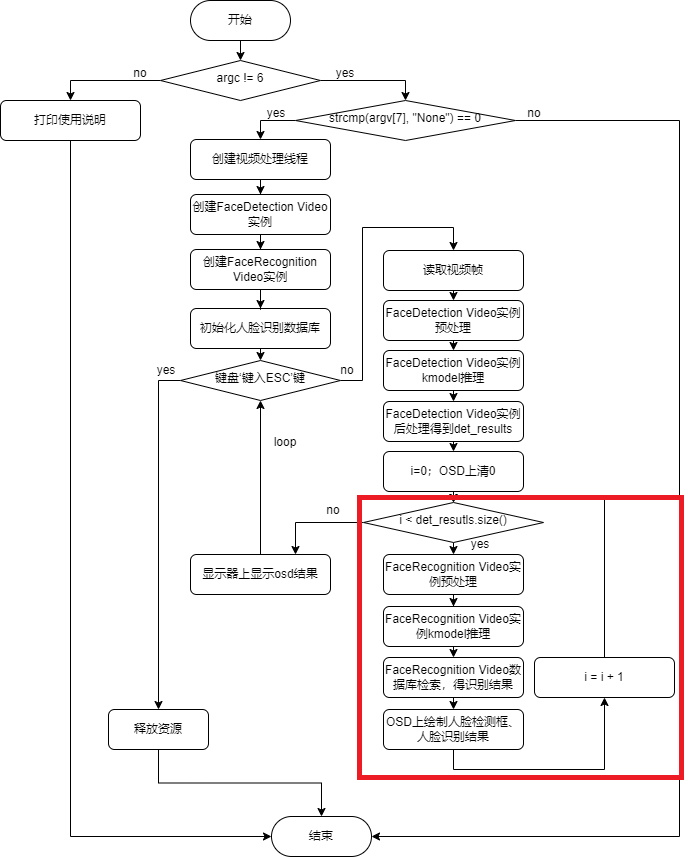
face_recognition code. This code only supports the development boards CanMV-K230-V1.0 and CanMV-K230-V2.0. For other models of CanMV-K230 development boards, you can use the latest vi_vo.h to replace the current repo vi_vo.h.
├── ai_base.cc                  # AI base class, encapsulates KPU runtime APIs, simplifies kmodel-related operations
├── ai_base.h
├── anchors_640.cc              # Anchors for face detection with 640 resolution input
├── CMakeLists.txt
├── face_detection.cc           # Face detection, preprocessing, kmodel inference, post-processing
├── face_detection.h
├── face_recognition.cc         # Face recognition, preprocessing, kmodel inference, database comparison
├── face_recognition.h
├── main.cc                     # Main process of face recognition demo
├── README.md
├── scoped_timing.hpp           # Timing class
├── utils.cc                    # Utility class, encapsulates common functions and AI2D runtime APIs, simplifies preprocessing operations
├── utils.h
└── vi_vo.h                     # Encapsulates sensor and display operations
To use K230Runtime for kmodel inference, you need to thoroughly understand the K230Runtime documentation. To simplify the inference process, we encapsulate the K230Runtime interfaces. The files ai_base.cc, scoped_timing.hpp, utils.cc, and vi_vo.h are pre-encapsulated methods and do not require modification. face_detection.cc has already been implemented in the face detection demo and can be directly copied. For face_recognition.cc, you only need to copy face_detection.cc and modify the corresponding constructor, preprocessing (pre_process), and post-processing (post_process).
1. Reading Images or Video Frames#
(1) Reading Images
cv::Mat ori_img = cv::imread(xxx);
(2) Reading Video Frames
Example of Reading Video Frames: test_vi_vo demo
2. Preprocessing#
Background Knowledge: If the parameters remain unchanged, ai2d_builder_ can be called repeatedly; if the parameters change, a new ai2d_builder_ needs to be created.
Face Recognition Image Preprocessing: Since the positions of facial key points in the input face are different, the calculated affine transformation will also be different. When performing face alignment (affine), the generated affine transformation needs to be used as a parameter to set AI2D. AI2D parameters will change each time, and a new ai2d_builder_ needs to be created using Utils::affine for preprocessing.
Face Recognition Video Stream Preprocessing: Similarly, since the positions of facial key points in different frames are different, a new ai2d_builder_ needs to be created using Utils::affine for preprocessing.
// ai2d for image
void FaceRecognition::pre_process(cv::Mat ori_img, float *sparse_points)
{
    ScopedTiming st(model_name_ + " pre_process image", debug_mode_);
    get_affine_matrix(sparse_points);

    std::vector<uint8_t> chw_vec;
    Utils::bgr2rgb_and_hwc2chw(ori_img, chw_vec);
    Utils::affine({ori_img.channels(), ori_img.rows, ori_img.cols}, chw_vec, matrix_dst_, ai2d_out_tensor_);

    if (debug_mode_ > 1)
    {
        auto vaddr_out_buf = ai2d_out_tensor_.impl()->to_host().unwrap()->buffer().as_host().unwrap().map(map_access_::map_read).unwrap().buffer();
        unsigned char *output = reinterpret_cast<unsigned char *>(vaddr_out_buf.data());
        Utils::dump_color_image("FaceRecognition_input_affine.png", {input_shapes_[0][3], input_shapes_[0][2]}, output);
    }
}

// ai2d for video
void FaceRecognition::pre_process(float *sparse_points)
{
    ScopedTiming st(model_name_ + " pre_process_video", debug_mode_);
    get_affine_matrix(sparse_points);
    size_t isp_size = isp_shape_.channel * isp_shape_.height * isp_shape_.width;
    auto buf = ai2d_in_tensor_.impl()->to_host().unwrap()->buffer().as_host().unwrap().map(map_access_::map_write).unwrap().buffer();
    memcpy(reinterpret_cast<char *>(buf.data()), (void *)vaddr_, isp_size);
    hrt::sync(ai2d_in_tensor_, sync_op_t::sync_write_back, true).expect("sync write_back failed");
    Utils::affine(matrix_dst_, ai2d_builder_, ai2d_in_tensor_, ai2d_out_tensor_);

    if (debug_mode_ > 1)
    {
        auto vaddr_out_buf = ai2d_out_tensor_.impl()->to_host().unwrap()->buffer().as_host().unwrap().map(map_access_::map_read).unwrap().buffer();
        unsigned char *output = reinterpret_cast<unsigned char *>(vaddr_out_buf.data());
        Utils::dump_color_image("FaceRecognition_input_affine.png", {input_shapes_[0][3], input_shapes_[0][2]}, output);
    }
}
The method to obtain sparse_points (facial key points): Perform face detection first, and the face detection result contains sparse_points.
// main.cc
......
// Face detection and face recognition instances share the same memory address vaddr
FaceDetection face_det(argv[1], atof(argv[2]), atof(argv[3]), {SENSOR_CHANNEL, SENSOR_HEIGHT, SENSOR_WIDTH}, reinterpret_cast<uintptr_t>(vaddr), reinterpret_cast<uintptr_t>(paddr), atoi(argv[8]));

FaceRecognition face_recg(argv[4], atoi(argv[5]), recg_thres, {SENSOR_CHANNEL, SENSOR_HEIGHT, SENSOR_WIDTH}, reinterpret_cast<uintptr_t>(vaddr), reinterpret_cast<uintptr_t>(paddr), atoi(argv[8]));

// Each time a frame is read from the sensor, the data is copied to vaddr
while (!isp_stop)
{
    ScopedTiming st("total time", 1);
    {
        // Each time a frame is read from the sensor
        ScopedTiming st("read capture", atoi(argv[8]));
        memset(&dump_info, 0, sizeof(k_video_frame_info));
        ret = kd_mpi_vicap_dump_frame(vicap_dev, VICAP_CHN_ID_1, VICAP_DUMP_YUV, &dump_info, 1000);
        if (ret)
        {
            printf("sample_vicap...kd_mpi_vicap_dump_frame failed.\n");
            continue;
        }
    }

    {
        // Copy data read from the sensor to vaddr
        ScopedTiming st("isp copy", atoi(argv[8]));
        auto vbvaddr = kd_mpi_sys_mmap_cached(dump_info.v_frame.phys_addr[0], size);
        memcpy(vaddr, (void *)vbvaddr, SENSOR_HEIGHT * SENSOR_WIDTH * 3);  // This can be removed later, no need to copy
        kd_mpi_sys_munmap(vbvaddr, size);
    }

    det_results.clear();

    // Copy vaddr data to face detection ai2d input, preprocess it, and the preprocessing result will be stored in the ai2d output; ai2d output actually points to the face detection kmodel input
    face_det.pre_process();
    face_det.inference();
    face_det.post_process({SENSOR_WIDTH, SENSOR_HEIGHT}, det_results);

    cv::Mat osd_frame(osd_height, osd_width, CV_8UC4, cv::Scalar(0, 0, 0, 0));
    for (int i = 0; i < det_results.size(); ++i)
    {
        // ***for face recg***
        // Copy vaddr data to face recognition ai2d input, preprocess it, and the preprocessing result will be stored in the ai2d output; ai2d output actually points to the face recognition kmodel input
        face_recg.pre_process(det_results[i].sparse_kps.points);
        face_recg.inference();

        FaceRecognitionInfo recg_result;
        face_recg.database_search(recg_result);
        face_recg.draw_result(osd_frame, det_results[i].bbox, recg_result, false);
    }

    {
        ScopedTiming st("osd copy", atoi(argv[8]));
        memcpy(pic_vaddr, osd_frame.data, osd_width * osd_height * 4);
        // Insert frame into display channel
        kd_mpi_vo_chn_insert_frame(osd_id + 3, &vf_info); // K_VO_OSD0
        ret = kd_mpi_vicap_dump_release(vicap_dev, VICAP_CHN_ID_1, &dump_info);
        if (ret)
        {
            printf("sample_vicap...kd_mpi_vicap_dump_release failed.\n");
        }
    }
}
......
3. kmodel Run#
// ai_base.cc
void AIBase::run()
{
    ScopedTiming st(model_name_ + " run", debug_mode_);
    kmodel_interp_.run().expect("error occurred in running model");
}

void AIBase::get_output()
{
    ScopedTiming st(model_name_ + " get_output", debug_mode_);
    p_outputs_.clear();
    for (int i = 0; i < kmodel_interp_.outputs_size(); i++)
    {
        auto out = kmodel_interp_.output_tensor(i).expect("cannot get output tensor");
        auto buf = out.impl()->to_host().unwrap()->buffer().as_host().unwrap().map(map_access_::map_read).unwrap().buffer();
        float *p_out = reinterpret_cast<float *>(buf.data());
        p_outputs_.push_back(p_out);
    }
}
// face_recognition.cc
void FaceRecognition::inference()
{
    this->run();
    this->get_output();
}
// main.cc, verify if kmodel inference is correct: we have already verified using simulator and main_nncase
......
FaceRecognition face_recg;
face_recg.inference();
......
4. Post-processing#
After obtaining the face recognition kmodel inference result embedding, you need to compare the current embedding with the embeddings in the database. If the comparison result is greater than a certain threshold, the recognition is successful, indicating that the face has been registered; otherwise, the recognition fails.
// face_recognition.cc
void FaceRecognition::l2_normalize(float *src, float *dst, int len)
{
    float sum = 0;
    for (int i = 0; i < len; ++i)
    {
        sum += src[i] * src[i];
    }
    sum = sqrtf(sum);
    for (int i = 0; i < len; ++i)
    {
        dst[i] = src[i] / sum;
    }
}

float FaceRecognition::cal_cosine_distance(float *feature_0, float *feature_1, int feature_len)
{
    float cosine_distance = 0;
    // Calculate the sum square
    for (int i = 0; i < feature_len; ++i)
    {
        float p0 = *(feature_0 + i);
        float p1 = *(feature_1 + i);
        cosine_distance += p0 * p1;
    }
    // Cosine distance
    return (0.5 + 0.5 * cosine_distance) * 100;
}

void FaceRecognition::database_search(FaceRecognitionInfo &result)
{
    int i;
    int v_id = -1;
    float v_score;
    float v_score_max = 0.0;
    float basef[feature_num_], testf[feature_num_];

    // Current frame
    l2_normalize(p_outputs_[0], testf, feature_num_);

    for (i = 0; i < valid_register_face_; i++)
    {
        l2_normalize(feature_database_ + i * feature_num_, basef, feature_num_);
        v_score = cal_cosine_distance(testf, basef, feature_num_);
        if (v_score > v_score_max)
        {
            v_score_max = v_score;
            v_id = i;
        }
    }
    if (v_id == -1)
    {
        result.id = v_id;
        result.name = "unknown";
        result.score = 0;
    }
    else
    {
        result.id = v_id;
        result.name = names_[v_id];
        result.score = v_score_max;
    }
}
5. Displaying Results#
Example of Displaying Results: test_vi_vo demo
6. Compilation and Execution#
Clone the code to the src/reference/ directory of the already started Docker container, execute build_app.sh, and copy the k230_bin directory to the small core of the K230 development board.
docker exec -it v1.3_0219_lj /bin/bash
cd src/reference
git clone https://github.com/JayL323/K230_AI_Demo_Development_Process_Analysis.git
cd K230_AI_Demo_Development_Process_Analysis/kmodel_related/kmodel_inference/
./build_app.sh debug         # If the debug directory is not needed, execute ./build_app.sh
Copy the k230_bin directory to the /sharefs/ directory on the K230 development board.
(1) Verify if preprocessing is correct
Set debug_mode to 2 to save the preprocessed image.
# The large and small cores share /sharefs/
# On the small core
cd /sharefs/
# Example: Replace the source directory with your own directory during actual execution
scp liujie@10.10.1.22:/xxx/k230_bin /sharefs/

# On the large core (press q+Enter to exit the auto-start program)
cd /sharefs/k230_bin/face_recognize
./face_recognition.elf face_detect_640.kmodel 0.6 0.2 face_recognize.kmodel 100 75 None 2 db
# On the small core
cd  /sharefs/k230_bin/face_recognize
scp FaceRecognition_input_affine.png username@ip:dir
The FaceRecognition_input_affine.png will be generated. Copy it to the PC to check if the preprocessing code is correct. If there is an issue, check if the original sensor image is correct and if the preprocessing parameters are set correctly.
(2) Verify if post-processing is correct
Post-processing for face recognition is relatively simple, as it only involves comparing the similarity between the current face and the faces in the database. Therefore, we will not verify it separately.
(3) Execution
On the large core, execute face_recognize_isp.sh to run the inference process based on the video stream.
# The large and small cores share /sharefs/
# On the large core
cd /sharefs/k230_bin/face_recognize
./face_recognize_isp.sh
# Press 'i' to start registering the largest face in the current frame, and enter the name of the registered face, e.g., aaa
# From the next frame, registered faces can be recognized
# Press 'Esc' to stop the current inference program
6.4 Common Debugging Techniques#
6.4.1 Technique 1: target = ‘cpu’#
If target = 'k230', generate the kmodel, and find that the kmodel inference result is incorrect, what should you do?
compile_options.target = 'k230'
...
ptq_options = nncase.PTQTensorOptions()
ptq_options.samples_count = 100
ptq_options.set_tensor_data(generate_data(input_shape, ptq_options.samples_count, args.dataset))
compiler.use_ptq(ptq_options)
Modify the target setting to target = 'cpu', regenerate cpu_xxx.kmodel. The generated kmodel will not be quantized. If the cpu_xxx.kmodel inference is correct but the k230_xxx.kmodel inference is incorrect, it indicates that the kmodel parsing is correct and the issue is related to quantization. You can check the number of calibration sets (too few?), the content of the calibration set (whether the format of generate_data matches the actual kmodel input), and modify the quantization method and type to correct it.
6.4.2 Technique 2: int16 Quantization#
If target = 'k230', generate the kmodel, and find that the inference using K230Runtime is effective but the accuracy needs improvement, what should you do?
If the inference is effective but the accuracy needs improvement, it likely means the calibration set is correct. You can optimize by modifying the quantization method and type.
# int16 Quantization (Quantization Parameter Configuration)
import nncase
ptq_options = nncase.PTQTensorOptions()
ptq_options.samples_count = 100                # The typical number of quantization samples is 100
ptq_options.set_tensor_data(generate_data(input_shape, ptq_options.samples_count, args.dataset))
# Four options can be selected as needed, simultaneous int16 quantization of w_quant_type and quant_type is not supported
# Option 1: Use 'NoClip' int16 quantization, weights: float32 -> int16
ptq_options.calibrate_method = 'NoClip'      # Quantization method, typical is min-max quantization
ptq_options.w_quant_type = 'int16'           # Specify the quantization type for weights, 'int16' or 'uint8'

# Option 2: Use 'NoClip' int16 quantization, data: float32 -> int16
ptq_options.calibrate_method = 'NoClip'
ptq_options.quant_type = 'int16'               # Specify the quantization type for data, 'int16' or 'uint8'

# Option 3: Use 'Kld' int16 quantization, weights: float32 -> int16
ptq_options.w_quant_type = 'int16'

# Option 4: Use 'Kld' int16 quantization, data: float32 -> int16
ptq_options.quant_type = 'int16'
compiler.use_ptq(ptq_options)
Face Detection Option 1 Quantization Example: mobile_retinaface_data_100_640_uint16_option_1.py
Face Detection Option 2 Quantization Example: mobile_retinaface_data_100_640_uint16_option_2.py
Face Detection Option 3 Quantization Example: mobile_retinaface_data_100_640_uint16_option_3.py
Face Detection Option 4 Quantization Example: mobile_retinaface_data_100_640_uint16_option_4.py
# Generation environment: The compilation environment built in section 6.2.2
git clone https://github.com/JayL323/K230_AI_Demo_Development_Process_Analysis.git
cd K230_AI_Demo_Development_Process_Analysis/kmodel_related/kmodel_export
./build_model_int16.sh
-rw-r--r--  1 root root 1.2M Mar  1 11:48 face_detect_int16_opt1.kmodel
-rw-r--r--  1 root root 960K Mar  1 11:50 face_detect_int16_opt2.kmodel
-rw-r--r--  1 root root 1.7M Mar  1 11:52 face_detect_int16_opt3.kmodel
-rw-r--r--  1 root root 960K Mar  1 11:54 face_detect_int16_opt4.kmodel
After running ./build_model_int16.sh, four models will be generated. While generating the kmodel, use the Simulator for verification and output the verification similarity. Choose the model based on the similarity.
6.4.3 Technique 3: Generating input.bin#
When generating the kmodel, if the preprocessing parameter is set to True, you can simply think of it as:
kmodel ≈ configured kmodel preprocessing + onnx;
For the same image, the preprocessing required for kmodel input ≈ the preprocessing required for onnx input - configured kmodel preprocessing; that is, kmodel_input.bin ≈ onnx_input.bin - configured kmodel preprocessing.