CanMV K230 教程#
快速上手#
开发板概况#
CanMV-K230开发板采用的是嘉楠科技Kendryte®系列AIoT芯片中的最新一代SoC芯片K230。该芯片采用全新的多异构单元加速计算架构,集成了2个RISC-V高能效计算核心,内置新一代KPU(Knowledge Process Unit)智能计算单元,具备多精度AI算力,广泛支持通用的AI计算框架,部分典型网络的利用率超过了70%。
该芯片同时具备丰富多样的外设接口,以及2D、2.5D等多个标量、向量、图形等专用硬件加速单元,可以对多种图像、视频、音频、AI等多样化计算任务进行全流程计算加速,具备低延迟、高性能、低功耗、快速启动、高安全性等多项特性。
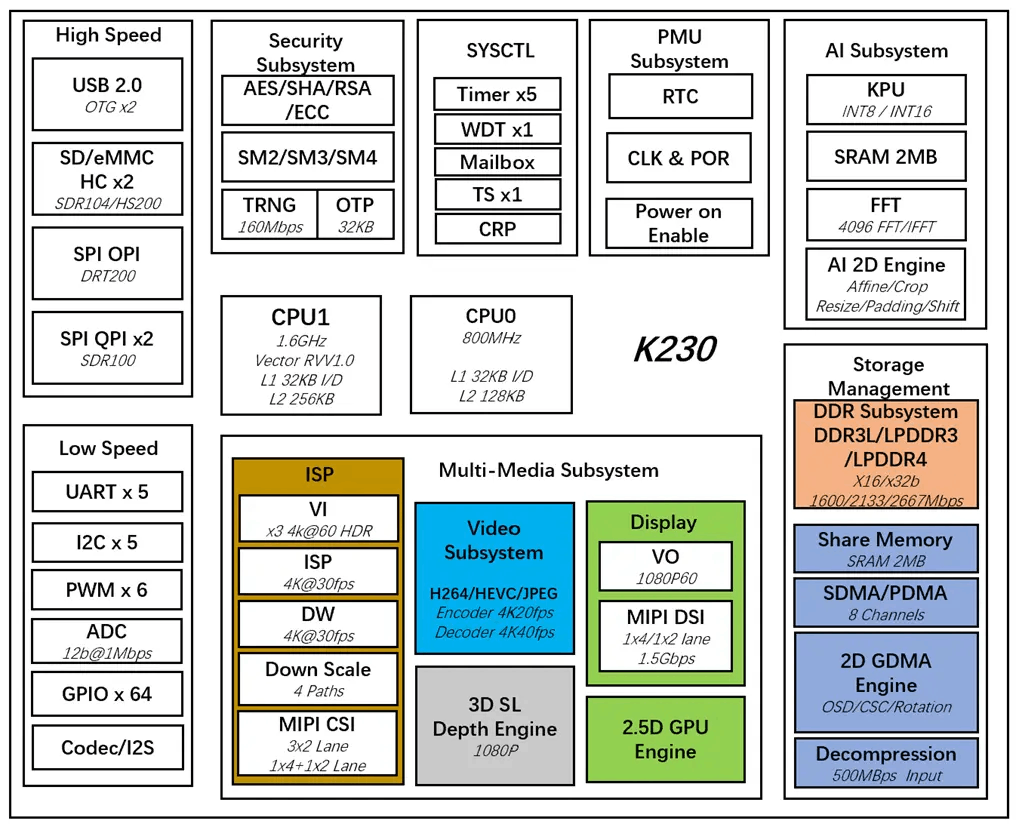
CanMV-K230采用单板设计,扩展接口丰富,极大程度的发挥K230高性能的优势,可直接用于各种智能产品的开发,加速产品落地。
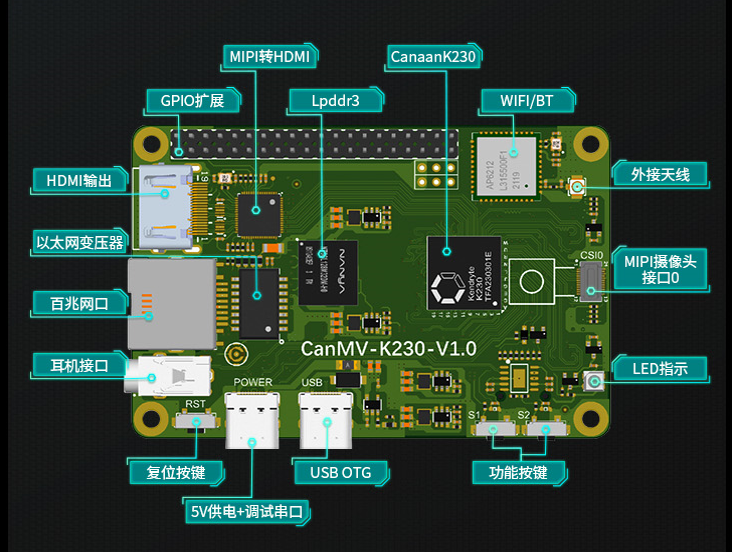
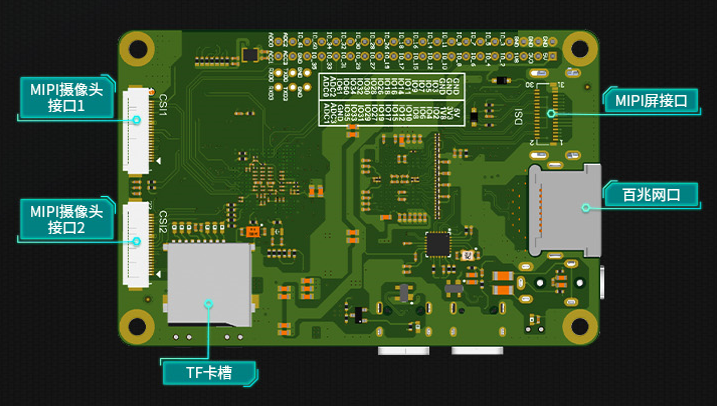
CanMV-K230默认套件#
CanMV-K230开发板默认套件包含以下物品:
1、CanMV-K230主板 x 1
2、OV5647摄像头 x 1
3、Type-C数据线 x 1
另外,需要用户准备以下配件:
1、TF卡, 用于烧写固件,启动系统(必须)
2、带HDMI接口的显示器及HDMI连接线
3、100M/1000M 以太网线缆,及有线路由器
调试说明#
串口连接#
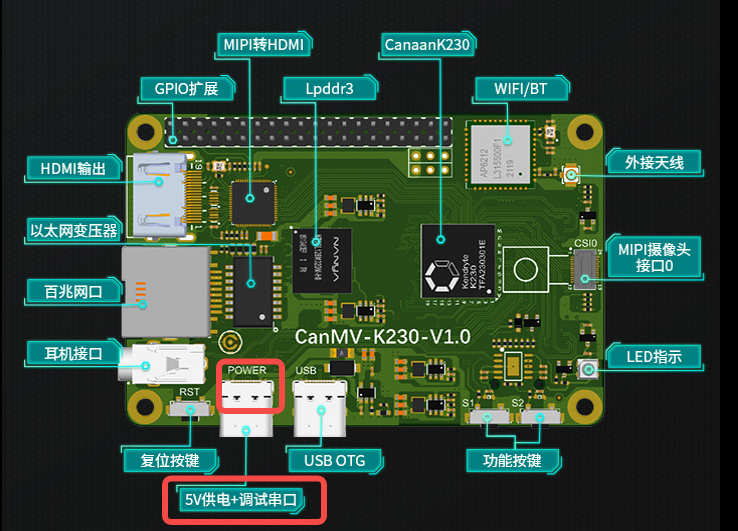
使用Type-C线连接CanMV-K230如下图的位置,线另一端连接至电脑。
串口调试#
Windows#
安装驱动
CanMV-K230自带usb转串口芯片 CH342,驱动下载地址https://www.wch.cn/downloads/CH343SER_EXE.html。
查看串口号
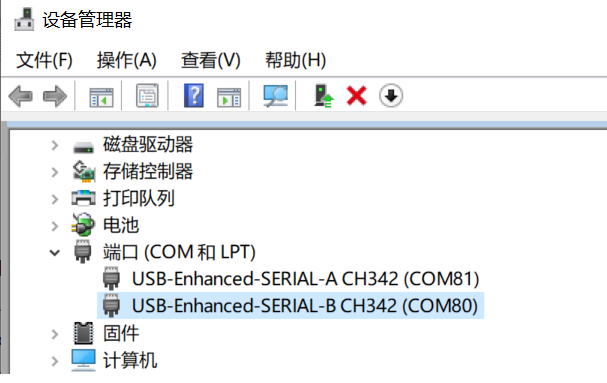
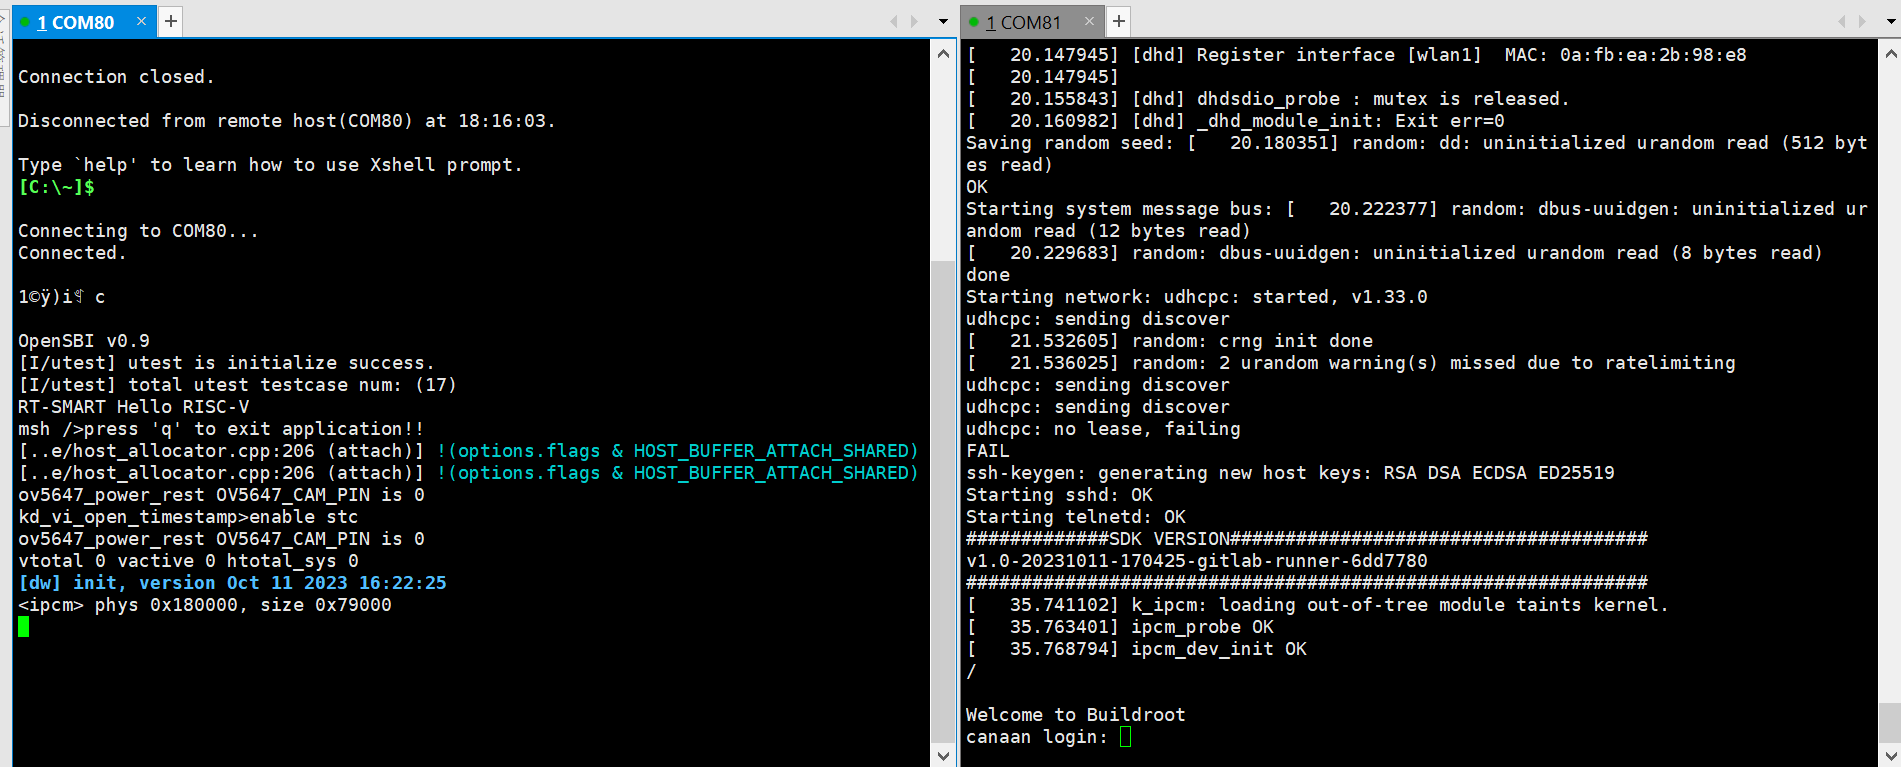
这里显示两个串口,COM80为小核Linux的调试串口,COM81为大核rt-smart的调试串口。
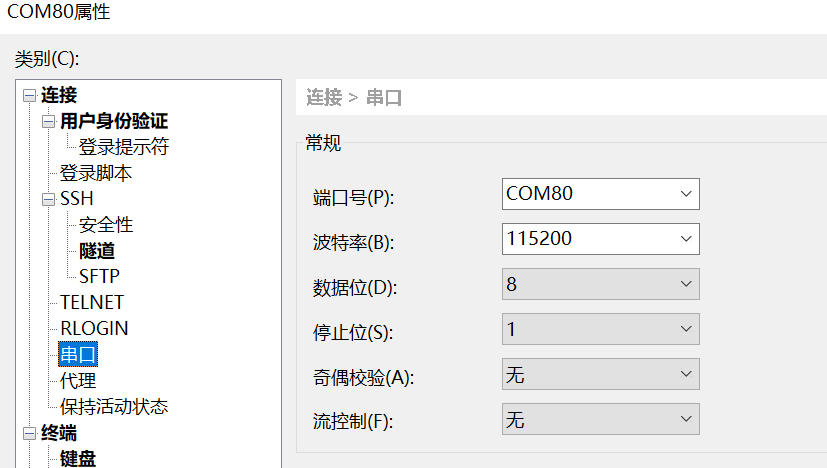
配置串口信息
打开工具Xshell(也可以使用其它串口工具)。
1、端口号选择设备管理器显示的端口号
2、波特率 115200
3、数据位 8
4、停止位 1
5、奇偶检验 无
6、流控制 无
linux#
Linux串口显示如下:
/dev/ttyACM0为小核linux调试串口/dev/ttyACM1为大核rt-smart调试串口
可以使用linux的minicom或其它串口工具进行连接调试,串口配置信息与windows一致。
固件获取及烧录#
固件获取#
CanMV-K230 固件下载地址: https://kendryte-download.canaan-creative.com/k230/release/sdk_images/
里面有各个版本的镜像。
k230_canmv_defconfig:对应CanMV-K230 1.0/1.1板的Linux+rtt双系统镜像。
k230_canmv_only_rtt_defconfig:对应CanMV-K230 1.0/1.1板的rtt-only系统镜像。
固件烧录#
将固件通过电脑烧写至TF卡中。
Linux下烧录#
在TF卡插到宿主机之前,输入:
ls -l /dev/sd\*
查看当前的存储设备。
将TF卡插入宿主机后,再次输入:
ls -l /dev/sd\*
查看此时的存储设备,新增加的就是TF卡设备节点。
假设/dev/sdc就是TF卡设备节点,执行如下命令烧录TF卡:
sudo dd if=sysimage-sdcard.img of=/dev/sdc bs=1M oflag=sync
Windows下烧录#
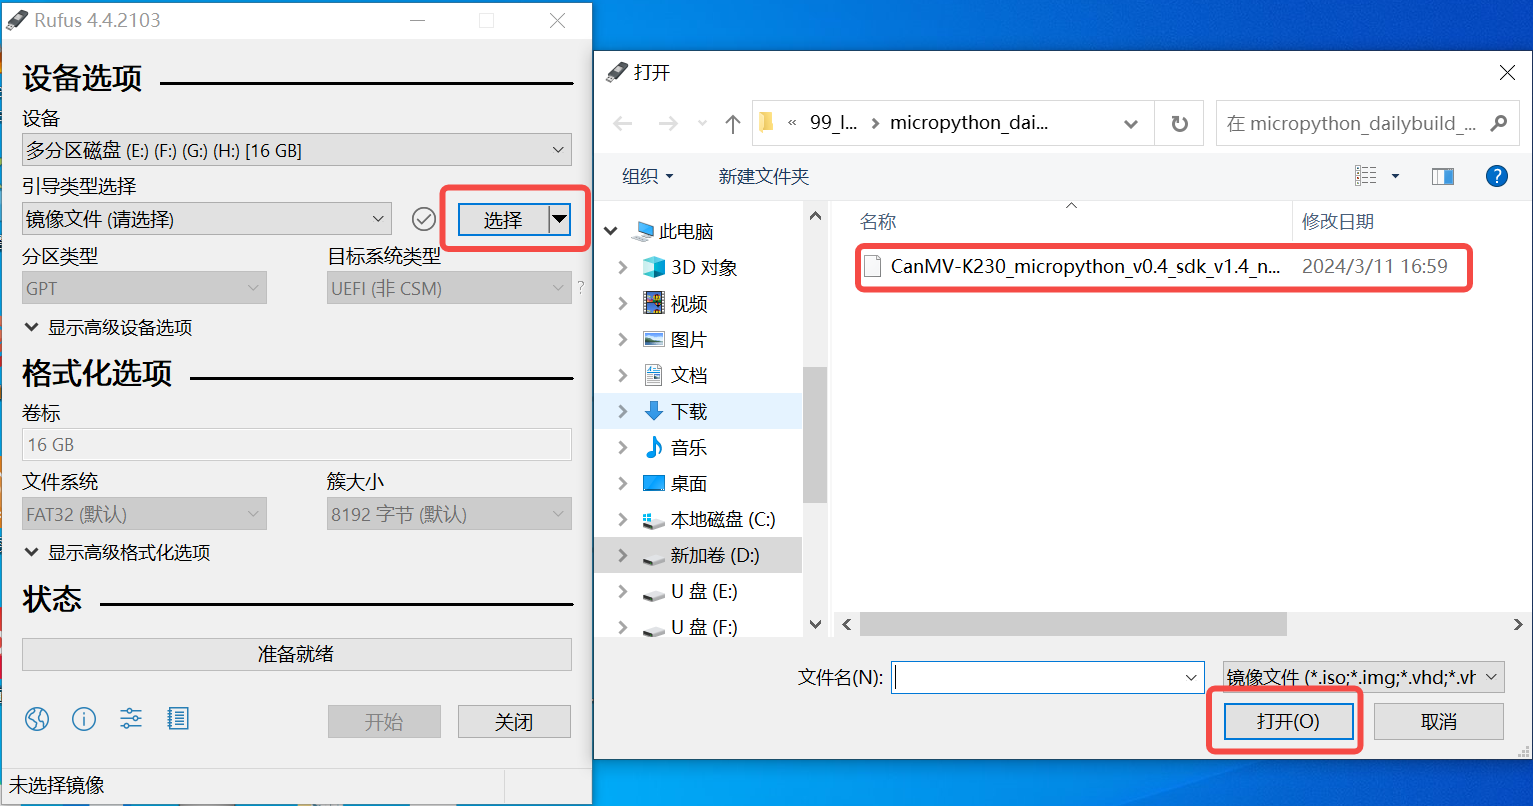
Windows下可通过rufus工具对TF卡进行烧录(rufus工具下载地址 http://rufus.ie/downloads/)。
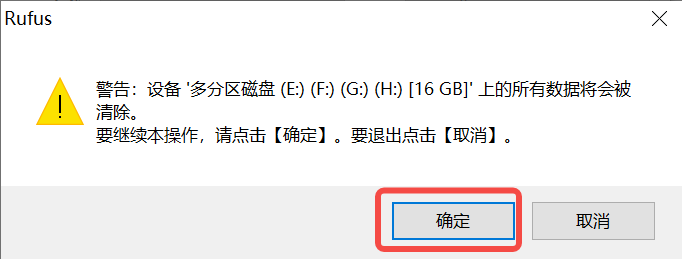
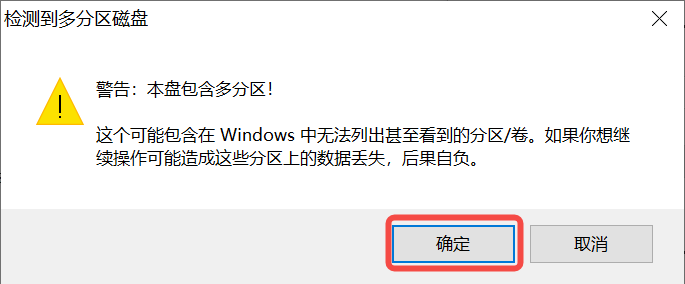
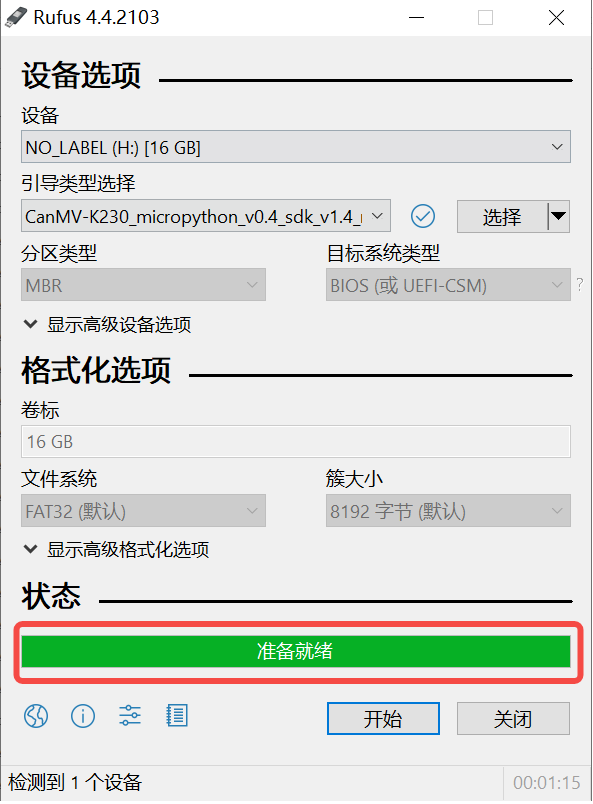
1)将TF卡插入PC,然后启动rufus工具,点击工具界面的”选择”按钮,选择待烧写的固件。
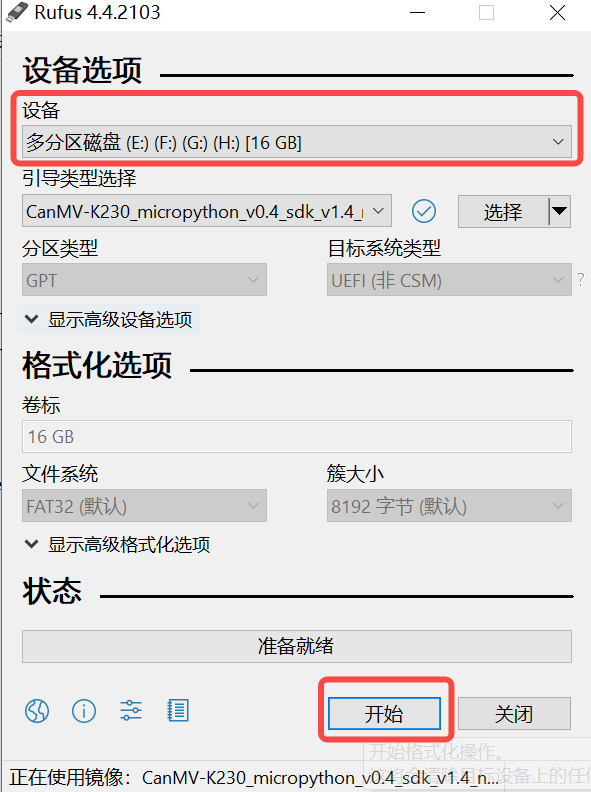
2)点击“开始”按钮开始烧写,烧写过程有进度条展示,烧写结束后会提示“准备就绪”。
启动系统#
将烧好固件的TF卡插入CanMV-K230 TF卡插槽,Type-C线连接电脑和板端的POWER口,板子即上电,系统开始启动。
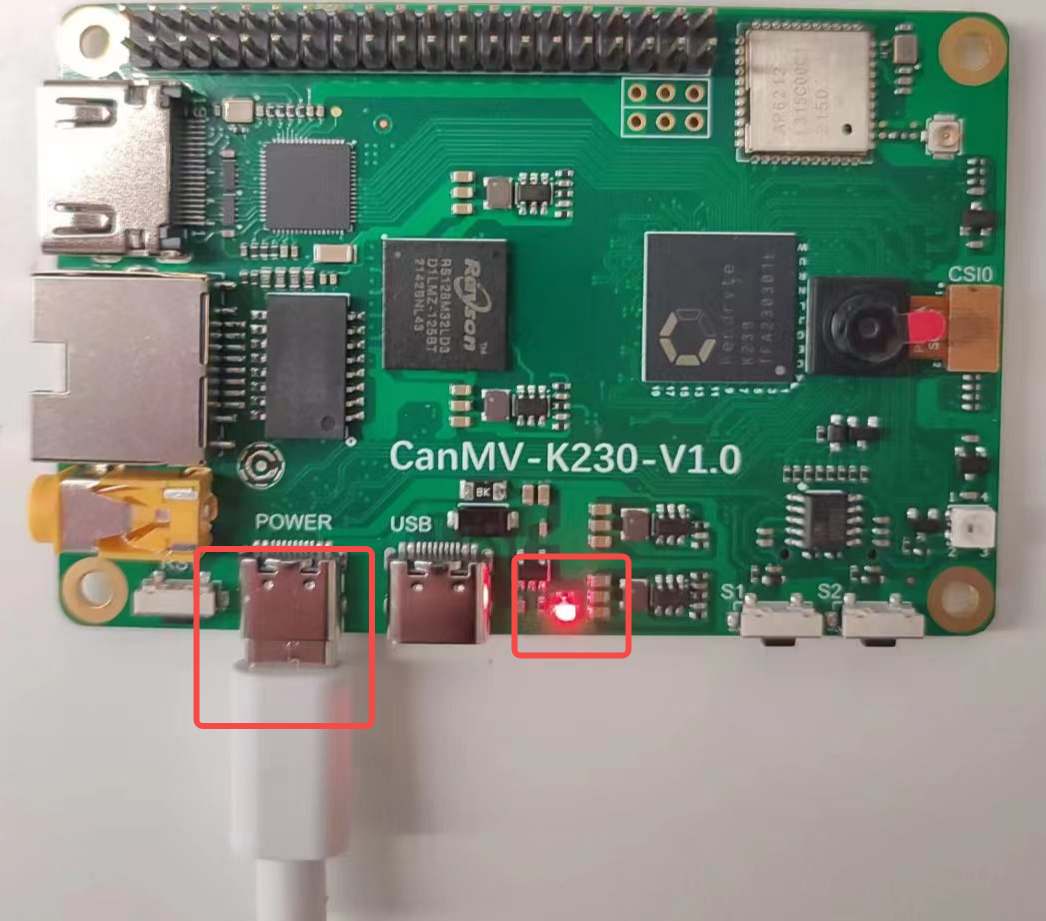
红框的中红灯亮,则说明开发板正常上电。此时查看串口信息。
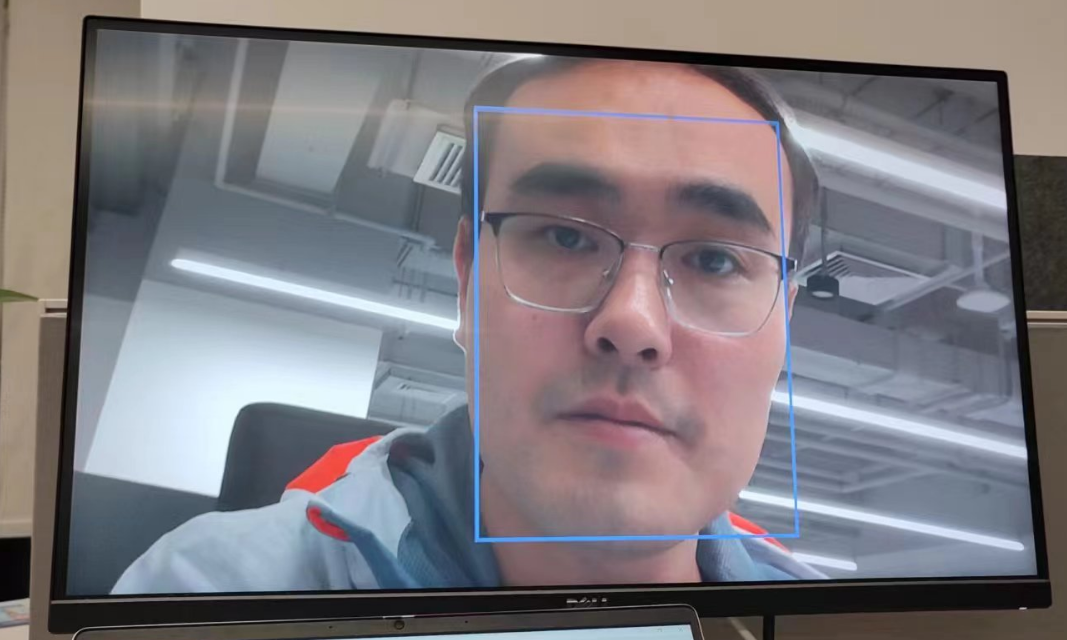
系统启动后默认运行人脸检测程序,将摄像头对准人脸,在显示器上会将人脸框出。
系统开发#
本章节介绍如何使用K230 SDK进行Linux+RTT或者RTT-only系统的开发。K230 SDK 包含了基于Linux和RT-smart的源代码,工具链和其他相关资源。
开发环境搭建#
编译环境#
主机环境 |
描述 |
|---|---|
Docker编译环境 |
SDK提供了dockerfile,可以生成docker镜像,用于编译SDK |
Ubuntu 20.04.4 LTS (x86_64) |
SDK可以在ubuntu 20.04环境下编译 |
K230 SDK需要在linux环境下编译,SDK支持docker环境编译,SDK开发包中发布了docker file(tools/docker/Dockerfile),可以生成docker镜像。具体dockerfile使用和编译步骤,在后面的编译章节会有详细介绍。
SDK使用的Docker 镜像以ubuntu 20.04 为基础,如果不使用docker编译环境,可以在ubuntu 20.04 主机环境下参考dockerfile的内容,安装相关HOST package和工具链后,编译SDK。
K230 SDK没有在其他Linux版本的主机环境下验证过,不保证SDK可以在其他环境下编译通过。
SDK开发包获取#
SDK目前在github和gitee同步发布
https://github.com/kendryte/k230_sdk
https://gitee.com/kendryte/k230_sdk
用户可以直接下载压缩包,下载地址 https://github.com/kendryte/k230_sdk/releases或者https://gitee.com/kendryte/k230_sdk/releases,或者使用git clone https://github.com/kendryte/k230_sdk或者 git clone https://gitee.com/kendryte/k230_sdk.git
用户可以根据自己的网络状况选择使用github或者gitee。
SDK编译#
编译介绍#
K230 SDK支持一键编译大小核操作系统和公共组件,生成可以烧写的镜像文件,用于部署到开发板启动运行。设备上linux系统的用户名是root无密码;
Setp 1:参考上文获取 SDK开发包
Step 2:进入SDK根目录
cd k230_sdk
Step 3:下载toolchain
source tools/get_download_url.sh && make prepare_sourcecode
make prepare_sourcecodewill download both Linux and RT-Smart toolchain, buildroot package and AI package from Microsoft Azure cloud server with CDN, the download cost time may based on your network connection speed.
Step 4:生成docker镜像(第一次编译需要,已经生成docker镜像后跳过此步骤)
docker build -f tools/docker/Dockerfile -t k230_docker tools/docker
Step 5: 进入docker环境,
docker run -u root -it -v $(pwd):$(pwd) -v $(pwd)/toolchain:/opt/toolchain -w $(pwd) k230_docker /bin/bash
Step 6: Docker环境下执行下面命令编译SDK
make CONF=k230_canmv_defconfig #编译CanMV-K230 1.0/1.1 板子Linux+RTT双系统镜像
或者
make CONF=k230_canmv_only_rtt_defconfig #编译CanMV-K230 1.0/1.1 板子RTT-only系统镜像
sdk不支持多进程编译,不要增加类似-j32多进程编译参数。
编译输出产物#
编译完成后,在output/xx_defconfig/images目录下可以看到编译输出产物
images目录下镜像文件说明如下:
sysimage-sdcard.img ————-是TF卡的启动镜像;
sysimage-sdcard.img.gz ———是TF卡的启动镜像压缩包(sysimage-sdcard.img文件的gzip压缩包),烧录时需要先解压缩。
至此整个SDK编译完成,成生镜像sysimage-sdcard.img,可烧录到TF卡启动系统。
示例1#
基础的hello world请参考 K230_实战基础篇_hello_world
以Vicap_demo为例,代码位于 k230_sdk/src/big/mpp/userapps/sample/sample_vicap
vicap demo通过调用mpi接口实现摄像头数据采集预览功能。CanMV开发板默认使用OV5647摄像头模组,支持单个摄像头最多输出三路数据流。
编译#
在k230_sdk目录下执行make rt-smart-clean && make rt-smart && make build-image,将大核的修改编译进sd卡镜像中,会在k230_sdk/output/k230_canmv_defconfig/images/目录下生成镜像文件sysimage-sdcard.img
对应的程序位于 k230_sdk/src/big/mpp/userapps/sample/elf/sample_vicap.elf
执行#
大核端进入 /sharefs/app,在该目录下执行./sample_vicap命令获取命令帮助信息
当输入:sample_vicap命令后打印如下提示信息:
usage: ./sample_vicap -mode 0 -dev 0 -sensor 0 -chn 0 -chn 1 -ow 640 -oh 480 -preview 1 -rotation 1
Options:
 -mode:         vicap work mode[0: online mode, 1: offline mode. only offline mode support multiple sensor input]     default 0
 -dev:          vicap device id[0,1,2]        default 0
 -dw:           enable dewarp[0,1]    default 0
 -sensor:       sensor type[0: ov9732@1280x720, 1: ov9286_ir@1280x720], 2: ov9286_speckle@1280x720]
 -ae:           ae status[0: disable AE, 1: enable AE]        default enable
 -awb:          awb status[0: disable AWB, 1: enable AWb]     default enable
 -chn:          vicap output channel id[0,1,2]        default 0
 -ow:           the output image width, default same with input width
 -oh:           the output image height, default same with input height
 -ox:           the output image start position of x
 -oy:           the output image start position of y
 -crop:         crop enable[0: disable, 1: enable]
 -ofmt:         the output pixel format[0: yuv, 1: rgb888, 2: rgb888p, 3: raw], only channel 0 support raw data, default yuv
 -preview:      the output preview enable[0: disable, 1: enable], only support 2 output channel preview
 -rotation:     display rotaion[0: degree 0, 1: degree 90, 2: degree 270, 3: degree 180, 4: unsupport rotaion]
 -help:         print this help
参数说明如下:
参数名称 |
可选参数值 |
参数说明 |
|---|---|---|
-dev |
0:vicap设备0 1:vicap设备1 2:vicap设备2. |
指定当前使用的vicap设备,系统最多支持三个vicap设备。通过指定设备号实现sensor与不同vicap设备之间的绑定关系。 例如: -dev 1 -sensor 0即表示将ov9732 1280x720 RGB图像输出绑定到vicap设备1. |
-mode |
0:在线模式;1:离线模式 |
指定vicap设备工作模式,当前之前在线模式和离线模式。对于多个sensor输入,必须指定为离线模式。 |
-sensor |
23:OV5647(CanMV开发板仅支持该sensor) |
指定当前使用的sensor类型 |
-chn |
0:vicap设备输出通道0 1:vicap设备输出通道1 2:vicap设备输出通道2. |
指定当前使用的vicap设备的输出通道,一个vicap设备最多支持三路输出,仅通道0支持RAW图像格式输出 |
-ow |
指定输出图像宽度,默认为输入图像宽度。宽度需要16字节对齐。 如果默认宽度超过显示屏输出最大宽度,则使用显示输出宽度作为图像最终输出宽度 如果输出宽度小于输入图像宽度,且未指定ox或者oy参数,则默认为缩放输出 |
|
-oh |
指定输出图像高度,默认为输入图像高度。 如果默认高度超过显示屏输出最大高度,则使用显示输出高度作为图像最终输出高度 如果输出高度小于输入图像高度,且未指定ox或者oy参数,则默认为缩放输出 |
|
-ox |
指定图像输出水平起始位置,该参数大于0将执行输出裁剪操作 |
|
-oy |
指定图像输出垂直起始位置,该参数大于0将执行输出裁剪操作 |
|
-crop |
0:禁用裁剪功能 1:使能裁剪功能 |
当输出图像尺寸小于输入图像尺寸时,默认未缩放输出,如果指定了该标志,则为裁剪输出 |
-ofmt |
0:yuv格式输出 1:rgb格式输出 2:raw格式输出 |
指定输出图像格式,默认为yuv输出。 |
-preview |
0:禁用预览显示 1:使能预览显示 |
指定输出图像预览显示功能。默认为使能。当前最多支持2路输出图像同时预览。 |
-rotation |
0:旋转0度 1:旋转90度 2:旋转180度 3:旋转270度 4:不支持旋转 |
指定预览显示窗口旋转角度。默认仅第一路输出图像窗口支持旋转功能。 |
示例1:
./sample_vicap -dev 0 -sensor 23 -chn 0 -chn 1 -ow 640 -oh 480
说明:将ov5647@1920x1080 RGB输出 绑定到vicap设备0,并使能vicap设备输出通道0和通道1,其中通道0输出大小默认为输入图像大小(1920x1080),通道1输出图像大小为640x480
该示例使用的API请参考 K230_VICAP_API参考.md K230_视频输出_API参考.md
CanMV-K230开发板支持的其它demo请参考 K230_SDK_CanMV_Board_Demo使用指南
其它SDK相关的文档请访问 K230 SDK 文档
示例2#
快起程序,源码位于k230_sdk/src/big/mpp/userapps/sample/fastboot_app,该程序为简单的人脸检测程序,是快述入门指南里面最后系统启动默认运行的程序。
编译程序#
在k230_sdk目录下执行make rt-smart-clean && make rt-smart && make build-image,将大核的修改编译进sd卡镜像中,会在k230_sdk/output/k230_canmv_defconfig/images/目录下生成镜像文件sysimage-sdcard.img
对应的程序位于 k230_sdk/src/big/mpp/userapps/sample/fastboot_elf/fastboot_app.elf
执行程序#
大核端进入 /bin,在该目录下执行./fastboot_app.elf test.kmodel
代码分析
/* ov5647 sensor 输出1920x1080分辨率的raw图给isp,输出1920x1080YUV用于显示,1280x720的RGB图给KPU用于人脸检测 */
#define ISP_INPUT_WIDTH (1920)
#define ISP_INPUT_HEIGHT (1080)
#define ISP_CHN1_HEIGHT (720)
#define ISP_CHN1_WIDTH  (1280)
#define ISP_CHN0_WIDTH  (1920)
#define ISP_CHN0_HEIGHT (1080)

k_vicap_dev vicap_dev;  /* vicap的设备,负责抓取图像 */
k_vicap_chn vicap_chn;  /* vicap的输出通道,ISP输出的图像,这一路跟显示器显示 */
k_vicap_dev_attr dev_attr; /* vicap的设备属性 */
k_vicap_chn_attr chn_attr; /* vicap输出的通道属性,用于配置输出给显示和AI的图像参数 */
k_vicap_sensor_info sensor_info; /* sensor 驱动相关的配置信息 */
k_vicap_sensor_type sensor_type; /* 使用的sensor 类型,CanMV-K230默认使用的OV5647 */
k_video_frame_info dump_info;    /* dump图像的信息,用于AI运算 */

/* 首先配置缓存池 */
int sample_vb_init(void)
{
    k_s32 ret;
    k_vb_config config;
    memset(&config, 0, sizeof(config));
    config.max_pool_cnt = 64;
    //VB for YUV420SP output
    config.comm_pool[0].blk_cnt = 5;  /* 缓存5个buffer */
    config.comm_pool[0].mode = VB_REMAP_MODE_NOCACHE;
    config.comm_pool[0].blk_size = VICAP_ALIGN_UP((ISP_CHN0_WIDTH * ISP_CHN0_HEIGHT * 3 / 2), VICAP_ALIGN_1K);  /* 缓存块大小,用于显示 */

    //VB for RGB888 output
    config.comm_pool[1].blk_cnt = 5;  /* 缓存5个buffer */
    config.comm_pool[1].mode = VB_REMAP_MODE_NOCACHE;
    config.comm_pool[1].blk_size = VICAP_ALIGN_UP((ISP_CHN1_HEIGHT * ISP_CHN1_WIDTH * 3 ), VICAP_ALIGN_1K);  /* 缓存块大小,用于AI */

    ret = kd_mpi_vb_set_config(&config); /* 配置缓存 */
    if (ret) {
        printf("vb_set_config failed ret:%d\n", ret);
        return ret;
    }

    ret = kd_mpi_vb_init(); /* 创建缓存池 */
    if (ret) {
        printf("vb_init failed ret:%d\n", ret);
    }
    return ret;
}

/* 其次配置显示相关的参数,我们使用的HDMI */
k_s32 sample_connector_init(void)
{
    k_u32 ret = 0;
    k_s32 connector_fd;

    k_connector_type connector_type = LT9611_MIPI_4LAN_1920X1080_30FPS; /* CanMV-K230使用的HDMI类型 */

    k_connector_info connector_info;

    memset(&connector_info, 0, sizeof(k_connector_info));

    //获取HDMI相对应的配置信息
    ret = kd_mpi_get_connector_info(connector_type, &connector_info);
    if (ret) {
        printf("sample_vicap, the sensor type not supported!\n");
        return ret;
    }

    /* 打开显示设备 */
    connector_fd = kd_mpi_connector_open(connector_info.connector_name);
    if (connector_fd < 0) {
        printf("%s, connector open failed.\n", __func__);
        return K_ERR_VO_NOTREADY;
    }

    /* 上电 */
    kd_mpi_connector_power_set(connector_fd, K_TRUE);
    /* 初始化HDMI */
    kd_mpi_connector_init(connector_fd, connector_info);

    return 0;
}

/* 配置vicap,用于采集sensor的图像 */
int sample_vivcap_init( void )
{
    k_s32 ret = 0;
    /* OV5647 1920x1080 30fps raw10 linear 模式 */
    sensor_type = OV_OV5647_MIPI_CSI0_1920X1080_30FPS_10BIT_LINEAR;
    /* 使用vicap的设备0 */
    vicap_dev = VICAP_DEV_ID_0;

    memset(&sensor_info, 0, sizeof(k_vicap_sensor_info));
    /* 获取sensor的信息 */
    ret = kd_mpi_vicap_get_sensor_info(sensor_type, &sensor_info);
    if (ret) {
        printf("sample_vicap, the sensor type not supported!\n");
        return ret;
    }

    /* 配置sensor的设备属性,为初始化ISP做准备 */
    memset(&dev_attr, 0, sizeof(k_vicap_dev_attr));
    dev_attr.acq_win.h_start = 0; /* ISP输入框水平无偏移 */
    dev_attr.acq_win.v_start = 0; /* ISP输入框垂直无偏移 */
    dev_attr.acq_win.width = ISP_INPUT_WIDTH; /* ISP输入图像宽度 */
    dev_attr.acq_win.height = ISP_INPUT_HEIGHT; /* ISP输入图像高度 */
    dev_attr.mode = VICAP_WORK_ONLINE_MODE; /* 在线模式,Sensor输入的raw数据不需要内存缓存 */

    dev_attr.pipe_ctrl.data = 0xFFFFFFFF;
    dev_attr.pipe_ctrl.bits.af_enable = 0; /* 无AF功能 */
    dev_attr.pipe_ctrl.bits.ahdr_enable = 0; /* 非HDR */


    dev_attr.cpature_frame = 0; /* 持续采集图像 */
    memcpy(&dev_attr.sensor_info, &sensor_info, sizeof(k_vicap_sensor_info));

    /* 配置vicap的设备属性 */
    ret = kd_mpi_vicap_set_dev_attr(vicap_dev, dev_attr);
    if (ret) {
        printf("sample_vicap, kd_mpi_vicap_set_dev_attr failed.\n");
        return ret;
    }

    memset(&chn_attr, 0, sizeof(k_vicap_chn_attr));

    /* 配置输出通道0的参数 */
    chn_attr.out_win.h_start = 0; /* 输出图像水平偏移 */
    chn_attr.out_win.v_start = 0; /* 输出图像垂直偏移 */
    chn_attr.out_win.width = ISP_CHN0_WIDTH; /* 输出图像的宽度 */
    chn_attr.out_win.height = ISP_CHN0_HEIGHT; /* 输出图像的高度 */
    chn_attr.crop_win = dev_attr.acq_win; /* 裁剪参数与输入的参数相同 */
    chn_attr.scale_win = chn_attr.out_win; /* 缩放参数与输出参数相同,既不缩放 */
    chn_attr.crop_enable = K_FALSE; /* 不裁剪 */
    chn_attr.scale_enable = K_FALSE; /* 不缩放 */
    chn_attr.chn_enable = K_TRUE; /* 通道使能,通道参数配置会生效 */
    chn_attr.pix_format = PIXEL_FORMAT_YVU_PLANAR_420; /* 输出的格式YUV420 */
    chn_attr.buffer_num = VICAP_MAX_FRAME_COUNT; /* 配置缓存个数 */
    chn_attr.buffer_size = VICAP_ALIGN_UP((ISP_CHN0_WIDTH * ISP_CHN0_HEIGHT * 3 / 2), VICAP_ALIGN_1K); /* 缓存大小,会在缓存池中拿buffer */
    vicap_chn = VICAP_CHN_ID_0; /* 配置ISP输出第0通道的属性 */

    /* 配置输出通道参数 */
    ret = kd_mpi_vicap_set_chn_attr(vicap_dev, vicap_chn, chn_attr);
    if (ret) {
        printf("sample_vicap, kd_mpi_vicap_set_chn_attr failed.\n");
        return ret;
    }

    /* 配置输出通道1的参数 */
    chn_attr.out_win.h_start = 0;
    chn_attr.out_win.v_start = 0;
    chn_attr.out_win.width = ISP_CHN1_WIDTH ;
    chn_attr.out_win.height = ISP_CHN1_HEIGHT;

    chn_attr.crop_win = dev_attr.acq_win;
    chn_attr.scale_win = chn_attr.out_win;
    chn_attr.crop_enable = K_FALSE;
    chn_attr.scale_enable = K_FALSE;
    chn_attr.chn_enable = K_TRUE;
    chn_attr.pix_format = PIXEL_FORMAT_BGR_888_PLANAR; /* 输出的格式为RGB888Planar */
    chn_attr.buffer_num = VICAP_MAX_FRAME_COUNT;//at least 3 buffers for isp
    chn_attr.buffer_size = VICAP_ALIGN_UP((ISP_CHN1_HEIGHT * ISP_CHN1_WIDTH * 3 ), VICAP_ALIGN_1K);

    ret = kd_mpi_vicap_set_chn_attr(vicap_dev, VICAP_CHN_ID_1, chn_attr);
    if (ret) {
        printf("sample_vicap, kd_mpi_vicap_set_chn_attr failed.\n");
        return ret;
    }

    /* 初始化vicap,初始化ISP */
    ret = kd_mpi_vicap_init(vicap_dev);
    if (ret) {
        printf("sample_vicap, kd_mpi_vicap_init failed.\n");
        return ret;
    }
    /* 启动sensor,ISP可以出图,后面可以使用dump函数获取图像 */
    ret = kd_mpi_vicap_start_stream(vicap_dev);
    if (ret) {
        printf("sample_vicap, kd_mpi_vicap_start_stream failed.\n");
        return ret;
    }
    return ret;
}

/* 设置绑定关系,ISP输出0通道与VO绑定,图像直接从ISP给显示器显示,不需要用户态程序操作 */
int sample_sys_bind_init(void)
{
    k_s32 ret = 0;
    k_mpp_chn vicap_mpp_chn;
    k_mpp_chn vo_mpp_chn;
    vicap_mpp_chn.mod_id = K_ID_VI; /*  */
    vicap_mpp_chn.dev_id = vicap_dev;
    vicap_mpp_chn.chn_id = vicap_chn;

    vo_mpp_chn.mod_id = K_ID_VO; /* 视频输出,CanMV-K230是HDMI */
    vo_mpp_chn.dev_id = K_VO_DISPLAY_DEV_ID;
    vo_mpp_chn.chn_id = K_VO_DISPLAY_CHN_ID1;

    ret = kd_mpi_sys_bind(&vicap_mpp_chn, &vo_mpp_chn);
    if (ret) {
        printf("kd_mpi_sys_unbind failed:0x%x\n", ret);
    }
    return ret;
}

int main(int argc, char *argv[])
{
    while(app_run)
    {
        /* Dump ISP输出通道1,既RGB图,用于AI */
        memset(&dump_info, 0 , sizeof(k_video_frame_info));
        ret = kd_mpi_vicap_dump_frame(vicap_dev, VICAP_CHN_ID_1, VICAP_DUMP_YUV, &dump_info, 1000);
        if (ret) {
            quit.store(false);
            printf("sample_vicap...kd_mpi_vicap_dump_frame failed.\n");
            break;
        }

        /* 调用mmap获取虚拟地址 */
        auto vbvaddr = kd_mpi_sys_mmap(dump_info.v_frame.phys_addr[0], size);

        boxes.clear();

        // 运行KPU,进行AI运算
        model.run(reinterpret_cast<uintptr_t>(vbvaddr), reinterpret_cast<uintptr_t>(dump_info.v_frame.phys_addr[0]));

        /* 调用munmap释放虚地址 */
        kd_mpi_sys_munmap(vbvaddr, size);
        // 获取AI运算的结果,这里是有脸坐标
        box_result = model.get_result();
        boxes = box_result.boxes;

        if(boxes.size() > 0)
        {
            num++;
            if(num == 1)
            {
                TEST_BOOT_TIME_TRIGER();
            }
            printf("boxes %llu \n",(perf_get_smodecycles()));
        }

        if(boxes.size() < face_count)
        {
            for (size_t i = boxes.size(); i < face_count; i++)
            {
                vo_frame.draw_en = 0;
                vo_frame.frame_num = i + 1;
                kd_mpi_vo_draw_frame(&vo_frame);
            }
        }

        /* 根据人脸坐标画框,此时可以显示器上显示人脸框 */
        for (size_t i = 0, j = 0; i < boxes.size(); i += 1)
        {
            // std::cout << "[" << boxes[i] << ", " << boxes[i + 1] << ", " << boxes[i + 2] <<", " << boxes[i + 3] << "]" << std::endl;
            vo_frame.draw_en = 1;
            vo_frame.line_x_start = ((uint32_t)boxes[i].x1) * ISP_CHN0_WIDTH / ISP_CHN1_WIDTH;
            vo_frame.line_y_start = ((uint32_t)boxes[i].y1) * ISP_CHN0_HEIGHT / ISP_CHN1_HEIGHT;
            vo_frame.line_x_end = ((uint32_t)boxes[i].x2) * ISP_CHN0_WIDTH / ISP_CHN1_WIDTH;
            vo_frame.line_y_end = ((uint32_t)boxes[i].y2) * ISP_CHN0_HEIGHT / ISP_CHN1_HEIGHT;
            vo_frame.frame_num = ++j;
            kd_mpi_vo_draw_frame(&vo_frame);
        }

        face_count = boxes.size();

        /* 调用dump_release释放前面dump的图像 */
        ret = kd_mpi_vicap_dump_release(vicap_dev, VICAP_CHN_ID_1, &dump_info);
        if (ret) {
            printf("sample_vicap...kd_mpi_vicap_dump_release failed.\n");
        }
    }
}
上面的代码及注释详细介绍了sensor、显示的初始化过程,也介绍了如何获取图像用于AI计算,后面的AI开发也是基于此进行的开发,更详细的AI开发请参考 “AI开发”章节。
nncase开发#
nncase是面向 AI 加速器的神经网络编译器,用于为 Kendryte系列芯片生成推理所需要的模型文件 .kmodel,并提供模型推理所需要的 runtime lib。
本教程主要包括以下内容:
使用
nncase完成模型编译,生成kmodel。在PC和开发板上执行
kmodel推理。
Tips:
本教程旨在让用户熟悉nncase的使用流程,文中模型输入数据均为随机数。实际应用场景的具体流程请参阅后续章节《AI开发》。
官方镜像中的nncase版本可能已过时,如果需使用最新nncase,需自行更新运行时库,详见教程。
模型编译和模拟器推理#
进行模型编译前,您需要了解以下关键信息:
KPU推理使用定点运算。因此在编译模型时,必须配置量化相关参数,用于将模型从浮点转换为定点。详见nncase文档中的PTQTensorOptions说明。nncase支持将前处理层集成到模型中,这可以减少推理时的前处理开销。相关参数和示意图见nncase文档的CompileOptions部分。
安装nncase工具链#
nncase工具链包括 nncase和 nncase-kpu插件包,两者均需正确安装才可以编译出CanMV-K230所支持的模型文件。nncase和 nncase-kpu插件包均在nncase github release发布,并且依赖dotnet-7.0。
Linux平台可以直接使用pip进行nncase和nncase-kpu插件包在线安装,Ubuntu环境下可使用apt安装dotnet。pip install --upgrade pip pip install nncase pip install nncase-kpu # nncase-2.x need dotnet-7 sudo apt-get update sudo apt-get install -y dotnet-sdk-7.0
Tips:如果使用官方提供的CanMV镜像,必须检查SDK中nncase的版本和使用pip安装的nncase版本是否一致。
Windows平台仅支持nncase在线安装,nncase-kpu需要在nncase github release手动下载安装。用户若没有Ubuntu环境, 可使用
nncase docker(Ubuntu 20.04 + Python 3.8 + dotnet-7.0)cd /path/to/nncase_sdk docker pull ghcr.io/kendryte/k230_sdk docker run -it --rm -v `pwd`:/mnt -w /mnt ghcr.io/kendryte/k230_sdk /bin/bash -c "/ bin/bash"
Tips:目前仅支持py3.7-3.10,如果pip安装失败请检查pip对应的Python版本。
环境配置#
使用pip安装软件包后,需将安装路径添加到PATH环境变量中。
export PATH=$PATH:/path/to/python/site-packages/
原始模型说明#
nncase目前支持 tflite、onnx格式的模型,更多格式的支持还在进行中。
Tips:
对于TensorFlow的
pb模型,请参考官方文档将其转换为tflite格式。注意不要设置量化选项,直接输出浮点模型即可。如果模型中存在quantize和dequantize算子,则属于量化模型,目前不支持。对于PyTorch的
pth等格式模型,需使用torch.export.onnx接口导出onnx格式。
编译脚本说明#
本Jupyter notebook分步骤详细描述了使用nncase编译、推理kmodel的流程,notebook内容涵盖:
参数配置:介绍如何正确配置编译参数,以满足实际部署需求;
获取模型信息:说明从原始模型中获取网络结构、层信息等关键数据的方法;
设置校正集数据:阐述如何准备好校正集样本数据,包括单输入和多输入模型两种情况,以用于量化校准过程;
设置推理数据:讲解推理部署时如何配置输入数据,支持不同需求场景;
配置多输入模型:介绍处理多输入模型时,如何正确设置每个输入的形状、数据格式等信息;
PC模拟器推理:说明如何在PC上利用模拟器推理
kmodel,这是验证编译效果的关键步骤;比较推理结果:通过与不同框架(TensorFlow、PyTorch等)的推理结果比较,验证kmodel的正确性;
以上步骤系统地介绍了模型编译的全流程,既适合初学者从零开始学习,也可作为经验丰富用户的参考指南。
示例代码#
当您阅读了Jupyter笔记本中的完整教程后,可以基于以下示例代码进行修改,完成自己的模型编译。
import nncase
import numpy as np
from sklearn.metrics.pairwise import cosine_similarity

import onnx
import onnxsim

def get_cosine(vec1, vec2):
    """
    result compare
    """
    return cosine_similarity(vec1.reshape(1, -1), vec2.reshape(1, -1))


def read_model_file(model_file):
    """
    read model
    """
    with open(model_file, 'rb') as f:
        model_content = f.read()
    return model_content


def parse_model_input_output(model_file):
    """
    parse onnx model
    """
    onnx_model = onnx.load(model_file)
    input_all = [node.name for node in onnx_model.graph.input]
    input_initializer = [node.name for node in onnx_model.graph.initializer]
    input_names = list(set(input_all) - set(input_initializer))
    input_tensors = [
        node for node in onnx_model.graph.input if node.name in input_names]

    # input
    inputs = []
    for _, e in enumerate(input_tensors):
        onnx_type = e.type.tensor_type
        input_dict = {}
        input_dict['name'] = e.name
        input_dict['dtype'] = onnx.mapping.TENSOR_TYPE_TO_NP_TYPE[onnx_type.elem_type]
        input_dict['shape'] = [i.dim_value for i in onnx_type.shape.dim]
        inputs.append(input_dict)

    return onnx_model, inputs

def model_simplify(model_file):
    """
    simplify model
    """
    if model_file.split('.')[-1] == "onnx":
        onnx_model, inputs = parse_model_input_output(model_file)
        onnx_model = onnx.shape_inference.infer_shapes(onnx_model)
        input_shapes = {}
        for input in inputs:
            input_shapes[input['name']] = input['shape']

        onnx_model, check = onnxsim.simplify(onnx_model, input_shapes=input_shapes)
        assert check, "Simplified ONNX model could not be validated"

        model_file = os.path.join(os.path.dirname(model_file), 'simplified.onnx')
        onnx.save_model(onnx_model, model_file)
        print("[ onnx done ]")
    elif model_file.split('.')[-1] == "tflite":
        print("[ tflite skip ]")
    else:
        raise Exception(f"Unsupport type {model_file.split('.')[-1]}")

    return model_file

def run_kmodel(kmodel_path, input_data):
    print("\n---------start run kmodel---------")
    print("Load kmodel...")
    model_sim = nncase.Simulator()
    with open(kmodel_path, 'rb') as f:
        model_sim.load_model(f.read())

    print("Set input data...")
    for i, p_d in enumerate(input_data):
        model_sim.set_input_tensor(i, nncase.RuntimeTensor.from_numpy(p_d))

    print("Run...")
    model_sim.run()

    print("Get output result...")
    all_result = []
    for i in range(model_sim.outputs_size):
        result = model_sim.get_output_tensor(i).to_numpy()
        all_result.append(result)
    print("----------------end-----------------")
    return all_result


def compile_kmodel(model_path, dump_path, calib_data):
    """
    Set compile options and ptq options.
    Compile kmodel.
    Dump the compile-time result to 'compile_options.dump_dir'
    """
    print("\n----------   compile    ----------")
    print("Simplify...")
    model_file = model_simplify(model_path)

    print("Set options...")
    # import_options
    import_options = nncase.ImportOptions()

    ############################################
    # 你需要修改下面这段代码中的参数来适配你的模型。
    ############################################
    # compile_options
    compile_options = nncase.CompileOptions()
    compile_options.target = "k230" #"cpu"
    compile_options.dump_ir = True  # if False, will not dump the compile-time result.
    compile_options.dump_asm = True
    compile_options.dump_dir = dump_path
    compile_options.input_file = ""

    # preprocess args
    compile_options.preprocess = False
    if compile_options.preprocess:
        compile_options.input_type = "uint8" # "uint8" "float32"
        compile_options.input_shape = [1,224,320,3]
        compile_options.input_range = [0,1]
        compile_options.input_layout = "NHWC" # "NHWC"
        compile_options.swapRB = False
        compile_options.mean = [0,0,0]
        compile_options.std = [1,1,1]
        compile_options.letterbox_value = 0
        compile_options.output_layout = "NHWC" # "NHWC"

    # quantize options
    ptq_options = nncase.PTQTensorOptions()
    ptq_options.quant_type = "uint8" # datatype : "float32", "int8", "int16"
    ptq_options.w_quant_type = "uint8"  # datatype : "float32", "int8", "int16"
    ptq_options.calibrate_method = "NoClip" # "Kld"
    ptq_options.finetune_weights_method = "NoFineTuneWeights"
    ptq_options.dump_quant_error = False
    ptq_options.dump_quant_error_symmetric_for_signed = False

    # mix quantize options
    # more details in docs/MixQuant.md
    ptq_options.quant_scheme = ""
    ptq_options.export_quant_scheme = False
    ptq_options.export_weight_range_by_channel = False
    ############################################

    ptq_options.samples_count = len(calib_data[0])
    ptq_options.set_tensor_data(calib_data)

    print("Compiling...")
    compiler = nncase.Compiler(compile_options)
    # import
    model_content = read_model_file(model_file)
    if model_path.split(".")[-1] == "onnx":
        compiler.import_onnx(model_content, import_options)
    elif model_path.split(".")[-1] == "tflite":
        compiler.import_tflite(model_content, import_options)

    compiler.use_ptq(ptq_options)

    # compile
    compiler.compile()
    kmodel = compiler.gencode_tobytes()

    # 可自行修改kmodel_path,在推理时需要传入正确的kmodel_path
    kmodel_path = os.path.join(dump_path, "test.kmodel")
    with open(kmodel_path, 'wb') as f:
        f.write(kmodel)
    print("----------------end-----------------")
    return kmodel_path

if __name__ == "__main__":
    # compile kmodel single input
    model_path = "./test.tflite"
    dump_path = "./tmp_tflite"

    # 校正集的数量为2
    calib_data = [[np.random.rand(1, 240, 320, 3).astype(np.float32), np.random.rand(1, 240, 320, 3).astype(np.float32)]]
    kmodel_path = compile_kmodel(model_path, dump_path, calib_data)

    # run kmodel(simulate)
    kmodel_path = "./tmp_tflite/test.kmodel"
    input_data = [np.random.rand(1, 240, 320, 3).astype(np.float32)]
    input_data[0].tofile(os.path.join(dump_path,"input_0.bin"))

    result = run_kmodel(kmodel_path, input_data)

    for idx, i in enumerate(result):
        print(i.shape)
        i.tofile(os.path.join(dump_path,"nncase_result_{}.bin".format(idx)))
注意事项#
当编译模型时遇到问题,可以在FAQ中查找出错log寻找解决办法,也可以在github中按照模板提issue,或者在 nncase QQ交流群 :790699378中直接提问。
同时,也欢迎您将您遇到的问题以及解决方案,提 PR到 nncase中,为开源工作贡献力量。
基于开发板进行模型推理#
目前 CanMV支持两套开发API,C++和 MicroPython,您可以根据您的需求进行选择。
MicroPython具有较低的开发门槛,用户可以直接编写类似于Python的代码进行应用开发;C++具有较高的门槛,但是更具灵活性,有着更好的性能(芯片的推理性能不受语言的影响)。
在开发板上推理时,我们提供两个模块用于加速模型推理
基于硬件的前处理模块:
AI2D,详细功能说明见AI2D运行时APIs;基于硬件的模型推理模块:
KPU,详细功能说明见KPU运行时APIs;
接下来,我们将在C++代码示例中说明这两个模块如何使用,有哪些需要注意的地方。
这里以人脸检测为例,下面将对编译的目录结构,代码重要功能进行说明,完整的代码示例见 k230_sdk/src/big/nncase/examples/image_face_detect。
目录结构#
在example目录下,与模型推理相关的文件结构如下:
k230_sdk/src/big/nncase/examples/
├── build_app.sh
├── CMakeLists.txt
├── image_face_detect
│   ├── anchors_320.cc
│   ├── CMakeLists.txt
│   ├── main.cc
│   ├── mobile_retinaface.cc
│   ├── mobile_retinaface.h
│   ├── model.cc
│   ├── model.h
│   ├── util.cc
│   └── util.h
└── README.md
build_app.sh:编译生成可执行文件
image_face_detect.elf的脚本,输出到out目录。CMakeLists.txt:设置编译时需要链接的库:
opencv、mmz、nncase,在工程中仅需要修改add_subdirectory()即可。image_face_detect:完整的人脸检测demo,其中包含了
AI2D、KPU、模型后处理等功能。
AI2D 配置#
在 mobile_retinaface.cc中使用了AI2D功能中的 Pad和 Resize功能,接下来将对 MobileRetinaface类进行代码解释,这里完成了 AI2D的参数配置:
设置
AI2D的输出tensor
ai2d_out_tensor_ = input_tensor(0);
input_tensor(0)是在获取 KPU的输入tensor。这一步就是在将 KPU的输入tensor同时设置为AI2D的输出tensor,将这两部分硬件连接起来使用。
设置
AI2D的参数
    dims_t in_shape { 1, ai2d_input_c_, ai2d_input_h_, ai2d_input_w_ };
    auto out_shape = input_shape(0);

    ai2d_datatype_t ai2d_dtype { ai2d_format::NCHW_FMT, ai2d_format::NCHW_FMT, typecode_t::dt_uint8, typecode_t::dt_uint8 };
    ai2d_crop_param_t crop_param { false, 0, 0, 0, 0 };
    ai2d_shift_param_t shift_param { false, 0 };

    float h_ratio = static_cast<float>(height) / out_shape[2];
    float w_ratio = static_cast<float>(width) / out_shape[3];
    float ratio = h_ratio > w_ratio ? h_ratio : w_ratio;

    int h_pad = out_shape[2] - height / ratio;
    int h_pad_before = h_pad / 2;
    int h_pad_after = h_pad - h_pad_before;

    int w_pad = out_shape[3] - width / ratio;
    int w_pad_before = w_pad / 2;
    int w_pad_after = w_pad - w_pad_before;

#if ENABLE_DEBUG
    std::cout << "h_ratio = " << h_ratio << ", w_ratio = " << w_ratio << ", ratio = " << ratio << std::endl;
    std::cout << "h_pad = " << h_pad << ", h_pad_before = " << h_pad_before << ", h_pad_after = " << h_pad_after << std::endl;
    std::cout << "w_pad = " << w_pad << ", w_pad_before = " << w_pad_before << ", w_pad_after = " << w_pad_after << std::endl;
#endif

    ai2d_pad_param_t pad_param{true, {{ 0, 0 }, { 0, 0 }, { h_pad_before, h_pad_after }, { w_pad_before, w_pad_after }}, ai2d_pad_mode::constant, { 0, 0, 0 }};
    ai2d_resize_param_t resize_param { true, ai2d_interp_method::tf_bilinear, ai2d_interp_mode::half_pixel };
    ai2d_affine_param_t affine_param { false };
首先需要设置AI2D的基础参数,包括输入格式、输出格式、输入类型和输出类型,具体参见文档。
然后设置AI2D功能参数,在人脸检测中仅使用了 Pad和 Resize功能,但是仍需要显式设置其他功能(crop,shift,affine)的参数,只将第一个参数设置为 false,其余参数符合语法即可。
生成
AI2D相关指令
    ai2d_builder_.reset(new ai2d_builder(in_shape, out_shape, ai2d_dtype, crop_param, shift_param, pad_param, resize_param, affine_param));
    ai2d_builder_->build_schedule();
首先需要创建ai2d_builder对象,如果已经存在该对象,那么需要使用reset函数来更新其中的参数,之后调用 build_schedule()功能即可完成指令生成。
到此,AI2D的配置就已经结束了,接下来我们来看一下 KPU相关的配置。
KPU 配置#
在 model.cc中进行了 KPU相关的配置,主要是提前分配输入tensor的内存。我们来看类 Model的构造函数:
Model::Model(const char *model_name, const char *kmodel_file): model_name_(model_name)
{
    // load kmodel
    kmodel_ = read_binary_file<unsigned char>(kmodel_file);
    interp_.load_model({ (const gsl::byte *)kmodel_.data(), kmodel_.size() }).expect("cannot load kmodel.");

    // create kpu input tensors
    for (size_t i = 0; i < interp_.inputs_size(); i++)
    {
        auto desc = interp_.input_desc(i);
        auto shape = interp_.input_shape(i);
        auto tensor = host_runtime_tensor::create(desc.datatype, shape, hrt::pool_shared).expect("cannot create input tensor");
        interp_.input_tensor(i, tensor).expect("cannot set input tensor");
    }

}
读取模型
kmodel_ = read_binary_file<unsigned char>(kmodel_file);
interp_.load_model({ (const gsl::byte *)kmodel_.data(), kmodel_.size() }).expect("cannot load kmodel.");
输入tensor内存分配
auto desc = interp_.input_desc(i);
auto shape = interp_.input_shape(i);
auto tensor = host_runtime_tensor::create(desc.datatype, shape, hrt::pool_shared).expect("cannot create input tensor");
这里根据从模型中获取到的shape信息以及类型信息,创建一个空的tensor。
Q:为什么是空的tensor,而不是直接填充数据进去呢?
A:可以先看一下
AI2D设置输出tensor时我们做了什么,没错,空的tensor是为了接收AI2D的输出数据,因此没有必要直接设置数据。但是,如果不使用AI2D模块,那么这里是需要设置输入数据的,例如:auto tensor = host_runtime_tensor::create( desc.datatype, shape, { (gsl::bytes*)vector.data(), (size_t)vector.size() }, true, hrt::pool_shared).expect(“cannot create input tensor”);
到此,KPU相关的配置也完成了,接下来我们看如何执行这两部分模块。
启动推理#
在 main.cc的 ai_proc函数中进行了推理,启动推理的代码为:
model.run(reinterpret_cast<uintptr_t>(vaddr), reinterpret_cast<uintptr_t>(paddr));
auto result = model.get_result();
result即为模型的输出结果,而在 run()中调用了 AI2D和 KPU。
void Model::run(uintptr_t vaddr, uintptr_t paddr)
{
    preprocess(vaddr, paddr);
    kpu_run();
    postprocess();
}

void MobileRetinaface::preprocess(uintptr_t vaddr, uintptr_t paddr)
{
    // ai2d input tensor
    dims_t in_shape { 1, ai2d_input_c_, ai2d_input_h_, ai2d_input_w_ };
    auto ai2d_in_tensor = host_runtime_tensor::create(typecode_t::dt_uint8, in_shape, { (gsl::byte *)vaddr, compute_size(in_shape) },
        false, hrt::pool_shared, paddr).expect("cannot create input tensor");
    hrt::sync(ai2d_in_tensor, sync_op_t::sync_write_back, true).expect("sync write_back failed");

    // run ai2d
    ai2d_builder_->invoke(ai2d_in_tensor, ai2d_out_tensor_).expect("error occurred in ai2d running");
}

void Model::kpu_run()
{
    interp_.run().expect("error occurred in running model");
}
其中 preprocess函数启动了 AI2D的推理 invoke,kpu_run函数中启动了 kpu的推理,当然在开始推理之前,需要设置 AI2D的输入,这里直接通过设定物理地址的方式,将其输入数据绑定在输入设备上。
Tips:postprocess() 函数调用了模型的后处理部分,由于不同模型后处理各不相同,并且相同模型还有不同版本后处理的区别,在进行完整的推理之前,
请先确保您的后处理C++代码的结果和您的Python模型后处理结果是一致的!!!
请先确保您的后处理C++代码的结果和您的Python模型后处理结果是一致的!!!
请先确保您的后处理C++代码的结果和您的Python模型后处理结果是一致的!!!
AI开发#
AI开发需要实现环境搭建、数据准备、模型训练和测试、CANMV k230镜像编译和烧录、C++代码编译、网络配置和文件传输、k230端部署等环节。以蔬菜分类场景为例,代码参见:kendryte/K230_training_scripts。
环境搭建#
(1)Linux系统;
(2)安装显卡驱动;
(3)安装Anaconda,用于创建模型训练环境;
(4)安装Docker,用于创建SDK镜像编译环境;
(5)安装dotnet SDK;
数据准备#
图像分类任务自定义数据集按照如下图格式组织:
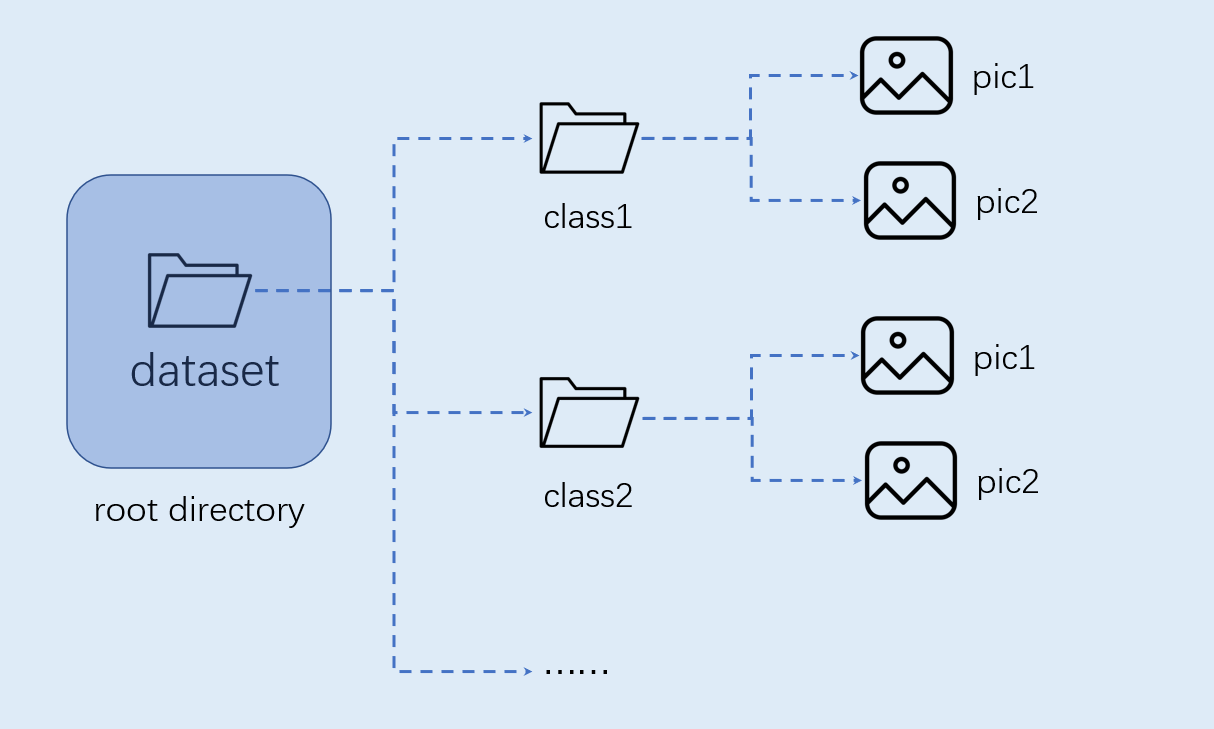
注意:图像分类必须按照上述格式进行组织。
模型训练和测试#
本节内容在训练环境中实现。
创建虚拟环境#
开启命令终端:
conda create -n myenv python=3.9
conda activate myenv
安装python库#
按照项目内的requirements.txt安装训练所用的python库,等待安装:
pip install -r requirements.txt
在requirements.txt中会安装模型转换的包nncase和nncase-kpu,nncase 是一个为 AI 加速器设计的神经网络编译器。
配置训练参数#
给出的训练脚本中配置文件yaml/config.yaml设置如下:
dataset:
  root_folder: ../data/veg_cls # 分类数据集路径
  split: true # 是否重新执行拆分,第一次执行必须为true
  train_ratio: 0.7 # 训练集比例
  val_ratio: 0.15 # 验证集比例
  test_ratio: 0.15 # 测试集比例

train:
  device: cuda
  txt_path: ../gen # 拆分过程生成的训练集、验证集、测试集txt文件,标签名称文件、校正集文件
  image_size: [ 224,224 ] # 分辨率
  mean: [ 0.485, 0.456, 0.406 ]
  std: [ 0.229, 0.224, 0.225 ]
  epochs: 10
  batchsize: 8
  learningrate: 0.001
  save_path: ../checkpoints # 模型保存路径

inference:
  mode: image # 推理模式,分为image和video; image模式下可推理单张图片和目录下所有图片,video调用摄像头实现推理
  inference_model: best # 分为best和last,分别调用checkpoints下的best.pth和last.pth进行推理
  images_path: ../data/veg_cls/bocai # 如果该路径为图片路径,则进行单张图片推理;如果该路径为目录,则对目录下所有图片进行推理

deploy:
  chip: k230 # 芯片类型,分为“k230”和“cpu”两种
  ptq_option: 0 # 量化类型,0为uint8,1,2,3,4为uint16的不同形式
模型训练#
进入到工程的scripts目录,执行训练代码:
python3 main.py
如果训练成功,在配置文件的model_save_dir目录下可以找到训练好的last.pth、best.pth、best.onnx、best.kmodel。
模型测试#
设置配置文件中的inference部分,设置测试配置,执行测试代码:
python3 inference.py
准备文件#
后面部署步骤需要用到的文件包括:
(1)checkpoints/best.kmodel;
(2)gen/labels.txt;
(3)待测试图片test.jpg;
CANMV K230镜像编译和烧录#
Docker环境搭建#
# 下载docker编译镜像
docker pull ghcr.io/kendryte/k230_sdk
# 可以使用以下命令确认docker镜像是否拉取成功
docker images | grep ghcr.io/kendryte/k230_sdk
# 下载1.0.1版本sdk
git clone -b v1.0.1 --single-branch https://github.com/kendryte/k230_sdk.git
cd k230_sdk
# 下载工具链Linux和RT-Smart toolchain, buildroot package, AI package等
make prepare_sourcecode
# 创建docker容器,$(pwd):$(pwd)表示系统当前目录映射到docker容器内部的相同目录下,将系统下的工具链目录映射到docker容器内部的/opt/toolchain目录下
docker run -u root -it -v $(pwd):$(pwd) -v $(pwd)/toolchain:/opt/toolchain -w $(pwd) ghcr.io/kendryte/k230_sdk /bin/bash
镜像编译#
# 在docker容器中编译镜像耗时较长,请耐心等待完成
make CONF=k230_canmv_defconfig
镜像烧录#
编译结束后在output/k230_canmv_defconfig/images目录下可以找到编译好的镜像文件:
k230_evb_defconfig/images
 ├── big-core
 ├── little-core
 ├── sysimage-sdcard.img    # SD卡启动镜像
 └──  sysimage-sdcard.img.gz # SD卡启动镜像压缩包
CANMV K230 支持SDCard启动方式。为方便开发,建议您准备一张TF卡(Micro SD卡)。
Linux: 如使用Linux烧录TF卡,需要先确认SD卡在系统中的名称/dev/sdx, 并替换如下命令中的/dev/sdx
sudo dd if=sysimage-sdcard.img of=/dev/sdx bs=1M oflag=sync
Windows: 如使用Windows烧录, 建议使用rufus工具。将生成的sysimage-sdcard.img下载到本地,使用烧录工具rufus进行烧录。

烧录成功后会弹出通知消息。在烧录前最好将SD卡格式化。
上电启动开发板#
安装MobaXterm实现串口通信,MobaXterm下载地址:https://mobaxterm.mobatek.net。

将烧录完成的SD卡插入进开板板卡槽中,HDMI输出连显示器,百兆网口连以太网,POWER连串口并供电。
系统上电后,默认会有两个串口设备,可分别用于访问小核Linux和大核RTSmart
小核Linux默认用户名root,密码为空。大核RTSmart系统中开机会自动启动一个应用程序,可按q键退出至命令提示符终端。
C++代码编译#
完成上述开发板的准备工作后,我们可以使用C++编写自己的代码,下面以图像分类任务为例,给出相关图像分类任务的示例代码,并进行解析。示例代码参考:kendryte/K230_training_scripts。
代码结构#
k230_code
├── cmake
│    ├── link.lds #链接脚本
│    ├── Riscv64.cmake
├── k230_deploy
│    ├── ai_base.cc # 模型部署基类实现
│    ├── ai_base.h # 模型部署基类,封装了nncase加载、input设置、模型推理、获取output操作,后续具体任务开发只需关注模型的前处理、后处理即可
│    ├── classification.cc # 图像分类code类实现
│    ├── classification.h # 图像分类任务类定义,继承AIBase,用于封装模型推理的前后处理
│    ├── main.cc # 主函数,参数解析,初始化Classification类示例,实现上板功能
│    ├── scoped_timing.hpp # 时间测试工具
│    ├── utils.cc # 工具类实现
│    ├── utils.h # 工具类, 封装了图像预处理和图像分类的常用函数,包括读取二进制文件、保存图片、图像处理、结果绘制等,用户可根据自己需求丰富该文件
│    ├── vi_vo.h # 视频输入输出头文件
│    ├── CMakeLists.txt # CMake脚本用于构建一个使用C/C++源文件的可执行文件,并链接到各种库
├── build_app.sh # 编译脚本,使用交叉编译工具链编译k230_deploy工程
└── CMakeLists.txt # CMake脚本用于构建 nncase_sdk 的项目工程
核心代码#
当您得到kmodel模型之后,具体AI上板代码包括:sensor&display初始化、kmodel加载、模型输入输出设置、获取图像、输入数据加载、输入数据预处理、模型推理、模型输出获取、输出后处理、OSD显示等步骤。如图所示:

图中黄框部分在SDK编译章节的示例2给出了示例代码,下面针对红框部分,介绍如何实现AI开发。
在上述过程中,kmodel加载、模型输入设置、模型推理、模型输出获取是所有任务的共有步骤。我们对此做了封装,ai_base.h和ai_base.cc可以直接拷贝使用。
ai_base.h定义了AIBase基类以及共有操作的接口:
#ifndef AI_BASE_H
#define AI_BASE_H
#include <vector>
#include <string>
#include <fstream>
#include <nncase/runtime/interpreter.h>
#include "scoped_timing.hpp"

using std::string;
using std::vector;
using namespace nncase::runtime;

/**
 * @brief AI基类,封装nncase相关操作
 * 主要封装了nncase的加载、设置输入、运行、获取输出操作,后续开发demo只需要关注模型的前处理、后处理即可
 */
class AIBase
{
public:
    /**
     * @brief AI基类构造函数,加载kmodel,并初始化kmodel输入、输出
     * @param kmodel_file kmodel文件路径
     * @param debug_mode  0(不调试)、 1(只显示时间)、2(显示所有打印信息)None
     * @return None
     */
    AIBase(const char *kmodel_file,const string model_name, const int debug_mode = 1);
    /**
     * @brief AI基类析构函数
     * @return None
    */
    ~AIBase();

    /**
     * @brief 设置kmodel输入
     * @param buf 输入数据指针
     * @param size 输入数据大小
     * @return None
     */
    void set_input(const unsigned char *buf, size_t size);

    /**
     * @brief 根据索引获取kmodel输入tensor
     * @param idx 输入数据索引
     * @return None
     */
    runtime_tensor get_input_tensor(size_t idx);

    /**
     * @brief 设置模型的输入tensor
     * @param idx 输入数据索引
     * @param tensor 输入tensor
     */
    void set_input_tensor(size_t idx, runtime_tensor &tensor);

    /**
     * @brief 初始化kmodel输出
     * @return None
     */
    void set_output();

    /**
     * @brief 推理kmodel
     * @return None
     */
    void run();

    /**
     * @brief 获取kmodel输出,结果保存在对应的类属性中
     * @return None
     */
    void get_output();


protected:
    string model_name_;                    // 模型名字
    int debug_mode_;                       // 调试模型,0(不打印),1(打印时间),2(打印所有)
    vector<float *> p_outputs_;            // kmodel输出对应的指针列表
    vector<vector<int>> input_shapes_;     //{{N,C,H,W},{N,C,H,W}...}
    vector<vector<int>> output_shapes_;    //{{N,C,H,W},{N,C,H,W}...}} 或 {{N,C},{N,C}...}}等
    vector<int> each_input_size_by_byte_;  //{0,layer1_length,layer1_length+layer2_length,...}
    vector<int> each_output_size_by_byte_; //{0,layer1_length,layer1_length+layer2_length,...}

private:
    /**
     * @brief 首次初始化kmodel输入,并获取输入shape
     * @return None
     */
    void set_input_init();

    /**
     * @brief 首次初始化kmodel输出,并获取输出shape
     * @return None
     */
    void set_output_init();

    vector<unsigned char> kmodel_vec_; // 通过读取kmodel文件得到整个kmodel数据,用于传给kmodel解释器加载kmodel
    interpreter kmodel_interp_; // kmodel解释器,从kmodel文件构建,负责模型的加载、输入输出设置和推理
};
#endif
ai_base.cc是ai_base.h中定义所有接口的具体实现。
/*
ai_base.h中AIBase类定义接口的具体实现
*/
#include "ai_base.h"
#include <iostream>
#include <cassert>
#include "utils.h"

using std::cout;
using std::endl;
using namespace nncase;
using namespace nncase::runtime::detail;

/*AIBase构造函数*/
AIBase::AIBase(const char *kmodel_file,const string model_name, const int debug_mode) : debug_mode_(debug_mode),model_name_(model_name)
{
    if (debug_mode > 1)
        cout << "kmodel_file:" << kmodel_file << endl;
    std::ifstream ifs(kmodel_file, std::ios::binary);//读入kmodel
    kmodel_interp_.load_model(ifs).expect("Invalid kmodel");//kmodel解释器加载kmodel
    set_input_init();
    set_output_init();
}

/*析构函数*/
AIBase::~AIBase()
{
}

/*
首次初始化kmodel输入
*/
void AIBase::set_input_init()
{
    ScopedTiming st(model_name_ + " set_input init", debug_mode_);//计时
    int input_total_size = 0;
    each_input_size_by_byte_.push_back(0); // 先补0,为之后做准备
    for (int i = 0; i < kmodel_interp_.inputs_size(); ++i)
    {
        auto desc = kmodel_interp_.input_desc(i);//索引为i的输入描述
        auto shape = kmodel_interp_.input_shape(i);//索引为i的输入shape
        auto tensor = host_runtime_tensor::create(desc.datatype, shape, hrt::pool_shared).expect("cannot create input tensor");//创建输入tensor
        kmodel_interp_.input_tensor(i, tensor).expect("cannot set input tensor");//绑定tensor到模型输入
        vector<int> in_shape = {shape[0], shape[1], shape[2], shape[3]};
        input_shapes_.push_back(in_shape);//存储输入shape
        int dsize = shape[0] * shape[1] * shape[2] * shape[3];//输入总字节数
        if (debug_mode_ > 1)
            cout << "input shape:" << shape[0] << " " << shape[1] << " " << shape[2] << " " << shape[3] << endl;
        if (desc.datatype == 0x06)//输入数据为uint8类型
        {
            input_total_size += dsize;
            each_input_size_by_byte_.push_back(input_total_size);
        }
        else if (desc.datatype == 0x0B)//输入数据为float32类型
        {
            input_total_size += (dsize * 4);
            each_input_size_by_byte_.push_back(input_total_size);
        }
        else
            assert(("kmodel input data type supports only uint8, float32", 0));
    }
    each_input_size_by_byte_.push_back(input_total_size); // 最后一个保存总大小
}

/*
设置模型的输入数据,加载模型输入的具体数据,和set_input_init的区别是是否有数据拷贝过程
*/
void AIBase::set_input(const unsigned char *buf, size_t size)
{
    //检查输入数据大小是否和模型要求大小相匹配
    if (*each_input_size_by_byte_.rbegin() != size)
        cout << "set_input:the actual input size{" + std::to_string(size) + "} is different from the model's required input size{" + std::to_string(*each_input_size_by_byte_.rbegin()) + "}" << endl;
    assert((*each_input_size_by_byte_.rbegin() == size));
    //计时
    ScopedTiming st(model_name_ + " set_input", debug_mode_);
    //循环遍历模型输入
    for (size_t i = 0; i < kmodel_interp_.inputs_size(); ++i)
    {
        //获取模型的输入描述和形状
        auto desc = kmodel_interp_.input_desc(i);
        auto shape = kmodel_interp_.input_shape(i);
        //创建tensor
        auto tensor = host_runtime_tensor::create(desc.datatype, shape, hrt::pool_shared).expect("cannot create input tensor");
        //将输入tensor映射到可写区域
        auto mapped_buf = std::move(hrt::map(tensor, map_access_::map_write).unwrap()); // mapped_buf实际是有缓存数据的
        //拷贝数据到tensor的缓冲区
        memcpy(reinterpret_cast<void *>(mapped_buf.buffer().data()), buf, each_input_size_by_byte_[i + 1] - each_input_size_by_byte_[i]);
        //解除映射
        auto ret = mapped_buf.unmap();
        ret = hrt::sync(tensor, sync_op_t::sync_write_back, true);
        if (!ret.is_ok())
        {
            std::cerr << "hrt::sync failed" << std::endl;
            std::abort();
        }
        //将tensor和模型的输入绑定
        kmodel_interp_.input_tensor(i, tensor).expect("cannot set input tensor");
    }
}

/*
按照索引获取模型的输入tensor
*/
runtime_tensor AIBase::get_input_tensor(size_t idx)
{
    return kmodel_interp_.input_tensor(idx).expect("cannot get input tensor");
}

/*
按照索引设置模型的输入tensor
*/
void AIBase::set_input_tensor(size_t idx, runtime_tensor &tensor)
{
    ScopedTiming st(model_name_ + " set_input_tensor", debug_mode_);
    kmodel_interp_.input_tensor(idx, tensor).expect("cannot set input tensor");
}

/*
首次初始化kmodel输出
*/
void AIBase::set_output_init()
{
    //计时
    ScopedTiming st(model_name_ + " set_output_init", debug_mode_);
    each_output_size_by_byte_.clear();
    int output_total_size = 0;
    each_output_size_by_byte_.push_back(0);
    //循环遍历模型的输出
    for (size_t i = 0; i < kmodel_interp_.outputs_size(); i++)
    {
        //获取输出描述和形状
        auto desc = kmodel_interp_.output_desc(i);
        auto shape = kmodel_interp_.output_shape(i);
        vector<int> out_shape;
        int dsize = 1;
        for (int j = 0; j < shape.size(); ++j)
        {
            out_shape.push_back(shape[j]);
            dsize *= shape[j];
            if (debug_mode_ > 1)
                cout << shape[j] << ",";
        }
        if (debug_mode_ > 1)
            cout << endl;
        output_shapes_.push_back(out_shape);
        //获取数据的总大小
        if (desc.datatype == 0x0B)
        {
            output_total_size += (dsize * 4);
            each_output_size_by_byte_.push_back(output_total_size);
        }
        else
            assert(("kmodel output data type supports only float32", 0));
        //创建tensor
        auto tensor = host_runtime_tensor::create(desc.datatype, shape, hrt::pool_shared).expect("cannot create output tensor");
        //将tensor和模型的输出绑定
        kmodel_interp_.output_tensor(i, tensor).expect("cannot set output tensor");
    }
}

/*
设置kmodel模型的输出
*/
void AIBase::set_output()
{
    ScopedTiming st(model_name_ + " set_output", debug_mode_);
    //循环将输出tensor和模型的输出绑定
    for (size_t i = 0; i < kmodel_interp_.outputs_size(); i++)
    {
        auto desc = kmodel_interp_.output_desc(i);
        auto shape = kmodel_interp_.output_shape(i);
        auto tensor = host_runtime_tensor::create(desc.datatype, shape, hrt::pool_shared).expect("cannot create output tensor");
        kmodel_interp_.output_tensor(i, tensor).expect("cannot set output tensor");
    }
}

/*
调用kmodel_interp_.run()实现模型推理
*/
void AIBase::run()
{
    ScopedTiming st(model_name_ + " run", debug_mode_);
    kmodel_interp_.run().expect("error occurred in running model");
}

/*
获取模型的输出(float指针形式,后处理时由后处理的具体要求取出),为后续后处理做准备
*/
void AIBase::get_output()
{
    ScopedTiming st(model_name_ + " get_output", debug_mode_);
    //p_outputs_存储模型的输出的指针,可以有多个输出
    p_outputs_.clear();
    for (int i = 0; i < kmodel_interp_.outputs_size(); i++)
    {
        //获取输出tensor
        auto out = kmodel_interp_.output_tensor(i).expect("cannot get output tensor");
        //将输出tensor映射到主机内存
        auto buf = out.impl()->to_host().unwrap()->buffer().as_host().unwrap().map(map_access_::map_read).unwrap().buffer();
        //将映射后的数据转换为float指针
        float *p_out = reinterpret_cast<float *>(buf.data());
        p_outputs_.push_back(p_out);
    }
}
不同任务场景的前处理和后处理有所不同,比如分类使用softmax计算类别概率,目标检测要做nms;因此您可以定义您的任务场景类继承AIBase类,将针对该任务的前处理和后处理代码进行封装。以图像分类为例:
classification.h中的Classification类继承自AIBase类,实现了图像分类任务的类定义,主要定义了图像分类模型的前处理、推理、后处理接口。初始化ai2d构建器实现图像预处理。还定义了一些图像分类任务的变量,比如分类阈值、类别名称、类别数等。
#ifndef _CLASSIFICATION_H
#define _CLASSIFICATION_H
#include "utils.h"
#include "ai_base.h"

/**
 * @brief 分类任务
 * 主要封装了对于每一帧图片,从预处理、运行到后处理给出结果的过程
 */
class Classification : public AIBase
{
    public:
    /**
    * @brief Classification构造函数,加载kmodel,并初始化kmodel输入、输出分类阈值
    * @param kmodel_path kmodel路径
    * @param image_path 推理图片路径(静态图使用)
    * @param labels 类别名称列表
    * @param cls_thresh 分类阈值
    * @param debug_mode  0(不调试)、 1(只显示时间)、2(显示所有打印信息)
    * @return None
    */
    Classification(string &kmodel_path, string &image_path,std::vector<std::string> labels, float cls_thresh,const int debug_mode);

    /**
    * @brief Classification构造函数,加载kmodel,并初始化kmodel输入、输出分类阈值
    * @param kmodel_path kmodel路径
    * @param image_path  推理图片路径(静态图使用)
    * @param labels      类别名称列表
    * @param cls_thresh  分类阈值
    * @param isp_shape   isp输入大小(chw)
    * @param vaddr       isp对应虚拟地址
    * @param paddr       isp对应物理地址
    * @param debug_mode  0(不调试)、 1(只显示时间)、2(显示所有打印信息)
    * @return None
    */
    Classification(string &kmodel_path, string &image_path,std::vector<std::string> labels,float cls_thresh, FrameCHWSize isp_shape, uintptr_t vaddr, uintptr_t paddr,const int debug_mode);

    /**
    * @brief Classification析构函数
    * @return None
    */
    ~Classification();

    /**
    * @brief 静态图片预处理
    * @param ori_img 原始图片
    * @return None
    */
    void pre_process(cv::Mat ori_img);

    /**
    * @brief 视频流预处理(ai2d for isp)
    * @return None
    */
    void pre_process();

    /**
    * @brief kmodel推理
    * @return None
    */
    void inference();

    /**
    * @brief kmodel推理结果后处理
    * @param results 后处理之后的基于原始图像的分类结果集合
    * @return None
    */
    void post_process(vector<cls_res> &results);

    private:

    /**
    * @brief 计算exp
    * @param x 自变量值
    * @return 返回计算exp后的结果
    */
    float fast_exp(float x);

    /**
    * @brief 计算sigmoid
    * @param x 自变量值
    * @return 返回计算sigmoid后的结果
    */
    float sigmoid(float x);

    std::unique_ptr<ai2d_builder> ai2d_builder_; // ai2d构建器
    runtime_tensor ai2d_in_tensor_;              // ai2d输入tensor
    runtime_tensor ai2d_out_tensor_;             // ai2d输出tensor
    uintptr_t vaddr_;                            // isp的虚拟地址
    FrameCHWSize isp_shape_;                     // isp对应的地址大小

    float cls_thresh;      //分类阈值
    vector<string> labels; //类别名字
    int num_class;         //类别数

    float* output;         //读取kmodel输出,float指针类型
};
#endif
在classification.cc中实现上述接口:
#include "classification.h"

/*
静态图推理,构造函数
*/
Classification::Classification(std::string &kmodel_path, std::string &image_path,std::vector<std::string> labels_,float cls_thresh_,const int debug_mode)
:AIBase(kmodel_path.c_str(),"Classification", debug_mode)
{
    cls_thresh=cls_thresh_;
    labels=labels_;
    num_class = labels.size();
    ai2d_out_tensor_ = this -> get_input_tensor(0);//继承自AIBase的接口
}

/*
视频流推理,构造函数
*/
Classification::Classification(std::string &kmodel_path, std::string &image_path,std::vector<std::string> labels_,float cls_thresh_, FrameCHWSize isp_shape, uintptr_t vaddr, uintptr_t paddr,const int debug_mode)
:AIBase(kmodel_path.c_str(),"Classification", debug_mode)
{
    cls_thresh=cls_thresh_;
    labels=labels_;
    num_class = labels.size();
    vaddr_ = vaddr;
    isp_shape_ = isp_shape;
    dims_t in_shape{1, isp_shape.channel, isp_shape.height, isp_shape.width};
    ai2d_in_tensor_ = hrt::create(typecode_t::dt_uint8, in_shape, hrt::pool_shared).expect("create ai2d input tensor failed");
    ai2d_out_tensor_ = this -> get_input_tensor(0);
    Utils::resize(ai2d_builder_, ai2d_in_tensor_, ai2d_out_tensor_);
}

/*
析构函数
*/
Classification::~Classification()
{
}

/*
静态图预处理函数
*/
void Classification::pre_process(cv::Mat ori_img)
{
    //计时
    ScopedTiming st(model_name_ + " pre_process image", debug_mode_);
    std::vector<uint8_t> chw_vec;
    //bgr转rgb,hwc转chw
    Utils::bgr2rgb_and_hwc2chw(ori_img, chw_vec);
    //resize
    Utils::resize({ori_img.channels(), ori_img.rows, ori_img.cols}, chw_vec, ai2d_out_tensor_);
}

/*
视频流预处理,具体参见ai2d应用部分
*/
void Classification::pre_process()
{
    ScopedTiming st(model_name_ + " pre_process video", debug_mode_);
    size_t isp_size = isp_shape_.channel * isp_shape_.height * isp_shape_.width;
    auto buf = ai2d_in_tensor_.impl()->to_host().unwrap()->buffer().as_host().unwrap().map(map_access_::map_write).unwrap().buffer();
    memcpy(reinterpret_cast<char *>(buf.data()), (void *)vaddr_, isp_size);
    hrt::sync(ai2d_in_tensor_, sync_op_t::sync_write_back, true).expect("sync write_back failed");
    ai2d_builder_->invoke(ai2d_in_tensor_, ai2d_out_tensor_).expect("error occurred in ai2d running");
}

/*
推理函数,run()和get_output()继承自AIBase
*/
void Classification::inference()
{
    this->run();
    this->get_output();
}

/*
后处理计算 exp
*/
float Classification::fast_exp(float x)
{
    union {
        uint32_t i;
        float f;
    } v{};
    v.i = (1 << 23) * (1.4426950409 * x + 126.93490512f);
    return v.f;
}

/*
后处理计算 sigmoid
*/
float Classification::sigmoid(float x)
{
    return 1.0f / (1.0f + fast_exp(-x));
}

/*
后处理函数
*/
void Classification::post_process(vector<cls_res> &results)
{
    ScopedTiming st(model_name_ + " post_process", debug_mode_);
    //p_outputs_中存放的是float类型指针,指向输出
    output = p_outputs_[0];
    cls_res b;
    //如果是多分类
    if(num_class > 2){
        float sum = 0.0;
        for (int i = 0; i < num_class; i++){
            sum += exp(output[i]);
        }
        b.score = cls_thresh;
        int max_index;
        //softmax处理
        for (int i = 0; i < num_class; i++)
        {
            output[i] = exp(output[i]) / sum;
        }
        max_index = max_element(output,output+num_class) - output;
        if (output[max_index] >= b.score)
        {
            b.label = labels[max_index];
            b.score = output[max_index];
            results.push_back(b);
        }
    }
    else// 2分类
    {
        float pre = sigmoid(output[0]);
        if (pre > cls_thresh)
        {
            b.label = labels[0];
            b.score = pre;
        }
        else{
            b.label = labels[1];
            b.score = 1 - pre;
        }
        results.push_back(b);
    }
}
在上述代码中的预处理部分,使用了一些工具函数,我们将其封装在utils.h中:
#ifndef UTILS_H
#define UTILS_H
#include <algorithm>
#include <vector>
#include <iostream>
#include <fstream>
#include <opencv2/core.hpp>
#include <opencv2/highgui.hpp>
#include <opencv2/imgcodecs.hpp>
#include <opencv2/imgproc.hpp>
#include <nncase/functional/ai2d/ai2d_builder.h>
#include <string>
#include <string.h>
#include <cmath>
#include <stdio.h>
#include <stdlib.h>
#include <sys/types.h>
#include <sys/stat.h>
#include <fcntl.h>
#include <sys/ioctl.h>
#include <unistd.h>
#include <stdint.h>
#include <random>


using namespace nncase;
using namespace nncase::runtime;
using namespace nncase::runtime::k230;
using namespace nncase::F::k230;


using namespace std;
using namespace cv;
using cv::Mat;
using std::cout;
using std::endl;
using std::ifstream;
using std::vector;

#define STAGE_NUM 3
#define STRIDE_NUM 3
#define LABELS_NUM 1

/**
 * @brief 分类结果结构
 */
typedef struct cls_res
{
    float score;//分类分数
    string label;//分类标签结果
}cls_res;

/**
 * @brief 单张/帧图片大小
 */
typedef struct FrameSize
{
    size_t width;  // 宽
    size_t height; // 高
} FrameSize;

/**
 * @brief 单张/帧图片大小
 */
typedef struct FrameCHWSize
{
    size_t channel; // 通道
    size_t height;  // 高
    size_t width;   // 宽
} FrameCHWSize;

/**
 * @brief AI工具类
 * 封装AI常用的函数,包括二进制文件读取、文件保存、图片预处理等操作
 */
class Utils
{
public:
    /**
     * @brief 对图片resize
     * @param ori_img             原始图片
     * @param frame_size      需要resize图像的宽高
     * @param padding         需要padding的像素,默认是cv::Scalar(104, 117, 123),BGR
     * @return                处理后图像
     */
    static cv::Mat resize(const cv::Mat ori_img, const FrameSize &frame_size);


    /**
     * @brief 将BGR图片从hwc转为chw
     * @param ori_img          原始图片
     * @param chw_vec          转为chw后的数据
     * @return None
     */
    static void bgr2rgb_and_hwc2chw(cv::Mat &ori_img, std::vector<uint8_t> &chw_vec);

    /*************************for ai2d ori_img process********************/
    // resize
    /**
     * @brief resize函数,对chw数据进行resize
     * @param ori_shape        原始数据chw
     * @param chw_vec          原始数据
     * @param ai2d_out_tensor  ai2d输出
     * @return None
     */
    static void resize(FrameCHWSize ori_shape, std::vector<uint8_t> &chw_vec, runtime_tensor &ai2d_out_tensor);

    /**
     * @brief resize函数
     * @param builder          ai2d构建器,用于运行ai2d
     * @param ai2d_in_tensor   ai2d输入
     * @param ai2d_out_tensor  ai2d输出
     * @return None
     */
    static void resize(std::unique_ptr<ai2d_builder> &builder, runtime_tensor &ai2d_in_tensor, runtime_tensor &ai2d_out_tensor);

    /**
     * @brief 将分类任务的结果绘制到图像上
     * @param frame         原始图像
     * @param results       分类的结果
     * @return None
     */
    static void draw_cls_res(cv::Mat& frame, vector<cls_res>& results);

    /**
     * @brief 将分类任务的结果绘制到屏幕的osd中
     * @param frame                 原始图像
     * @param results               分类的结果
     * @param osd_frame_size        osd的宽高
     * @param sensor_frame_size     sensor的宽高
     * @return None
     */
    static void draw_cls_res(cv::Mat& frame, vector<cls_res>& results, FrameSize osd_frame_size, FrameSize sensor_frame_size);
};
#endif
如果您有需要还可以添加其他的工具函数。下面是utils.cc文件,完成工具类接口的实现:
#include <iostream>
#include "utils.h"

using std::ofstream;
using std::vector;

auto cache = cv::Mat::zeros(1, 1, CV_32FC1);

cv::Mat Utils::resize(const cv::Mat img, const FrameSize &frame_size)
{
    cv::Mat cropped_img;
    cv::resize(img, cropped_img, cv::Size(frame_size.width, frame_size.height), cv::INTER_LINEAR);
    return cropped_img;
}

void Utils::bgr2rgb_and_hwc2chw(cv::Mat &ori_img, std::vector<uint8_t> &chw_vec)
{
    // for bgr format
    std::vector<cv::Mat> bgrChannels(3);
    cv::split(ori_img, bgrChannels);
    for (auto i = 2; i > -1; i--)
    {
        std::vector<uint8_t> data = std::vector<uint8_t>(bgrChannels[i].reshape(1, 1));
        chw_vec.insert(chw_vec.end(), data.begin(), data.end());
    }
}

void Utils::resize(FrameCHWSize ori_shape, std::vector<uint8_t> &chw_vec, runtime_tensor &ai2d_out_tensor)
{
    // build ai2d_in_tensor
    dims_t in_shape{1, ori_shape.channel, ori_shape.height, ori_shape.width};
    runtime_tensor ai2d_in_tensor = host_runtime_tensor::create(typecode_t::dt_uint8, in_shape, hrt::pool_shared).expect("cannot create input tensor");

    auto input_buf = ai2d_in_tensor.impl()->to_host().unwrap()->buffer().as_host().unwrap().map(map_access_::map_write).unwrap().buffer();
    memcpy(reinterpret_cast<char *>(input_buf.data()), chw_vec.data(), chw_vec.size());
    hrt::sync(ai2d_in_tensor, sync_op_t::sync_write_back, true).expect("write back input failed");

    // run ai2d
    // ai2d_datatype_t ai2d_dtype{ai2d_format::NCHW_FMT, ai2d_format::NCHW_FMT, typecode_t::dt_uint8, typecode_t::dt_uint8};
    ai2d_datatype_t ai2d_dtype{ai2d_format::NCHW_FMT, ai2d_format::NCHW_FMT, ai2d_in_tensor.datatype(), ai2d_out_tensor.datatype()};
    ai2d_crop_param_t crop_param { false, 30, 20, 400, 600 };
    ai2d_shift_param_t shift_param{false, 0};
    ai2d_pad_param_t pad_param{false, {{0, 0}, {0, 0}, {0, 0}, {0, 0}}, ai2d_pad_mode::constant, {114, 114, 114}};
    ai2d_resize_param_t resize_param{true, ai2d_interp_method::tf_bilinear, ai2d_interp_mode::half_pixel};
    ai2d_affine_param_t affine_param{false, ai2d_interp_method::cv2_bilinear, 0, 0, 127, 1, {0.5, 0.1, 0.0, 0.1, 0.5, 0.0}};

    dims_t out_shape = ai2d_out_tensor.shape();
    ai2d_builder builder { in_shape, out_shape, ai2d_dtype, crop_param, shift_param, pad_param, resize_param, affine_param };
    builder.build_schedule();
    builder.invoke(ai2d_in_tensor,ai2d_out_tensor).expect("error occurred in ai2d running");
}

void Utils::resize(std::unique_ptr<ai2d_builder> &builder, runtime_tensor &ai2d_in_tensor, runtime_tensor &ai2d_out_tensor)
{
    // run ai2d
    ai2d_datatype_t ai2d_dtype{ai2d_format::NCHW_FMT, ai2d_format::NCHW_FMT, ai2d_in_tensor.datatype(), ai2d_out_tensor.datatype()};
    ai2d_crop_param_t crop_param { false, 30, 20, 400, 600 };
    ai2d_shift_param_t shift_param{false, 0};
    ai2d_pad_param_t pad_param{false, {{0, 0}, {0, 0}, {0, 0}, {0, 0}}, ai2d_pad_mode::constant, {114, 114, 114}};
    ai2d_resize_param_t resize_param{true, ai2d_interp_method::tf_bilinear, ai2d_interp_mode::half_pixel};
    ai2d_affine_param_t affine_param{false, ai2d_interp_method::cv2_bilinear, 0, 0, 127, 1, {0.5, 0.1, 0.0, 0.1, 0.5, 0.0}};

    dims_t in_shape = ai2d_in_tensor.shape();
    dims_t out_shape = ai2d_out_tensor.shape();
    builder.reset(new ai2d_builder(in_shape, out_shape, ai2d_dtype, crop_param, shift_param, pad_param, resize_param, affine_param));
    builder->build_schedule();
    builder->invoke(ai2d_in_tensor,ai2d_out_tensor).expect("error occurred in ai2d running");
}


void Utils::draw_cls_res(cv::Mat& frame, vector<cls_res>& results)
{
    double fontsize = (frame.cols * frame.rows * 1.0) / (300 * 250);
    if (fontsize > 2)
    {
        fontsize = 2;
    }

    for(int i = 0; i < results.size(); i++)
    {
        std::string text = "class: " + results[i].label + ", score: " + std::to_string(round(results[i].score * 100) / 100.0).substr(0, 4);

        cv::putText(frame, text, cv::Point(1, 40), cv::FONT_HERSHEY_SIMPLEX, 0.8, cv::Scalar(255, 255, 0), 2);
        std::cout << text << std::endl;
    }
}

void Utils::draw_cls_res(cv::Mat& frame, vector<cls_res>& results, FrameSize osd_frame_size, FrameSize sensor_frame_size)
{
    double fontsize = (frame.cols * frame.rows * 1.0) / (1100 * 1200);
    for(int i = 0; i < results.size(); i++)
    {
        std::string text = "class: " + results[i].label + ", score: " + std::to_string(round(results[i].score * 100) / 100.0).substr(0, 4);
        cv::putText(frame, text, cv::Point(1, 40), cv::FONT_HERSHEY_SIMPLEX, 0.8, cv::Scalar(255, 255, 255, 0), 2);
        std::cout << text << std::endl;
    }
}
为了便于调试,我们在scoped_timing.hpp中封装了计时类ScopedTiming,用于统计在该类实例生命周期内的耗时。
#include <chrono>
#include <string>
#include <iostream>

/**
 * @brief 计时类
 * 统计在该类实例生命周期内的耗时
 */
class ScopedTiming
{
public:
    /**
     * @brief ScopedTiming 构造函数,初始化计时对象名称并开始计时
     * @param info 计时对象名称
     * @param enable_profile 是否开始计时
     * @return None
     */
    ScopedTiming(std::string info = "ScopedTiming", int enable_profile = 1)
    : m_info(info), enable_profile(enable_profile)
    {
        if (enable_profile)
        {
            m_start = std::chrono::steady_clock::now();
        }
    }

    /**
     * @brief ScopedTiming析构,结束计时,并打印耗时
     * @return None
     */
     ~ScopedTiming()
    {
        if (enable_profile)
        {
            m_stop = std::chrono::steady_clock::now();
            double elapsed_ms = std::chrono::duration<double, std::milli>(m_stop - m_start).count();
            std::cout << m_info << " took " << elapsed_ms << " ms" << std::endl;
        }
    }

private:
    int enable_profile;                            // 是否统计时间
    std::string m_info;                            // 计时对象名称
    std::chrono::steady_clock::time_point m_start; // 计时开始时间
    std::chrono::steady_clock::time_point m_stop;  // 计时结束时间
};
main.cc是实现板端推理的主要代码,主要实现解析传入参数,打印使用说明,实现两个不同分支的推理。如果输入的第二个参数是推理图像路径,则调用image_proc函数进行图像推理;如果传入的是None,则调用video_proc函数进行视频流推理。
静态图推理代码
void image_proc_cls(string &kmodel_path, string &image_path,vector<string> labels,float cls_thresh ,int debug_mode)
{
    cv::Mat ori_img = cv::imread(image_path);
    int ori_w = ori_img.cols;
    int ori_h = ori_img.rows;
    //创建任务类实例
    Classification cls(kmodel_path,image_path,labels,cls_thresh,debug_mode);
    //前处理
    cls.pre_process(ori_img);
    //推理
    cls.inference();
    vector<cls_res> results;
    //后处理
    cls.post_process(results);
    Utils::draw_cls_res(ori_img,results);
    cv::imwrite("result_cls.jpg", ori_img);

}
上述代码是main.cc中的静态图像推理代码部分,首先从图片路径初始化cv::Mat对象ori_img,然后初始化Classification实例cls,调用cls预处理函数pre_process,推理函数reference,后处理函数post_process,最后调用utils.h中的draw_cls_res将结果绘制在图片上并保存为result_cls.jpg。如您需要修改前后处理部分,可在Classification.cc中进行修改,如您想添加其他工具方法,可在utils中定义,并在utils.cc中实现。
视频流推理代码可以参考SDK编译章节的示例2部分代码。其中AI开发的核心代码为:
Classification cls(kmodel_path,labels,cls_thresh, {3, ISP_CHN1_HEIGHT, ISP_CHN1_WIDTH}, reinterpret_cast<uintptr_t>(vbvaddr), reinterpret_cast<uintptr_t>(dump_info.v_frame.phys_addr[0]), debug_mode);
vector<cls_res> results;
results.clear();
cls.pre_process();
cls.inference();
cls.post_process(results);
为了使用方便,我们对视频流处理部分做了封装,您可以参考示例代码:<K230_training_scripts/end2end_cls_doc at main · kendryte/K230_training_scripts (github.com)>中k230_code中的vi_vo.h文件和main.cc中的具体实现。
k230_code/k230_deploy/CMakeLists.txt说明
这是k230_code/k230_deploy目录下的CMakeLists.txt脚本,设置编译的C++文件和生成的elf可执行文件名称,由下面:
set(src main.cc utils.cc ai_base.cc classification.cc)
set(bin main.elf)

include_directories(${PROJECT_SOURCE_DIR}):添加项目的根目录到头文件搜索路径中。
include_directories(${nncase_sdk_root}/riscv64/rvvlib/include):添加 nncase RISC-V 向量库的头文件目录。
include_directories(${k230_sdk}/src/big/mpp/userapps/api/):添加 k230 SDK 中的用户应用程序 API 头文件目录。
include_directories(${k230_sdk}/src/big/mpp/include):添加 k230 SDK 的一般头文件目录。
include_directories(${k230_sdk}/src/big/mpp/include/comm):添加与通信相关的头文件目录。
include_directories(${k230_sdk}/src/big/mpp/userapps/sample/sample_vo):添加示例 VO(视频输出)应用程序头文件目录。

link_directories(${nncase_sdk_root}/riscv64/rvvlib/): 添加链接器搜索路径,指向 nncase RISC-V 向量库的目录。
add_executable(${bin} ${src}): 创建一个可执行文件,将之前设置的源文件列表作为输入。
target_link_libraries(${bin} ...):设置可执行文件需要链接的库。列表中列出了各种库,包括 nncase 相关的库、k230 SDK 的库,以及其他一些库。
target_link_libraries(${bin} opencv_imgproc opencv_imgcodecs opencv_core zlib libjpeg-turbo libopenjp2 libpng libtiff libwebp csi_cv): 将一些 OpenCV 相关的库和其他一些库链接到可执行文件中。
install(TARGETS ${bin} DESTINATION bin): 安装生成的可执行文件到指定的目标路径(bin 目录)中。
k230_code/CMakeLists.txt说明
cmake_minimum_required(VERSION 3.2)
project(nncase_sdk C CXX)

set(nncase_sdk_root "${PROJECT_SOURCE_DIR}/../../nncase/")
set(k230_sdk ${nncase_sdk_root}/../../../)
set(CMAKE_EXE_LINKER_FLAGS "-T ${PROJECT_SOURCE_DIR}/cmake/link.lds --static")

# set opencv
set(k230_opencv ${k230_sdk}/src/big/utils/lib/opencv)
include_directories(${k230_opencv}/include/opencv4/)
link_directories(${k230_opencv}/lib ${k230_opencv}/lib/opencv4/3rdparty)

# set mmz
link_directories(${k230_sdk}/src/big/mpp/userapps/lib)

# set nncase
include_directories(${nncase_sdk_root}/riscv64)
include_directories(${nncase_sdk_root}/riscv64/nncase/include)
include_directories(${nncase_sdk_root}/riscv64/nncase/include/nncase/runtime)
link_directories(${nncase_sdk_root}/riscv64/nncase/lib/)

add_subdirectory(k230_deploy)
这是k230_code目录下的CMakeLists.txt脚本。该脚本重点关注如下部分:
set(nncase_sdk_root "${PROJECT_SOURCE_DIR}/../../nncase/"):设置nncase目录
set(k230_sdk ${nncase_sdk_root}/../../../):设置k230_sdk的目录,当前是从nncase目录的三级父目录得到
set(CMAKE_EXE_LINKER_FLAGS "-T ${PROJECT_SOURCE_DIR}/cmake/link.lds --static"):设置链接脚本路径,链接脚本放于k230_code/cmake下
...
add_subdirectory(k230_deploy): 添加待编译的工程子目录,如您要编译自己的工程,可以更换该行
k230_code/build_app.sh说明
#!/bin/bash
set -x

# set cross build toolchain
# 将交叉编译工具链的路径添加到系统的 PATH 环境变量中,以便在后续的命令中使用。该工具链是使用的大核编译工具链。
export PATH=$PATH:/opt/toolchain/riscv64-linux-musleabi_for_x86_64-pc-linux-gnu/bin/

clear
rm -rf out
mkdir out
pushd out
cmake -DCMAKE_BUILD_TYPE=Release                 \
      -DCMAKE_INSTALL_PREFIX=`pwd`               \
      -DCMAKE_TOOLCHAIN_FILE=cmake/Riscv64.cmake \
      ..

make -j && make install
popd

# 生成的main.elf可以在k230_code目录下的k230_bin文件夹下找到
k230_bin=`pwd`/k230_bin
rm -rf ${k230_bin}
mkdir -p ${k230_bin}

if [ -f out/bin/main.elf ]; then
      cp out/bin/main.elf ${k230_bin}
fi
代码编译#
将项目中的k230_code文件夹拷贝到k230_sdk目录下的src/big/nncase下,执行编译脚本,将C++代码编译成main.elf可执行文件。
# 在k230_SDK根目录下执行
make CONF=k230_canmv_defconfig prepare_memory
# 回到当前项目目录,赋予权限
chmod +x build_app.sh
./build_app.sh
准备ELF文件#
后面部署步骤需要用到的文件包括:
k230_code/k230_bin/main.elf;
网络配置与文件传输#
将待使用文件拷贝到开发板上有两种方式可供选择。一种是tftp传输方法,一种是scp传输方法。
tftp文件传输#
Windows系统PC端网络配置
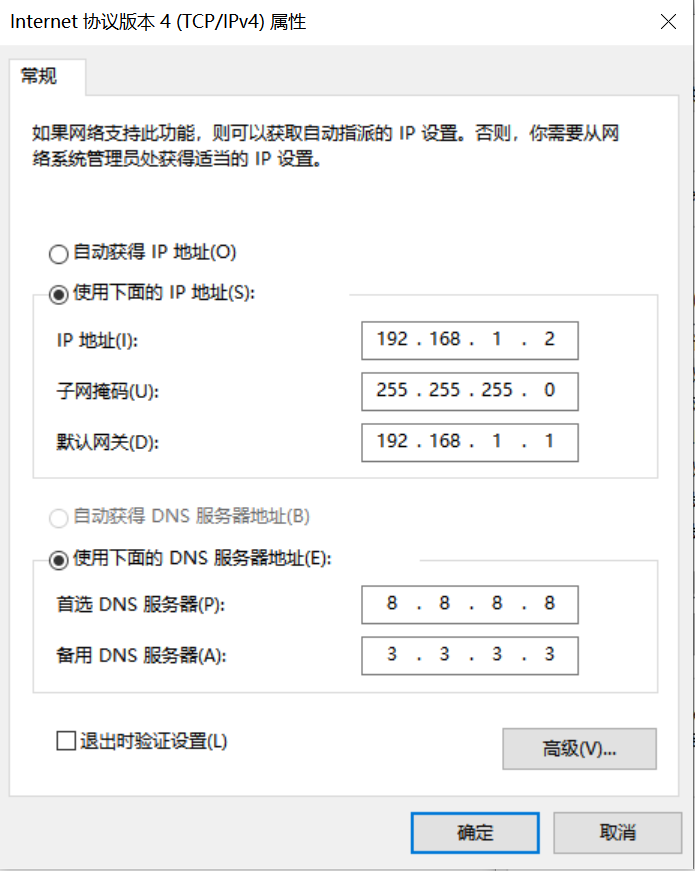
控制面板->网络和共享中心->更改适配器设置->以太网网卡->右键属性->选中(TCP/IPv4)->属性
配置IP地址、掩码、网关,配置DNS服务器地址:
开发板网络配置
进入小核命令行,执行:
# 查看是否有eth0
ifconfig
# 配置开发板IP,和PC在同一网段下
ifconfig eth0 192.168.1.22
# 查看IP配置
ifconfig
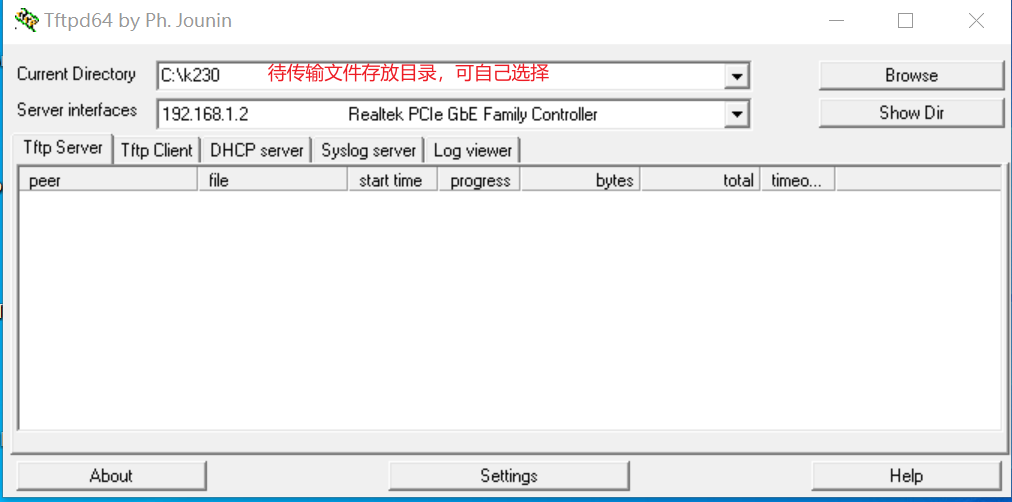
工具:tftpd64
安装tftp通信工具,下载地址:https://bitbucket.org/phjounin/tftpd64/downloads/
启动tftpd64,配置待传输文件存放目录和服务网卡
sharefs说明
# 进入小核根目录
cd /
# 查看目录
ls
# sharefs目录是大小核共用目录,因此从小核拷贝到sharefs目录下的文件对大核也可见
文件传输
# 以下代码在小核串口执行
# 将PC上tftpd64配置文件存放目录中的文件传输至开发板的当前目录
tftp -g -r your_file 192.168.1.2
# 将开发板当前目录下的文件传输至tftpd64配置文件存放目录
tftp -p -r board_file 192.168.1.2
scp文件传输#
在Linux系统中,PC正常连接网络,开发板可以通过网线连接PC所在网关下其他网口,通过scp命令实现文件传输。
开发板上电,进入大小核COM界面,在小核执行scp传输命令:
# 从PC拷贝文件至开发板
scp 用户名@域名或IP:文件所在目录 开发板目的目录
#拷贝文件夹
scp -r 用户名@域名或IP:文件所在目录 开发板目的目录
# 从开发板拷贝文件至PC
scp 开发板待拷贝目录 用户名@域名或IP:PC目的目录
# 拷贝文件夹
scp -r 开发板待拷贝目录 用户名@域名或IP:PC目的目录
K230端部署#
板端部署过程#
按照上节配置好的文件传输过程,在MobaXterm上的小核界面进入/sharefs,创建测试文件夹:
cd /sharefs
mkdir test_cls
cd test_cls
将模型训练和测试部分准备好的文件和C++代码编译部分准备好的elf文件拷贝到开发板。
test_cls
 ├──best.kmodel
 ├──labels.txt
 ├──main.elf
 ├──test.jpg
在大核COM口进入到/sharefs/test_cls目录下,
执行静态图推理,执行下述代码(注意:代码需在大核下执行,文件拷贝需在小核下完成):
# "模型推理时传参说明:"
# "<kmodel_path> <image_path> <labels_txt> <debug_mode>"
# "Options:"
# "  kmodel_path     Kmodel的路径\n"
# "  image_path      待推理图片路径/摄像头(None)\n"
# "  labels_txt      类别标签文件路径\n"
# "  debug_mode      是否需要调试,0、1、2分别表示不调试、简单调试、详细调试\n"
main.elf best.kmodel test.jpg labels.txt 2
如执行摄像头视频流推理,执行下述代码:
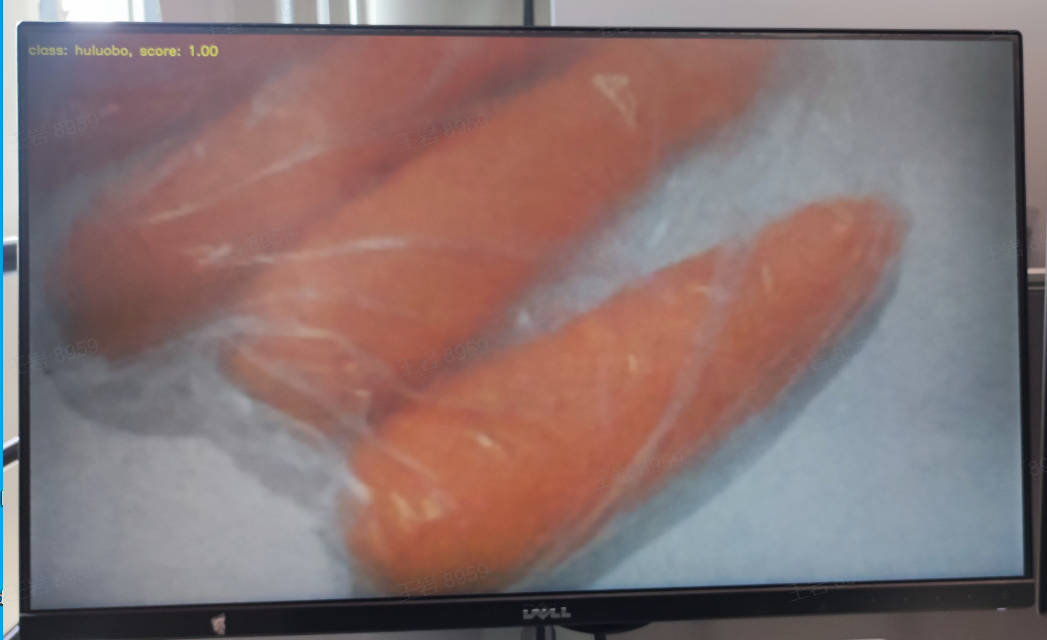
main.elf best.kmodel None labels.txt 2
上板部署效果#
静态图推理图示:

视频流推理图示:
常见问题问答(FAQ)#
请参考常见问题问答