CanMV K230 Tutorial#

Copyright © 2023 Beijing Canaan Creative Information Technology Co., Ltd.
Disclaimer#
The products, services, or features you purchase are subject to the commercial contracts and terms of Beijing Canaan Creative Information Technology Co., Ltd. (hereinafter referred to as “the company”) and its affiliates. All or part of the products, services, or features described in this document may not be within the scope of your purchase or usage. Unless otherwise agreed in the contract, the company does not provide any express or implied statements or warranties regarding the accuracy, reliability, completeness, merchantability, fitness for a particular purpose, and non-infringement of any statements, information, or content in this document. Unless otherwise agreed, this document is provided only as a reference for usage guidance.
Due to product version upgrades or other reasons, the content of this document may be updated or modified periodically without any notice.
Trademark Statement#
 , “Canaan,” and other Canaan trademarks are trademarks of Beijing Canaan Creative Information Technology Co., Ltd. and its affiliates. All other trademarks or registered trademarks mentioned in this document are owned by their respective owners.
Copyright © 2023 Beijing Canaan Creative Information Technology Co., Ltd. All rights reserved. Without the written permission of the company, no unit or individual is allowed to excerpt, copy any part or all of the content of this document, and must not disseminate it in any form.
Table of Contents#
[toc]
Preface#
This document is based on the CanMV-K230 development board and introduces the K230 SDK, nncase, and AI development process.
Getting Started#
Development Board Overview#
The CanMV-K230 development board uses the latest generation SoC chip K230 from the Kendryte® series AIoT chips by Canaan Technology. This chip adopts a new multi-heterogeneous unit accelerated computing architecture, integrating two RISC-V high-efficiency computing cores, with a built-in new generation KPU (Knowledge Process Unit) intelligent computing unit. It supports multi-precision AI computing power and a wide range of general AI computing frameworks, with utilization rates of some typical networks exceeding 70%.
The chip also has a rich variety of peripheral interfaces and multiple dedicated hardware acceleration units for scalar, vector, and graphics, such as 2D and 2.5D. It can perform full-process computation acceleration for various image, video, audio, and AI tasks, featuring low latency, high performance, low power consumption, fast startup, and high security.
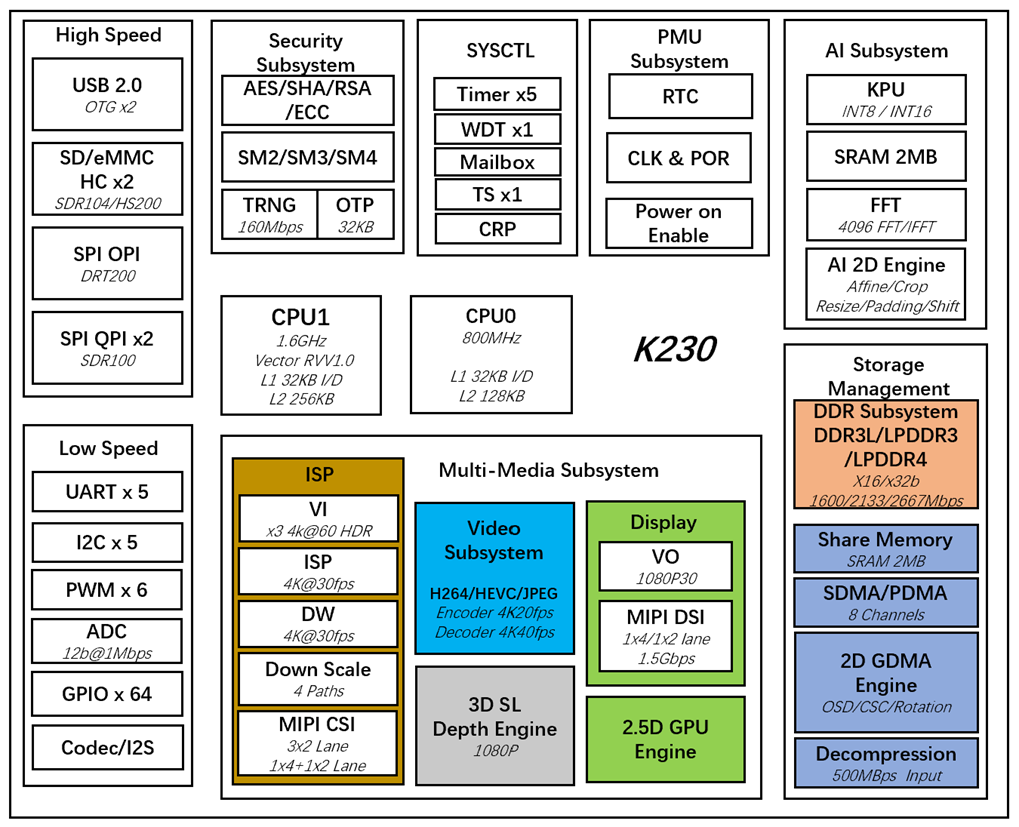
The CanMV-K230 adopts a single-board design with rich expansion interfaces, fully leveraging the high performance of the K230, and can be directly used for the development of various intelligent products, accelerating product landing.
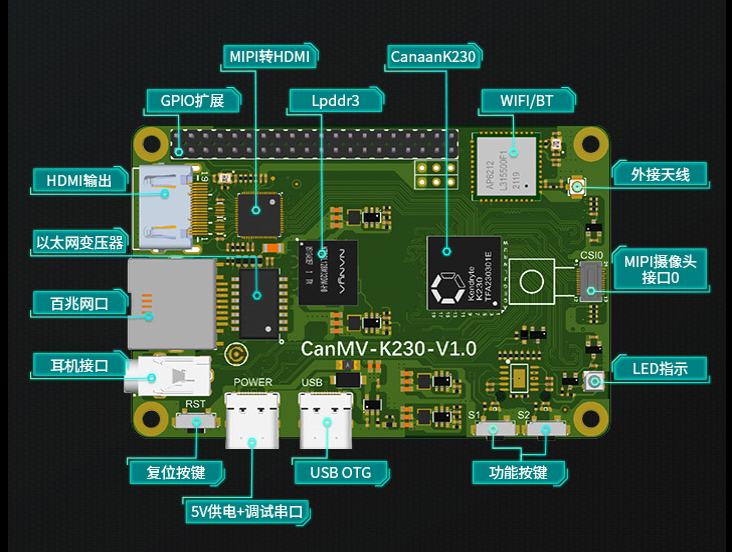
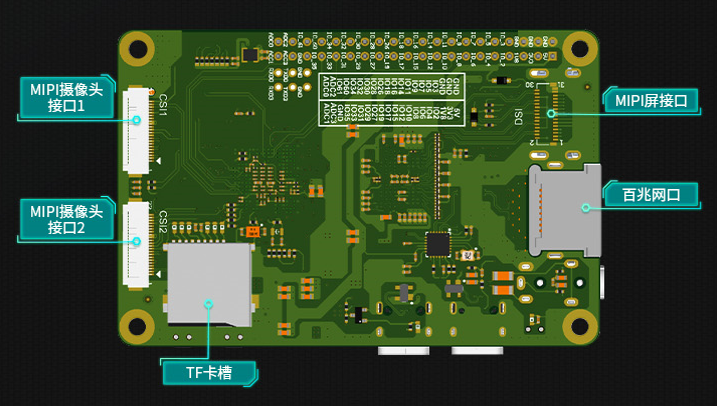
CanMV-K230 Default Kit#
The CanMV-K230 development board default kit includes the following items:
CanMV-K230 mainboard x 1
OV5647 camera x 1
Type-C data cable x 1
Additionally, users need to prepare the following accessories:
TF card for firmware burning and system startup (mandatory)
Monitor with HDMI interface and HDMI cable
100M/1000M Ethernet cable and wired router
Debug Instructions#
Serial Connection#
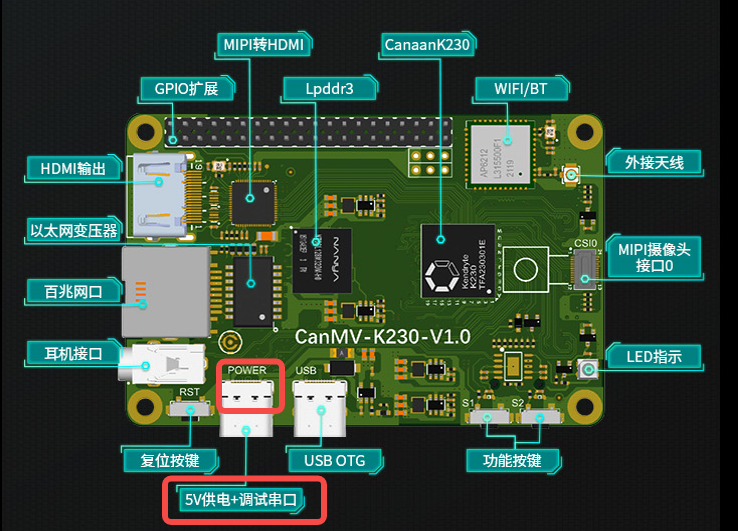
Use a Type-C cable to connect the CanMV-K230 to the position shown in the figure below, and connect the other end of the cable to the computer.
Serial Debugging#
Windows#
Install the driver
The CanMV-K230 comes with a CH342 USB to serial chip. The driver download address is https://www.wch.cn/downloads/CH343SER_EXE.html.
View the serial port number
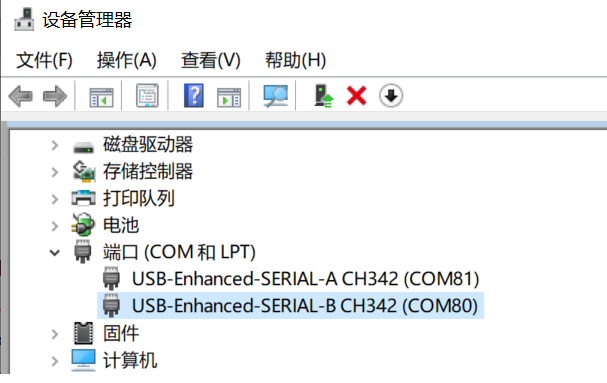
Two serial ports are displayed here: COM80 for the small core Linux debug serial port, and COM81 for the large core rt-smart debug serial port.
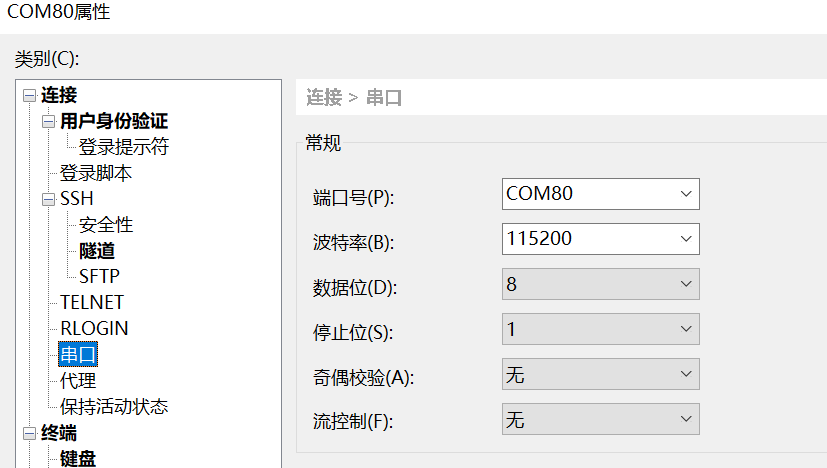
Configure serial port information
Open the Xshell tool (or other serial port tools).
Select the port number displayed in the Device Manager
Baud rate: 115200
Data bits: 8
Stop bits: 1
Parity: None
Flow control: None
Linux#
The Linux serial port display is as follows:
/dev/ttyACM0for the small core Linux debug serial port/dev/ttyACM1for the large core rt-smart debug serial port
You can use the Linux minicom or other serial tools to connect and debug, with serial port configuration information consistent with Windows.
Firmware Acquisition and Burning#
Firmware Acquisition#
CanMV-K230 firmware download address: https://kendryte-download.canaan-creative.com/k230/release/sdk_images/
k230_canmv_defconfig: CanMV-K230 1.0/1.1 Linux+rtt image.
k230_canmv_only_rtt_defconfig: CanMV-K230 1.0/1.1 rtt-only image.
Firmware Burning#
Burn the firmware to the TF card via a computer.
Burning Under Linux#
Before inserting the TF card into the host machine, input:
ls -l /dev/sd*
to view the current storage devices.
After inserting the TF card into the host machine, input again:
ls -l /dev/sd*
to view the storage devices at this time. The newly added one is the TF card device node.
Assuming /dev/sdc is the TF card device node, execute the following command to burn the TF card:
sudo dd if=sysimage-sdcard.img of=/dev/sdc bs=1M oflag=sync
Burning Under Windows#
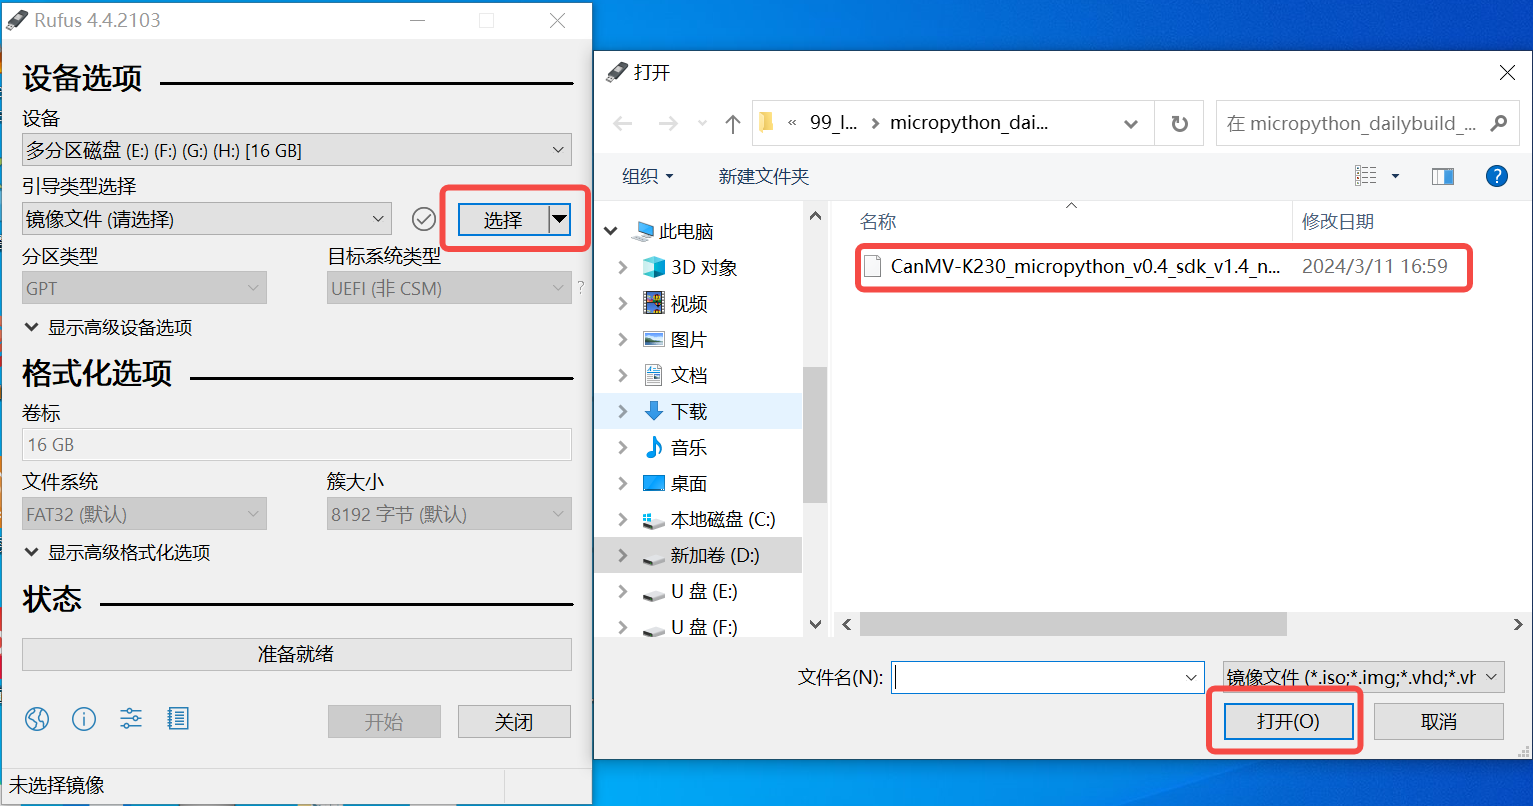
Under Windows, you can use the Rufus tool to burn the TF card (Rufus tool download address: http://rufus.ie/downloads/).
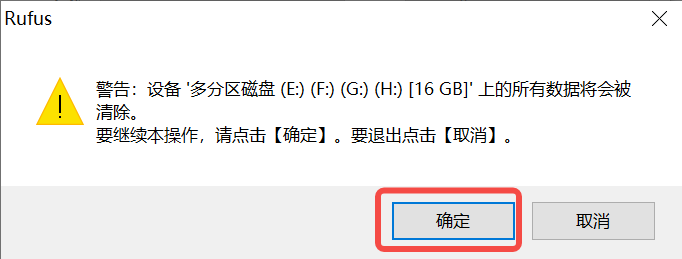
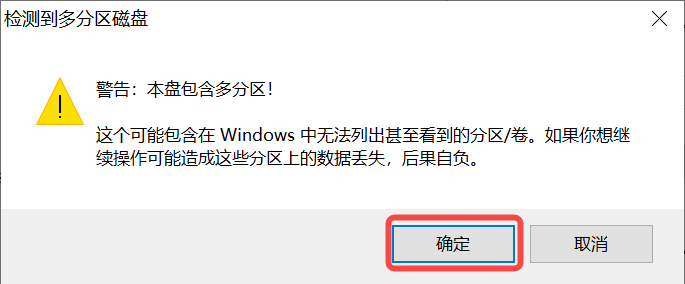
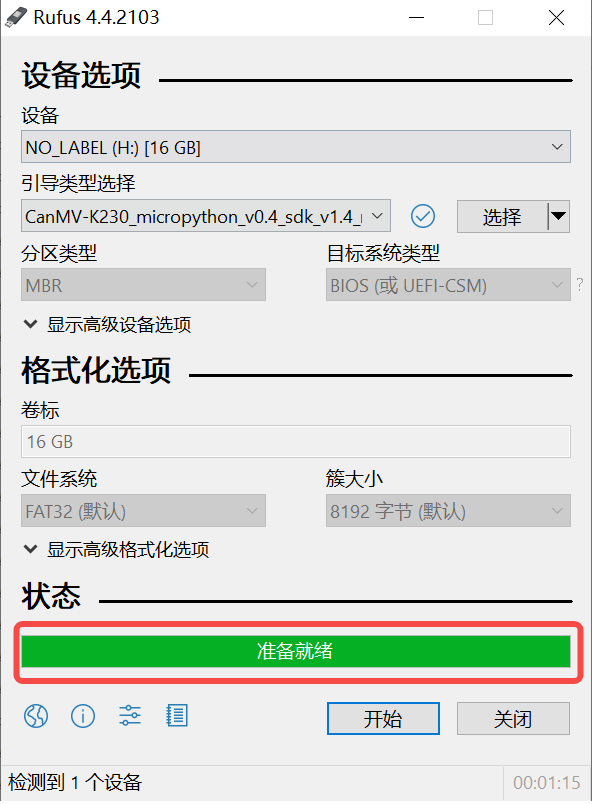
Insert the TF card into the PC, then start the Rufus tool, click the “Select” button on the tool interface, and choose the firmware to be burned.
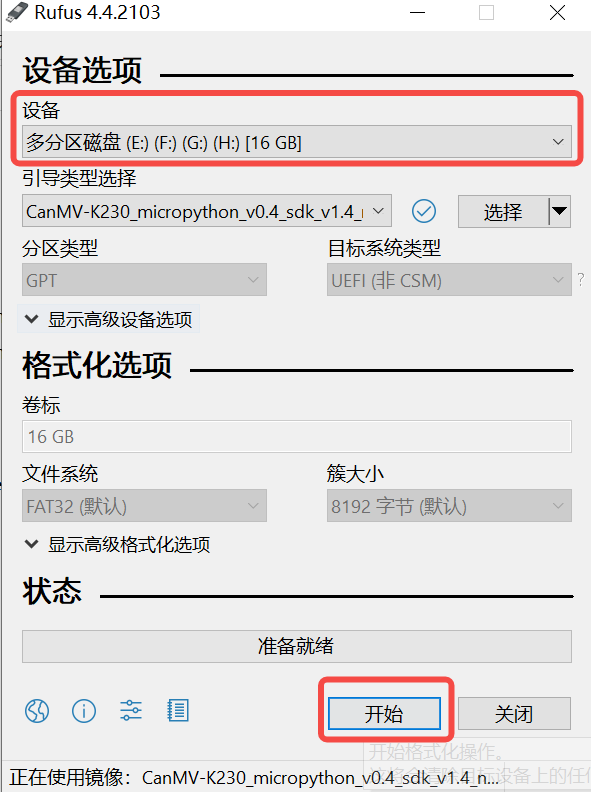
Click the “Start” button to start burning. The burning process will display a progress bar, and it will prompt “Ready” after the burning is completed.
System Startup#
Insert the TF card with the burned firmware into the CanMV-K230 TF card slot, connect the Type-C cable to the computer and the POWER port on the board, and the board will power on, and the system will start.
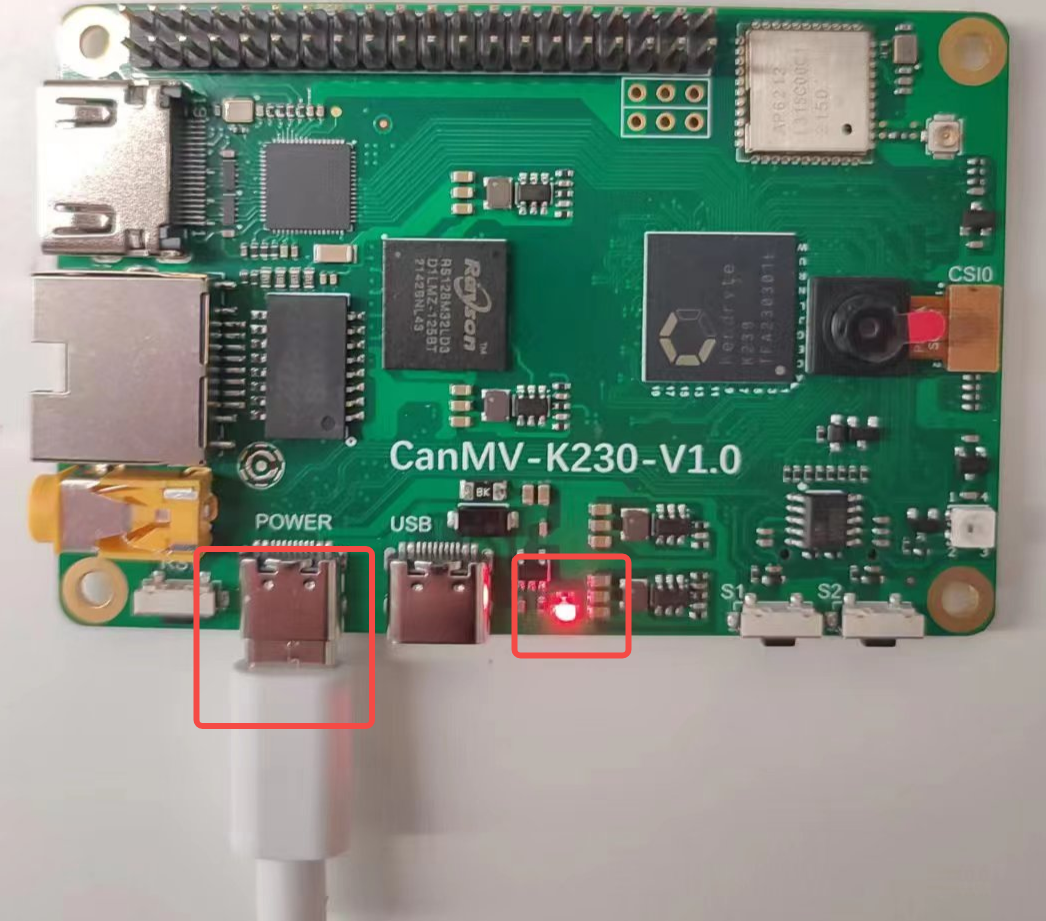
If the red light in the red frame is on, it means the development board is powered on normally. At this time, check the serial port information.
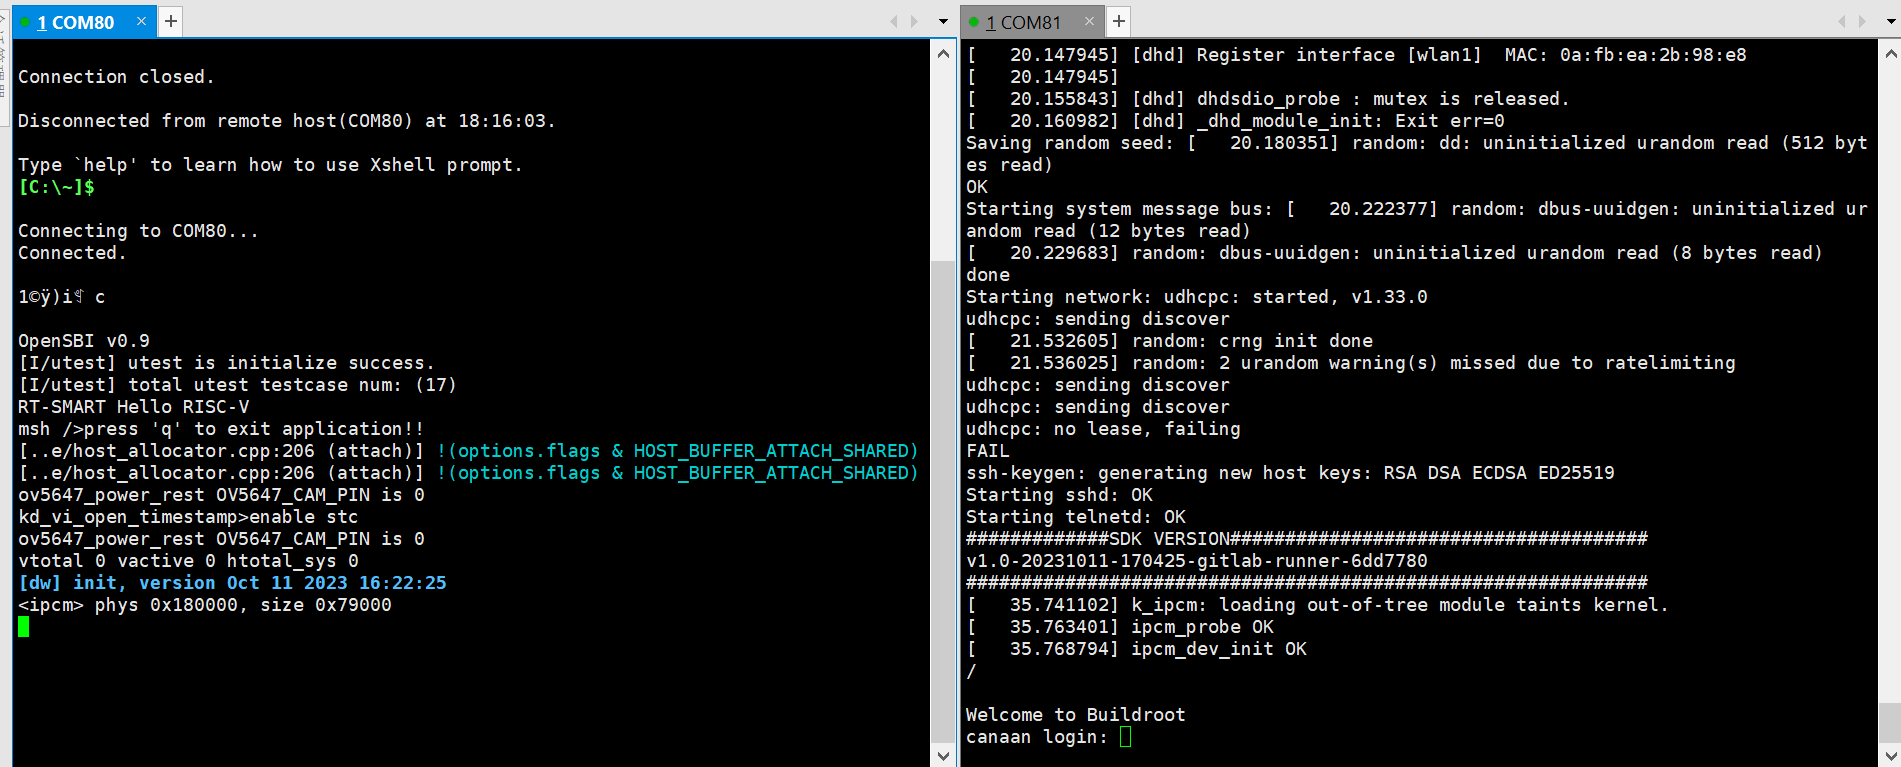
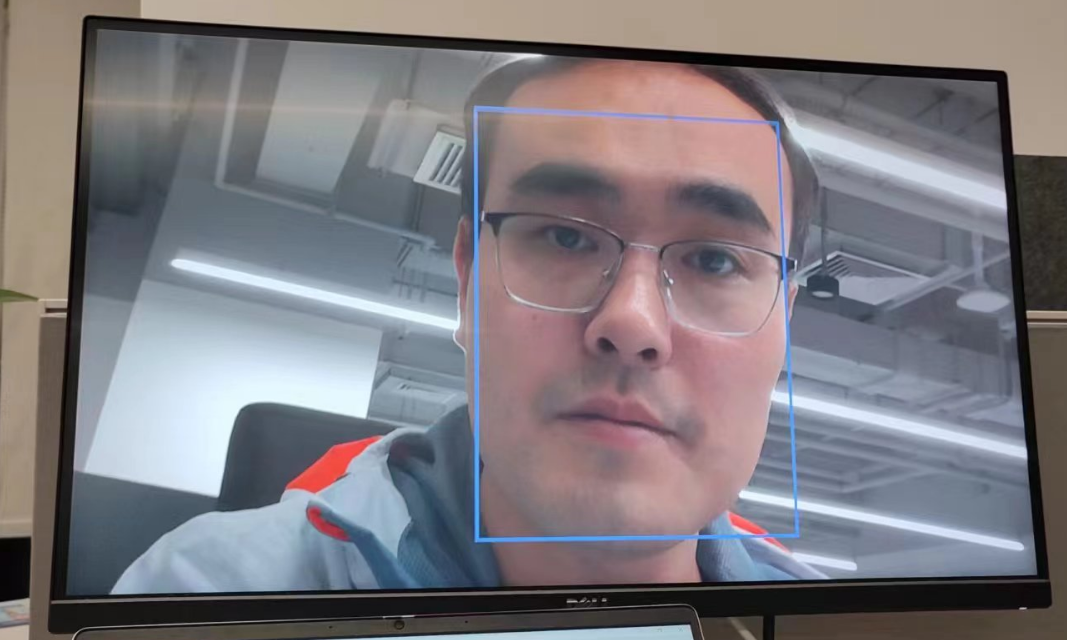
After the system starts, it will run the face detection program by default. Point the camera at the face, and the face will be framed on the monitor.
Linux+RT-smart Dual System Development#
This chapter introduces how to use the K230 SDK for Linux and RT-smart system development. The K230 SDK includes the source code, toolchain, and other related resources needed for dual-core heterogeneous system development based on Linux and RT-smart.
Development Environment Setup#
Compilation Environment#
Host Environment |
Description |
|---|---|
Docker Compilation Environment |
The SDK provides a docker file to generate a docker image for compiling the SDK |
Ubuntu 20.04.4 LTS (x86_64) |
The SDK can be compiled in the Ubuntu 20.04 environment |
The K230 SDK needs to be compiled in a Linux environment. The SDK supports Docker environment compilation, and the SDK development package releases a docker file (tools/docker/Dockerfile) to generate a Docker image. The specific usage and compilation steps of the docker file will be introduced in detail in the subsequent compilation chapters.
The Docker image used by the SDK is based on Ubuntu 20.04. If you do not use the Docker compilation environment, you can install the relevant HOST package and toolchain according to the content of the docker file in the Ubuntu 20.04 host environment and then compile the SDK.
The K230 SDK has not been verified in other Linux version host environments and does not guarantee that the SDK can be compiled in other environments.
SDK Development Package Acquisition#
The SDK is currently released simultaneously on GitHub and Gitee.
https://github.com/kendryte/k230_sdk
https://gitee.com/kendryte/k230_sdk
Users can directly download the compressed package from https://github.com/kendryte/k230_sdk/releases or https://gitee.com/kendryte/k230_sdk/releases, or use git clone https://github.com/kendryte/k230_sdk or git clone https://gitee.com/kendryte/k230_sdk.git.
Users can choose to use GitHub or Gitee according to their network conditions.
SDK Compilation#
Compilation Introduction#
The K230 SDK supports one-click compilation of the large and small core operating systems and public components, generating a burnable image file for deployment to the development board for startup and operation. The username of the Linux system on the device is root without a password;
Step 1: Refer to the above to obtain the SDK development package Step 2: Enter the SDK root directory
cd k230_sdk
Step 3: Download the toolchain
source tools/get_download_url.sh && make prepare_sourcecode
make prepare_sourcecodewill download both Linux and RT-Smart toolchain, buildroot package, and AI package from the Microsoft Azure cloud server with CDN. The download time may vary based on your network connection speed.
Step 4: Generate the Docker image (required for the first compilation, skip this step if the Docker image has already been generated)
docker build -f tools/docker/Dockerfile -t k230_docker tools/docker
Step 5: Enter the Docker environment
docker run -u root -it -v $(pwd):$(pwd) -v $(pwd)/toolchain:/opt/toolchain -w $(pwd) k230_docker /bin/bash
Step 6: In the Docker environment, execute the following command to compile the SDK
make CONF=k230_canmv_defconfig # Compile the CanMV-K230 board image
The SDK does not support multi-process compilation. Do not add multi-process compilation parameters like -j32.
Compilation Output#
After the compilation is completed, you can see the compilation output in the output/k230_canmv_defconfig/images directory.
The images directory contains the following image files:
sysimage-sdcard.img ————- is the boot image of the TF card;
sysimage-sdcard.img.gz ——— is the compressed package of the boot image of the TF card (the gzip compressed package of the sysimage-sdcard.img file), which needs to be decompressed before burning.
At this point, the entire SDK compilation is completed, generating the image sysimage-sdcard.img, which can be burned to the TF card to start the system.
Example: 1
For a basic hello world example, please refer to K230_Basic_Tutorial_Hello_World
Taking Vicap_demo as an example, the code is located at k230_sdk/src/big/mpp/userapps/sample/sample_vicap.
The Vicap demo implements camera data acquisition and preview functions by calling the MPI interface. The CanMV development board uses the OV5647 camera module by default, supporting up to three output data streams from a single camera.
Compilation#
In the k230_sdk directory, execute make rt-smart-clean && make rt-smart && make build-image to compile the modifications of the large core into the sd card image, and generate the image file sysimage-sdcard.img in the k230_sdk/output/k230_canmv_defconfig/images/ directory.
The corresponding program is located at k230_sdk/src/big/mpp/userapps/sample/elf/sample_vicap.elf.
Execution#
On the large core side, enter to /sharefs/app and execute the ./sample_vicap command in this directory to get command help information. When you input the sample_vicap command, the following prompt information will be printed:
usage: ./sample_vicap -mode 0 -dev 0 -sensor 0 -chn 0 -chn 1 -ow 640 -oh 480 -preview 1 -rotation 1
Options:
 -mode:         vicap work mode[0: online mode, 1: offline mode. only offline mode support multiple sensor input]     default 0
 -dev:          vicap device id[0,1,2]        default 0
 -dw:           enable dewarp[0,1]    default 0
 -sensor:       sensor type[0: ov9732@1280x720, 1: ov9286_ir@1280x720], 2: ov9286_speckle@1280x720]
 -ae:           ae status[0: disable AE, 1: enable AE]        default enable
 -awb:          awb status[0: disable AWB, 1: enable AWB]     default enable
 -chn:          vicap output channel id[0,1,2]        default 0
 -ow:           the output image width, default same with input width
 -oh:           the output image height, default same with input height
 -ox:           the output image start position of x
 -oy:           the output image start position of y
 -crop:         crop enable[0: disable, 1: enable]
 -ofmt:         the output pixel format[0: yuv, 1: rgb888, 2: rgb888p, 3: raw], only channel 0 support raw data, default yuv
 -preview:      the output preview enable[0: disable, 1: enable], only support 2 output channel preview
 -rotation:     display rotation[0: degree 0, 1: degree 90, 2: degree 270, 3: degree 180, 4: unsupported rotation]
 -help:         print this help
Parameter descriptions are as follows:
Parameter Name |
Optional Values |
Description |
|---|---|---|
-dev |
0: vicap device 0 1: vicap device 1 2: vicap device 2 |
Specifies the vicap device to use. The system supports up to three vicap devices. By specifying the device number, you can bind the sensor to different vicap devices. For example, |
-mode |
0: online mode; 1: offline mode |
Specifies the vicap device work mode. Currently supports online and offline modes. For multiple sensor inputs, you must specify offline mode. |
-sensor |
23: OV5647 (CanMV development board only supports this sensor) |
Specifies the sensor type to use. |
-chn |
0: vicap device output channel 0 1: vicap device output channel 1 2: vicap device output channel 2 |
Specifies the output channel of the vicap device to use. A vicap device supports up to three output channels, with only channel 0 supporting RAW image format output. |
-ow |
Specifies the output image width, default is the input image width. Width must be aligned to 16 bytes. If the default width exceeds the display screen’s maximum width, the display output width will be used as the final output width. If the output width is less than the input image width and the ox or oy parameters are not specified, it defaults to scaled output. |
|
-oh |
Specifies the output image height, default is the input image height. If the default height exceeds the display screen’s maximum height, the display output height will be used as the final output height. If the output height is less than the input image height and the ox or oy parameters are not specified, it defaults to scaled output. |
|
-ox |
Specifies the horizontal start position of the image output. If this parameter is greater than 0, output cropping will be performed. |
|
-oy |
Specifies the vertical start position of the image output. If this parameter is greater than 0, output cropping will be performed. |
|
-crop |
0: disable cropping 1: enable cropping |
When the output image size is smaller than the input image size, it defaults to scaled output. If this flag is specified, it will crop the output. |
-ofmt |
0: yuv format output 1: rgb format output 2: raw format output |
Specifies the output image format, default is yuv output. |
-preview |
0: disable preview 1: enable preview |
Specifies the output image preview function. Default is enabled. Currently supports up to 2 output image previews simultaneously. |
-rotation |
0: 0 degrees 1: 90 degrees 2: 180 degrees 3: 270 degrees 4: unsupported rotation |
Specifies the rotation angle of the preview window. By default, only the first output image window supports rotation. |
Example 1:
./sample_vicap -dev 0 -sensor 23 -chn 0 -chn 1 -ow 640 -oh 480
Description: Binds the ov5647@1920x1080 RGB output to vicap device 0 and enables vicap device output channels 0 and 1. Channel 0 output size defaults to the input image size (1920x1080), and channel 1 output image size is 640x480.
For the API used in this example, please refer to K230_VICAP_API_Reference.md and K230_Video_Output_API_Reference.md.
For other demos supported by the CanMV-K230 development board, please refer to K230_SDK_CanMV_Board_Demo_User_Guide.
For other SDK-related documents, please visit K230 SDK Documentation.
Example: 2
Fastboot program, source code located at k230_sdk/src/big/mpp/userapps/sample/fastboot_app, is a simple face detection program and is the default program that runs after the system starts in the Quick Start guide.
Compiling the Program#
In the k230_sdk directory, execute make rt-smart-clean && make rt-smart && make build-image to compile the modifications of the large core into the SD card image. The image file sysimage-sdcard.img will be generated in the k230_sdk/output/k230_canmv_defconfig/images/ directory.
The corresponding program is located at k230_sdk/src/big/mpp/userapps/sample/fastboot_elf/fastboot_app.elf.
Execution of the Program#
On the large core side, navigate to the /bin directory and execute ./fastboot_app.elf test.kmodel.
Code Analysis#
/* The OV5647 sensor outputs a 1920x1080 resolution raw image to the ISP, outputs a 1920x1080 YUV image for display, and a 1280x720 RGB image for KPU for face detection */
#define ISP_INPUT_WIDTH (1920)
#define ISP_INPUT_HEIGHT (1080)
#define ISP_CHN1_HEIGHT (720)
#define ISP_CHN1_WIDTH  (1280)
#define ISP_CHN0_WIDTH  (1920)
#define ISP_CHN0_HEIGHT (1080)

k_vicap_dev vicap_dev;  /* VICAP device responsible for capturing images */
k_vicap_chn vicap_chn;  /* VICAP output channel, ISP output image, this path is for display */
k_vicap_dev_attr dev_attr; /* VICAP device attributes */
k_vicap_chn_attr chn_attr; /* VICAP output channel attributes for configuring output parameters for display and AI */
k_vicap_sensor_info sensor_info; /* Sensor driver-related configuration information */
k_vicap_sensor_type sensor_type; /* Sensor type used, CanMV-K230 uses OV5647 by default */
k_video_frame_info dump_info;    /* Information for dumping images for AI computation */

/* First, configure the buffer pool */
int sample_vb_init(void)
{
    k_s32 ret;
    k_vb_config config;
    memset(&config, 0, sizeof(config));
    config.max_pool_cnt = 64;
    // VB for YUV420SP output
    config.comm_pool[0].blk_cnt = 5;  /* Buffer 5 blocks */
    config.comm_pool[0].mode = VB_REMAP_MODE_NOCACHE;
    config.comm_pool[0].blk_size = VICAP_ALIGN_UP((ISP_CHN0_WIDTH * ISP_CHN0_HEIGHT * 3 / 2), VICAP_ALIGN_1K);  /* Buffer block size for display */

    // VB for RGB888 output
    config.comm_pool[1].blk_cnt = 5;  /* Buffer 5 blocks */
    config.comm_pool[1].mode = VB_REMAP_MODE_NOCACHE;
    config.comm_pool[1].blk_size = VICAP_ALIGN_UP((ISP_CHN1_HEIGHT * ISP_CHN1_WIDTH * 3), VICAP_ALIGN_1K);  /* Buffer block size for AI */

    ret = kd_mpi_vb_set_config(&config); /* Configure buffer */
    if (ret) {
        printf("vb_set_config failed ret:%d\n", ret);
        return ret;
    }

    ret = kd_mpi_vb_init(); /* Create buffer pool */
    if (ret) {
        printf("vb_init failed ret:%d\n", ret);
    }
    return ret;
}

/* Next, configure display-related parameters, we use HDMI */
k_s32 sample_connector_init(void)
{
    k_u32 ret = 0;
    k_s32 connector_fd;

    k_connector_type connector_type = LT9611_MIPI_4LAN_1920X1080_30FPS; /* HDMI type used by CanMV-K230 */

    k_connector_info connector_info;

    memset(&connector_info, 0, sizeof(k_connector_info));

    // Get HDMI corresponding configuration information
    ret = kd_mpi_get_connector_info(connector_type, &connector_info);
    if (ret) {
        printf("sample_vicap, the sensor type not supported!\n");
        return ret;
    }

    /* Open display device */
    connector_fd = kd_mpi_connector_open(connector_info.connector_name);
    if (connector_fd < 0) {
        printf("%s, connector open failed.\n", __func__);
        return K_ERR_VO_NOTREADY;
    }

    /* Power on */
    kd_mpi_connector_power_set(connector_fd, K_TRUE);
    /* Initialize HDMI */
    kd_mpi_connector_init(connector_fd, connector_info);

    return 0;
}

/* Configure VICAP for capturing sensor images */
int sample_vivcap_init(void)
{
    k_s32 ret = 0;
    /* OV5647 1920x1080 30fps raw10 linear mode */
    sensor_type = OV_OV5647_MIPI_CSI0_1920X1080_30FPS_10BIT_LINEAR;
    /* Use VICAP device 0 */
    vicap_dev = VICAP_DEV_ID_0;

    memset(&sensor_info, 0, sizeof(k_vicap_sensor_info));
    /* Get sensor information */
    ret = kd_mpi_vicap_get_sensor_info(sensor_type, &sensor_info);
    if (ret) {
        printf("sample_vicap, the sensor type not supported!\n");
        return ret;
    }

    /* Configure sensor device attributes to prepare for ISP initialization */
    memset(&dev_attr, 0, sizeof(k_vicap_dev_attr));
    dev_attr.acq_win.h_start = 0; /* No horizontal offset for ISP input frame */
    dev_attr.acq_win.v_start = 0; /* No vertical offset for ISP input frame */
    dev_attr.acq_win.width = ISP_INPUT_WIDTH; /* ISP input image width */
    dev_attr.acq_win.height = ISP_INPUT_HEIGHT; /* ISP input image height */
    dev_attr.mode = VICAP_WORK_ONLINE_MODE; /* Online mode, raw data from sensor does not need memory buffering */

    dev_attr.pipe_ctrl.data = 0xFFFFFFFF;
    dev_attr.pipe_ctrl.bits.af_enable = 0; /* No AF function */
    dev_attr.pipe_ctrl.bits.ahdr_enable = 0; /* Not HDR */

    dev_attr.cpature_frame = 0; /* Continuously capture images */
    memcpy(&dev_attr.sensor_info, &sensor_info, sizeof(k_vicap_sensor_info));

    /* Configure VICAP device attributes */
    ret = kd_mpi_vicap_set_dev_attr(vicap_dev, dev_attr);
    if (ret) {
        printf("sample_vicap, kd_mpi_vicap_set_dev_attr failed.\n");
        return ret;
    }

    memset(&chn_attr, 0, sizeof(k_vicap_chn_attr));

    /* Configure output channel 0 parameters */
    chn_attr.out_win.h_start = 0; /* Horizontal offset of output image */
    chn_attr.out_win.v_start = 0; /* Vertical offset of output image */
    chn_attr.out_win.width = ISP_CHN0_WIDTH; /* Output image width */
    chn_attr.out_win.height = ISP_CHN0_HEIGHT; /* Output image height */
    chn_attr.crop_win = dev_attr.acq_win; /* Cropping parameters same as input parameters */
    chn_attr.scale_win = chn_attr.out_win; /* Scaling parameters same as output parameters, no scaling */
    chn_attr.crop_enable = K_FALSE; /* No cropping */
    chn_attr.scale_enable = K_FALSE; /* No scaling */
    chn_attr.chn_enable = K_TRUE; /* Channel enable, channel parameters will take effect */
    chn_attr.pix_format = PIXEL_FORMAT_YVU_PLANAR_420; /* Output format YUV420 */
    chn_attr.buffer_num = VICAP_MAX_FRAME_COUNT; /* Configure buffer count */
    chn_attr.buffer_size = VICAP_ALIGN_UP((ISP_CHN0_WIDTH * ISP_CHN0_HEIGHT * 3 / 2), VICAP_ALIGN_1K); /* Buffer size, will use buffer from buffer pool */
    vicap_chn = VICAP_CHN_ID_0; /* Configure ISP output channel 0 attributes */

    /* Configure output channel parameters */
    ret = kd_mpi_vicap_set_chn_attr(vicap_dev, vicap_chn, chn_attr);
    if (ret) {
        printf("sample_vicap, kd_mpi_vicap_set_chn_attr failed.\n");
        return ret;
    }

    /* Configure output channel 1 parameters */
    chn_attr.out_win.h_start = 0;
    chn_attr.out_win.v_start = 0;
    chn_attr.out_win.width = ISP_CHN1_WIDTH;
    chn_attr.out_win.height = ISP_CHN1_HEIGHT;

    chn_attr.crop_win = dev_attr.acq_win;
    chn_attr.scale_win = chn_attr.out_win;
    chn_attr.crop_enable = K_FALSE;
    chn_attr.scale_enable = K_FALSE;
    chn_attr.chn_enable = K_TRUE;
    chn_attr.pix_format = PIXEL_FORMAT_BGR_888_PLANAR; /* Output format RGB888Planar */
    chn_attr.buffer_num = VICAP_MAX_FRAME_COUNT; // at least 3 buffers for ISP
    chn_attr.buffer_size = VICAP_ALIGN_UP((ISP_CHN1_HEIGHT * ISP_CHN1_WIDTH * 3), VICAP_ALIGN_1K);

    ret = kd_mpi_vicap_set_chn_attr(vicap_dev, VICAP_CHN_ID_1, chn_attr);
    if (ret) {
        printf("sample_vicap, kd_mpi_vicap_set_chn_attr failed.\n");
        return ret;
    }

    /* Initialize VICAP, initialize ISP */
    ret = kd_mpi_vicap_init(vicap_dev);
    if (ret) {
        printf("sample_vicap, kd_mpi_vicap_init failed.\n");
        return ret;
    }
    /* Start sensor, ISP can output images, later use dump function to get images */
    ret = kd_mpi_vicap_start_stream(vicap_dev);
    if (ret) {
        printf("sample_vicap, kd_mpi_vicap_start_stream failed.\n");
        return ret;
    }
    return ret;
}

/* Set binding relationship, bind ISP output channel 0 with VO, image directly from ISP to display, no user-mode program operation needed */
int sample_sys_bind_init(void)
{
    k_s32 ret = 0;
    k_mpp_chn vicap_mpp_chn;
    k_mpp_chn vo_mpp_chn;
    vicap_mpp_chn.mod_id = K_ID_VI; /*  */
    vicap_mpp_chn.dev_id = vicap_dev;
    vicap_mpp_chn.chn_id = vicap_chn;

    vo_mpp_chn.mod_id = K_ID_VO; /* Video output, CanMV-K230 is HDMI */
    vo_mpp_chn.dev_id = K_VO_DISPLAY_DEV_ID;
    vo_mpp_chn.chn_id = K_VO_DISPLAY_CHN_ID1;

    ret = kd_mpi_sys_bind(&vicap_mpp_chn, &vo_mpp_chn);
    if (ret) {
        printf("kd_mpi_sys_unbind failed:0x%x\n", ret);
    }
    return ret;
}

int main(int argc, char *argv[])
{
    while(app_run)
    {
        /* Dump ISP output channel 1, i.e., RGB image for AI */
        memset(&dump_info, 0, sizeof(k_video_frame_info));
        ret = kd_mpi_vicap_dump_frame(vicap_dev, VICAP_CHN_ID_1, VICAP_DUMP_YUV, &dump_info, 1000);
        if (ret) {
            quit.store(false);
            printf("sample_vicap...kd_mpi_vicap_dump_frame failed.\n");
            break;
        }

        /* Use mmap to get virtual address */
        auto vbvaddr = kd_mpi_sys_mmap(dump_info.v_frame.phys_addr[0], size);

        boxes.clear();

        // Run KPU, perform AI computation
        model.run(reinterpret_cast<uintptr_t>(vbvaddr), reinterpret_cast<uintptr_t>(dump_info.v_frame.phys_addr[0]));

        /* Use munmap to release virtual address */
        kd_mpi_sys_munmap(vbvaddr, size);
        // Get AI computation result, here it is face coordinates
        box_result = model.get_result();
        boxes = box_result.boxes;

        if(boxes.size() > 0)
        {
            num++;
            if(num == 1)
            {
                TEST_BOOT_TIME_TRIGER();
            }
            printf("boxes %llu \n",(perf_get_smodecycles()));
        }

        if(boxes.size() < face_count)
        {
            for (size_t i = boxes.size(); i < face_count; i++)
            {
                vo_frame.draw_en = 0;
                vo_frame.frame_num = i + 1;
                kd_mpi_vo_draw_frame(&vo_frame);
            }
        }

        /* Draw boxes based on face coordinates, can display face boxes on the screen */
        for (size_t i = 0, j = 0; i < boxes.size(); i += 1)
        {
            // std::cout << "[" << boxes[i] << ", " << boxes[i + 1] << ", " << boxes[i + 2] <<", " << boxes[i + 3] << "]" << std::endl;
            vo_frame.draw_en = 1;
            vo_frame.line_x_start = ((uint32_t)boxes[i].x1) * ISP_CHN0_WIDTH / ISP_CHN1_WIDTH;
            vo_frame.line_y_start = ((uint32_t)boxes[i].y1) * ISP_CHN0_HEIGHT / ISP_CHN1_HEIGHT;
            vo_frame.line_x_end = ((uint32_t)boxes[i].x2) * ISP_CHN0_WIDTH / ISP_CHN1_WIDTH;
            vo_frame.line_y_end = ((uint32_t)boxes[i].y2) * ISP_CHN0_HEIGHT / ISP_CHN1_HEIGHT;
            vo_frame.frame_num = ++j;
            kd_mpi_vo_draw_frame(&vo_frame);
        }

        face_count = boxes.size();

        /* Call dump_release to release the dumped image */
        ret = kd_mpi_vicap_dump_release(vicap_dev, VICAP_CHN_ID_1, &dump_info);
        if (ret) {
            printf("sample_vicap...kd_mpi_vicap_dump_release failed.\n");
        }
    }
}
The above code and comments provide a detailed introduction to the initialization process of the sensor and display, as well as how to obtain images for AI computation. Subsequent AI development is based on this. For more detailed AI development, please refer to the “AI Development” chapter.
nncase Development#
nncase is a neural network compiler for AI accelerators, used to generate the .kmodel required for inference on Kendryte series chips, and provides the runtime lib needed for model inference.
This tutorial mainly includes the following content:
Use
nncaseto complete model compilation and generatekmodel.Execute
kmodelinference on PC and development board.
Tips:
This tutorial aims to familiarize users with the usage process of nncase. The model input data in the text are all random numbers. For specific processes in actual application scenarios, please refer to the subsequent chapters “AI Development”.
The nncase version in the official image may be outdated. If you need to use the latest nncase, you need to update the runtime library. Refer to Tutorial.
Model Compilation and Simulator Inference#
Before compiling the model, you need to understand the following key information:
KPUinference uses fixed-point operations. Therefore, when compiling the model, you must configure quantization-related parameters to convert the model from floating-point to fixed-point. For more details, refer to the PTQTensorOptions section in thenncasedocumentation.nncasesupports integrating preprocessing layers into the model, which can reduce the preprocessing overhead during inference. Relevant parameters and diagrams can be found in the CompileOptions section of thenncasedocumentation.
Installing the nncase Toolchain#
The nncase toolchain includes the nncase and nncase-kpu plugin packages. Both need to be correctly installed to compile model files supported by CanMV-K230. The nncase and nncase-kpu plugin packages are released on nncase GitHub release and depend on dotnet-7.0.
On the
Linuxplatform, you can directly use pip to installnncaseand thenncase-kpuplugin package online. On Ubuntu, you can useaptto installdotnet.pip install --upgrade pip pip install nncase pip install nncase-kpu # nncase-2.x needs dotnet-7 sudo apt-get update sudo apt-get install -y dotnet-sdk-7.0
Tips: If you are using the official CanMV image, you must check if the nncase version in the SDK matches the version installed via pip.
On the
Windowsplatform, onlynncasesupports online installation.nncase-kpuneeds to be manually downloaded and installed from the nncase GitHub release.If you do not have an Ubuntu environment, you can use
nncase docker(Ubuntu 20.04 + Python 3.8 + dotnet-7.0)cd /path/to/nncase_sdk docker pull ghcr.io/kendryte/k230_sdk docker run -it --rm -v `pwd`:/mnt -w /mnt ghcr.io/kendryte/k230_sdk /bin/bash -c "/bin/bash"
Tips: Currently, only py3.7-3.10 is supported. If pip installation fails, please check the Python version corresponding to pip.
Environment Configuration#
After installing the packages using pip, you need to add the installation path to the PATH environment variable.
export PATH=$PATH:/path/to/python/site-packages/
Original Model Description#
nncase currently supports tflite and onnx format models, with more formats being supported in the future.
Tips:
For TensorFlow
pbmodels, refer to the official documentation to convert them totfliteformat. Do not set quantization options; directly output the floating-point model. If the model contains quantize and dequantize operators, it is a quantized model, which is currently not supported.For PyTorch
pthformat models, use thetorch.export.onnxinterface to export them toonnxformat.
Compilation Script Explanation#
This Jupyter notebook describes in detail the steps to compile and infer kmodel using nncase. The notebook covers:
Parameter Configuration: Introduces how to correctly configure compilation parameters to meet actual deployment needs.
Obtaining Model Information: Explains how to obtain key data such as network structure and layer information from the original model.
Setting Calibration Data: Describes how to prepare calibration sample data, including for single-input and multi-input models, for the quantization calibration process.
Setting Inference Data: Explains how to configure input data for inference deployment, supporting different scenarios.
Configuring Multi-Input Models: Introduces how to correctly set the shape and data format for each input when dealing with multi-input models.
PC Simulator Inference: Explains how to use the simulator to infer
kmodelon a PC, which is a key step to verify the compilation effect.Comparing Inference Results: Verifies the correctness of
kmodelby comparing inference results with different frameworks (TensorFlow, PyTorch, etc.).The above steps systematically introduce the entire process of model compilation, suitable for beginners to learn from scratch and as a reference guide for experienced users.
Sample Code#
After reading the complete tutorial in the Jupyter notebook, you can modify the following sample code to complete your own model compilation.
import nncase
import numpy as np
from sklearn.metrics.pairwise import cosine_similarity

import onnx
import onnxsim

def get_cosine(vec1, vec2):
    """
    result compare
    """
    return cosine_similarity(vec1.reshape(1, -1), vec2.reshape(1, -1))


def read_model_file(model_file):
    """
    read model
    """
    with open(model_file, 'rb') as f:
        model_content = f.read()
    return model_content


def parse_model_input_output(model_file):
    """
    parse onnx model
    """
    onnx_model = onnx.load(model_file)
    input_all = [node.name for node in onnx_model.graph.input]
    input_initializer = [node.name for node in onnx_model.graph.initializer]
    input_names = list(set(input_all) - set(input_initializer))
    input_tensors = [
        node for node in onnx_model.graph.input if node.name in input_names]

    # input
    inputs = []
    for _, e in enumerate(input_tensors):
        onnx_type = e.type.tensor_type
        input_dict = {}
        input_dict['name'] = e.name
        input_dict['dtype'] = onnx.mapping.TENSOR_TYPE_TO_NP_TYPE[onnx_type.elem_type]
        input_dict['shape'] = [i.dim_value for i in onnx_type.shape.dim]
        inputs.append(input_dict)

    return onnx_model, inputs

def model_simplify(model_file):
    """
    simplify model
    """
    if model_file.split('.')[-1] == "onnx":
        onnx_model, inputs = parse_model_input_output(model_file)
        onnx_model = onnx.shape_inference.infer_shapes(onnx_model)
        input_shapes = {}
        for input in inputs:
            input_shapes[input['name']] = input['shape']

        onnx_model, check = onnxsim.simplify(onnx_model, input_shapes=input_shapes)
        assert check, "Simplified ONNX model could not be validated"

        model_file = os.path.join(os.path.dirname(model_file), 'simplified.onnx')
        onnx.save_model(onnx_model, model_file)
        print("[ onnx done ]")
    elif model_file.split('.')[-1] == "tflite":
        print("[ tflite skip ]")
    else:
        raise Exception(f"Unsupported type {model_file.split('.')[-1]}")

    return model_file

def run_kmodel(kmodel_path, input_data):
    print("\n---------start run kmodel---------")
    print("Load kmodel...")
    model_sim = nncase.Simulator()
    with open(kmodel_path, 'rb') as f:
        model_sim.load_model(f.read())

    print("Set input data...")
    for i, p_d in enumerate(input_data):
        model_sim.set_input_tensor(i, nncase.RuntimeTensor.from_numpy(p_d))

    print("Run...")
    model_sim.run()

    print("Get output result...")
    all_result = []
    for i in range(model_sim.outputs_size):
        result = model_sim.get_output_tensor(i).to_numpy()
        all_result.append(result)
    print("----------------end-----------------")
    return all_result


def compile_kmodel(model_path, dump_path, calib_data):
    """
    Set compile options and ptq options.
    Compile kmodel.
    Dump the compile-time result to 'compile_options.dump_dir'
    """
    print("\n----------   compile    ----------")
    print("Simplify...")
    model_file = model_simplify(model_path)

    print("Set options...")
    # import_options
    import_options = nncase.ImportOptions()

    ############################################
    # You need to modify the parameters in the following code to fit your model.
    ############################################
    # compile_options
    compile_options = nncase.CompileOptions()
    compile_options.target = "k230" #"cpu"
    compile_options.dump_ir = True  # if False, will not dump the compile-time result.
    compile_options.dump_asm = True
    compile_options.dump_dir = dump_path
    compile_options.input_file = ""

    # preprocess args
    compile_options.preprocess = False
    if compile_options.preprocess:
        compile_options.input_type = "uint8" # "uint8" "float32"
        compile_options.input_shape = [1,224,320,3]
        compile_options.input_range = [0,1]
        compile_options.input_layout = "NHWC" # "NHWC"
        compile_options.swapRB = False
        compile_options.mean = [0,0,0]
        compile_options.std = [1,1,1]
        compile_options.letterbox_value = 0
        compile_options.output_layout = "NHWC" # "NHWC"

    # quantize options
    ptq_options = nncase.PTQTensorOptions()
    ptq_options.quant_type = "uint8" # datatype : "float32", "int8", "int16"
    ptq_options.w_quant_type = "uint8"  # datatype : "float32", "int8", "int16"
    ptq_options.calibrate_method = "NoClip" # "Kld"
    ptq_options.finetune_weights_method = "NoFineTuneWeights"
    ptq_options.dump_quant_error = False
    ptq_options.dump_quant_error_symmetric_for_signed = False

    # mix quantize options
    # more details in docs/MixQuant.md
    ptq_options.quant_scheme = ""
    ptq_options.export_quant_scheme = False
    ptq_options.export_weight_range_by_channel = False
    ############################################

    ptq_options.samples_count = len(calib_data[0])
    ptq_options.set_tensor_data(calib_data)

    print("Compiling...")
    compiler = nncase.Compiler(compile_options)
    # import
    model_content = read_model_file(model_file)
    if model_path.split(".")[-1] == "onnx":
        compiler.import_onnx(model_content, import_options)
    elif model_path.split(".")[-1] == "tflite":
        compiler.import_tflite(model_content, import_options)

    compiler.use_ptq(ptq_options)

    # compile
    compiler.compile()
    kmodel = compiler.gencode_tobytes()

    # You can modify kmodel_path as needed. Pass the correct kmodel_path during inference.
    kmodel_path = os.path.join(dump_path, "test.kmodel")
    with open(kmodel_path, 'wb') as f:
        f.write(kmodel)
    print("----------------end-----------------")
    return kmodel_path

if __name__ == "__main__":
    # compile kmodel single input
    model_path = "./test.tflite"
    dump_path = "./tmp_tflite"

    # The number of calibration sets is 2
    calib_data = [[np.random.rand(1, 240, 320, 3).astype(np.float32), np.random.rand(1, 240, 320, 3).astype(np.float32)]]
    kmodel_path = compile_kmodel(model_path, dump_path, calib_data)

    # run kmodel(simulate)
    kmodel_path = "./tmp_tflite/test.kmodel"
    input_data = [np.random.rand(1, 240, 320, 3).astype(np.float32)]
    input_data[0].tofile(os.path.join(dump_path,"input_0.bin"))

    result = run_kmodel(kmodel_path, input_data)

    for idx, i in enumerate(result):
        print(i.shape)
        i.tofile(os.path.join(dump_path,"nncase_result_{}.bin".format(idx)))
Notes#
When encountering issues during model compilation, you can refer to the FAQ to find solutions based on error logs, or you can submit an issue on GitHub following the template, or ask questions directly in the nncase QQ group: 790699378.
Additionally, you are welcome to contribute the issues you encounter and their solutions by submitting a PR to nncase, contributing to the open-source community.
Model Inference on the Development Board#
Currently, CanMV supports two sets of development APIs, C++ and MicroPython, allowing you to choose based on your needs.
MicroPythonhas a lower development threshold, allowing users to directly write code similar toPythonfor application development.C++has a higher threshold but offers greater flexibility and better performance (the inference performance of the chip is not affected by the language).
For inference on the development board, we provide two modules to accelerate model inference:
Hardware-based preprocessing module:
AI2D. For detailed functionality, see AI2D Runtime APIs.Hardware-based model inference module:
KPU. For detailed functionality, see KPU Runtime APIs.
Next, we will explain how to use these two modules and what to pay attention to in a C++ code example.
Here, we take face detection as an example. The following will explain the directory structure of the compiled code and the important functions of the code. For the complete code example, see k230_sdk/src/big/nncase/examples/image_face_detect.
Directory Structure
In the example directory, the file structure related to model inference is as follows:
k230_sdk/src/big/nncase/examples/
├── build_app.sh
├── CMakeLists.txt
├── image_face_detect
│   ├── anchors_320.cc
│   ├── CMakeLists.txt
│   ├── main.cc
│   ├── mobile_retinaface.cc
│   ├── mobile_retinaface.h
│   ├── model.cc
│   ├── model.h
│   ├── util.cc
│   └── util.h
└── README.md
build_app.sh: Script to compile and generate the executable fileimage_face_detect.elf, output to theoutdirectory.CMakeLists.txt: Sets the libraries needed to link during compilation:opencv,mmz,nncase. Onlyadd_subdirectory()needs to be modified in the project.image_face_detect: A complete face detection demo that includes functionalities likeAI2D,KPU, and model post-processing.
AI2D Configuration#
In mobile_retinaface.cc, the Pad and Resize functionalities of AI2D are used. Next, we will explain the code of the MobileRetinaface class, where the AI2D parameters are configured:
Set the output tensor of
AI2D.
ai2d_out_tensor_ = input_tensor(0);
input_tensor(0) is used to get the input tensor of KPU. This step sets the input tensor of KPU as the output tensor of AI2D, connecting these two hardware parts for use.
Set the parameters of
AI2D.
    dims_t in_shape { 1, ai2d_input_c_, ai2d_input_h_, ai2d_input_w_ };
    auto out_shape = input_shape(0);

    ai2d_datatype_t ai2d_dtype { ai2d_format::NCHW_FMT, ai2d_format::NCHW_FMT, typecode_t::dt_uint8, typecode_t::dt_uint8 };
    ai2d_crop_param_t crop_param { false, 0, 0, 0, 0 };
    ai2d_shift_param_t shift_param { false, 0 };

    float h_ratio = static_cast<float>(height) / out_shape[2];
    float w_ratio = static_cast<float>(width) / out_shape[3];
    float ratio = h_ratio > w_ratio ? h_ratio : w_ratio;

    int h_pad = out_shape[2] - height / ratio;
    int h_pad_before = h_pad / 2;
    int h_pad_after = h_pad - h_pad_before;

    int w_pad = out_shape[3] - width / ratio;
    int w_pad_before = w_pad / 2;
    int w_pad_after = w_pad - w_pad_before;

#if ENABLE_DEBUG
    std::cout << "h_ratio = " << h_ratio << ", w_ratio = " << w_ratio << ", ratio = " << ratio << std::endl;
    std::cout << "h_pad = " << h_pad << ", h_pad_before = " << h_pad_before << ", h_pad_after = " << h_pad_after << std::endl;
    std::cout << "w_pad = " << w_pad << ", w_pad_before = " << w_pad_before << ", w_pad_after = " << w_pad_after << std::endl;
#endif

    ai2d_pad_param_t pad_param{true, {{ 0, 0 }, { 0, 0 }, { h_pad_before, h_pad_after }, { w_pad_before, w_pad_after }}, ai2d_pad_mode::constant, { 0, 0, 0 }};
    ai2d_resize_param_t resize_param { true, ai2d_interp_method::tf_bilinear, ai2d_interp_mode::half_pixel };
    ai2d_affine_param_t affine_param { false };
First, set the basic parameters of AI2D, including input format, output format, input type, and output type. Refer to the documentation for details. Then, set the functional parameters of AI2D. In face detection, only the Pad and Resize functionalities are used, but other functionalities (crop, shift, affine) still need to be explicitly set by setting the first parameter to false and ensuring the remaining parameters are syntactically correct.
Generate
AI2Drelated instructions.
    ai2d_builder_.reset(new ai2d_builder(in_shape, out_shape, ai2d_dtype, crop_param, shift_param, pad_param, resize_param, affine_param));
    ai2d_builder_->build_schedule();
First, create an ai2d_builder object. If the object already exists, use the reset function to update its parameters. Then call the build_schedule() function to generate the instructions.
This completes the AI2D configuration. Next, we will look at the KPU configuration.
KPU Configuration#
In model.cc, the KPU configuration is done, mainly pre-allocating memory for the input tensor. Let’s look at the constructor of the Model class:
Model::Model(const char *model_name, const char *kmodel_file): model_name_(model_name)
{
    // load kmodel
    kmodel_ = read_binary_file<unsigned char>(kmodel_file);
    interp_.load_model({ (const gsl::byte *)kmodel_.data(), kmodel_.size() }).expect("cannot load kmodel.");

    // create kpu input tensors
    for (size_t i = 0; i < interp_.inputs_size(); i++)
    {
        auto desc = interp_.input_desc(i);
        auto shape = interp_.input_shape(i);
        auto tensor = host_runtime_tensor::create(desc.datatype, shape, hrt::pool_shared).expect("cannot create input tensor");
        interp_.input_tensor(i, tensor).expect("cannot set input tensor");
    }

}
Read the model.
kmodel_ = read_binary_file<unsigned char>(kmodel_file);
interp_.load_model({ (const gsl::byte *)kmodel_.data(), kmodel_.size() }).expect("cannot load kmodel.");
Allocate memory for the input tensor.
auto desc = interp_.input_desc(i);
auto shape = interp_.input_shape(i);
auto tensor = host_runtime_tensor::create(desc.datatype, shape, hrt::pool_shared).expect("cannot create input tensor");
Here, create an empty tensor based on the shape and type information obtained from the model.
Q: Why create an empty tensor instead of directly filling it with data?
A: Look at what we did when setting the output tensor of
AI2D. Yes, the empty tensor is to receive the output data fromAI2D, so there is no need to set the data directly. However, if theAI2Dmodule is not used, you need to set the input data here, for example:auto tensor = host_runtime_tensor::create( desc.datatype, shape, { (gsl::bytes*)vector.data(), (size_t)vector.size() }, true, hrt::pool_shared).expect("cannot create input tensor");
This completes the KPU configuration. Next, let’s see how to execute these two modules.
Start Inference#
In the ai_proc function of main.cc, the inference is started with the following code:
model.run(reinterpret_cast<uintptr_t>(vaddr), reinterpret_cast<uintptr_t>(paddr));
auto result = model.get_result();
result is the output result of the model, and run() calls AI2D and KPU.
void Model::run(uintptr_t vaddr, uintptr_t paddr)
{
    preprocess(vaddr, paddr);
    kpu_run();
    postprocess();
}

void MobileRetinaface::preprocess(uintptr_t vaddr, uintptr_t paddr)
{
    // ai2d input tensor
    dims_t in_shape { 1, ai2d_input_c_, ai2d_input_h_, ai2d_input_w_ };
    auto ai2d_in_tensor = host_runtime_tensor::create(typecode_t::dt_uint8, in_shape, { (gsl::byte *)vaddr, compute_size(in_shape) },
        false, hrt::pool_shared, paddr).expect("cannot create input tensor");
    hrt::sync(ai2d_in_tensor, sync_op_t::sync_write_back, true).expect("sync write_back failed");

    // run ai2d
    ai2d_builder_->invoke(ai2d_in_tensor, ai2d_out_tensor_).expect("error occurred in ai2d running");
}

void Model::kpu_run()
{
    interp_.run().expect("error occurred in running model");
}
In the preprocess function, AI2D inference is started with invoke, and in the kpu_run function, kpu inference is started. Before starting inference, the input of AI2D needs to be set by directly binding the input data to the input device using the physical address.
Tips: The
postprocess()function calls the model’s post-processing part. Since different models have different post-processing, and even the same model may have different versions of post-processing.Before you start reasoning, you need to do this first!
Ensure that the results of your C++ post-processing code are consistent with your Python model post-processing results!
Ensure that the results of your C++ post-processing code are consistent with your Python model post-processing results!
Ensure that the results of your C++ post-processing code are consistent with your Python model post-processing results!
AI Development#
AI development involves setting up the environment, preparing data, training and testing the model, compiling and burning the CANMV k230 image, compiling C++ code, configuring the network, transferring files, and deploying on the k230 end. Taking the vegetable classification scenario as an example, the code can be found at: kendryte/K230_training_scripts.
Environment Setup#
Linux system;
Install GPU drivers;
Install Anaconda for creating the model training environment;
Install Docker for creating the SDK image compilation environment;
Install dotnet SDK.
Data Preparation#
The custom dataset for image classification should be organized as follows:
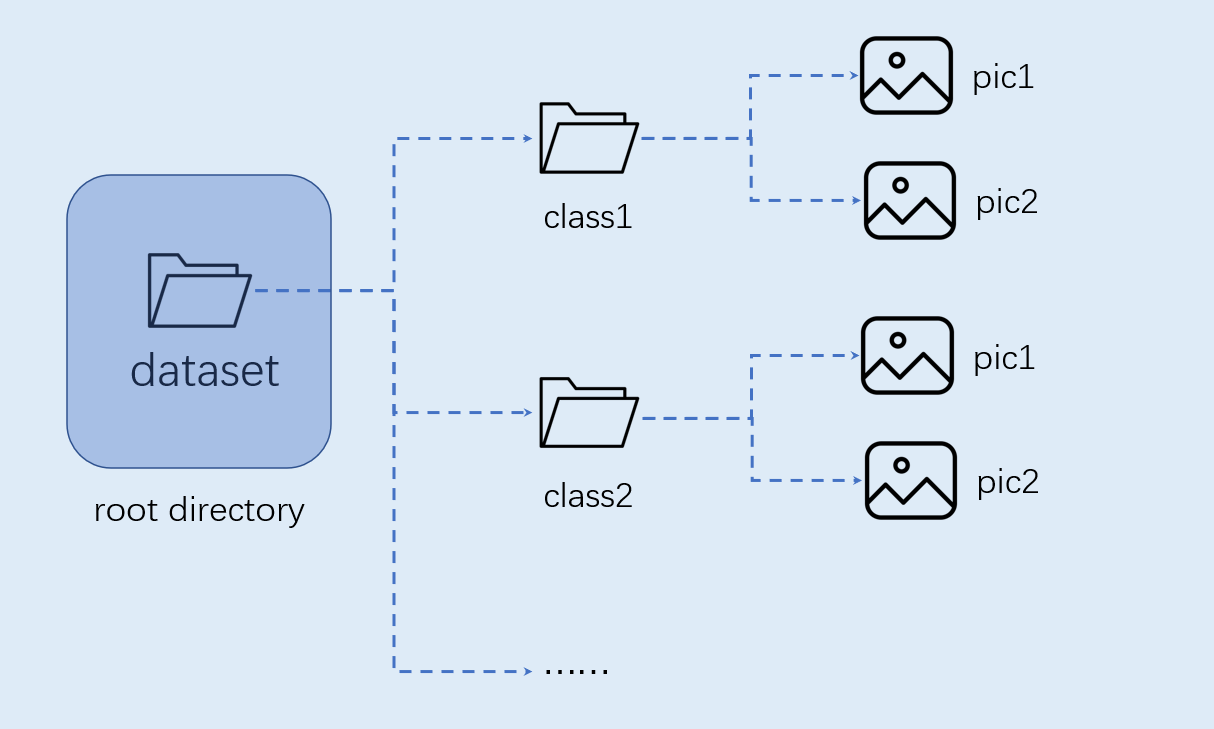
Note: Image classification must be organized in the above format.
Model Training and Testing#
This section is implemented in the training environment.
Create Virtual Environment#
Open the command terminal:
conda create -n myenv python=3.9
conda activate myenv
Install Python Libraries#
Install the Python libraries used for training as specified in the requirements.txt file in the project, and wait for the installation to complete:
pip install -r requirements.txt
The requirements.txt file will install packages for model conversion, including nncase and nncase-kpu. nncase is a neural network compiler designed for AI accelerators.
Configure Training Parameters#
The provided training script configuration file yaml/config.yaml is set as follows:
dataset:
  root_folder: ../data/veg_cls # Path to the classification dataset
  split: true # Whether to re-split, must be true the first time
  train_ratio: 0.7 # Training set ratio
  val_ratio: 0.15 # Validation set ratio
  test_ratio: 0.15 # Test set ratio

train:
  device: cuda
  txt_path: ../gen # Path to the generated training, validation, and test set txt files, label name file, and calibration set file
  image_size: [ 224,224 ] # Resolution
  mean: [ 0.485, 0.456, 0.406 ]
  std: [ 0.229, 0.224, 0.225 ]
  epochs: 10
  batchsize: 8
  learningrate: 0.001
  save_path: ../checkpoints # Path to save the model

inference:
  mode: image # Inference mode, can be image or video; in image mode, single images or all images in a directory can be inferred, video mode uses a camera for inference
  inference_model: best # Can be best or last, corresponding to best.pth and last.pth in the checkpoints directory
  images_path: ../data/veg_cls/bocai # If this path is an image path, single image inference is performed; if it is a directory, all images in the directory are inferred

deploy:
  chip: k230 # Chip type, can be "k230" or "cpu"
  ptq_option: 0 # Quantization type, 0 for uint8, 1, 2, 3, 4 for different forms of uint16
Model Training#
Navigate to the scripts directory of the project and execute the training code:
python3 main.py
If the training is successful, you can find the trained last.pth, best.pth, best.onnx, and best.kmodel in the model_save_dir directory specified in the configuration file.
Model Testing#
Set the inference part of the configuration file, configure the test settings, and execute the test code:
python3 inference.py
Prepare Files#
The files needed for the subsequent deployment steps include:
checkpoints/best.kmodel;gen/labels.txt;Test image
test.jpg.
CANMV K230 Image Compilation and Burning#
Docker Environment Setup#
# Download the docker compilation image
docker pull ghcr.io/kendryte/k230_sdk
# Confirm if the docker image was successfully pulled
docker images | grep ghcr.io/kendryte/k230_sdk
# Download the 1.0.1 version SDK
git clone -b v1.0.1 --single-branch https://github.com/kendryte/k230_sdk.git
cd k230_sdk
# Download the toolchain for Linux and RT-Smart, buildroot package, AI package, etc.
make prepare_sourcecode
# Create a docker container, $(pwd):$(pwd) maps the current directory to the same directory inside the docker container, mapping the toolchain directory to /opt/toolchain inside the docker container
docker run -u root -it -v $(pwd):$(pwd) -v $(pwd)/toolchain:/opt/toolchain -w $(pwd) ghcr.io/kendryte/k230_sdk /bin/bash
Image Compilation#
# Compiling the image in the docker container takes a long time, please be patient
make CONF=k230_canmv_defconfig
Image Burning#
After compilation, you can find the compiled image files in the output/k230_canmv_defconfig/images directory:
k230_evb_defconfig/images
 ├── big-core
 ├── little-core
 ├── sysimage-sdcard.img    # SD card boot image
 └── sysimage-sdcard.img.gz # Compressed SD card boot image
The CANMV K230 supports SDCard booting. For convenience during development, it is recommended to prepare a TF card (Micro SD card).
Linux: To burn the TF card on Linux, first confirm the SD card’s name in the system as /dev/sdx, and replace /dev/sdx in the following command:
sudo dd if=sysimage-sdcard.img of=/dev/sdx bs=1M oflag=sync
Windows: For burning on Windows, it is recommended to use the Rufus tool. Download the generated sysimage-sdcard.img to your local machine and use Rufus to burn it.

A notification message will appear upon successful burning. It is best to format the SD card before burning.
Powering Up and Starting the Development Board#
Install MobaXterm for serial communication. Download MobaXterm from: https://mobaxterm.mobatek.net.

Insert the burned SD card into the board’s card slot, connect HDMI output to a monitor, connect the Ethernet port to a network, and connect the POWER port for serial communication and power supply.
After powering up the system, there will be two serial devices by default, which can be used to access the small-core Linux and the big-core RTSmart systems.
The default username for the small-core Linux is root, with no password. In the big-core RTSmart system, an application will automatically start on boot, which can be exited to the command prompt terminal by pressing the q key.
C++ Code Compilation#
After preparing the development board as described above, you can write your own code in C++. Below is an example of an image classification task, with relevant example code and analysis. Refer to the example code at: kendryte/K230_training_scripts.
Code Structure#
k230_code
├── cmake
│    ├── link.lds # Linker script
│    ├── Riscv64.cmake
├── k230_deploy
│    ├── ai_base.cc # Base class implementation for model deployment
│    ├── ai_base.h # Base class for model deployment, encapsulating nncase loading, input setting, model inference, and output retrieval. Subsequent task development only needs to focus on model preprocessing and postprocessing.
│    ├── classification.cc # Implementation of the image classification class
│    ├── classification.h # Definition of the image classification task class, inheriting AIBase, used for encapsulating model inference preprocessing and postprocessing
│    ├── main.cc # Main function, parameter parsing, initialization of the Classification class instance, implementing the board functionality
│    ├── scoped_timing.hpp # Timing test tool
│    ├── utils.cc # Utility class implementation
│    ├── utils.h # Utility class, encapsulating common functions for image preprocessing and classification, including reading binary files, saving images, image processing, result drawing, etc. Users can enrich this file according to their needs.
│    ├── vi_vo.h # Video input and output header file
│    ├── CMakeLists.txt # CMake script for building an executable file using C/C++ source files and linking to various libraries
├── build_app.sh # Build script, using a cross-compilation toolchain to compile the k230_deploy project
└── CMakeLists.txt # CMake script for building the nncase_sdk project
Core Code#
After obtaining the kmodel model, the specific AI code for the board includes: sensor & display initialization, kmodel loading, model input/output setting, image acquisition, input data loading, input data preprocessing, model inference, model output retrieval, output postprocessing, and OSD display. As shown in the figure:

The yellow box part in the figure is provided in Example 2 of the SDK compilation section. The red box part will be introduced below to implement AI development.
In the above process, kmodel loading, model input setting, model inference, and model output retrieval are common steps for all tasks. We have encapsulated these steps, and ai_base.h and ai_base.cc can be directly copied for use.
ai_base.h defines the AIBase base class and the interfaces for common operations:
#ifndef AI_BASE_H
#define AI_BASE_H
#include <vector>
#include <string>
#include <fstream>
#include <nncase/runtime/interpreter.h>
#include "scoped_timing.hpp"

using std::string;
using std::vector;
using namespace nncase::runtime;

/**
 * @brief AI base class, encapsulating nncase related operations
 * Mainly encapsulates nncase loading, setting input, running, and getting output operations. Subsequent demo development only needs to focus on model preprocessing and postprocessing.
 */
class AIBase
{
public:
    /**
     * @brief AI base class constructor, loads kmodel, and initializes kmodel input and output
     * @param kmodel_file Path to the kmodel file
     * @param debug_mode  0 (no debugging), 1 (only show time), 2 (show all print information)
     * @return None
     */
    AIBase(const char *kmodel_file, const string model_name, const int debug_mode = 1);
    /**
     * @brief AI base class destructor
     * @return None
    */
    ~AIBase();

    /**
     * @brief Sets kmodel input
     * @param buf Pointer to input data
     * @param size Size of input data
     * @return None
     */
    void set_input(const unsigned char *buf, size_t size);

    /**
     * @brief Gets kmodel input tensor by index
     * @param idx Index of input data
     * @return None
     */
    runtime_tensor get_input_tensor(size_t idx);

    /**
     * @brief Sets the input tensor of the model
     * @param idx Index of input data
     * @param tensor Input tensor
     */
    void set_input_tensor(size_t idx, runtime_tensor &tensor);

    /**
     * @brief Initializes kmodel output
     * @return None
     */
    void set_output();

    /**
     * @brief Infers kmodel
     * @return None
     */
    void run();

    /**
     * @brief Gets kmodel output, results are saved in the corresponding class attributes
     * @return None
     */
    void get_output();

protected:
    string model_name_;                    // Model name
    int debug_mode_;                       // Debug mode, 0 (no print), 1 (print time), 2 (print all)
    vector<float *> p_outputs_;            // List of pointers corresponding to kmodel output
    vector<vector<int>> input_shapes_;     // {{N,C,H,W},{N,C,H,W}...}
    vector<vector<int>> output_shapes_;    // {{N,C,H,W},{N,C,H,W}...}} or {{N,C},{N,C}...}} etc.
    vector<int> each_input_size_by_byte_;  // {0,layer1_length,layer1_length+layer2_length,...}
    vector<int> each_output_size_by_byte_; // {0,layer1_length,layer1_length+layer2_length,...}

private:
    /**
     * @brief Initializes kmodel input for the first time and gets input shape
     * @return None
     */
    void set_input_init();

    /**
     * @brief Initializes kmodel output for the first time and gets output shape
     * @return None
     */
    void set_output_init();

    vector<unsigned char> kmodel_vec_; // The entire kmodel data obtained by reading the kmodel file, used for loading the kmodel into the kmodel interpreter
    interpreter kmodel_interp_; // kmodel interpreter, constructed from the kmodel file, responsible for loading the model, setting input and output, and inference
};
#endif
ai_base.cc provides the concrete implementation of all interfaces defined in ai_base.h.
/*
Implementation of the interfaces defined in the AIBase class in ai_base.h
*/
#include "ai_base.h"
#include <iostream>
#include <cassert>
#include "utils.h"

using std::cout;
using std::endl;
using namespace nncase;
using namespace nncase::runtime::detail;

/* AIBase constructor */
AIBase::AIBase(const char *kmodel_file, const string model_name, const int debug_mode) : debug_mode_(debug_mode), model_name_(model_name)
{
    if (debug_mode > 1)
        cout << "kmodel_file:" << kmodel_file << endl;
    std::ifstream ifs(kmodel_file, std::ios::binary); // Read the kmodel
    kmodel_interp_.load_model(ifs).expect("Invalid kmodel"); // Load the kmodel into the kmodel interpreter
    set_input_init();
    set_output_init();
}

/* Destructor */
AIBase::~AIBase()
{
}

/*
Initialize kmodel input for the first time
*/
void AIBase::set_input_init()
{
    ScopedTiming st(model_name_ + " set_input init", debug_mode_); // Timing
    int input_total_size = 0;
    each_input_size_by_byte_.push_back(0); // Add 0 first, for preparation
    for (int i = 0; i < kmodel_interp_.inputs_size(); ++i)
    {
        auto desc = kmodel_interp_.input_desc(i); // Input description at index i
        auto shape = kmodel_interp_.input_shape(i); // Input shape at index i
        auto tensor = host_runtime_tensor::create(desc.datatype, shape, hrt::pool_shared).expect("cannot create input tensor"); // Create input tensor
        kmodel_interp_.input_tensor(i, tensor).expect("cannot set input tensor"); // Bind tensor to model input
        vector<int> in_shape = {shape[0], shape[1], shape[2], shape[3]};
        input_shapes_.push_back(in_shape); // Store input shape
        int dsize = shape[0] * shape[1] * shape[2] * shape[3]; // Total input bytes
        if (debug_mode_ > 1)
            cout << "input shape:" << shape[0] << " " << shape[1] << " " << shape[2] << " " << shape[3] << endl;
        if (desc.datatype == 0x06) // Input data is of type uint8
        {
            input_total_size += dsize;
            each_input_size_by_byte_.push_back(input_total_size);
        }
        else if (desc.datatype == 0x0B) // Input data is of type float32
        {
            input_total_size += (dsize * 4);
            each_input_size_by_byte_.push_back(input_total_size);
        }
        else
            assert(("kmodel input data type supports only uint8, float32", 0));
    }
    each_input_size_by_byte_.push_back(input_total_size); // The last one saves the total size
}

/*
Set the model's input data, load the specific data for the model input. The difference from set_input_init is whether there is a data copy process
*/
void AIBase::set_input(const unsigned char *buf, size_t size)
{
    // Check if the input data size matches the size required by the model
    if (*each_input_size_by_byte_.rbegin() != size)
        cout << "set_input: the actual input size{" + std::to_string(size) + "} is different from the model's required input size{" + std::to_string(*each_input_size_by_byte_.rbegin()) + "}" << endl;
    assert((*each_input_size_by_byte_.rbegin() == size));
    // Timing
    ScopedTiming st(model_name_ + " set_input", debug_mode_);
    // Loop through the model inputs
    for (size_t i = 0; i < kmodel_interp_.inputs_size(); ++i)
    {
        // Get the model's input description and shape
        auto desc = kmodel_interp_.input_desc(i);
        auto shape = kmodel_interp_.input_shape(i);
        // Create tensor
        auto tensor = host_runtime_tensor::create(desc.datatype, shape, hrt::pool_shared).expect("cannot create input tensor");
        // Map the input tensor to a writable area
        auto mapped_buf = std::move(hrt::map(tensor, map_access_::map_write).unwrap()); // mapped_buf actually has cached data
        // Copy data to the tensor's buffer
        memcpy(reinterpret_cast<void *>(mapped_buf.buffer().data()), buf, each_input_size_by_byte_[i + 1] - each_input_size_by_byte_[i]);
        // Unmap
        auto ret = mapped_buf.unmap();
        ret = hrt::sync(tensor, sync_op_t::sync_write_back, true);
        if (!ret.is_ok())
        {
            std::cerr << "hrt::sync failed" << std::endl;
            std::abort();
        }
        // Bind the tensor to the model's input
        kmodel_interp_.input_tensor(i, tensor).expect("cannot set input tensor");
    }
}

/*
Get the model's input tensor by index
*/
runtime_tensor AIBase::get_input_tensor(size_t idx)
{
    return kmodel_interp_.input_tensor(idx).expect("cannot get input tensor");
}

/*
Set the model's input tensor by index
*/
void AIBase::set_input_tensor(size_t idx, runtime_tensor &tensor)
{
    ScopedTiming st(model_name_ + " set_input_tensor", debug_mode_);
    kmodel_interp_.input_tensor(idx, tensor).expect("cannot set input tensor");
}

/*
Initialize kmodel output for the first time
*/
void AIBase::set_output_init()
{
    // Timing
    ScopedTiming st(model_name_ + " set_output_init", debug_mode_);
    each_output_size_by_byte_.clear();
    int output_total_size = 0;
    each_output_size_by_byte_.push_back(0);
    // Loop through the model's outputs
    for (size_t i = 0; i < kmodel_interp_.outputs_size(); i++)
    {
        // Get output description and shape
        auto desc = kmodel_interp_.output_desc(i);
        auto shape = kmodel_interp_.output_shape(i);
        vector<int> out_shape;
        int dsize = 1;
        for (int j = 0; j < shape.size(); ++j)
        {
            out_shape.push_back(shape[j]);
            dsize *= shape[j];
            if (debug_mode_ > 1)
                cout << shape[j] << ",";
        }
        if (debug_mode_ > 1)
            cout << endl;
        output_shapes_.push_back(out_shape);
        // Get the total size of data
        if (desc.datatype == 0x0B)
        {
            output_total_size += (dsize * 4);
            each_output_size_by_byte_.push_back(output_total_size);
        }
        else
            assert(("kmodel output data type supports only float32", 0));
        // Create tensor
        auto tensor = host_runtime_tensor::create(desc.datatype, shape, hrt::pool_shared).expect("cannot create output tensor");
        // Bind the tensor to the model's output
        kmodel_interp_.output_tensor(i, tensor).expect("cannot set output tensor");
    }
}

/*
Set the kmodel model's output
*/
void AIBase::set_output()
{
    ScopedTiming st(model_name_ + " set_output", debug_mode_);
    // Loop through and bind the output tensor to the model's output
    for (size_t i = 0; i < kmodel_interp_.outputs_size(); i++)
    {
        auto desc = kmodel_interp_.output_desc(i);
        auto shape = kmodel_interp_.output_shape(i);
        auto tensor = host_runtime_tensor::create(desc.datatype, shape, hrt::pool_shared).expect("cannot create output tensor");
        kmodel_interp_.output_tensor(i, tensor).expect("cannot set output tensor");
    }
}

/*
Call kmodel_interp_.run() to perform model inference
*/
void AIBase::run()
{
    ScopedTiming st(model_name_ + " run", debug_mode_);
    kmodel_interp_.run().expect("error occurred in running model");
}

/*
Get the model's output (in the form of float pointers, to be extracted according to specific requirements during post-processing), in preparation for subsequent post-processing
*/
void AIBase::get_output()
{
    ScopedTiming st(model_name_ + " get_output", debug_mode_);
    // p_outputs_ stores the pointers to the model's outputs, there can be multiple outputs
    p_outputs_.clear();
    for (int i = 0; i < kmodel_interp_.outputs_size(); i++)
    {
        // Get the output tensor
        auto out = kmodel_interp_.output_tensor(i).expect("cannot get output tensor");
        // Map the output tensor to host memory
        auto buf = out.impl()->to_host().unwrap()->buffer().as_host().unwrap().map(map_access_::map_read).unwrap().buffer();
        // Convert the mapped data to a float pointer
        float *p_out = reinterpret_cast<float *>(buf.data());
        p_outputs_.push_back(p_out);
    }
}
The preprocessing and post-processing for different task scenarios vary. For example, classification uses softmax to calculate the class probability, while object detection performs NMS. Therefore, you can define your task-specific class inheriting from the AIBase class and encapsulate the preprocessing and post-processing code for that task. Taking image classification as an example:
The Classification class in classification.h inherits from the AIBase class and implements the class definition for the image classification task. It mainly defines the preprocessing, inference, and post-processing interfaces for the image classification model. It initializes the ai2d builder to perform image preprocessing. It also defines some variables for the image classification task, such as classification threshold, class names, number of classes, etc. Sure, here is the translation of the provided code comments and documentation into English:
#ifndef _CLASSIFICATION_H
#define _CLASSIFICATION_H
#include "utils.h"
#include "ai_base.h"

/**
 * @brief Classification task
 * Mainly encapsulates the process of preprocessing, running, and post-processing to give results for each frame of the image.
 */
class Classification : public AIBase
{
    public:
    /**
    * @brief Classification constructor, loads kmodel and initializes kmodel input, output, and classification threshold
    * @param kmodel_path Path to the kmodel
    * @param image_path Path to the inference image (used for static images)
    * @param labels List of class names
    * @param cls_thresh Classification threshold
    * @param debug_mode  0 (no debugging), 1 (show only time), 2 (show all print information)
    * @return None
    */
    Classification(string &kmodel_path, string &image_path, std::vector<std::string> labels, float cls_thresh, const int debug_mode);

    /**
    * @brief Classification constructor, loads kmodel and initializes kmodel input, output, and classification threshold
    * @param kmodel_path Path to the kmodel
    * @param image_path Path to the inference image (used for static images)
    * @param labels List of class names
    * @param cls_thresh Classification threshold
    * @param isp_shape ISP input size (CHW)
    * @param vaddr Virtual address corresponding to ISP
    * @param paddr Physical address corresponding to ISP
    * @param debug_mode  0 (no debugging), 1 (show only time), 2 (show all print information)
    * @return None
    */
    Classification(string &kmodel_path, string &image_path, std::vector<std::string> labels, float cls_thresh, FrameCHWSize isp_shape, uintptr_t vaddr, uintptr_t paddr, const int debug_mode);

    /**
    * @brief Classification destructor
    * @return None
    */
    ~Classification();

    /**
    * @brief Static image preprocessing
    * @param ori_img Original image
    * @return None
    */
    void pre_process(cv::Mat ori_img);

    /**
    * @brief Video stream preprocessing (ai2d for ISP)
    * @return None
    */
    void pre_process();

    /**
    * @brief kmodel inference
    * @return None
    */
    void inference();

    /**
    * @brief Post-processing of kmodel inference results
    * @param results Collection of classification results based on the original image after post-processing
    * @return None
    */
    void post_process(vector<cls_res> &results);

    private:

    /**
    * @brief Calculate exp
    * @param x Independent variable value
    * @return Returns the result after calculating exp
    */
    float fast_exp(float x);

    /**
    * @brief Calculate sigmoid
    * @param x Independent variable value
    * @return Returns the result after calculating sigmoid
    */
    float sigmoid(float x);

    std::unique_ptr<ai2d_builder> ai2d_builder_; // ai2d builder
    runtime_tensor ai2d_in_tensor_;              // ai2d input tensor
    runtime_tensor ai2d_out_tensor_;             // ai2d output tensor
    uintptr_t vaddr_;                            // Virtual address of ISP
    FrameCHWSize isp_shape_;                     // Size of the address corresponding to ISP

    float cls_thresh;      // Classification threshold
    vector<string> labels; // Class names
    int num_class;         // Number of classes

    float* output;         // Read kmodel output, float pointer type
};
#endif
In classification.cc, implement the above interfaces:
#include "classification.h"

/*
Static image inference, constructor
*/
Classification::Classification(std::string &kmodel_path, std::string &image_path, std::vector<std::string> labels_, float cls_thresh_, const int debug_mode)
:AIBase(kmodel_path.c_str(),"Classification", debug_mode)
{
    cls_thresh = cls_thresh_;
    labels = labels_;
    num_class = labels.size();
    ai2d_out_tensor_ = this->get_input_tensor(0); // Interface inherited from AIBase
}

/*
Video stream inference, constructor
*/
Classification::Classification(std::string &kmodel_path, std::string &image_path, std::vector<std::string> labels_, float cls_thresh_, FrameCHWSize isp_shape, uintptr_t vaddr, uintptr_t paddr, const int debug_mode)
:AIBase(kmodel_path.c_str(),"Classification", debug_mode)
{
    cls_thresh = cls_thresh_;
    labels = labels_;
    num_class = labels.size();
    vaddr_ = vaddr;
    isp_shape_ = isp_shape;
    dims_t in_shape{1, isp_shape.channel, isp_shape.height, isp_shape.width};
    ai2d_in_tensor_ = hrt::create(typecode_t::dt_uint8, in_shape, hrt::pool_shared).expect("create ai2d input tensor failed");
    ai2d_out_tensor_ = this->get_input_tensor(0);
    Utils::resize(ai2d_builder_, ai2d_in_tensor_, ai2d_out_tensor_);
}

/*
Destructor
*/
Classification::~Classification()
{
}

/*
Static image preprocessing function
*/
void Classification::pre_process(cv::Mat ori_img)
{
    // Timing
    ScopedTiming st(model_name_ + " pre_process image", debug_mode_);
    std::vector<uint8_t> chw_vec;
    // BGR to RGB, HWC to CHW
    Utils::bgr2rgb_and_hwc2chw(ori_img, chw_vec);
    // Resize
    Utils::resize({ori_img.channels(), ori_img.rows, ori_img.cols}, chw_vec, ai2d_out_tensor_);
}

/*
Video stream preprocessing, see ai2d application part for details
*/
void Classification::pre_process()
{
    ScopedTiming st(model_name_ + " pre_process video", debug_mode_);
    size_t isp_size = isp_shape_.channel * isp_shape_.height * isp_shape_.width;
    auto buf = ai2d_in_tensor_.impl()->to_host().unwrap()->buffer().as_host().unwrap().map(map_access_::map_write).unwrap().buffer();
    memcpy(reinterpret_cast<char *>(buf.data()), (void *)vaddr_, isp_size);
    hrt::sync(ai2d_in_tensor_, sync_op_t::sync_write_back, true).expect("sync write_back failed");
    ai2d_builder_->invoke(ai2d_in_tensor_, ai2d_out_tensor_).expect("error occurred in ai2d running");
}

/*
Inference function, run() and get_output() inherited from AIBase
*/
void Classification::inference()
{
    this->run();
    this->get_output();
}

/*
Post-processing calculate exp
*/
float Classification::fast_exp(float x)
{
    union {
        uint32_t i;
        float f;
    } v{};
    v.i = (1 << 23) * (1.4426950409 * x + 126.93490512f);
    return v.f;
}

/*
Post-processing calculate sigmoid
*/
float Classification::sigmoid(float x)
{
    return 1.0f / (1.0f + fast_exp(-x));
}

/*
Post-processing function
*/
void Classification::post_process(vector<cls_res> &results)
{
    ScopedTiming st(model_name_ + " post_process", debug_mode_);
    // p_outputs_ stores float pointers pointing to the output
    output = p_outputs_[0];
    cls_res b;
    // If it is multi-class classification
    if(num_class > 2){
        float sum = 0.0;
        for (int i = 0; i < num_class; i++){
            sum += exp(output[i]);
        }
        b.score = cls_thresh;
        int max_index;
        // Softmax processing
        for (int i = 0; i < num_class; i++)
        {
            output[i] = exp(output[i]) / sum;
        }
        max_index = max_element(output, output + num_class) - output;
        if (output[max_index] >= b.score)
        {
            b.label = labels[max_index];
            b.score = output[max_index];
            results.push_back(b);
        }
    }
    else // Binary classification
    {
        float pre = sigmoid(output[0]);
        if (pre > cls_thresh)
        {
            b.label = labels[0];
            b.score = pre;
        }
        else{
            b.label = labels[1];
            b.score = 1 - pre;
        }
        results.push_back(b);
    }
}
In the preprocessing part of the above code, some utility functions are used, which we encapsulate in utils.h:
#ifndef UTILS_H
#define UTILS_H
#include <algorithm>
#include <vector>
#include <iostream>
#include <fstream>
#include <opencv2/core.hpp>
#include <opencv2/highgui.hpp>
#include <opencv2/imgcodecs.hpp>
#include <opencv2/imgproc.hpp>
#include <nncase/functional/ai2d/ai2d_builder.h>
#include <string>
#include <string.h>
#include <cmath>
#include <stdio.h>
#include <stdlib.h>
#include <sys/types.h>
#include <sys/stat.h>
#include <fcntl.h>
#include <sys/ioctl.h>
#include <unistd.h>
#include <stdint.h>
#include <random>


using namespace nncase;
using namespace nncase::runtime;
using namespace nncase::runtime::k230;
using namespace nncase::F::k230;


using namespace std;
using namespace cv;
using cv::Mat;
using std::cout;
using std::endl;
using std::ifstream;
using std::vector;

#define STAGE_NUM 3
#define STRIDE_NUM 3
#define LABELS_NUM 1

/**
 * @brief Classification result structure
 */
typedef struct cls_res
{
    float score; // Classification score
    string label; // Classification label result
} cls_res;

/**
 * @brief Single frame/image size
 */
typedef struct FrameSize
{
    size_t width;  // Width
    size_t height; // Height
} FrameSize;

/**
 * @brief Single frame/image size
 */
typedef struct FrameCHWSize
{
    size_t channel; // Channel
    size_t height;  // Height
    size_t width;   // Width
} FrameCHWSize;

/**
 * @brief AI utility class
 * Encapsulates commonly used AI functions, including reading binary files, saving files, image preprocessing, etc.
 */
class Utils
{
public:
    /**
     * @brief Resize the image
     * @param ori_img Original image
     * @param frame_size Size of the image to be resized
     * @param padding Padding pixels, default is cv::Scalar(104, 117, 123), BGR
     * @return Processed image
     */
    static cv::Mat resize(const cv::Mat ori_img, const FrameSize &frame_size);


    /**
     * @brief Convert BGR image from HWC to CHW
     * @param ori_img Original image
     * @param chw_vec Data after conversion to CHW
     * @return None
     */
    static void bgr2rgb_and_hwc2chw(cv::Mat &ori_img, std::vector<uint8_t> &chw_vec);

    /*************************for ai2d ori_img process********************/
    // resize
    /**
     * @brief Resize function, resize CHW data
     * @param ori_shape Original data CHW
     * @param chw_vec Original data
     * @param ai2d_out_tensor ai2d output
     * @return None
     */
    static void resize(FrameCHWSize ori_shape, std::vector<uint8_t> &chw_vec, runtime_tensor &ai2d_out_tensor);

    /**
     * @brief Resize function
     * @param builder ai2d builder, used to run ai2d
     * @param ai2d_in_tensor ai2d input
     * @param ai2d_out_tensor ai2d output
     * @return None
     */
    static void resize(std::unique_ptr<ai2d_builder> &builder, runtime_tensor &ai2d_in_tensor, runtime_tensor &ai2d_out_tensor);

    /**
     * @brief Draw classification results on the image
     * @param frame Original image
     * @param results Classification results
     * @return None
     */
    static void draw_cls_res(cv::Mat& frame, vector<cls_res>& results);

    /**
     * @brief Draw classification results on the screen's OSD
     * @param frame Original image
     * @param results Classification results
     * @param osd_frame_size OSD width and height
     * @param sensor_frame_size Sensor width and height
     * @return None
     */
    static void draw_cls_res(cv::Mat& frame, vector<cls_res>& results, FrameSize osd_frame_size, FrameSize sensor_frame_size);
};
#endif
You can add other utility functions as needed.
Below is the utils.cc file, which completes the implementation of the utility class interfaces:
#include <iostream>
#include "utils.h"

using std::ofstream;
using std::vector;

auto cache = cv::Mat::zeros(1, 1, CV_32FC1);

cv::Mat Utils::resize(const cv::Mat img, const FrameSize &frame_size)
{
    cv::Mat cropped_img;
    cv::resize(img, cropped_img, cv::Size(frame_size.width, frame_size.height), cv::INTER_LINEAR);
    return cropped_img;
}

void Utils::bgr2rgb_and_hwc2chw(cv::Mat &ori_img, std::vector<uint8_t> &chw_vec)
{
    // for bgr format
    std::vector<cv::Mat> bgrChannels(3);
    cv::split(ori_img, bgrChannels);
    for (auto i = 2; i > -1; i--)
    {
        std::vector<uint8_t> data = std::vector<uint8_t>(bgrChannels[i].reshape(1, 1));
        chw_vec.insert(chw_vec.end(), data.begin(), data.end());
    }
}

void Utils::resize(FrameCHWSize ori_shape, std::vector<uint8_t> &chw_vec, runtime_tensor &ai2d_out_tensor)
{
    // build ai2d_in_tensor
    dims_t in_shape{1, ori_shape.channel, ori_shape.height, ori_shape.width};
    runtime_tensor ai2d_in_tensor = host_runtime_tensor::create(typecode_t::dt_uint8, in_shape, hrt::pool_shared).expect("cannot create input tensor");

    auto input_buf = ai2d_in_tensor.impl()->to_host().unwrap()->buffer().as_host().unwrap().map(map_access_::map_write).unwrap().buffer();
    memcpy(reinterpret_cast<char *>(input_buf.data()), chw_vec.data(), chw_vec.size());
    hrt::sync(ai2d_in_tensor, sync_op_t::sync_write_back, true).expect("write back input failed");

    // run ai2d
    // ai2d_datatype_t ai2d_dtype{ai2d_format::NCHW_FMT, ai2d_format::NCHW_FMT, typecode_t::dt_uint8, typecode_t::dt_uint8};
    ai2d_datatype_t ai2d_dtype{ai2d_format::NCHW_FMT, ai2d_format::NCHW_FMT, ai2d_in_tensor.datatype(), ai2d_out_tensor.datatype()};
    ai2d_crop_param_t crop_param { false, 30, 20, 400, 600 };
    ai2d_shift_param_t shift_param{false, 0};
    ai2d_pad_param_t pad_param{false, {{0, 0}, {0, 0}, {0, 0}, {0, 0}}, ai2d_pad_mode::constant, {114, 114, 114}};
    ai2d_resize_param_t resize_param{true, ai2d_interp_method::tf_bilinear, ai2d_interp_mode::half_pixel};
    ai2d_affine_param_t affine_param{false, ai2d_interp_method::cv2_bilinear, 0, 0, 127, 1, {0.5, 0.1, 0.0, 0.1, 0.5, 0.0}};

    dims_t out_shape = ai2d_out_tensor.shape();
    ai2d_builder builder { in_shape, out_shape, ai2d_dtype, crop_param, shift_param, pad_param, resize_param, affine_param };
    builder.build_schedule();
    builder.invoke(ai2d_in_tensor,ai2d_out_tensor).expect("error occurred in ai2d running");
}

void Utils::resize(std::unique_ptr<ai2d_builder> &builder, runtime_tensor &ai2d_in_tensor, runtime_tensor &ai2d_out_tensor)
{
    // run ai2d
    ai2d_datatype_t ai2d_dtype{ai2d_format::NCHW_FMT, ai2d_format::NCHW_FMT, ai2d_in_tensor.datatype(), ai2d_out_tensor.datatype()};
    ai2d_crop_param_t crop_param { false, 30, 20, 400, 600 };
    ai2d_shift_param_t shift_param{false, 0};
    ai2d_pad_param_t pad_param{false, {{0, 0}, {0, 0}, {0, 0}, {0, 0}}, ai2d_pad_mode::constant, {114, 114, 114}};
    ai2d_resize_param_t resize_param{true, ai2d_interp_method::tf_bilinear, ai2d_interp_mode::half_pixel};
    ai2d_affine_param_t affine_param{false, ai2d_interp_method::cv2_bilinear, 0, 0, 127, 1, {0.5, 0.1, 0.0, 0.1, 0.5, 0.0}};

    dims_t in_shape = ai2d_in_tensor.shape();
    dims_t out_shape = ai2d_out_tensor.shape();
    builder.reset(new ai2d_builder(in_shape, out_shape, ai2d_dtype, crop_param, shift_param, pad_param, resize_param, affine_param));
    builder->build_schedule();
    builder->invoke(ai2d_in_tensor,ai2d_out_tensor).expect("error occurred in ai2d running");
}


void Utils::draw_cls_res(cv::Mat& frame, vector<cls_res>& results)
{
    double fontsize = (frame.cols * frame.rows * 1.0) / (300 * 250);
    if (fontsize > 2)
    {
        fontsize = 2;
    }

    for(int i = 0; i < results.size(); i++)
    {
        std::string text = "class: " + results[i].label + ", score: " + std::to_string(round(results[i].score * 100) / 100.0).substr(0, 4);

        cv::putText(frame, text, cv::Point(1, 40), cv::FONT_HERSHEY_SIMPLEX, 0.8, cv::Scalar(255, 255, 0), 2);
        std::cout << text << std::endl;
    }
}

void Utils::draw_cls_res(cv::Mat& frame, vector<cls_res>& results, FrameSize osd_frame_size, FrameSize sensor_frame_size)
{
    double fontsize = (frame.cols * frame.rows * 1.0) / (1100 * 1200);
    for(int i = 0; i < results.size(); i++)
    {
        std::string text = "class: " + results[i].label + ", score: " + std::to_string(round(results[i].score * 100) / 100.0).substr(0, 4);
        cv::putText(frame, text, cv::Point(1, 40), cv::FONT_HERSHEY_SIMPLEX, 0.8, cv::Scalar(255, 255, 255, 0), 2);
        std::cout << text << std::endl;
    }
}
To facilitate debugging, we encapsulated the timing class ScopedTiming in scoped_timing.hpp, which is used to measure the time taken within the lifecycle of this class instance.
#include <chrono>
#include <string>
#include <iostream>

/**
 * @brief Timing class
 * Measures the time taken within the lifecycle of this class instance
 */
class ScopedTiming
{
public:
    /**
     * @brief ScopedTiming constructor, initializes the timing object name and starts timing
     * @param info Name of the timing object
     * @param enable_profile Whether to start timing
     * @return None
     */
    ScopedTiming(std::string info = "ScopedTiming", int enable_profile = 1)
    : m_info(info), enable_profile(enable_profile)
    {
        if (enable_profile)
        {
            m_start = std::chrono::steady_clock::now();
        }
    }

    /**
     * @brief ScopedTiming destructor, ends timing and prints the elapsed time
     * @return None
     */
     ~ScopedTiming()
    {
        if (enable_profile)
        {
            m_stop = std::chrono::steady_clock::now();
            double elapsed_ms = std::chrono::duration<double, std::milli>(m_stop - m_start).count();
            std::cout << m_info << " took " << elapsed_ms << " ms" << std::endl;
        }
    }

private:
    int enable_profile;                            // Whether to measure time
    std::string m_info;                            // Timing object name
    std::chrono::steady_clock::time_point m_start; // Timing start time
    std::chrono::steady_clock::time_point m_stop;  // Timing end time
};
main.cc is the main code for implementing board-side inference. It mainly parses the input parameters, prints the usage instructions, and implements inference for two different branches. If the second input parameter is the path to the inference image, the image_proc function is called for image inference; if the input is None, the video_proc function is called for video stream inference.
Static image inference code
void image_proc_cls(string &kmodel_path, string &image_path,vector<string> labels,float cls_thresh ,int debug_mode)
{
    cv::Mat ori_img = cv::imread(image_path);
    int ori_w = ori_img.cols;
    int ori_h = ori_img.rows;
    // Create task class instance
    Classification cls(kmodel_path,image_path,labels,cls_thresh,debug_mode);
    // Pre-process
    cls.pre_process(ori_img);
    // Inference
    cls.inference();
    vector<cls_res> results;
    // Post-process
    cls.post_process(results);
    Utils::draw_cls_res(ori_img,results);
    cv::imwrite("result_cls.jpg", ori_img);

}
The above code is part of the static image inference code in main.cc. First, it initializes the cv::Mat object ori_img from the image path, then initializes the Classification instance cls, calls the pre_process function of cls, the inference function, and the post_process function. Finally, it calls draw_cls_res in utils.h to draw the results on the image and saves it as result_cls.jpg. If you need to modify the pre-processing and post-processing parts, you can do so in Classification.cc. If you want to add other utility methods, you can define them in utils and implement them in utils.cc.
Video stream inference code can refer to the example code in the SDK Compilation Chapter under Example 2. The core AI development code is:
Classification cls(kmodel_path,labels,cls_thresh, {3, ISP_CHN1_HEIGHT, ISP_CHN1_WIDTH}, reinterpret_cast<uintptr_t>(vbvaddr), reinterpret_cast<uintptr_t>(dump_info.v_frame.phys_addr[0]), debug_mode);
vector<cls_res> results;
results.clear();
cls.pre_process();
cls.inference();
cls.post_process(results);
For convenience, we have encapsulated the video stream processing part. You can refer to the example code in the K230_training_scripts/end2end_cls_doc at main · kendryte/K230_training_scripts (github.com) under k230_code in the vi_vo.h file and the specific implementation in main.cc.
Explanation of
k230_code/k230_deploy/CMakeLists.txt
This is the CMakeLists.txt script in the k230_code/k230_deploy directory, which sets the C++ files to be compiled and the name of the generated ELF executable file:
set(src main.cc utils.cc ai_base.cc classification.cc)
set(bin main.elf)

include_directories(${PROJECT_SOURCE_DIR}): Adds the project's root directory to the header file search path.
include_directories(${nncase_sdk_root}/riscv64/rvvlib/include): Adds the header file directory of the nncase RISC-V vector library.
include_directories(${k230_sdk}/src/big/mpp/userapps/api/): Adds the user application API header file directory from the k230 SDK.
include_directories(${k230_sdk}/src/big/mpp/include): Adds the general header file directory from the k230 SDK.
include_directories(${k230_sdk}/src/big/mpp/include/comm): Adds the communication-related header file directory.
include_directories(${k230_sdk}/src/big/mpp/userapps/sample/sample_vo): Adds the sample VO (video output) application header file directory.

link_directories(${nncase_sdk_root}/riscv64/rvvlib/): Adds the linker search path pointing to the nncase RISC-V vector library directory.
add_executable(${bin} ${src}): Creates an executable file, using the previously set list of source files as input.
target_link_libraries(${bin} ...): Sets the libraries that the executable file needs to link. The list includes various libraries, including nncase-related libraries, k230 SDK libraries, and some other libraries.
target_link_libraries(${bin} opencv_imgproc opencv_imgcodecs opencv_core zlib libjpeg-turbo libopenjp2 libpng libtiff libwebp csi_cv): Links some OpenCV-related libraries and other libraries to the executable file.
install(TARGETS ${bin} DESTINATION bin): Installs the generated executable file to the specified target path (bin directory).
Explanation of
k230_code/CMakeLists.txt
cmake_minimum_required(VERSION 3.2)
project(nncase_sdk C CXX)

set(nncase_sdk_root "${PROJECT_SOURCE_DIR}/../../nncase/")
set(k230_sdk ${nncase_sdk_root}/../../../)
set(CMAKE_EXE_LINKER_FLAGS "-T ${PROJECT_SOURCE_DIR}/cmake/link.lds --static")

#  set opencv
set(k230_opencv ${k230_sdk}/src/big/utils/lib/opencv)
include_directories(${k230_opencv}/include/opencv4/)
link_directories(${k230_opencv}/lib ${k230_opencv}/lib/opencv4/3rdparty)

#  set mmz
link_directories(${k230_sdk}/src/big/mpp/userapps/lib)

#  set nncase
include_directories(${nncase_sdk_root}/riscv64)
include_directories(${nncase_sdk_root}/riscv64/nncase/include)
include_directories(${nncase_sdk_root}/riscv64/nncase/include/nncase/runtime)
link_directories(${nncase_sdk_root}/riscv64/nncase/lib/)

add_subdirectory(k230_deploy)
This is the CMakeLists.txt script in the k230_code directory. The script mainly focuses on the following parts:
set(nncase_sdk_root "${PROJECT_SOURCE_DIR}/../../nncase/"): Sets the nncase directory.
set(k230_sdk ${nncase_sdk_root}/../../../): Sets the k230_sdk directory, which is obtained from the three-level parent directory of the nncase directory.
set(CMAKE_EXE_LINKER_FLAGS "-T ${PROJECT_SOURCE_DIR}/cmake/link.lds --static"): Sets the linker script path, with the linker script placed under `k230_code/cmake`.
...
add_subdirectory(k230_deploy): Adds the project subdirectory to be compiled. If you want to compile your own project, you can change this line.
Explanation of
k230_code/build_app.sh
#!/bin/bash
set -x

#  set cross build toolchain
#  Adds the path of the cross-compilation toolchain to the system PATH environment variable for subsequent commands. This toolchain is the one used for large-core compilation.
Export Path and Clear Previous Builds#
export PATH=$PATH:/opt/toolchain/riscv64-linux-musleabi_for_x86_64-pc-linux-gnu/bin/

clear
rm -rf out
mkdir out
pushd out
cmake -DCMAKE_BUILD_TYPE=Release                 \
      -DCMAKE_INSTALL_PREFIX=`pwd`               \
      -DCMAKE_TOOLCHAIN_FILE=cmake/Riscv64.cmake \
      ..

make -j && make install
popd
Generate main.elf and Place in k230_bin Directory#
# The generated main.elf can be found in the k230_bin folder under the k230_code directory
k230_bin=`pwd`/k230_bin
rm -rf ${k230_bin}
mkdir -p ${k230_bin}

if [ -f out/bin/main.elf ]; then
      cp out/bin/main.elf ${k230_bin}
fi
Code Compilation#
Copy the k230_code folder from the project to the src/big/nncase directory in the k230_sdk directory, and execute the build script to compile the C++ code into the main.elf executable file.
# Execute in the root directory of k230_SDK
make CONF=k230_canmv_defconfig prepare_memory
# Return to the current project directory and grant permissions
chmod +x build_app.sh
./build_app.sh
Prepare ELF File#
The files needed for the subsequent deployment steps include:
k230_code/k230_bin/main.elf
Network Configuration and File Transfer#
There are two ways to copy the files to be used to the development board: TFTP transfer method and SCP transfer method.
TFTP File Transfer#
Windows System PC Network Configuration
Go to Control Panel -> Network and Sharing Center -> Change adapter settings -> Ethernet card -> Right-click Properties -> Select (TCP/IPv4) -> Properties
Configure the IP address, mask, gateway, and DNS server address:
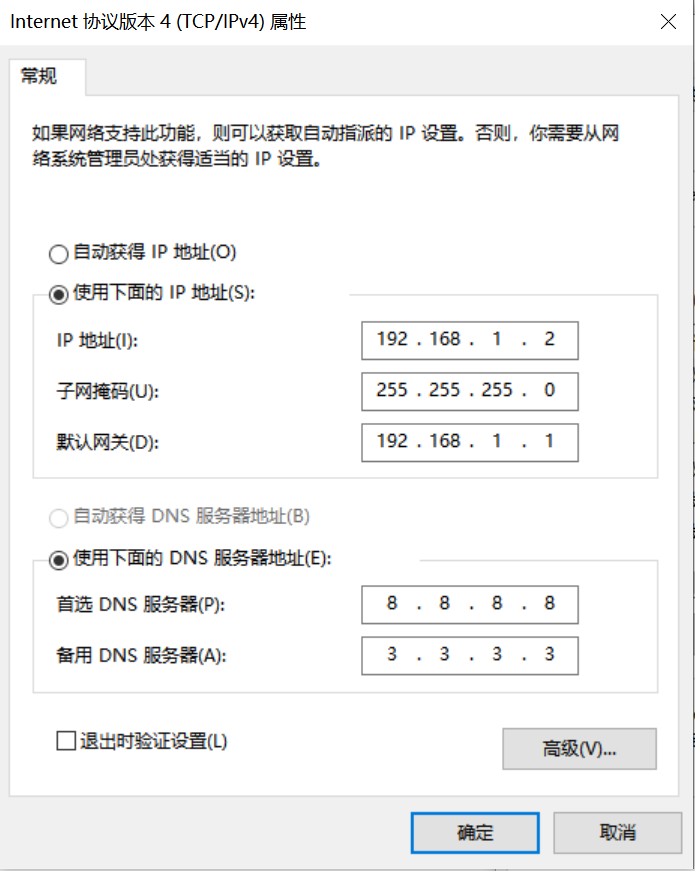
Development Board Network Configuration
Enter the small core command line and execute:
# Check if eth0 exists
ifconfig
# Configure the IP of the development board to be on the same subnet as the PC
ifconfig eth0 192.168.1.22
# Check IP configuration
ifconfig
Tool: tftpd64
Install the TFTP communication tool, download link: https://bitbucket.org/phjounin/tftpd64/downloads/
Start tftpd64, configure the directory for storing files to be transferred and the service network card
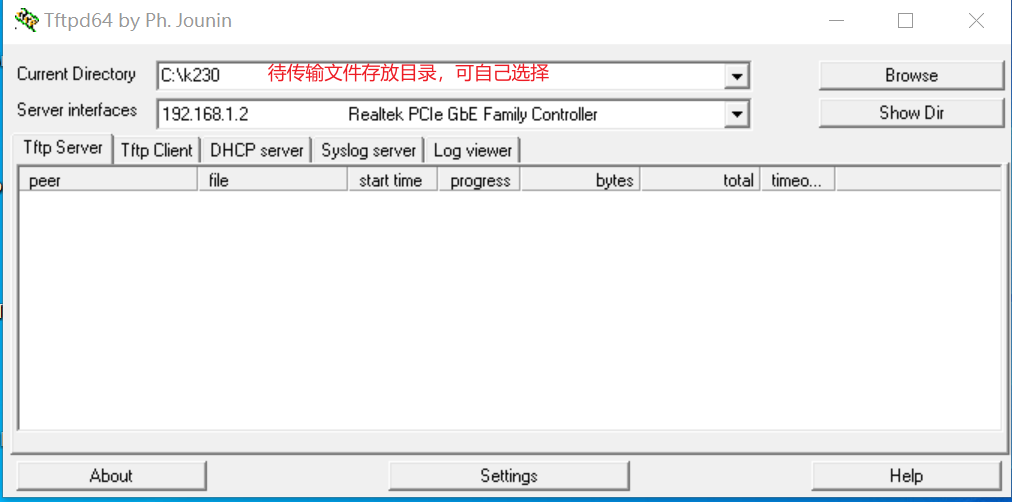
sharefs Explanation
# Enter the root directory of the small core
cd /
# View the directory
ls
# The sharefs directory is shared by the big and small cores, so files copied to the sharefs directory from the small core are also visible to the big core
File Transfer
# The following code is executed on the small core serial port
# Transfer files from the PC's tftpd64 configured file storage directory to the current directory of the development board
tftp -g -r your_file 192.168.1.2
# Transfer files from the current directory of the development board to the tftpd64 configured file storage directory
tftp -p -r board_file 192.168.1.2
SCP File Transfer#
In a Linux system, the PC is normally connected to the network, and the development board can be connected to other network ports under the gateway where the PC is located through a network cable to achieve file transfer using the scp command.
Power on the development board, enter the big and small core COM interface, and execute the scp transfer command on the small core:
# Copy files from the PC to the development board
scp username@domain_or_IP:source_directory destination_directory_on_board
# Copy a directory
scp -r username@domain_or_IP:source_directory destination_directory_on_board
# Copy files from the development board to the PC
scp source_directory_on_board username@domain_or_IP:destination_directory_on_PC
# Copy a directory
scp -r source_directory_on_board username@domain_or_IP:destination_directory_on_PC
K230 End Deployment#
Board Deployment Process#
Following the file transfer process configured in the previous section, enter the /sharefs directory on the small core interface in MobaXterm and create a test folder:
cd /sharefs
mkdir test_cls
cd test_cls
Copy the files prepared for model training and testing and the ELF file compiled from the C++ code to the development board.
test_cls
 ├──best.kmodel
 ├──labels.txt
 ├──main.elf
 ├──test.jpg
Enter the /sharefs/test_cls directory on the big core COM port,
Execute static image inference by executing the following code (Note: The code needs to be executed on the big core, and file copying needs to be completed on the small core):
# "Model inference parameter description:"
# "<kmodel_path> <image_path> <labels_txt> <debug_mode>"
# "Options:"
# "  kmodel_path     Path to the Kmodel\n"
# "  image_path      Path to the image to be inferred / camera (None)\n"
# "  labels_txt      Path to the label file\n"
# "  debug_mode      Whether debugging is needed, 0, 1, and 2 represent no debugging, simple debugging, and detailed debugging respectively\n"
main.elf best.kmodel test.jpg labels.txt 2
To perform video stream inference, execute the following code:
main.elf best.kmodel None labels.txt 2
Deployment Effect on Board#
Static image inference illustration:

Video stream inference illustration:
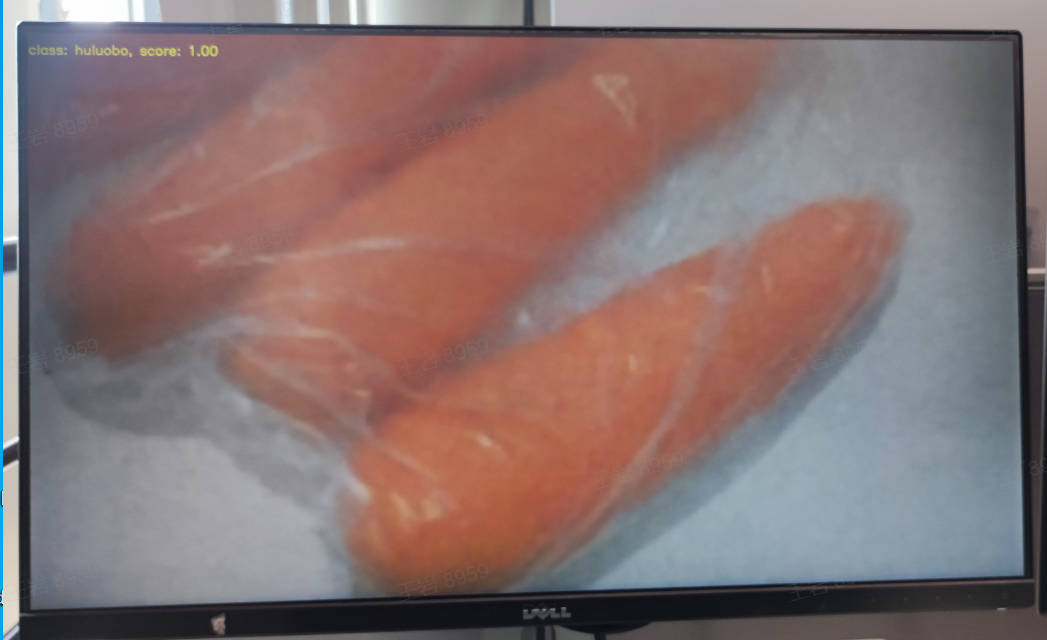
Frequently Asked Questions (FAQ)#
Please refer to the FAQ: