9. Developing with AI Cube#
Note:
This chapter uses SDK1.1.0 and nncase2.4.0 versions. Please refer to the corresponding version of AI Cube User Guide for further information. User Guide Download: Canaan Developer Community (canaan-creative.com)->Downloads->Tools->AI Cube->AI_Cube_V##_User Guide.
Ensure version compatibility during development. Refer to the version compatibility between k230_sdk and nncase at: K230 SDK nncase Version Compatibility — K230 Documentation (canaan-creative.com).
For MicroPython development, ensure version compatibility between k230_canmv (MicroPython development), k230_sdk, and nncase. Refer to: CanMV-K230_SDK_nncase Version Compatibility — K230 CanMV Documentation (canaan-creative.com).
Refer to the related tutorial videos in the reference section.
AI Cube does not support AMD training GPUs.
This chapter details the usage of the AI Cube tool on both Ubuntu and Windows platforms for image classification and object detection tasks, and the process of deploying tasks on the K230 development board. AI Cube is an offline training tool suitable for users with computational resources who prioritize data security but do not focus on underlying training code.
9.1 Implementing Image Classification Task with AI Cube#
9.1.1 Software Installation#
AI Cube is an offline development tool provided by Canaan for developers, ensuring data security and enabling visual local training. The platform supports eight tasks: image classification, object detection, semantic segmentation, OCR detection, OCR recognition, metric learning, multi-label classification, and anomaly detection.
Using the Ubuntu version of AI Cube to implement vegetable classification and deploy it on CanMV-K230 as an example, this section introduces the quick development process with AI Cube. Prepare an Ubuntu PC with a graphical interface and install the CUDA driver.
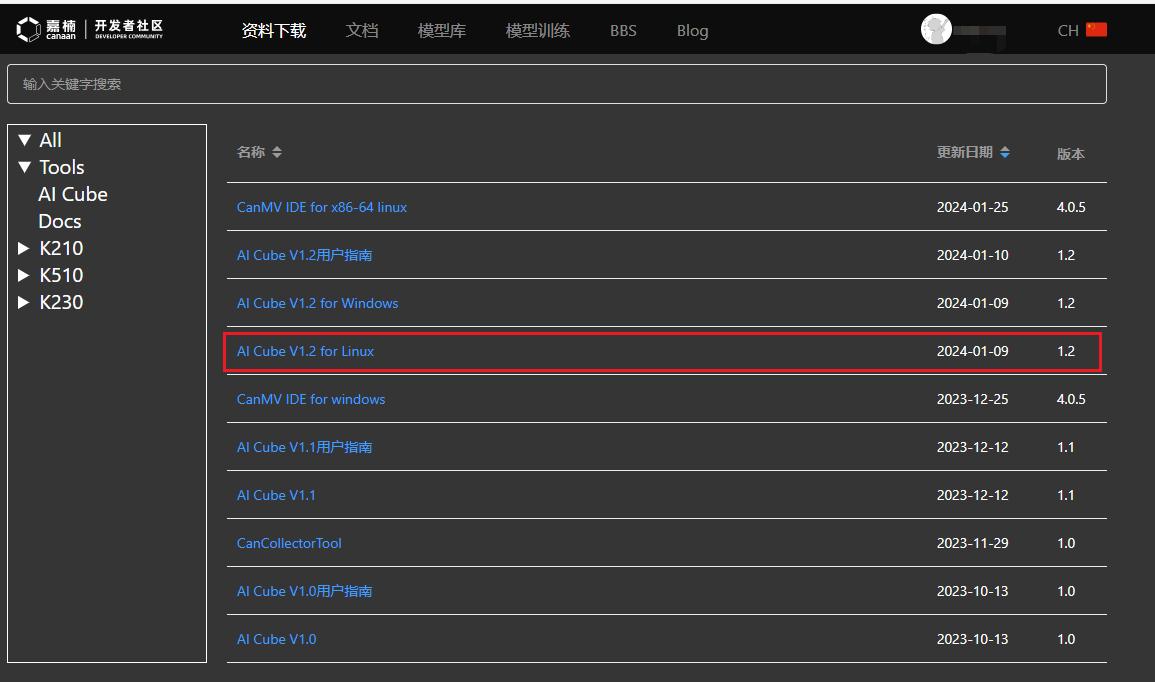
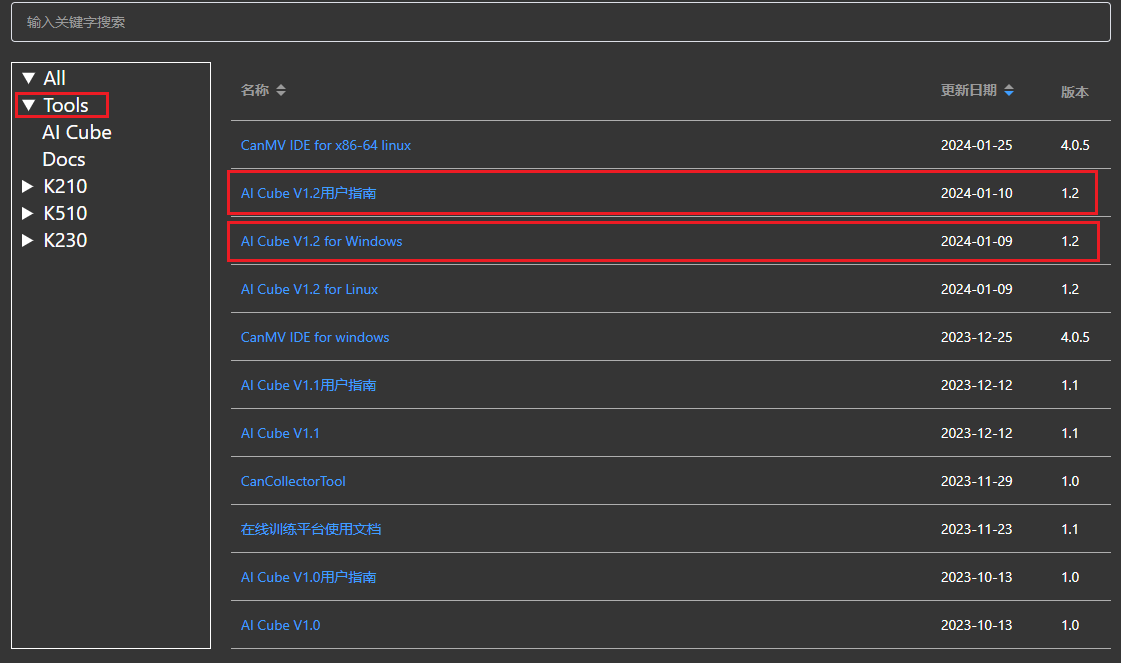
First, download the Linux version of AI Cube from the Canaan Developer Community (canaan-creative.com) under Tools. It is recommended to use version V1.2.
Extract the installation package in the download directory:
unzip AI_Cube_for_Linux_v1.2.zip
The extracted directory structure is shown below:
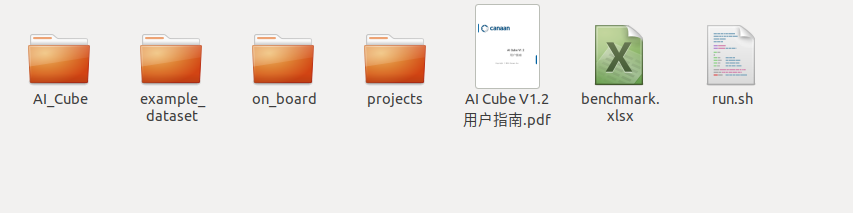
Open a new terminal and install dotnet sdk 7.0 if not already installed:
wget https://packages.microsoft.com/config/ubuntu/20.04/packages-microsoft-prod.deb -O packages-microsoft-prod.deb
dpkg -i packages-microsoft-prod.deb
apt update
apt install -y apt-transport-https
apt install -y dotnet-sdk-7.0
Navigate to the extracted directory in the terminal and start AI Cube:
./run.sh
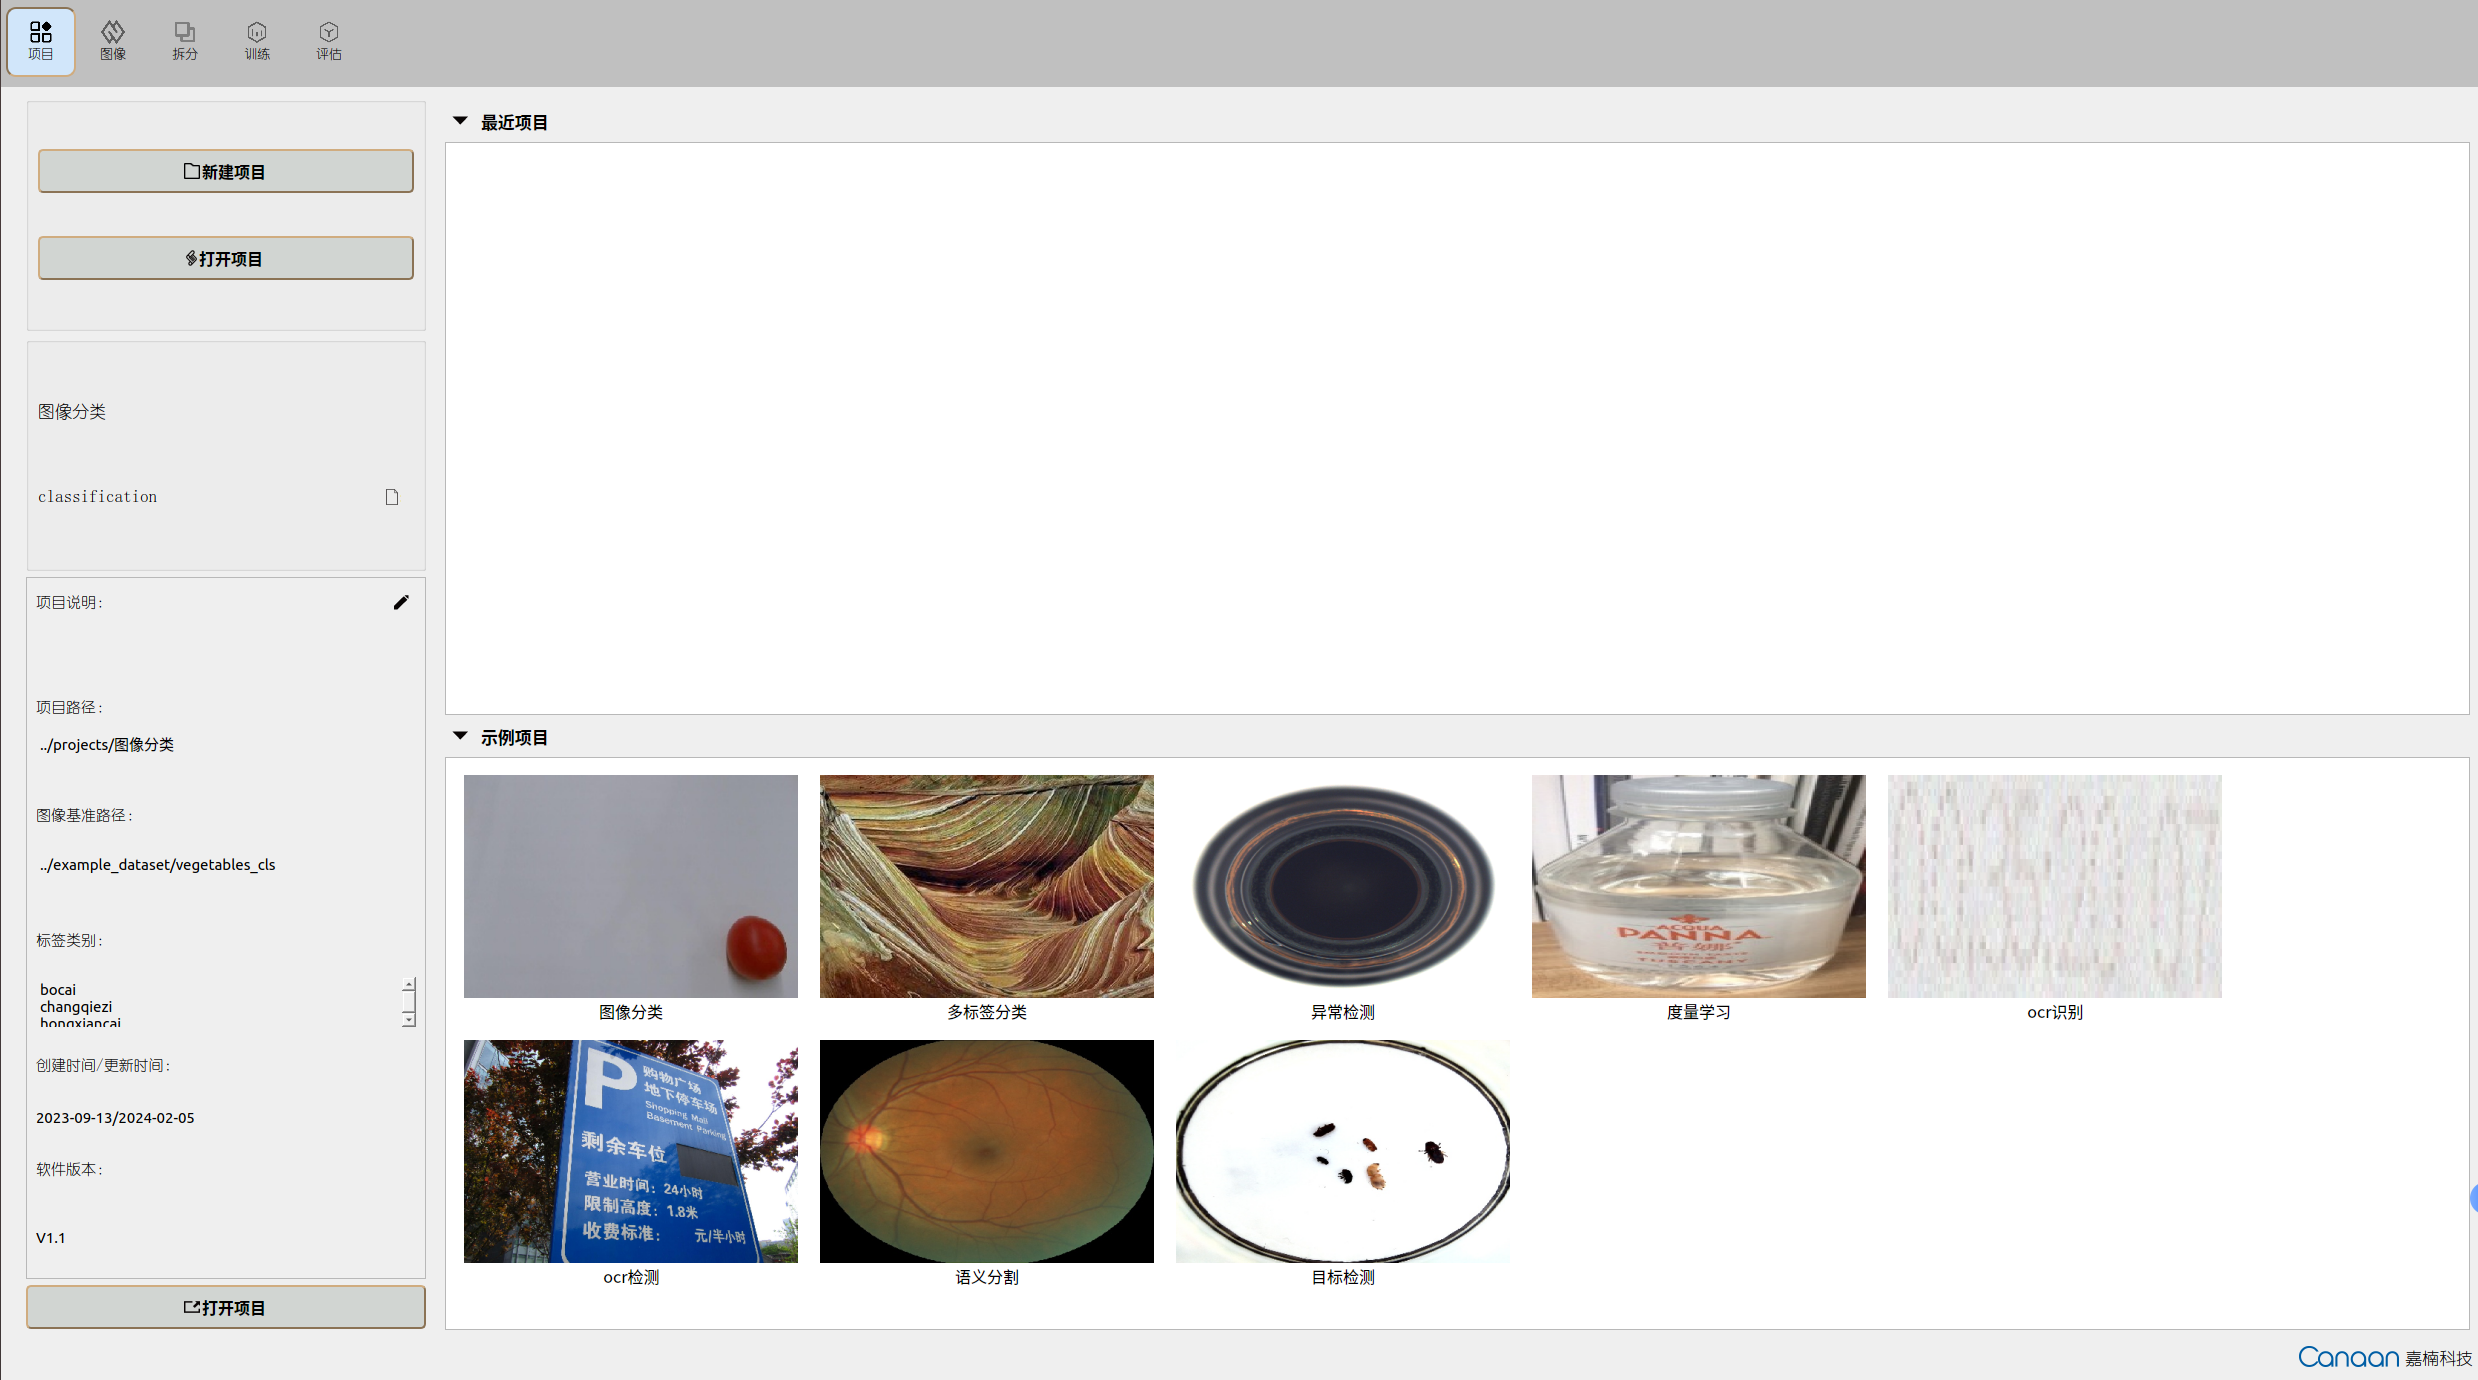
9.1.2 Feature Pages Introduction#
AI Cube includes five feature pages. The “Projects” page mainly handles project management, displaying current and recent projects. The “Images” page shows the dataset information of the current project, allowing users to view dataset images. The “Split” page displays split information, statistics on split categories, and images of different split sets. The “Training” page configures training parameters, displays training information and curves. The “Evaluation” page handles model evaluation and displays evaluation information, and can configure deployment parameters to generate deployment packages.
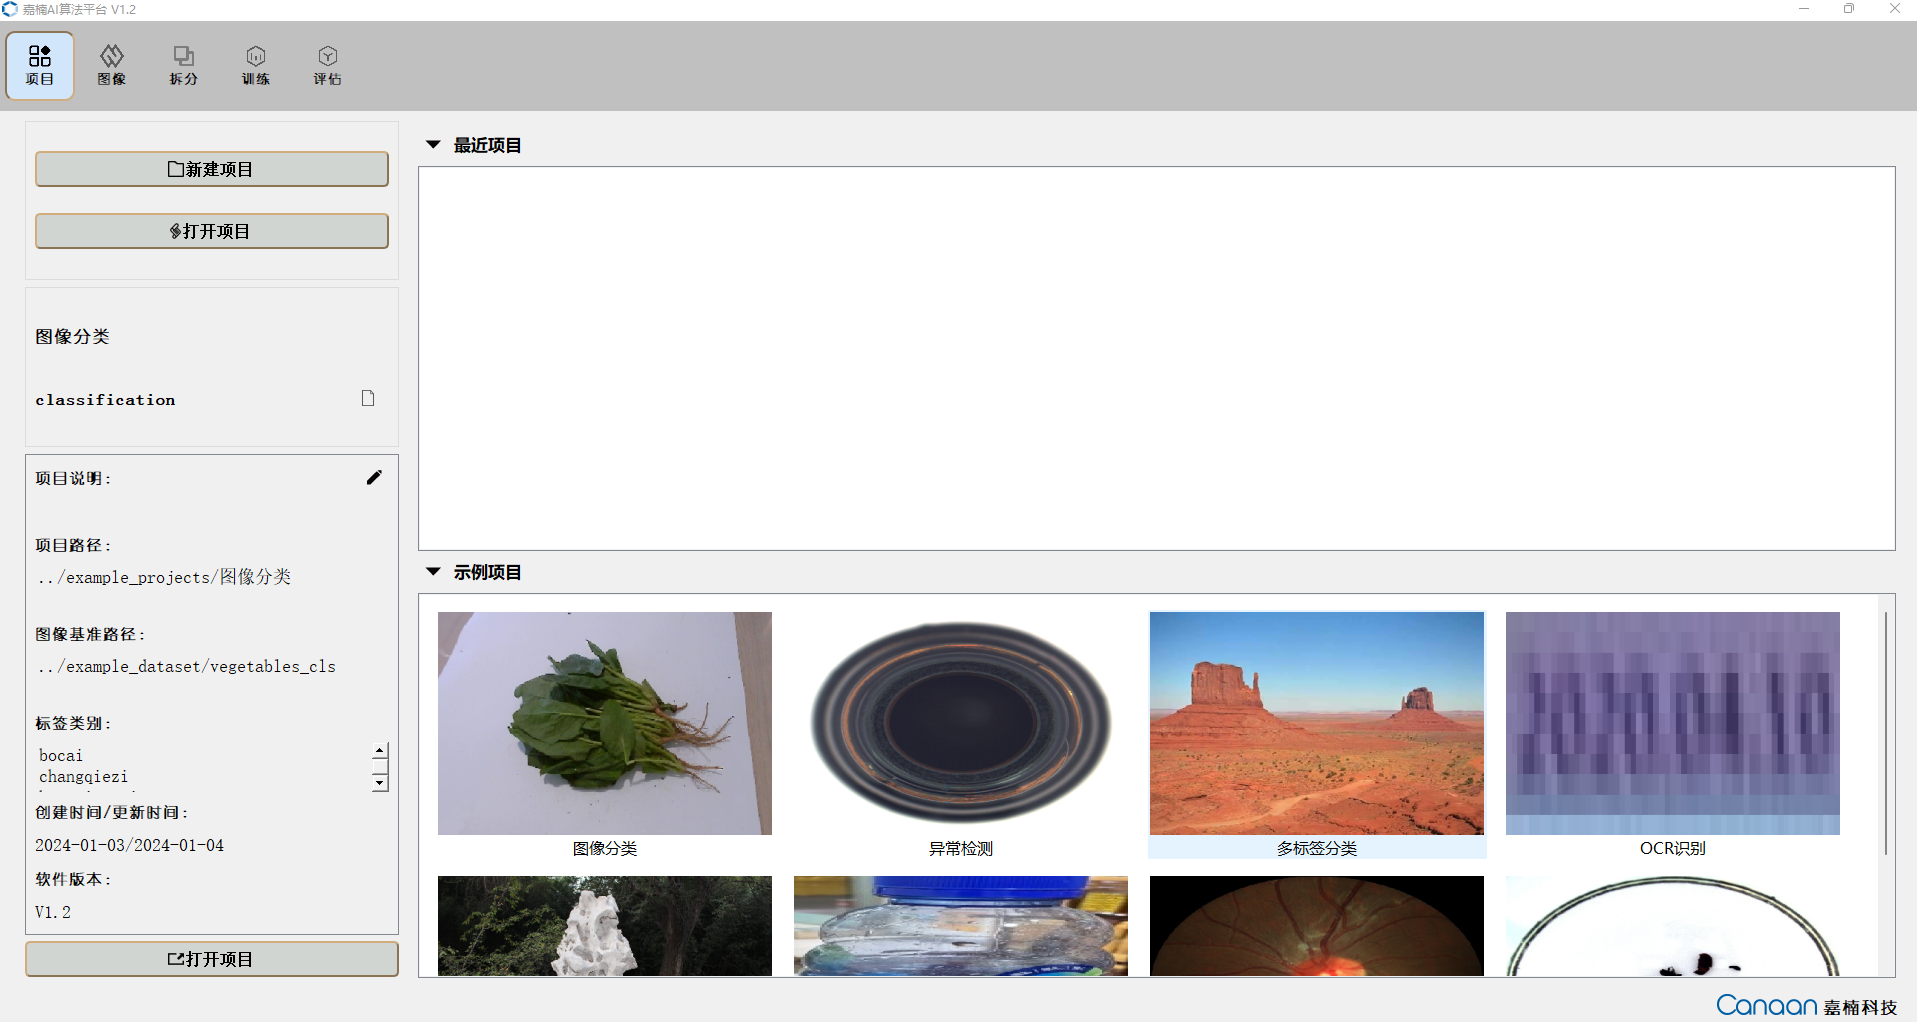
“Projects” page illustration:
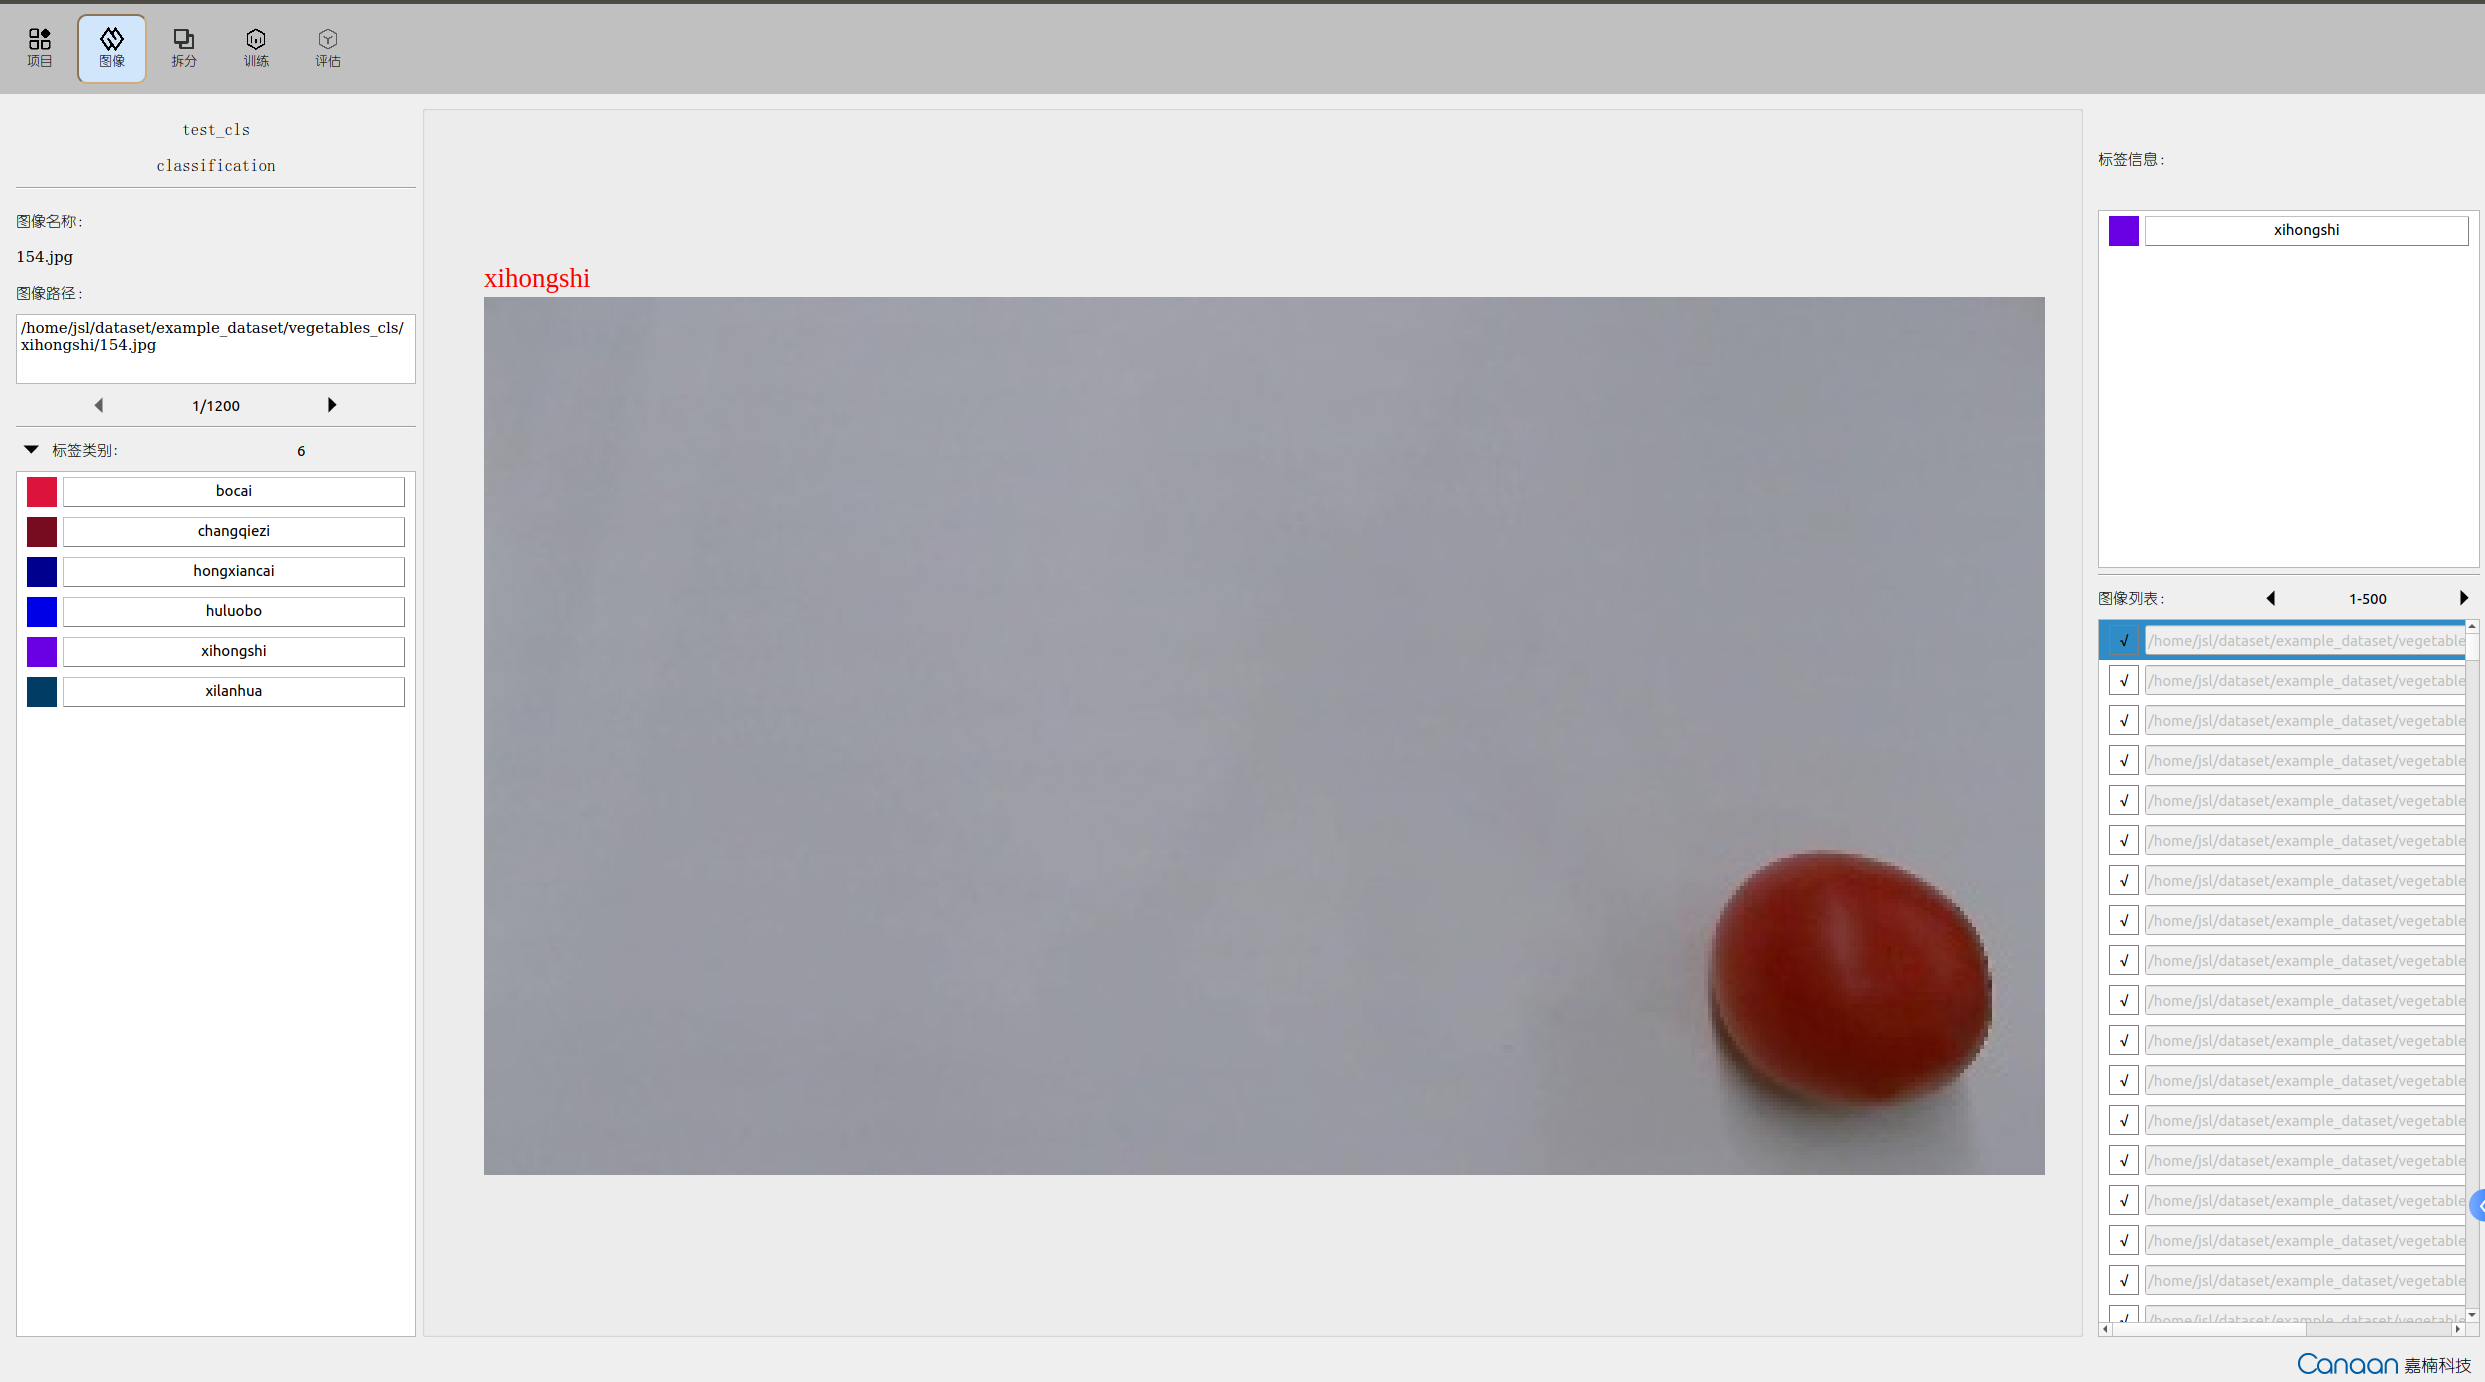
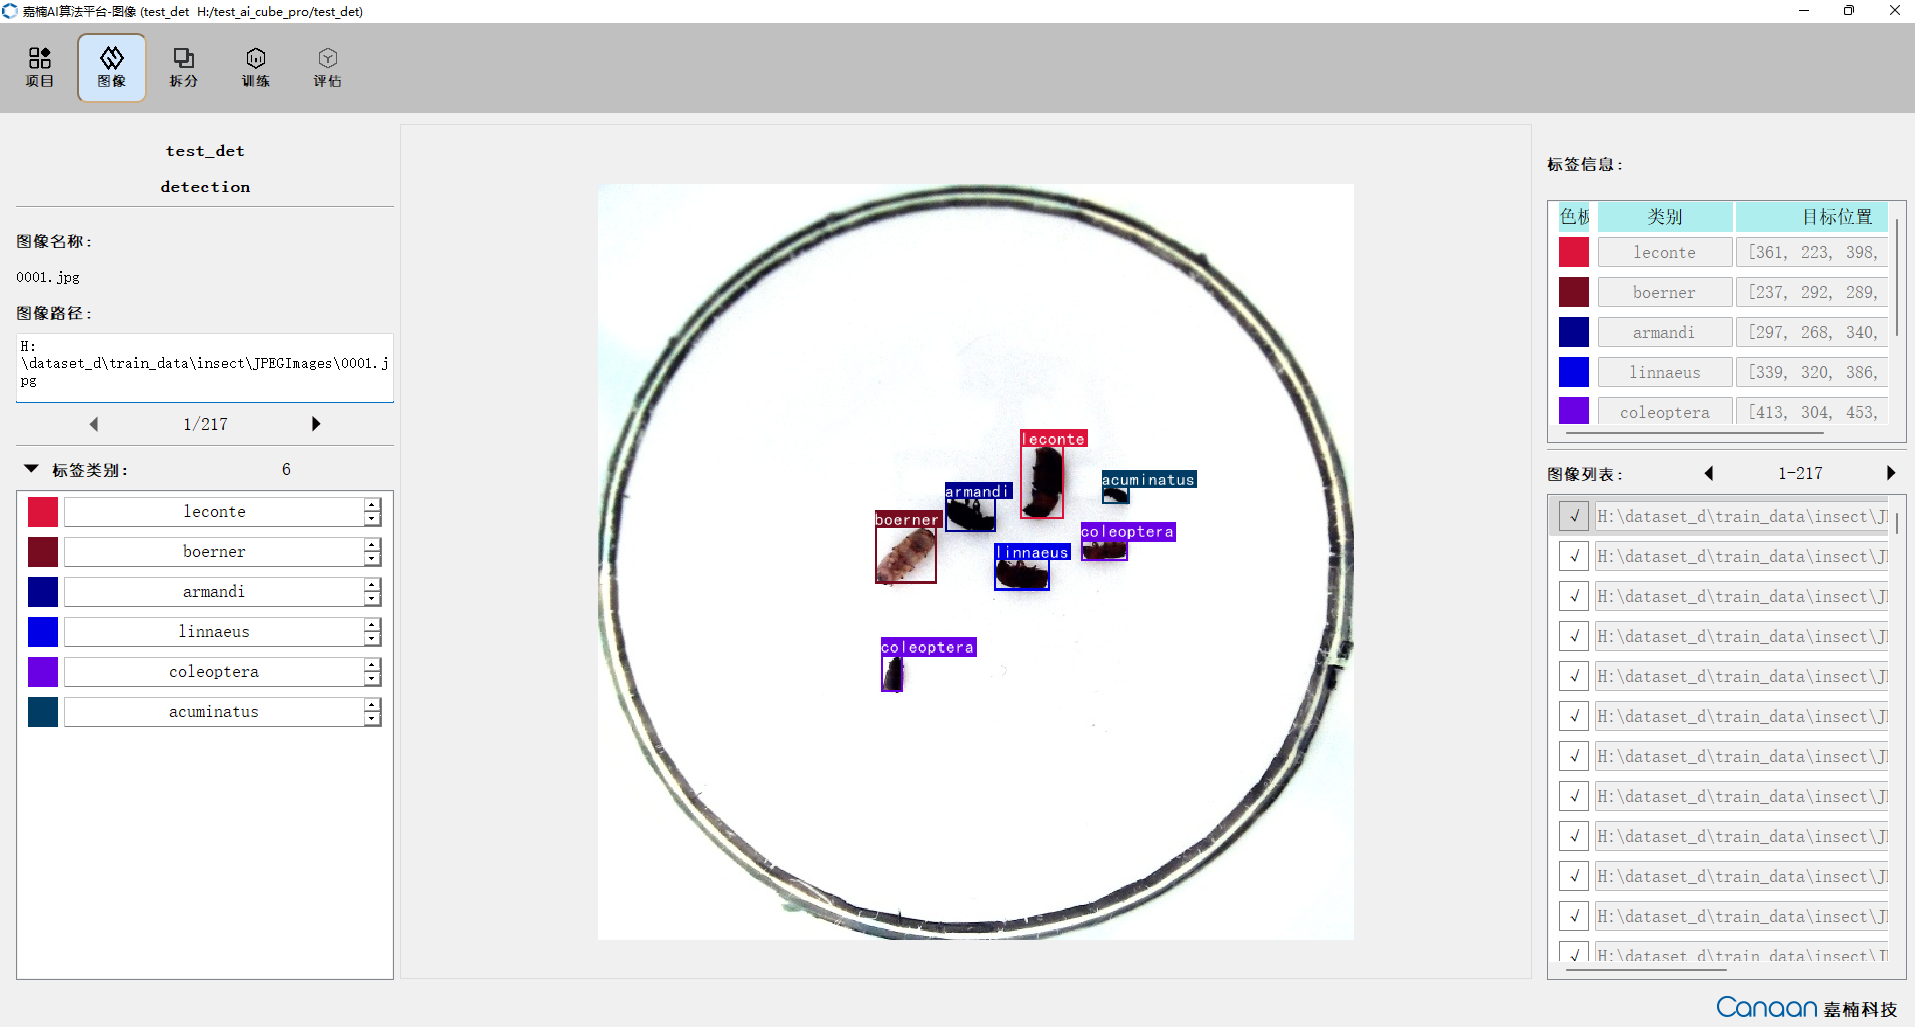
“Images” page illustration:
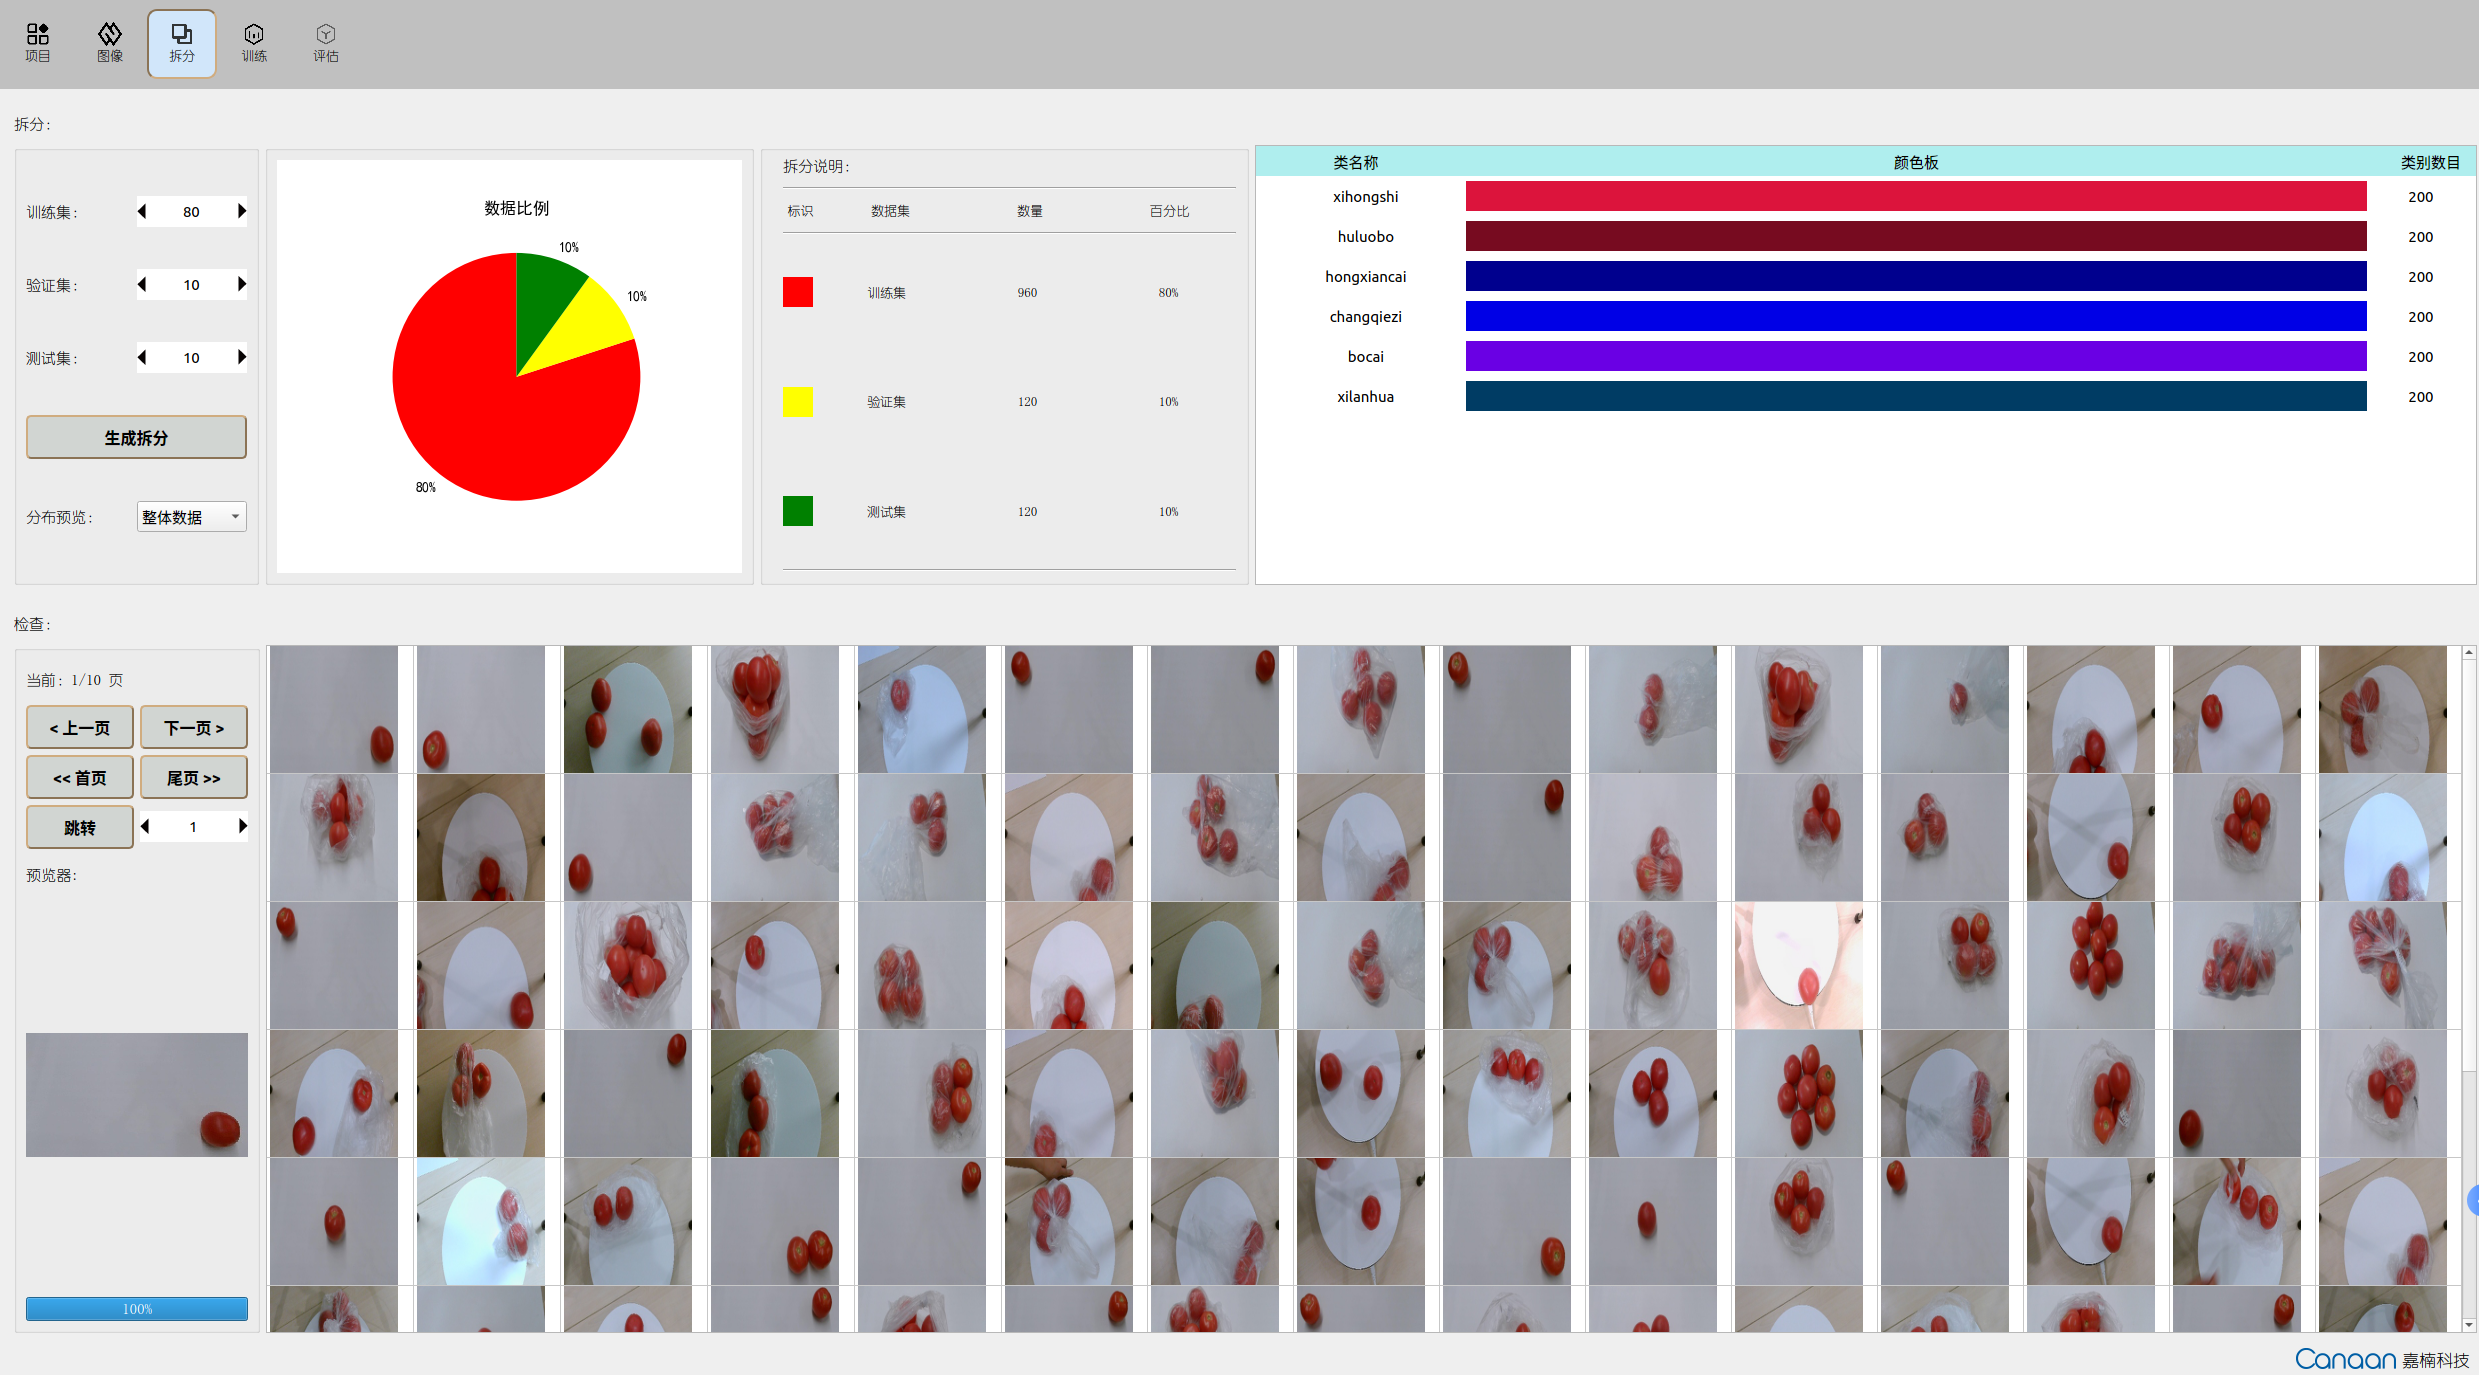
“Split” page illustration:
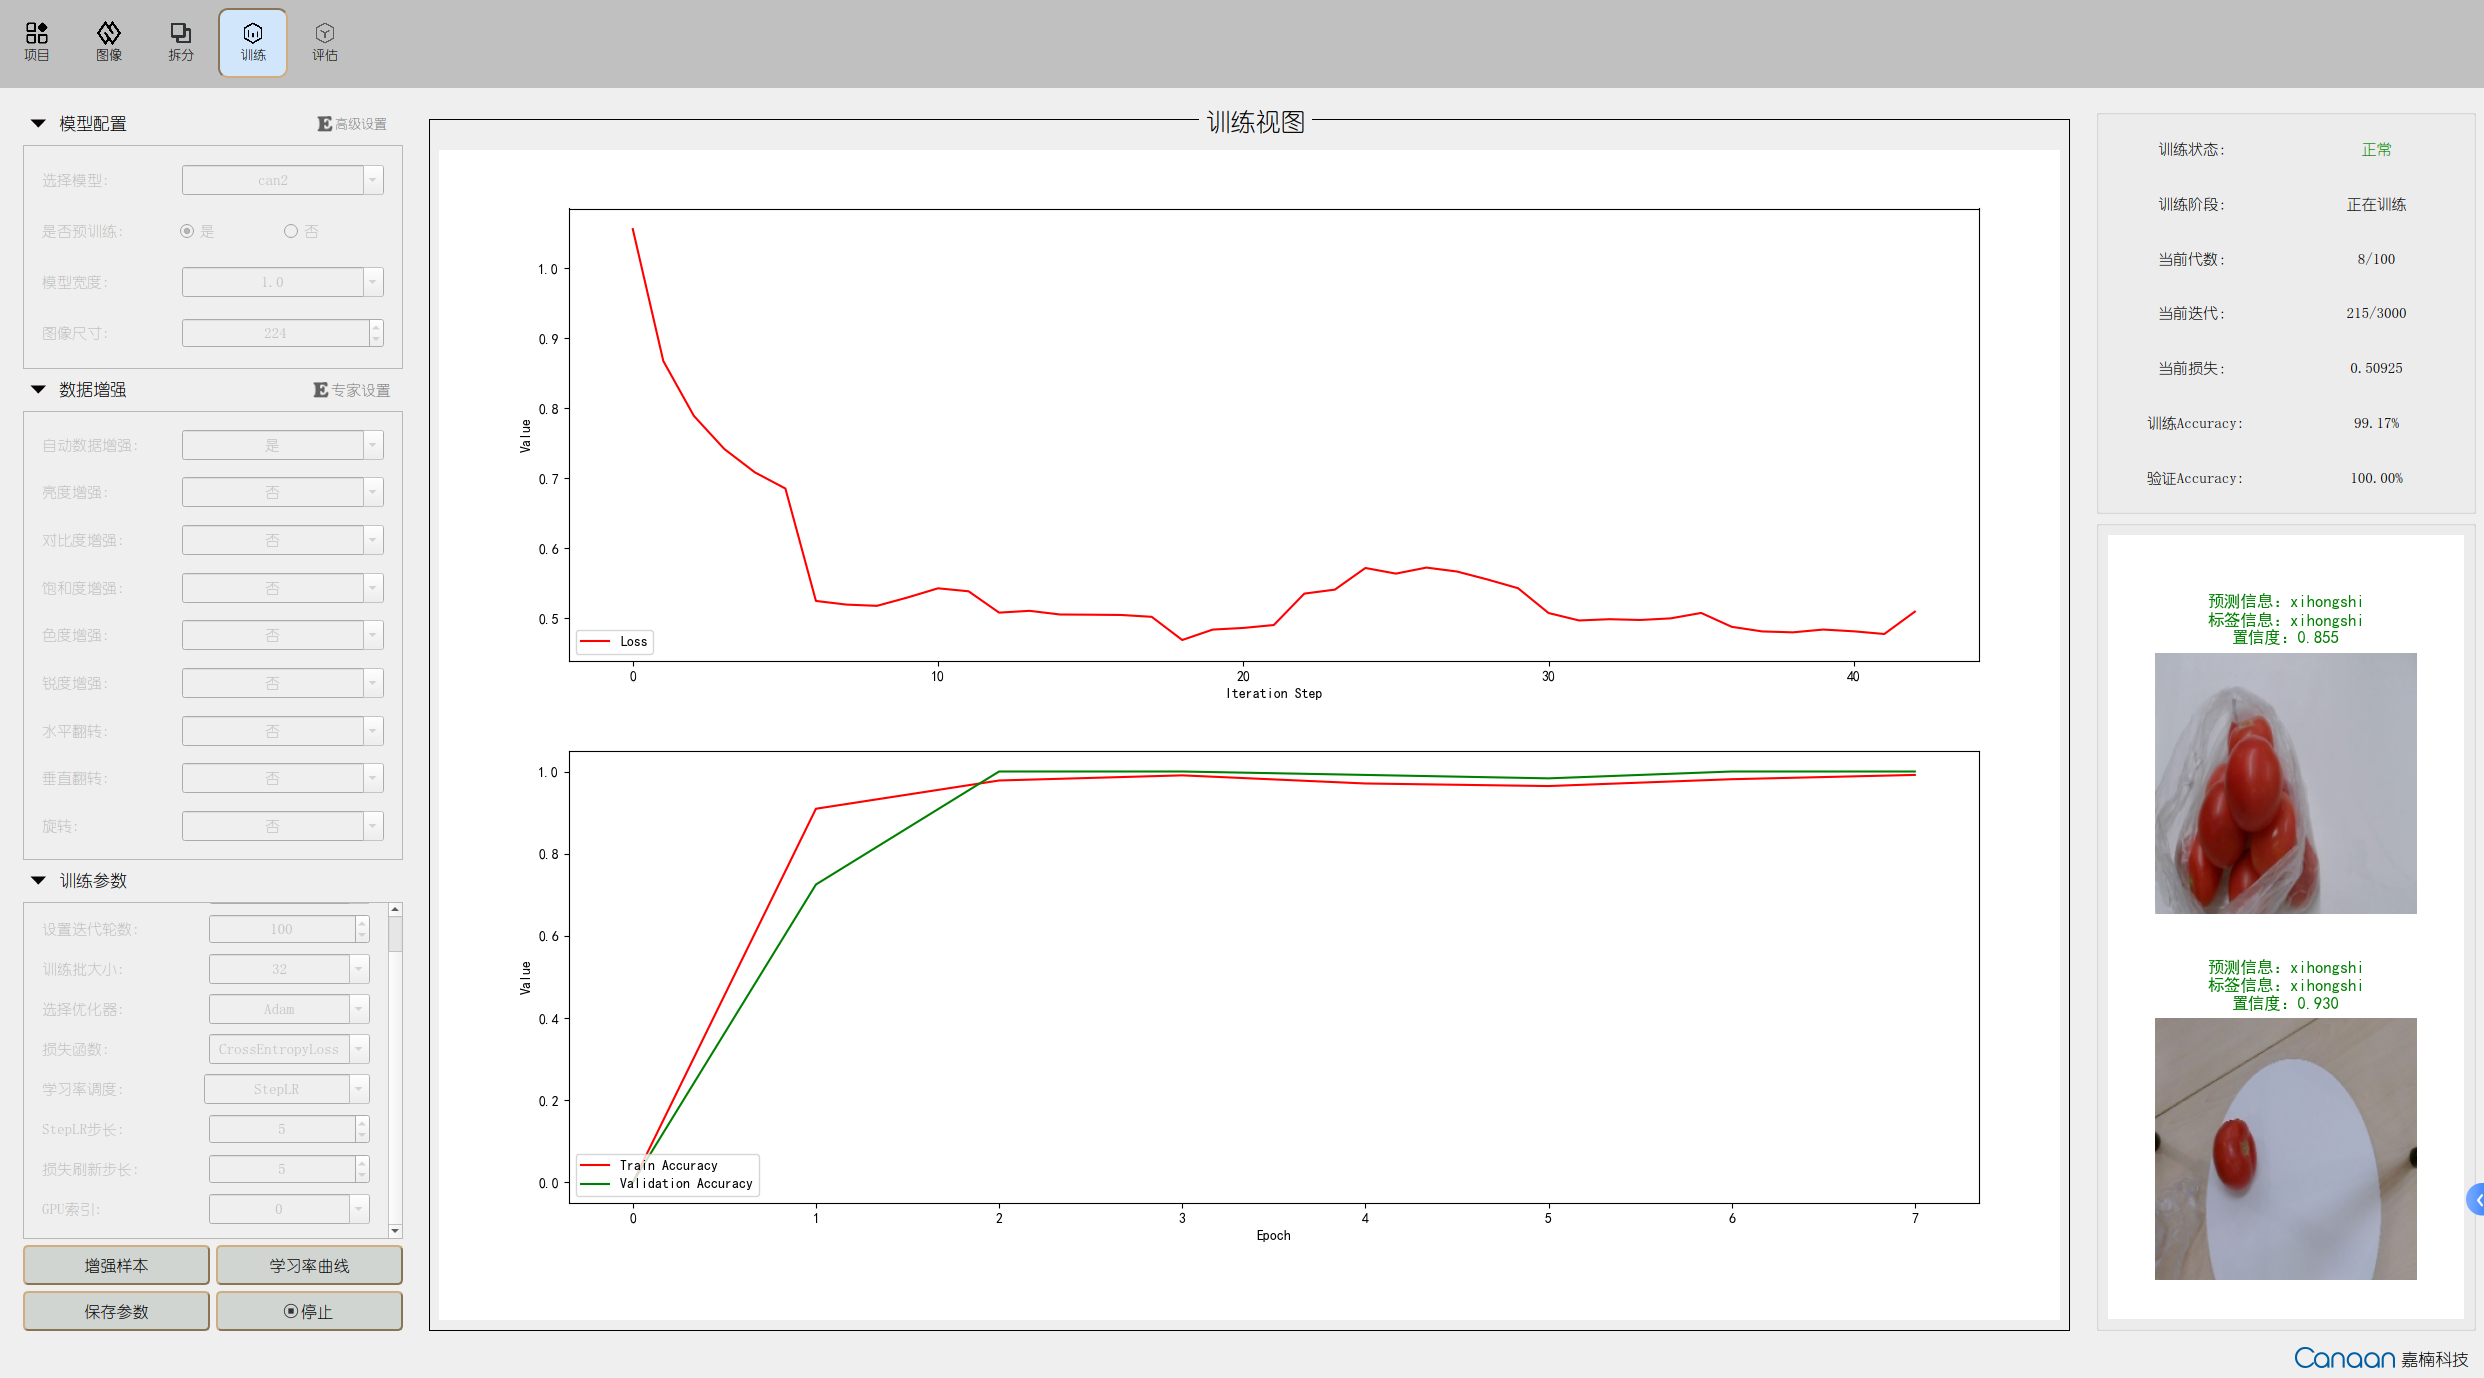
“Training” page illustration:
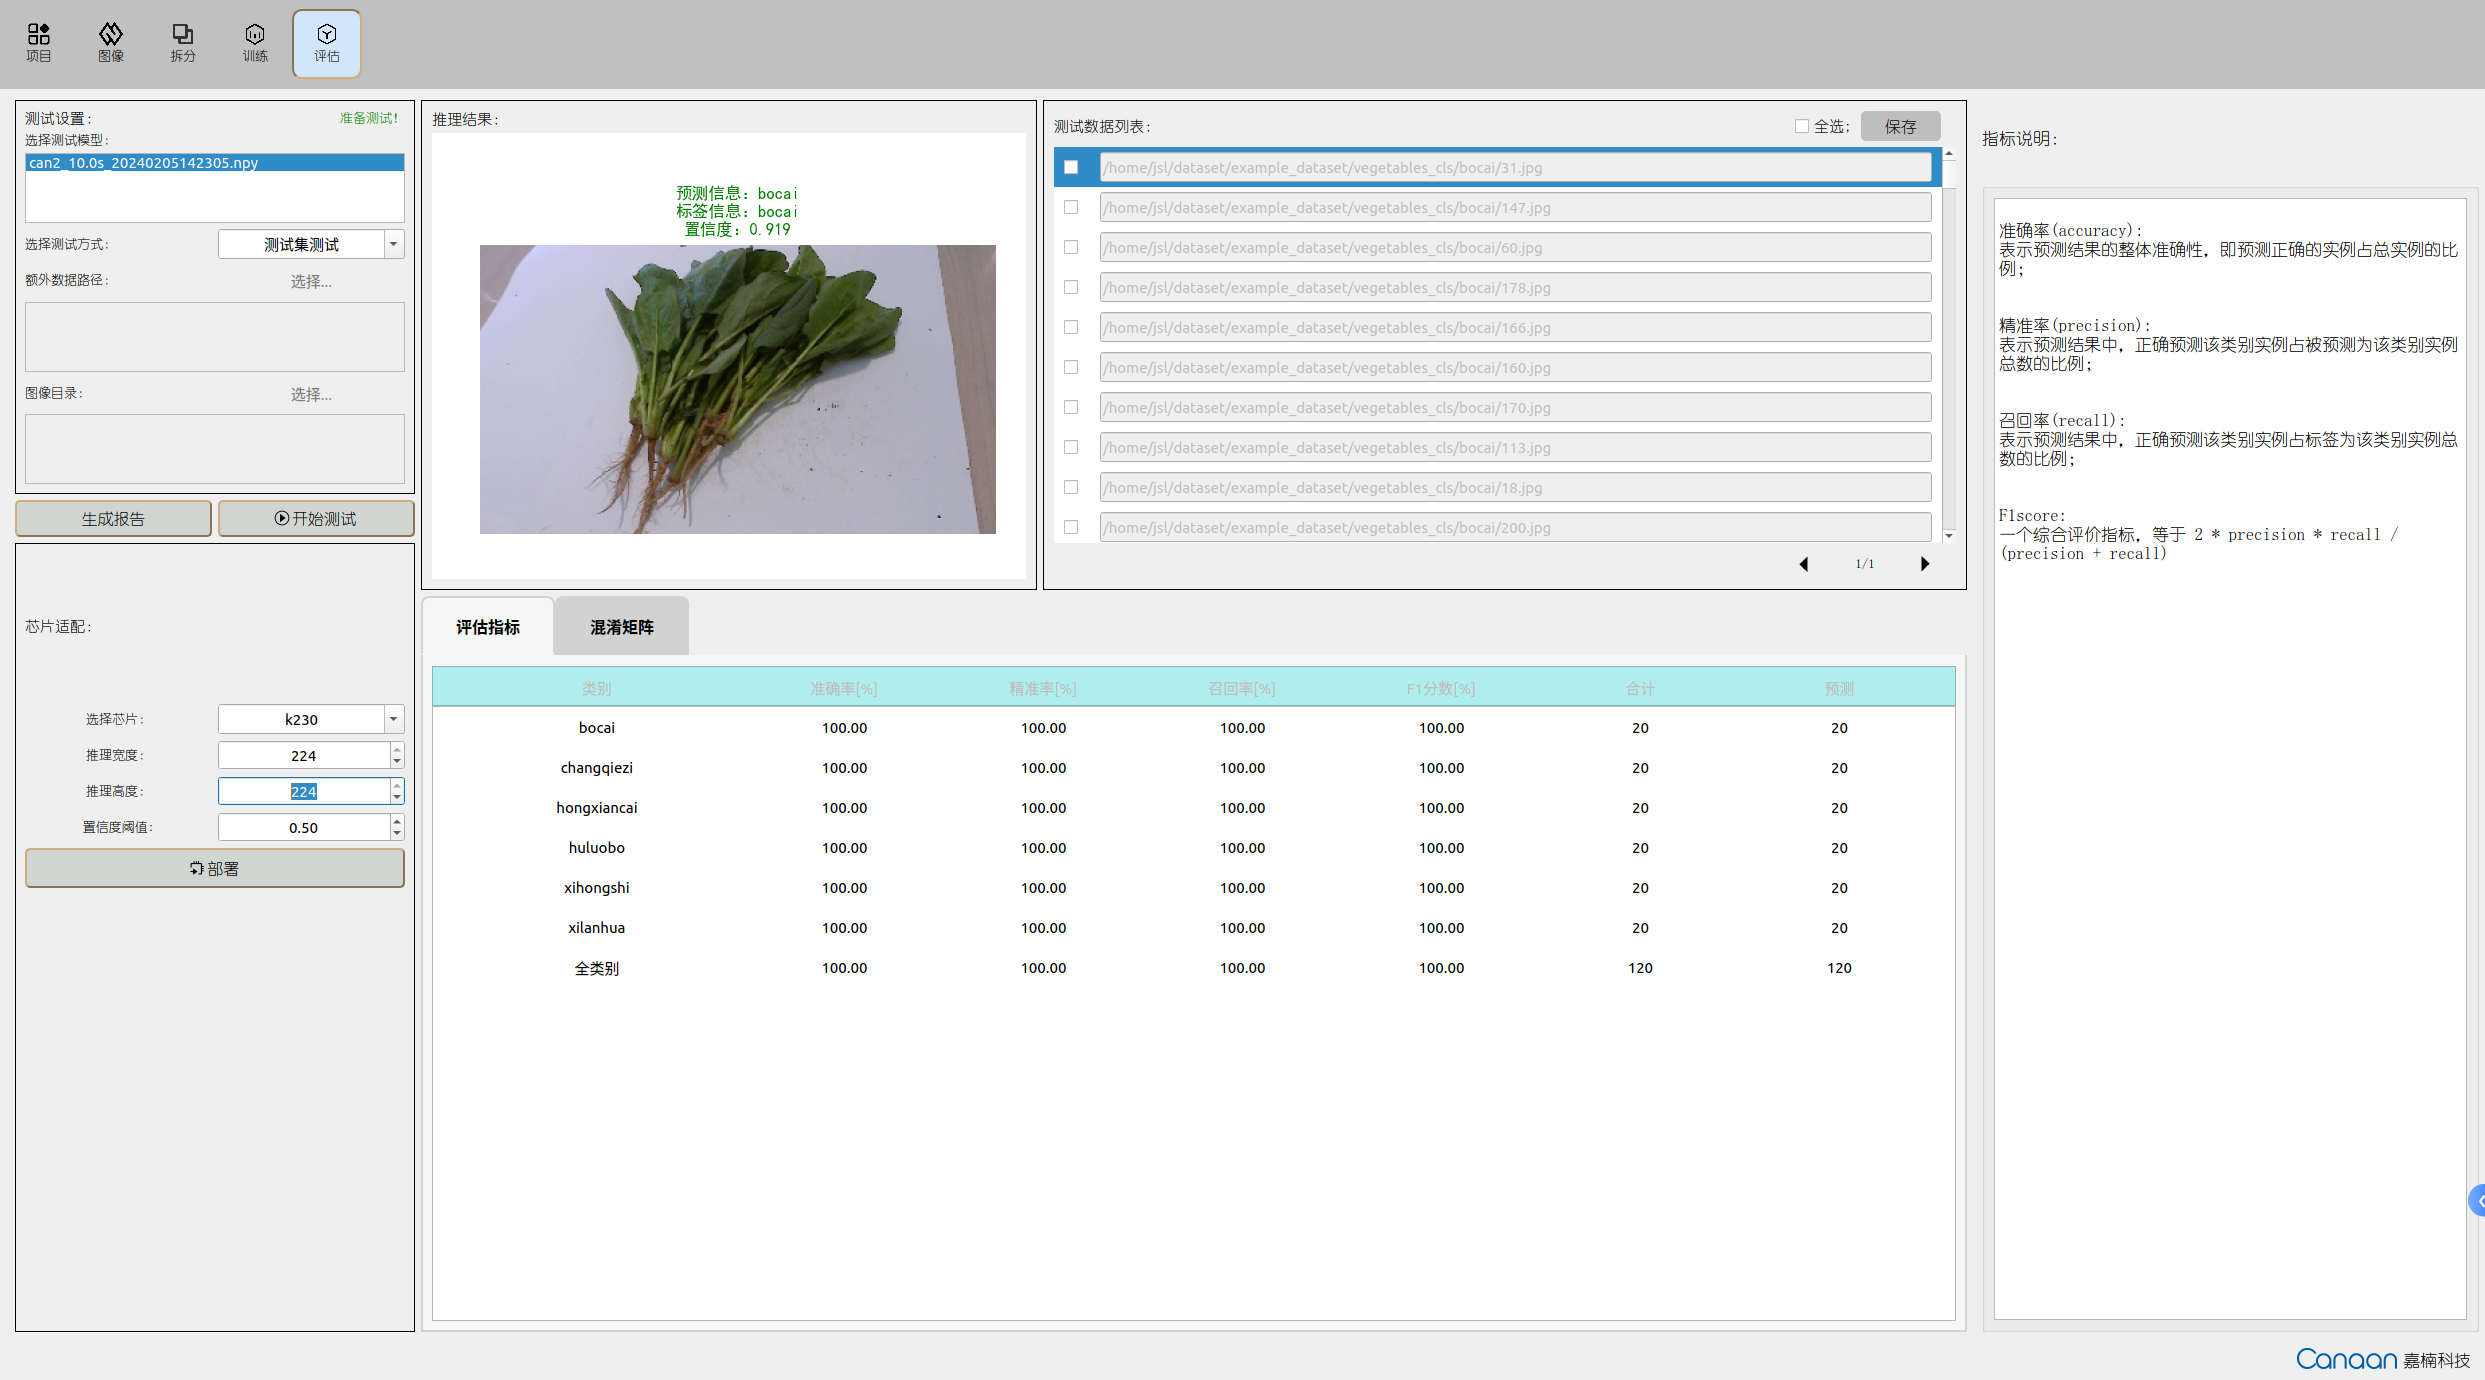
“Evaluation” page illustration:
9.1.3 Creating a Dataset#
Organize the dataset according to the format required for different tasks. View the dataset format by clicking on “New Project” on the “Projects” page. We also provide example datasets for different tasks in the AI Cube/example_dataset/ directory. For instance, vegetable_cls is an example dataset for image classification tasks.
The relationship between example datasets and tasks is as follows:
Dataset Name |
Task |
Description |
|---|---|---|
vegetable_cls |
Image Classification |
Vegetable classification scene |
insect |
Object Detection |
Insect detection scene |
Ocular_lesions |
Semantic Segmentation |
Eye lesion segmentation scene |
dataset_td100 |
OCR Detection |
OCR text detection scene |
ProductionDate |
OCR Recognition |
Production date recognition scene |
drink |
Metric Learning |
Beverage bottle classification scene |
multilabel2000 |
Multi-label Classification |
Natural scenery multi-label classification scene |
bottle |
Anomaly Detection |
Bottle mouth anomaly detection scene |
You can use our example datasets or organize your dataset according to the corresponding format. Below is the structure of the vegetable classification dataset:
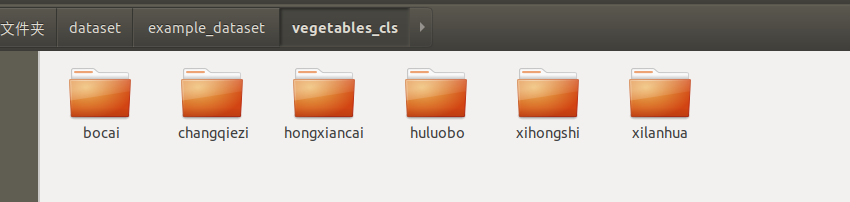
Each category has a subdirectory containing all images of that category.
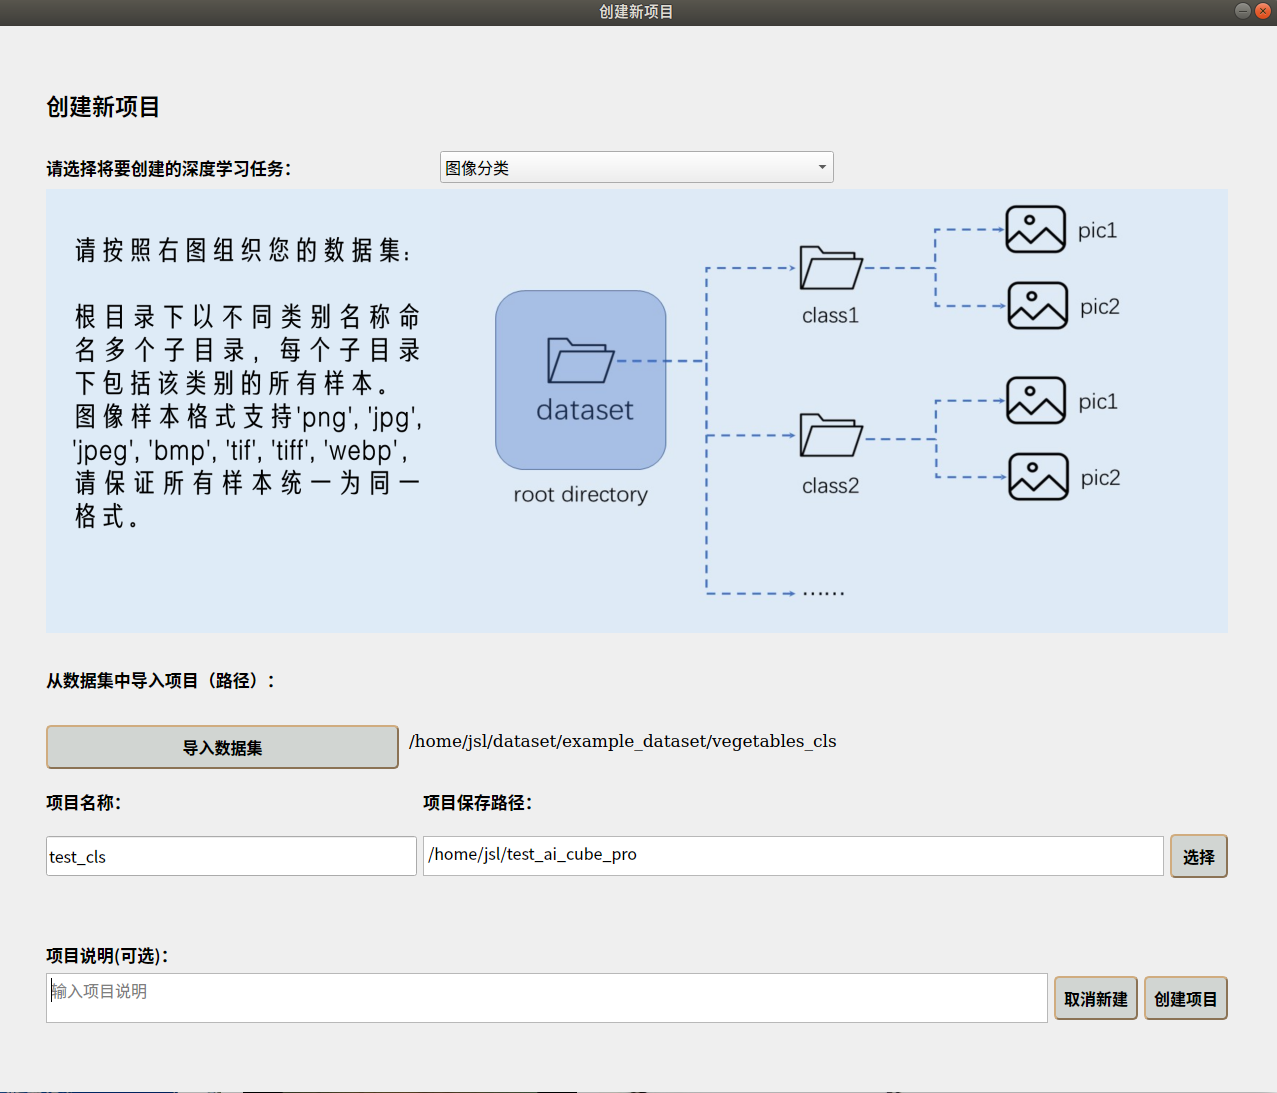
9.1.4 Creating a Project#
Go to the “Projects” page —> Click “New Project” button —> Select task type —> Import dataset —> Choose project storage path —> Add project name —> Create project.
The new project interface is shown below:
After creating the project, it will automatically switch to the “Images” page, where you can view your dataset details. On the “Split” page, you can split the dataset according to custom proportions and view the split statistics.
9.1.5 Starting Training#
Go to the “Training” page and configure the model, data augmentation, and training parameters on the left side.
Common parameter explanations:
Platform Parameter Name |
Common Parameter Definition |
Parameter Explanation |
|---|---|---|
Model |
model |
Different network structures for different tasks |
Backbone |
model backbone |
Feature extraction part of the model, used in detection and segmentation tasks |
Pre-trained |
pretrain |
Load pre-trained models provided by AI Cube |
Pre-trained Model Language |
pretrain language |
Specific parameter for OCR recognition tasks, choose the sample language of the pre-trained model |
Model Size |
model size |
n, s, m, l, x, variants of the same model, differing in model size and input resolution, used to balance accuracy and speed |
Model Width |
model width |
Larger width means more parameters |
Image Size |
image size |
Model input resolution, single value indicates input as [x,x], double value indicates input as [x,y] |
ASPP Dilation Rate |
ASPP dilation rate |
Parameter for semantic segmentation, different scales of atrous convolution and pooling operations, using different dilation rates for atrous convolution can expand the receptive field and obtain broader contextual information |
Embedding Length |
embedding length |
Specific parameter for metric learning tasks, the length of the vectorized sample |
Automatic Data Augmentation |
TrivialAugment |
Parameter-free single-image single-time automatic data augmentation |
Other Data Augmentation Methods |
— |
Brightness, contrast, saturation, hue, sharpness enhancement, flipping, rotation, random scaling, random cropping, perspective transformation, Gaussian blur, histogram equalization, gray world algorithm, CutOut, Random Erasing, Mask |
Learning Rate |
learning rate |
Parameter for the optimization algorithm, the adjustment step size for each iteration |
Epoch |
epoch |
An epoch is the process of training the neural network with all training samples once |
Training Batch Size |
batchsize |
Number of samples used for each forward and backward propagation |
Optimizer |
optimizer |
Optimization function used during network optimization, such as SGD, Adam, etc. |
AutoAnchor |
autoanchor |
Adaptive anchor boxes in object detection tasks |
NMS Option |
nms option |
Non-maximum suppression options to distinguish within-class and between-class in object detection tasks |
Confidence Threshold |
confidence threshold |
Used to filter predicted boxes by class, predictions below this threshold will be deleted |
IOU Threshold |
IOU threshold |
Non-maximum suppression for overlapping boxes, calculates scores for all detection boxes, compares with the highest score detection box, and deletes boxes above this threshold; similar to Box threshold in OCR detection |
Automatic Mixed Precision |
AMP |
Uses different data precisions for different layers to save memory and improve computation speed |
Exponential Moving Average |
EMA |
Smoothing method to prevent the influence of outliers, weights decay exponentially over time |
Early Stopping |
Early Stopping |
Method to increase model generalization and prevent overfitting |
Warm-up Strategy |
WarmUp |
Adjusts learning rate during the initial training phase to help the model converge faster |
Multi-scale Training |
MST |
Trains with input images of different scales to improve detection model generalization for objects of different sizes |
Loss Function |
loss function |
Evaluates the difference between model predictions and true values, the smaller the loss, the better the model performance |
Learning Rate Scheduler |
learning rate scheduler |
Strategy to adjust learning rate dynamically during training, includes StepLR, CosineAnnealingLR, LinearLR, MultiStepLR, etc. |
Loss Refresh Step |
loss refresh step |
Frequency of Loss curve drawing in the interface, measured in batch units |
GPU Index |
gpu index |
GPU index number |
After configuring the parameters for different tasks, click the “Augment Samples” button to view some example samples after data augmentation; click the “Learning Rate Curve” to view the changes in learning rate caused by different learning rate strategies; click the “Start Training” button, and training information will be displayed on the upper right panel, with loss curves and metric curves drawn in the middle; example samples’ prediction results will be iteratively displayed on the lower right panel for each epoch. The training interface is shown below:
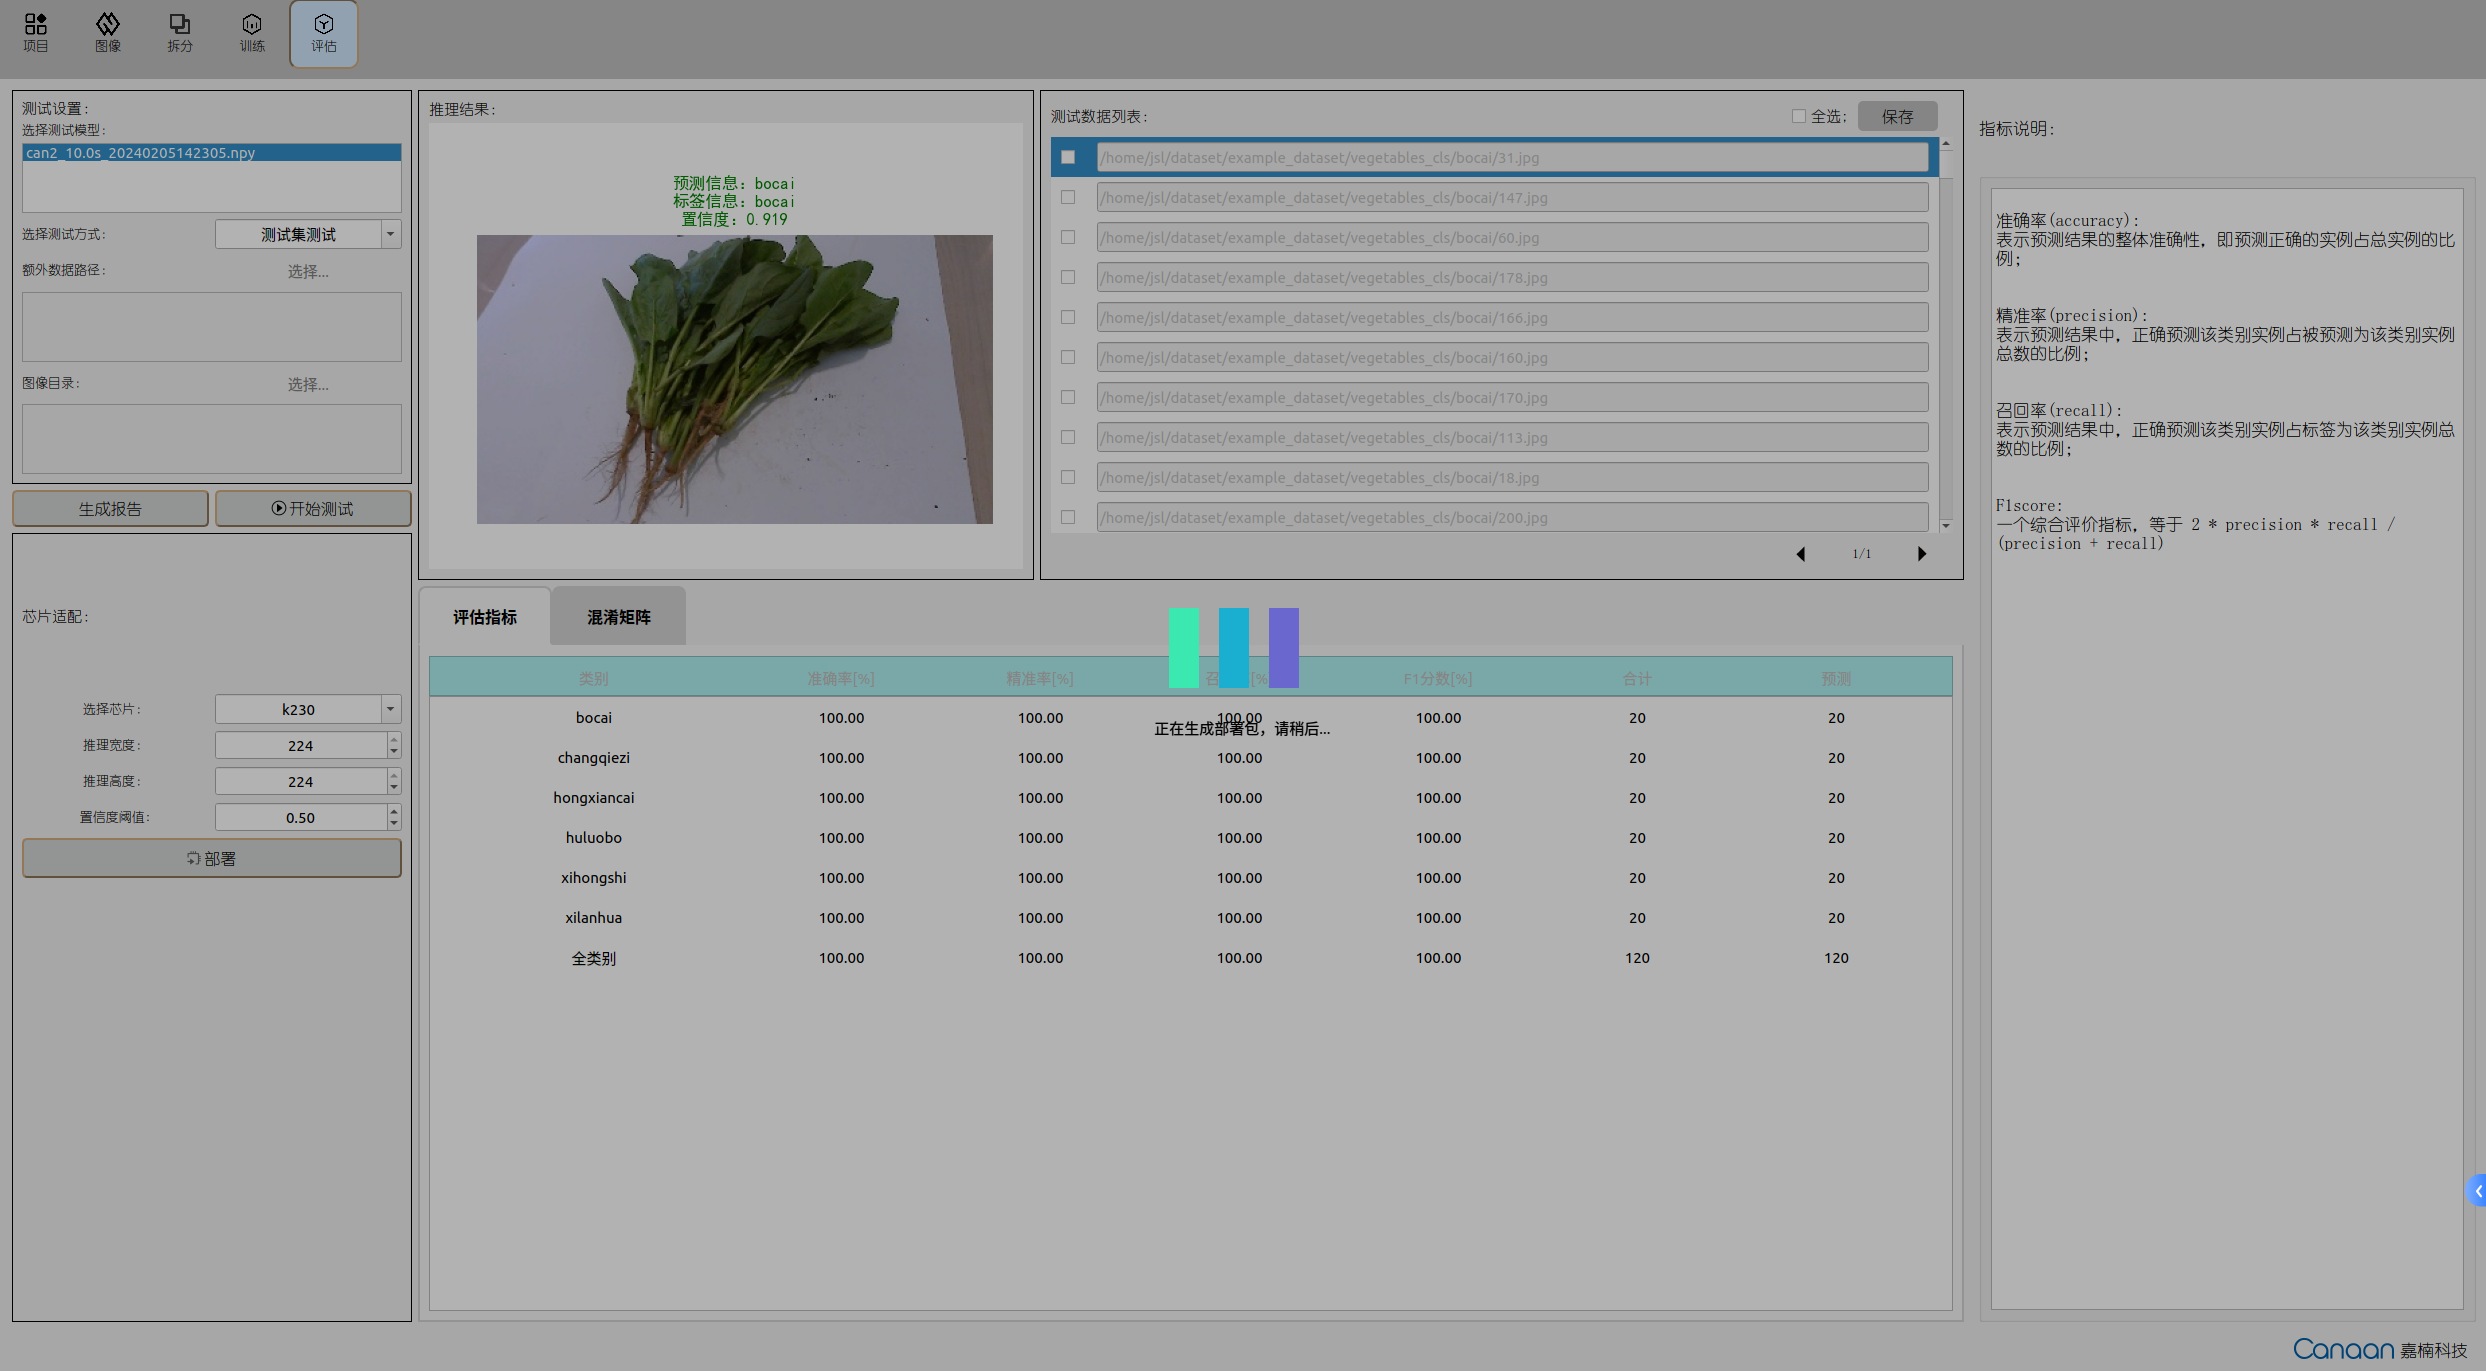
9.1.6 Model Testing#
Go to the “Evaluation” page, select the trained model, and choose the testing method. The testing methods are as follows:
Testing Method |
Description |
|---|---|
Test on Test Set |
Tests and evaluates the test set obtained from splitting, outputs test metric data |
Test on Additional Data |
Tests using annotated data in the same format as the training dataset, outputs test metric data |
Test on Image Directory |
Uses the trained model and parameters to infer all unannotated samples in the image directory, without test metrics |
Click the “Start Testing” button to start testing. After testing, view the model performance based on evaluation metrics; double-click the test data list entries to view the inference results in a larger image.
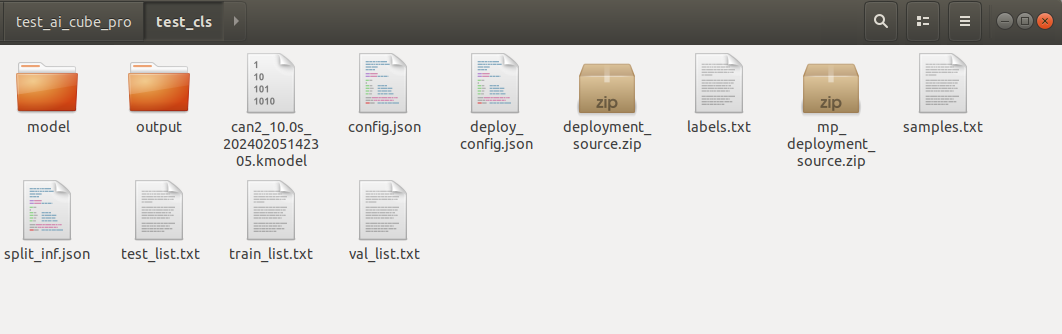
9.1.7 Model Deployment#
If the model performance meets your requirements, you can configure deployment parameters in the chip adaptation panel, mainly the model input resolution and some basic parameters, and click the “Deploy” button to generate the deployment package.
After generating the deployment package, you can find the following files in the root directory of the current project:
deployment_source.zip
mp_deployment_source.zip
*.kmodel
deploy_config.json
9.1.8 Preparing for Board Deployment#
After completing above steps, the AI Cube part is finished. Now, deploy the obtained kmodel on the CanMV-K230 development board. The CanMV-K230 development board is shown below:
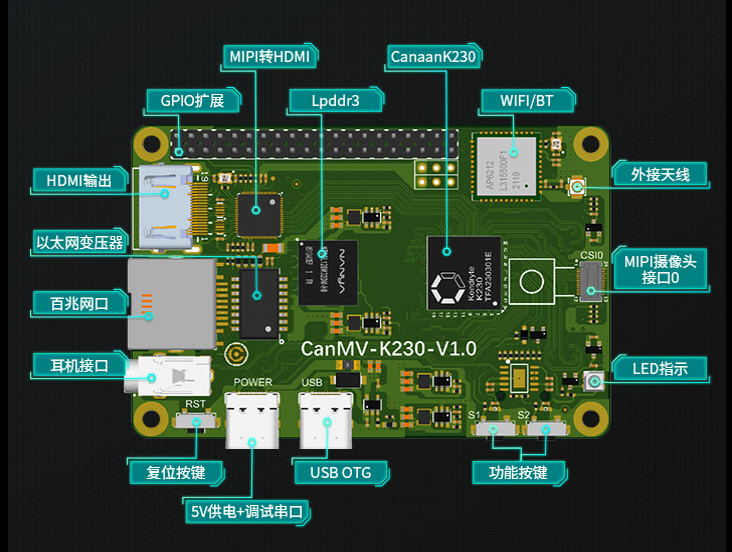
Before deploying on the board, you need to prepare the following items:
One CanMV-K230 development board;
One USB-TypeC data cable;
One SD card;
One card reader;
One HDMI monitor, supporting 1080P;
One Ethernet cable (optional, files can also be copied directly using the SD card);
Before running on the board, you need to install the following software:
MobaXterm: serial port debugging tool, download and install at https://mobaxterm.mobatek.net/download.html.
Rufus: image burning tool, download and install at rufus tool download address.
9.1.8.1 Image Burning#
First, go to the Canaan Developer Community (canaan-creative.com) download page, select K230->Images, and choose K230_canmv_sdcard_v##_nncase_v###.img.gz. Select the corresponding version based on the “nncase_version” field in the deploy_config.json obtained in section 9.1.7.
Note:
For the version compatibility between k230_sdk and nncase, please refer to:
CanMV-K230_SDK_nncase Version Compatibility — K230 CanMV Documentation (canaan-creative.com)
The deployment package supports Linux+RT-Smart dual systems and pure RT-Smart single systems. You need to compile the single system image yourself. For the compilation steps, refer to Compile K230_SDK;
The kmodel files in the deployment package partially support inference on the K230D chip, but the running scripts need to be written and compiled into elf files by yourself;
Linux:
Before inserting the SD card into the host machine, enter:
ls -l /dev/sd\*
to check the current storage devices.
After inserting the TF card into the host machine, enter again:
ls -l /dev/sd\*
to identify the new storage device, which will be the TF card device node.
Assuming /dev/sdc is the TF card device node, execute the following command to burn the TF card:
sudo dd if=sysimage-sdcard.img of=/dev/sdc bs=1M oflag=sync
Windows:
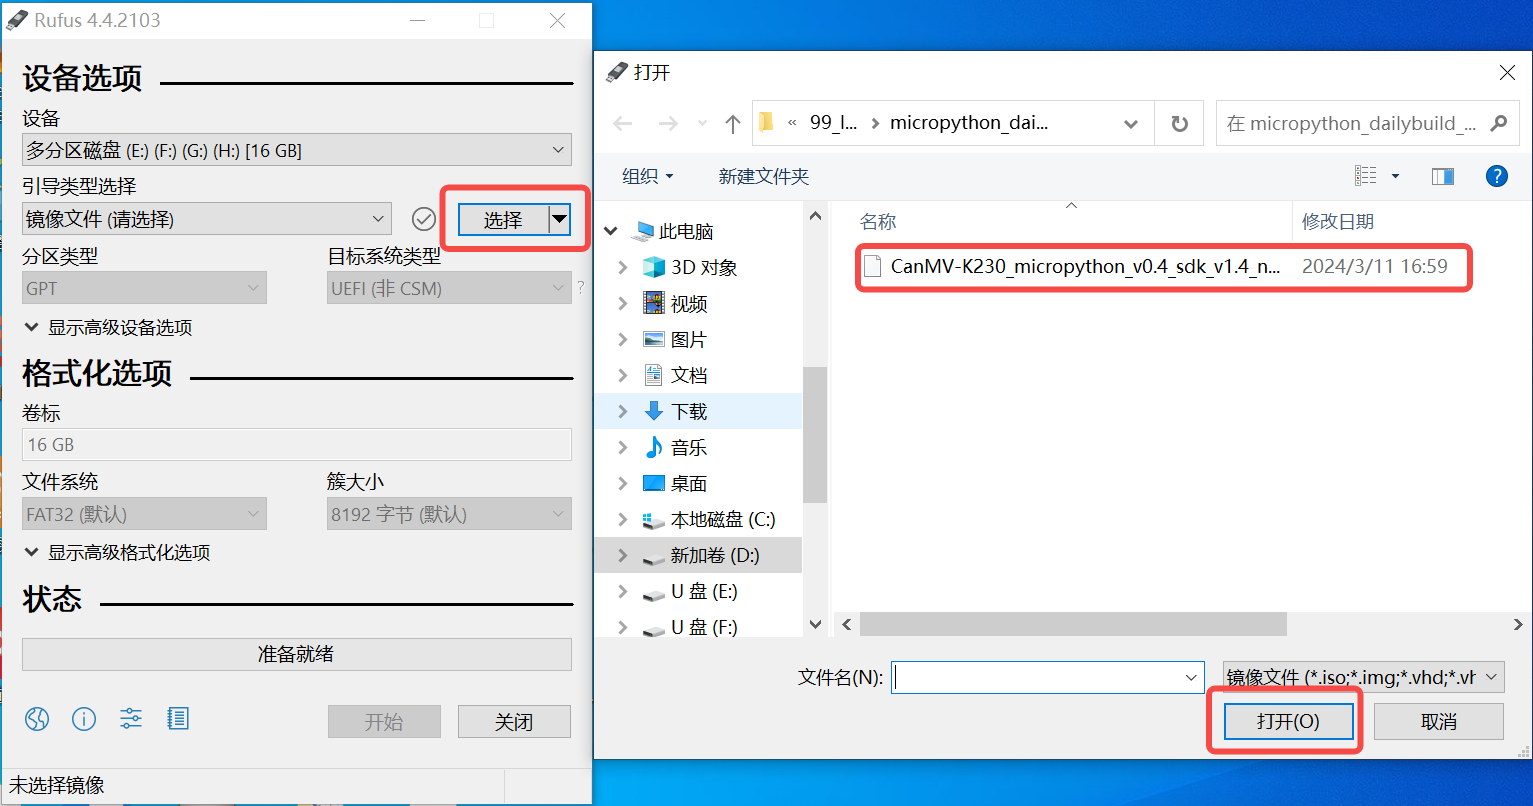
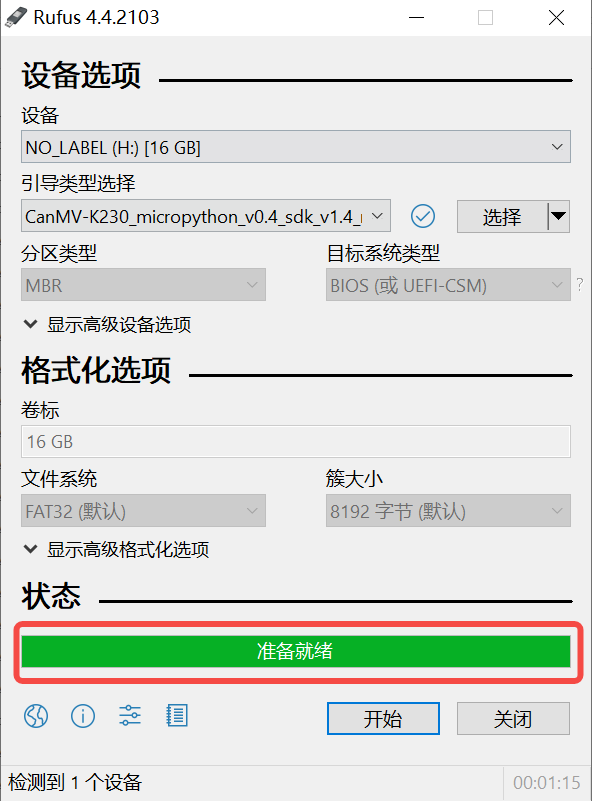
For Windows, you can use the Rufus tool to burn the TF card. Download Rufus.
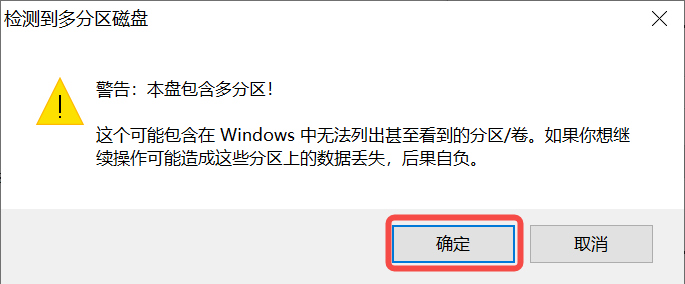
Insert the SD card into the PC, then launch Rufus. Click the “Select” button in the tool interface and choose the firmware to be burned.
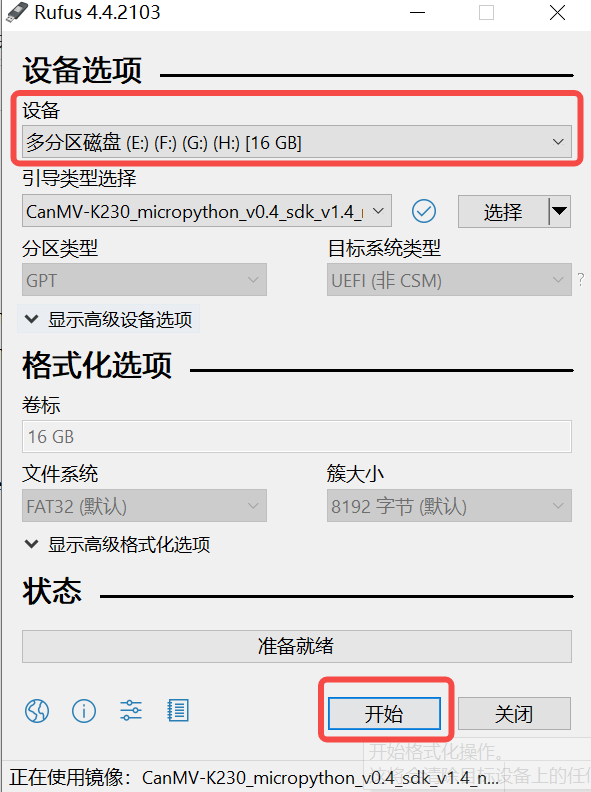
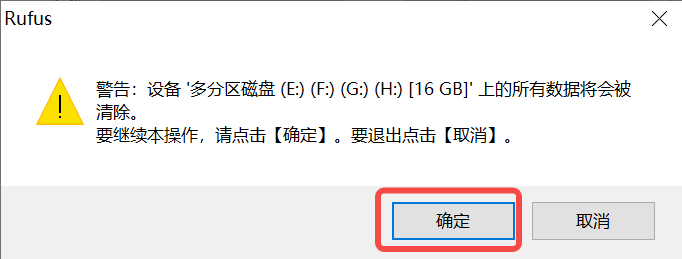
Click the “Start” button to begin burning. A progress bar will display the burning process, and it will indicate “Ready” upon completion.
After burning, insert the SD card into the development board and power it on:
Connect the monitor to the HDMI port. If network usage is required, connect the Ethernet port.
9.1.8.2 Network Configuration#
Note:If you choose to use a card reader to copy files offline, you can skip this step. The following network configuration method is only applicable to Linux+RT-Smart dual systems.
Skip this step if you choose to copy files offline using a card reader.
Serial Tool Debugging
Install a serial debugging tool: MobaXterm. Download and install from https://mobaxterm.mobatek.net/download.html.
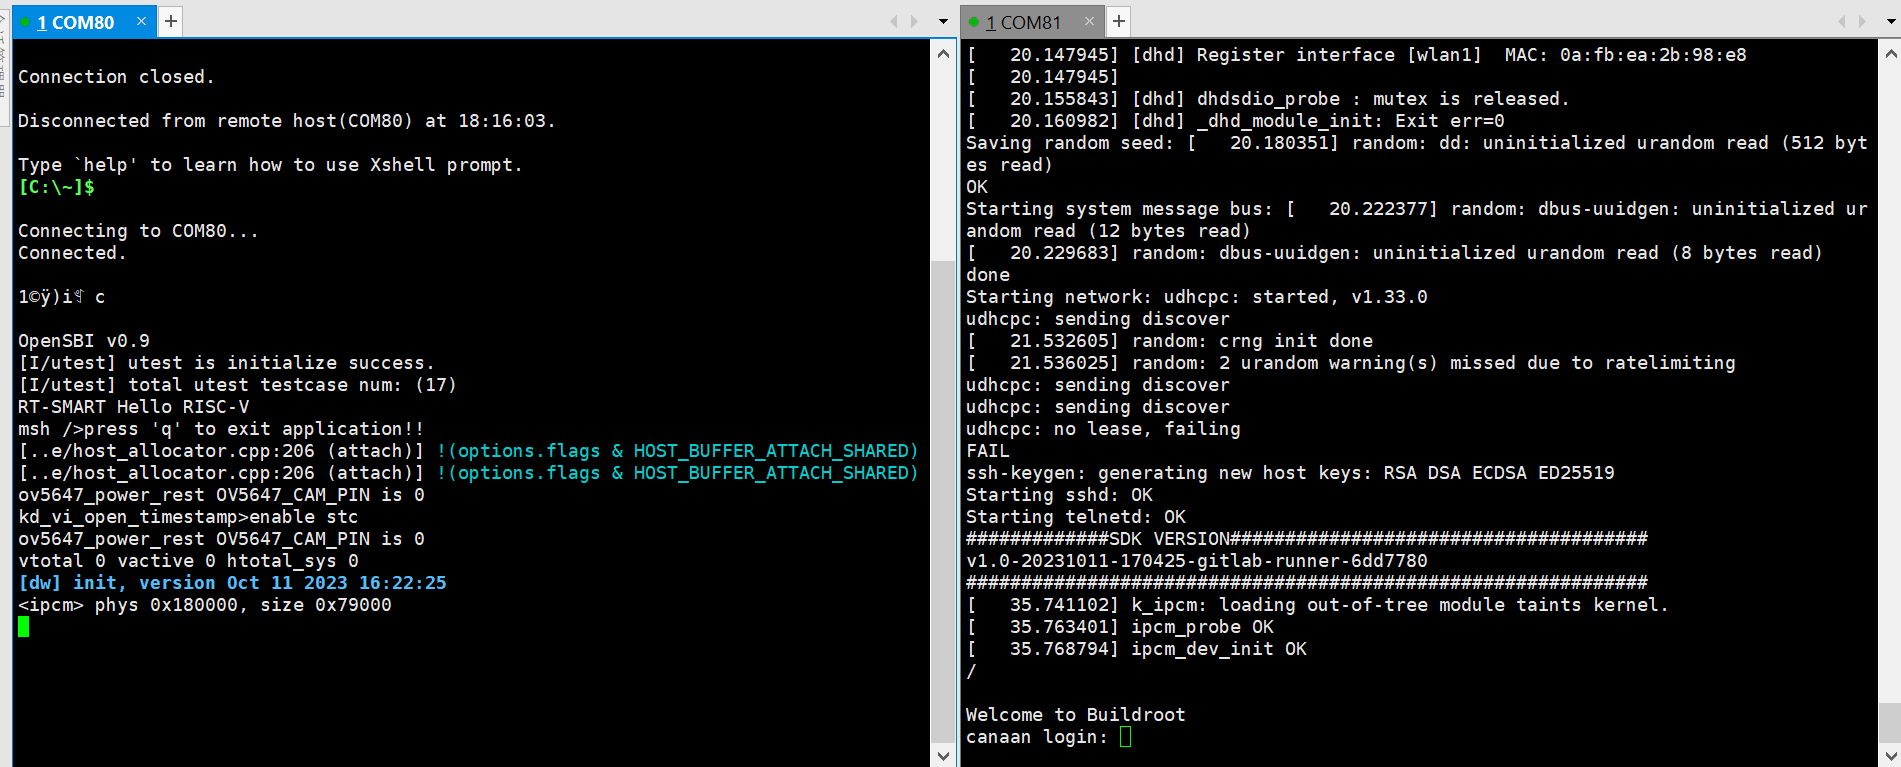
After launching MobaXterm, select Session –> Serial:
Choose two consecutive serial ports for the Serial Port, and set the Speed (bps) to 115200.
Log in to the small core serial port using “root”. For the large core serial port, press “q” and Enter to exit the auto-start face recognition program.
Network Configuration on Windows PC
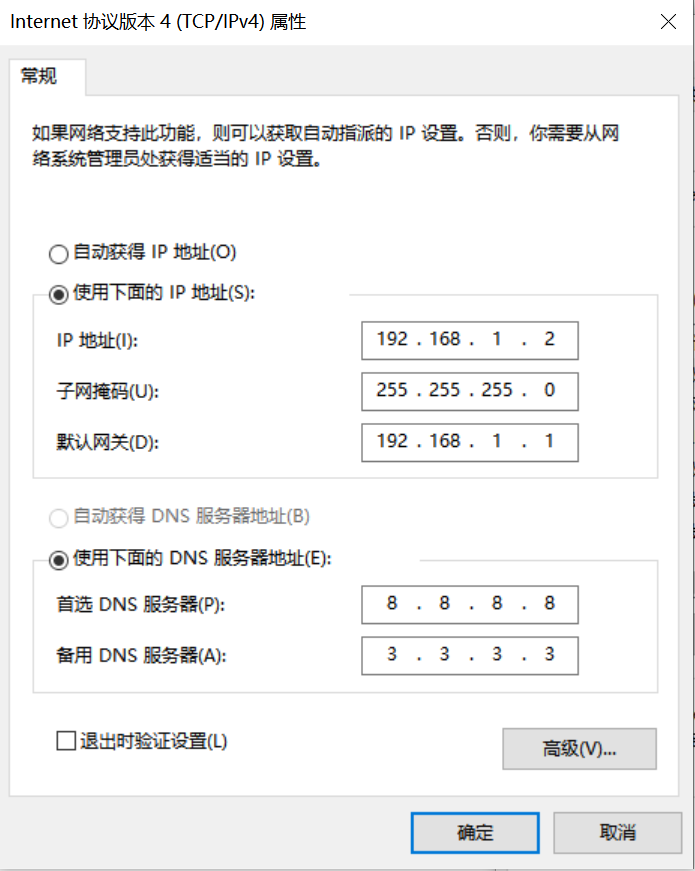
Go to Control Panel -> Network and Sharing Center -> Change adapter settings -> Ethernet -> Right-click Properties -> Select (TCP/IPv4) -> Properties
Configure the IP address, subnet mask, gateway, and DNS server address:
Network Configuration on Development Board
Enter the small core command line and execute:
# Check for eth0
ifconfig
# Configure the development board IP to be on the same subnet as the PC
ifconfig eth0 192.168.1.22
# Check IP configuration
ifconfig
Note: Network configuration commands need to be re-executed after each power cycle.
9.1.8.3 File Copying#
For Linux+RT-Smart dual system image:
sharefs Directory Explanation
# Go to the root directory of the small core
cd /
# List directories
ls
# The sharefs directory is shared between the small and large cores, so files copied to the sharefs directory from the small core are also visible to the large core
Offline Card Reader Copying
Power off and remove the SD card. Use a card reader to copy files from the PC to the shared sharefs directory on the SD card. The default root directory of the SD card corresponds to the sharefs directory, so copy files here.
Local Network TFTP Copying
Install the TFTP communication tool. Download from: https://bitbucket.org/phjounin/tftpd64/downloads/.
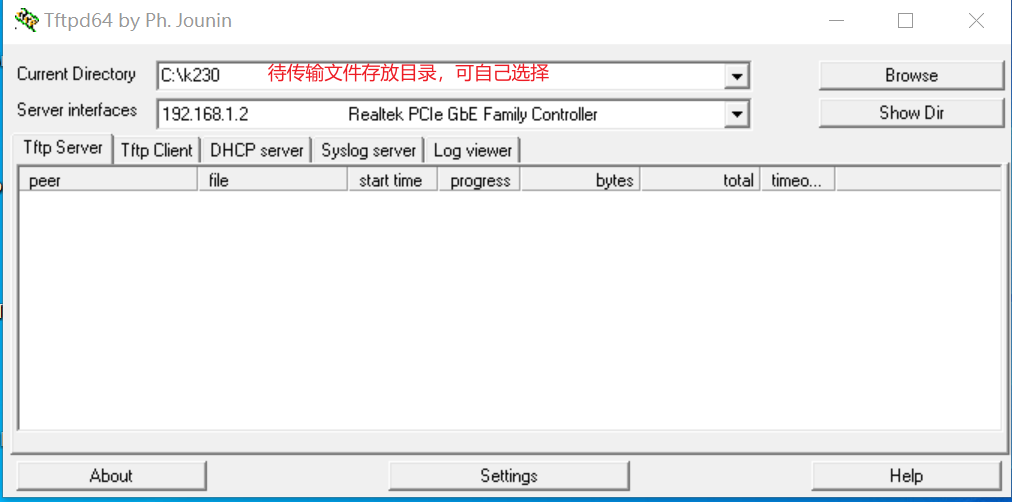
Launch tftpd64 and configure the directory for storing files to be transferred and the service network card.
# The following commands are executed on the small core serial port
# Transfer files from the PC's tftpd64 configuration directory to the current directory on the development board
tftp -g -r your_file 192.168.1.2
# Transfer files from the current directory on the development board to the PC's tftpd64 configuration directory
tftp -p -r board_file 192.168.1.2
scp Copying
On Linux systems, connect the PC to the network normally. The development board can connect to other network ports under the same gateway as the PC via an Ethernet cable. Use the scp command for file transfer.
Power on the development board and enter the dual-core COM interface. Execute the scp transfer command on the small core:
# Copy files from the PC to the development board
scp username@domain_or_IP:path_to_file target_directory_on_board
# Copy folders
scp -r username@domain_or_IP:path_to_folder target_directory_on_board
# Copy files from the development board to the PC
scp path_to_file_on_board username@domain_or_IP:target_directory_on_PC
# Copy folders
scp -r path_to_folder_on_board username@domain_or_IP:target_directory_on_PC
Files to be Copied
File |
Description |
|---|---|
AICube project directory/*.kmodel |
kmodel generated by the project |
AICube project directory/deploy_config.json |
Deployment configuration file |
AI Cube installation directory/on_board/elfs/canmv/main_canmv.elf |
Precompiled executable file |
test.jpg |
Static image for testing |
Other files extracted from deployment_source.zip |
For example, OCR tasks require font libraries Asci0816.zf, HZKf2424.hz, and corresponding dictionary files. |
For the above image classification task, create a subfolder named test_cls in the sharefs directory and copy the following files:
kmodel file, main_canmv.elf, a test sample image test.jpg, and deploy_config.json file to the test_cls directory.
For pure RT-Smart single system image:
Only the offline copy method can be used. The root directory of the PC disk corresponds to the sdcard folder in the root directory of the big core. Please search for the copied file in the /sdcard directory through the big core serial port.
Files to be Copied
File |
Description |
|---|---|
AICube project directory/*.kmodel |
kmodel generated by the project |
AICube project directory/deploy_config.json |
Deployment configuration file |
AI Cube installation directory/on_board/elfs/canmv/main_canmv.elf |
Precompiled executable file |
test.jpg |
Static image for testing |
Other files extracted from deployment_source.zip |
For example, OCR tasks require font libraries Asci0816.zf, HZKf2424.hz, and corresponding dictionary files. |
9.1.9 Running on the Board#
Static Image Inference
Connect to the large core serial port and execute the following commands:
# Linux+RT-Smart
cd /sharefs/test_cls
# Only RT-Smart
cd /sdcard/test_cls
# .elf <deploy_config.json> <input_path> <debug_mode>
# deploy_config.json: Deployment configuration file;
# input_path: Path to the inference image, set to None for video stream inference;
# debug_mode: Debug mode, 0 for no debug, 1 for simple debug, 2 for detailed debug;
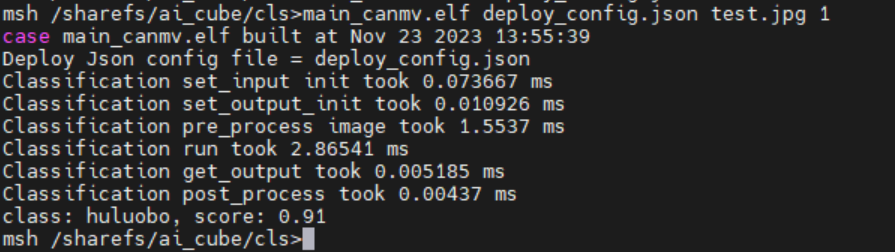
./main_canmv.elf deploy_config.json test.jpg 0
Static image inference result:
Video Stream Inference
Connect to the large core serial port and execute the following commands:
# Linux+RT-Smart
cd /sharefs/test_cls
# Only RT-Smart
cd /sdcard/test_cls
# .elf <deploy_config.json> <input_path> <debug_mode>
# deploy_config.json: Deployment configuration file;
# input_path: Path to the inference image, set to None for video stream inference;
# debug_mode: Debug mode, 0 for no debug, 1 for simple debug, 2 for detailed debug;
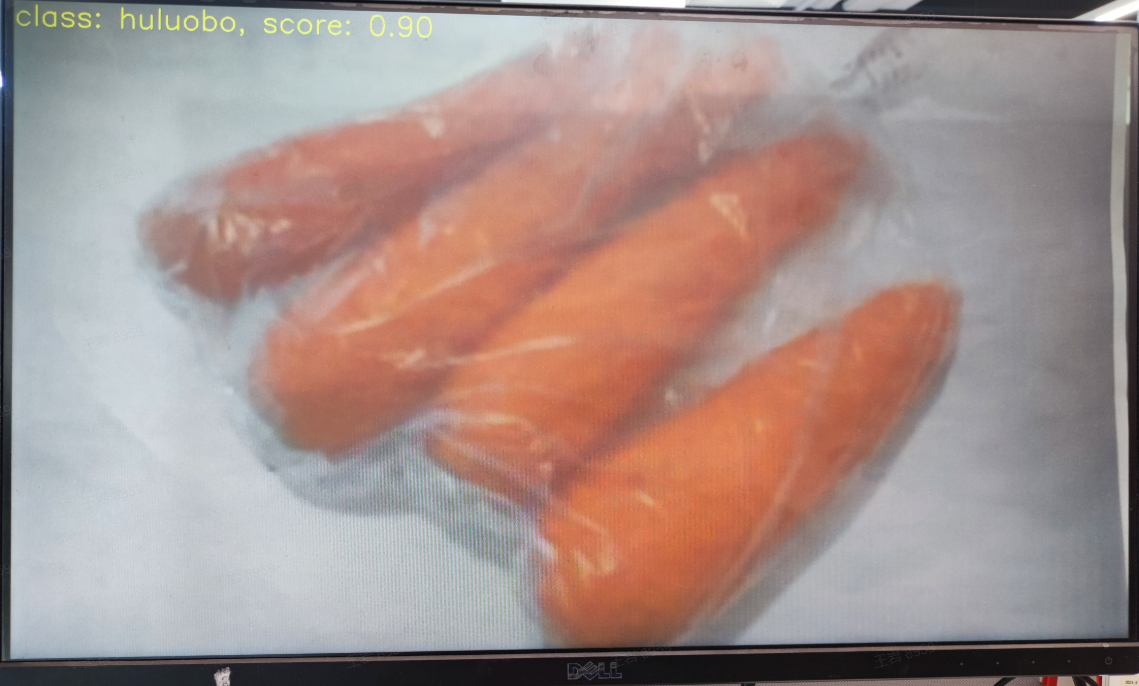
./main_canmv.elf deploy_config.json None 0
Video stream inference result:
9.1.10 Running MicroPython#
9.1.10.1 Image Burning#
Burn the MicroPython image. Go to the Canaan Developer Community (canaan-creative.com) download page, click on K230/Images, and download CanMV-K230_micropython_v##_sdk_v##__nncase_v###.img.gz. Select the version based on the “nncase_version” field in the deploy_config.json file. Use the method described in section 9.1.8.1 for burning.
Note:
For the version compatibility between k230_canmv, k230_sdk, and nncase, please refer to:
CanMV-K230_SDK_nncase Version Compatibility — K230 CanMV Documentation (canaan-creative.com)
9.1.10.2 File Copying#
Use a card reader for offline copying. Copy the kmodel file, deploy_config.json, and test image files to a directory on the SD card and note the directory.
9.1.10.3 Installing the IDE#
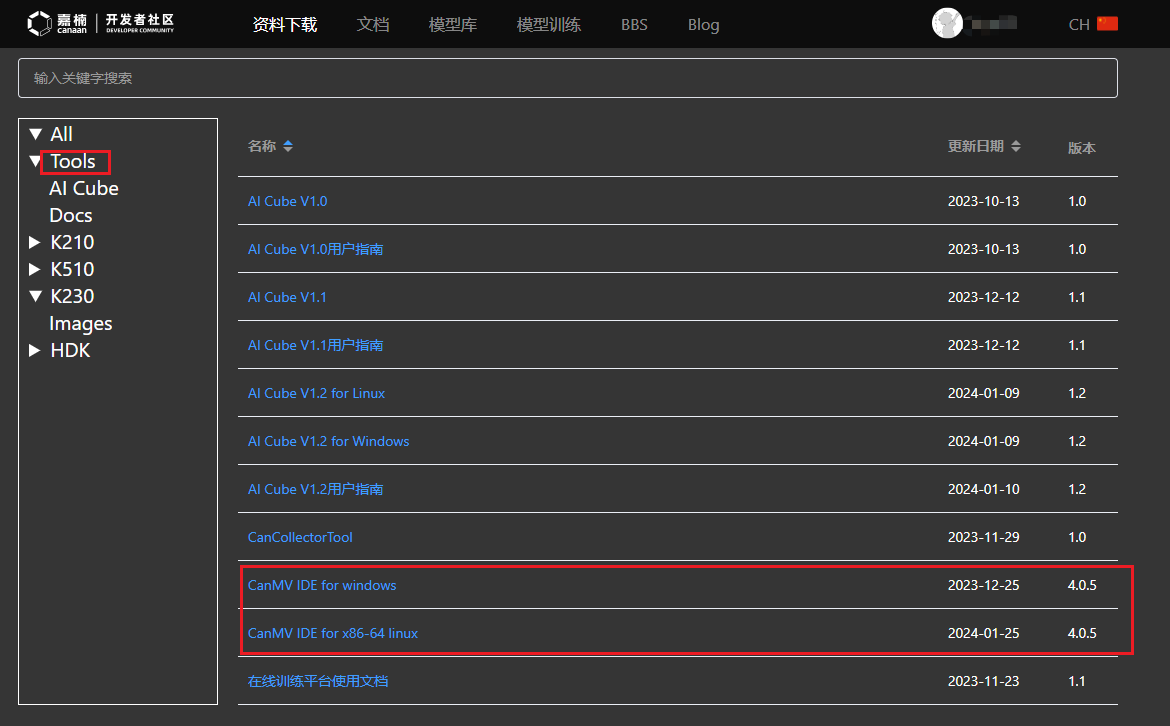
Install the CanMV IDE. Go to the Canaan Developer Community (canaan-creative.com) download page, click on Tools, and download the appropriate version of the CanMV IDE installation package based on your system.
9.1.10.4 Powering On#
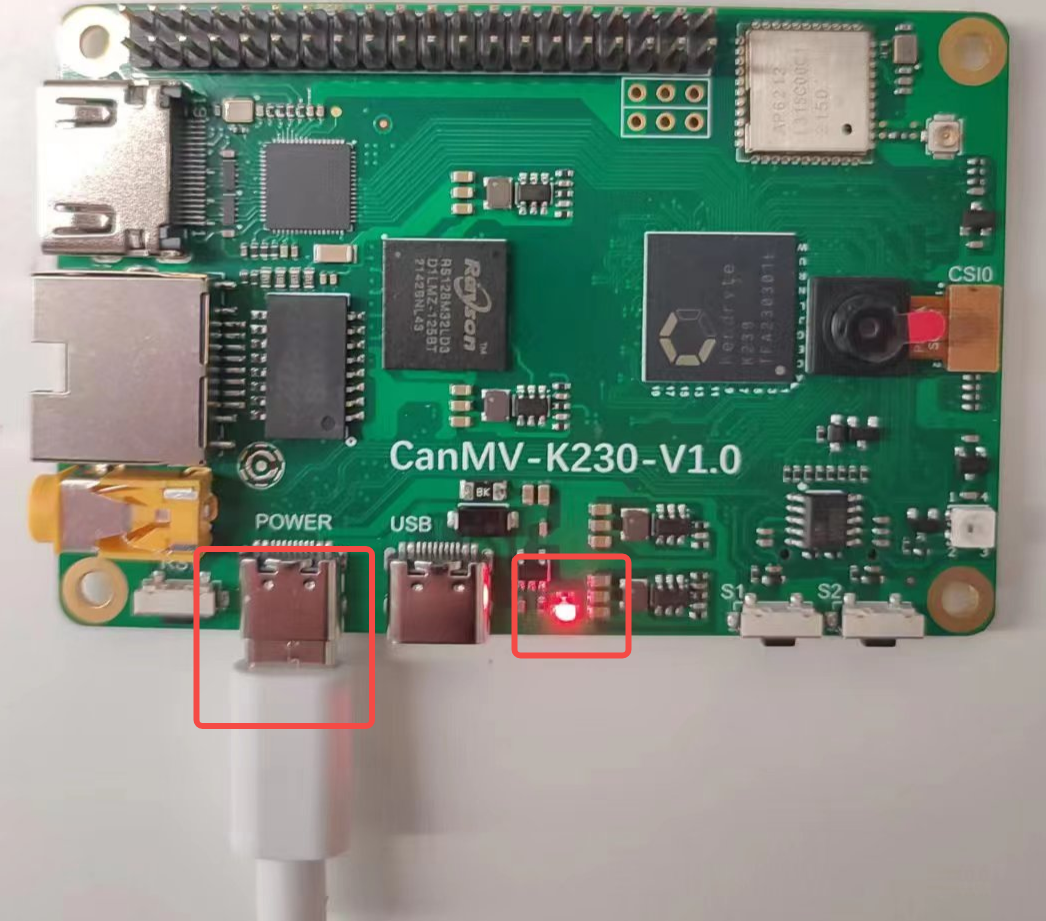
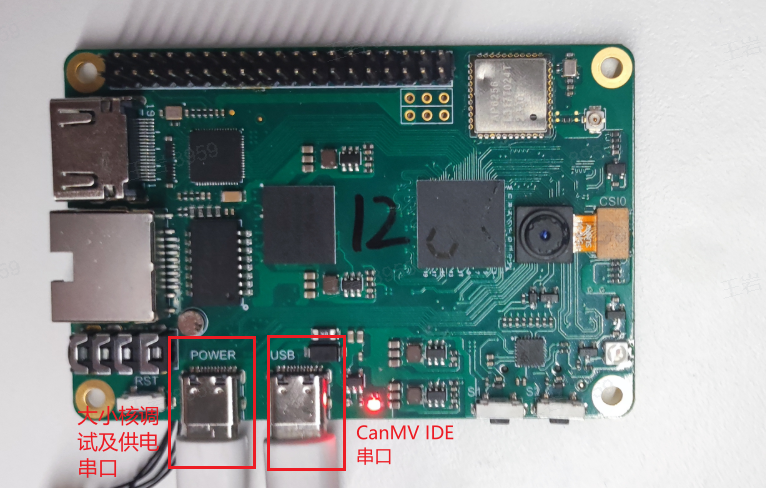
Connect the development board as shown below and power it on:
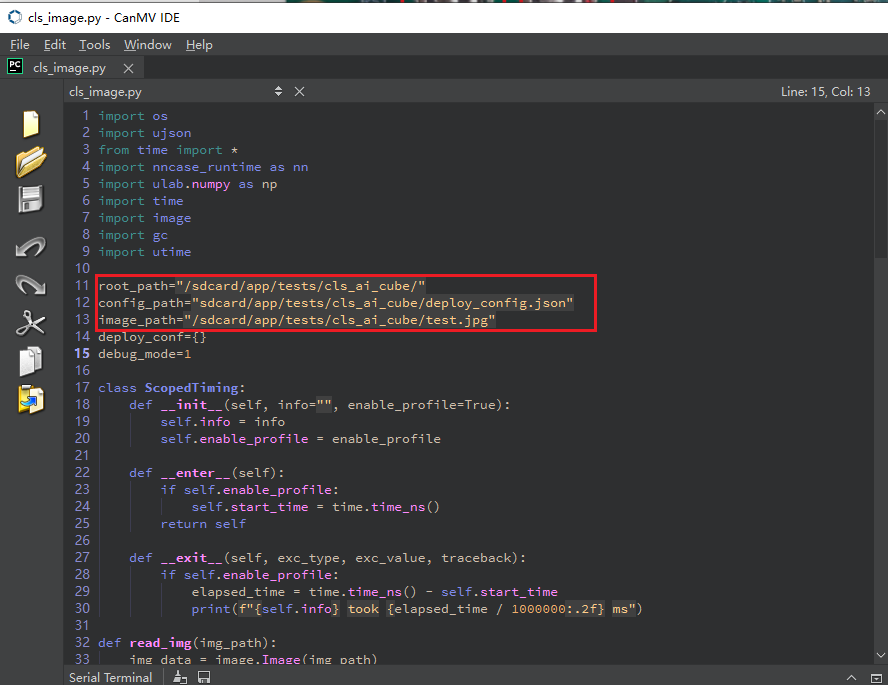
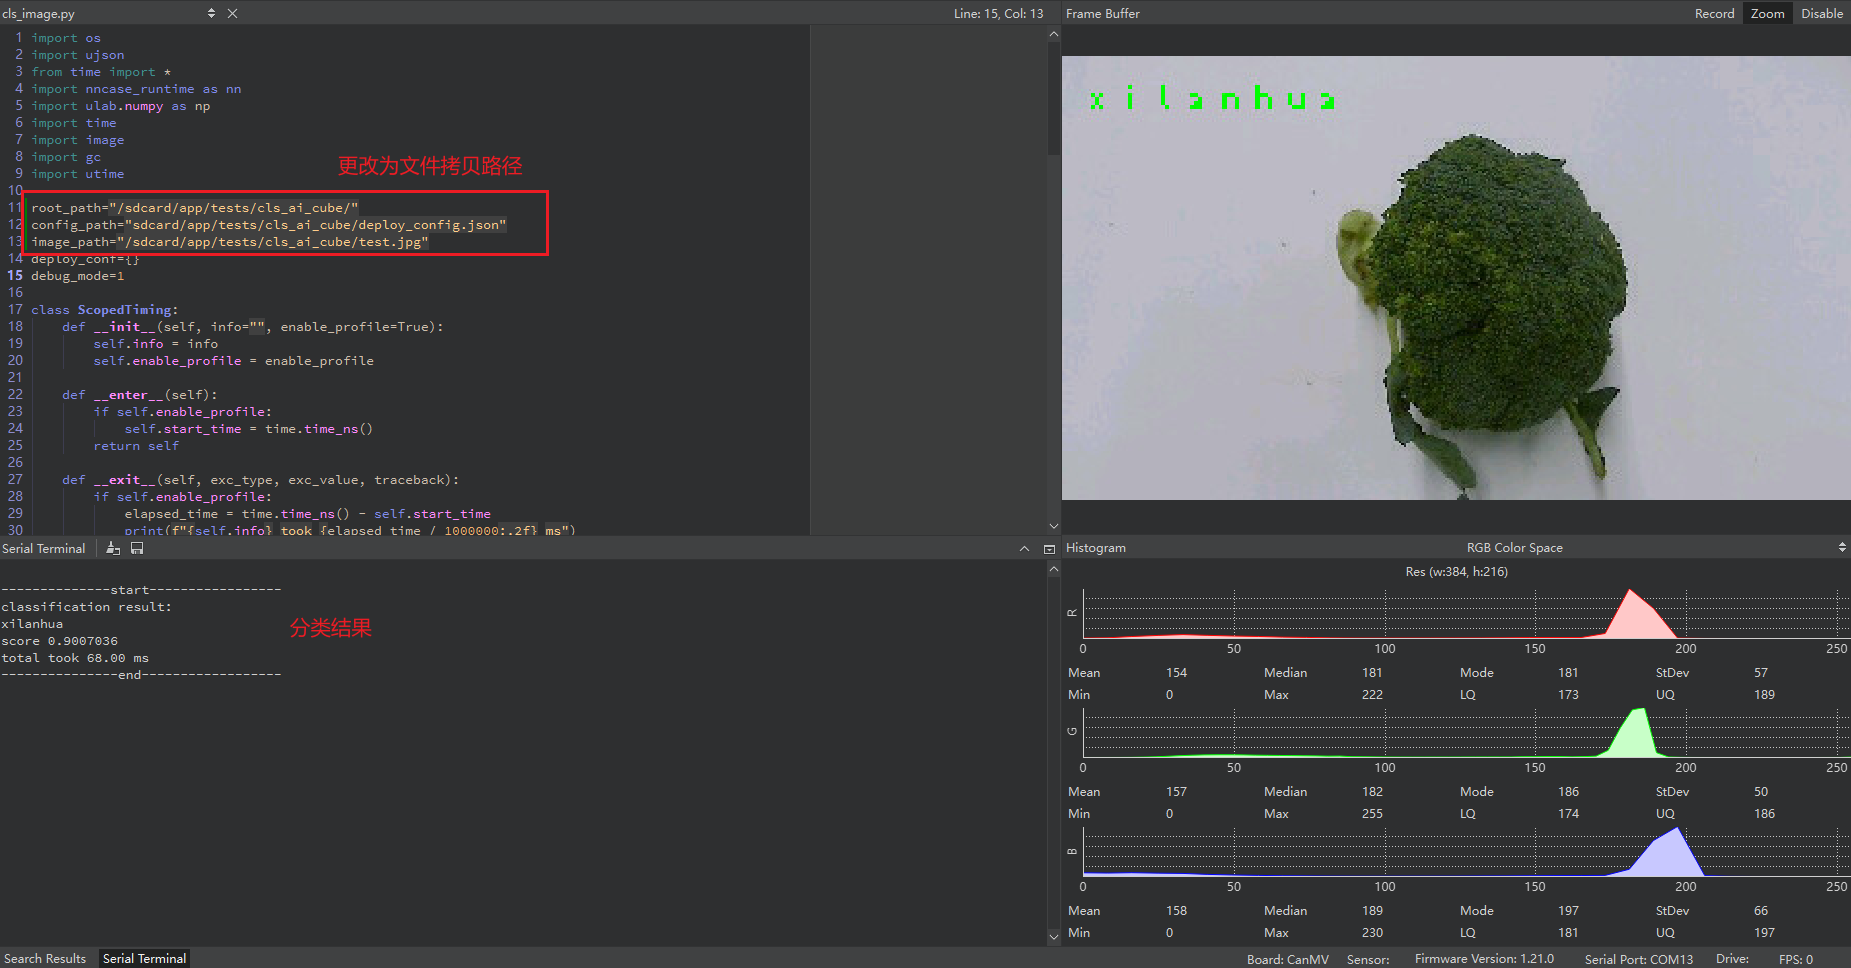
Launch the CanMV IDE, open the file, and select the cls_image.py file from the extracted mp_deployment_source.zip. Modify the file path in the red box below to the path where you copied your files for single image inference:
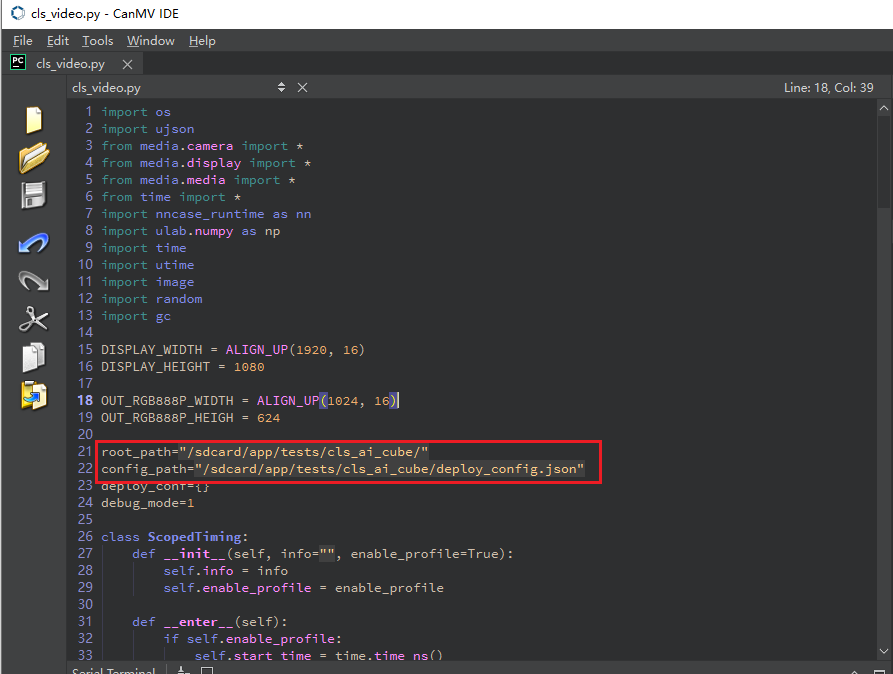
Or open the cls_video.py file, modify the file path to your copied directory, and perform video inference:
When the connection status in the lower left corner changes to the following:
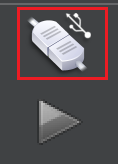
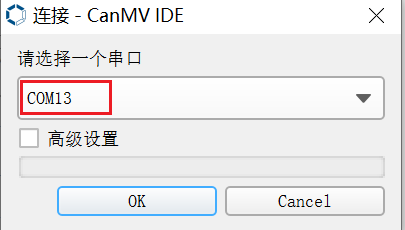
Click the button to connect to the serial port. Select the third serial port, excluding the small and large core serial ports:
 After connecting, click the green triangle button to run.
Single image inference result:
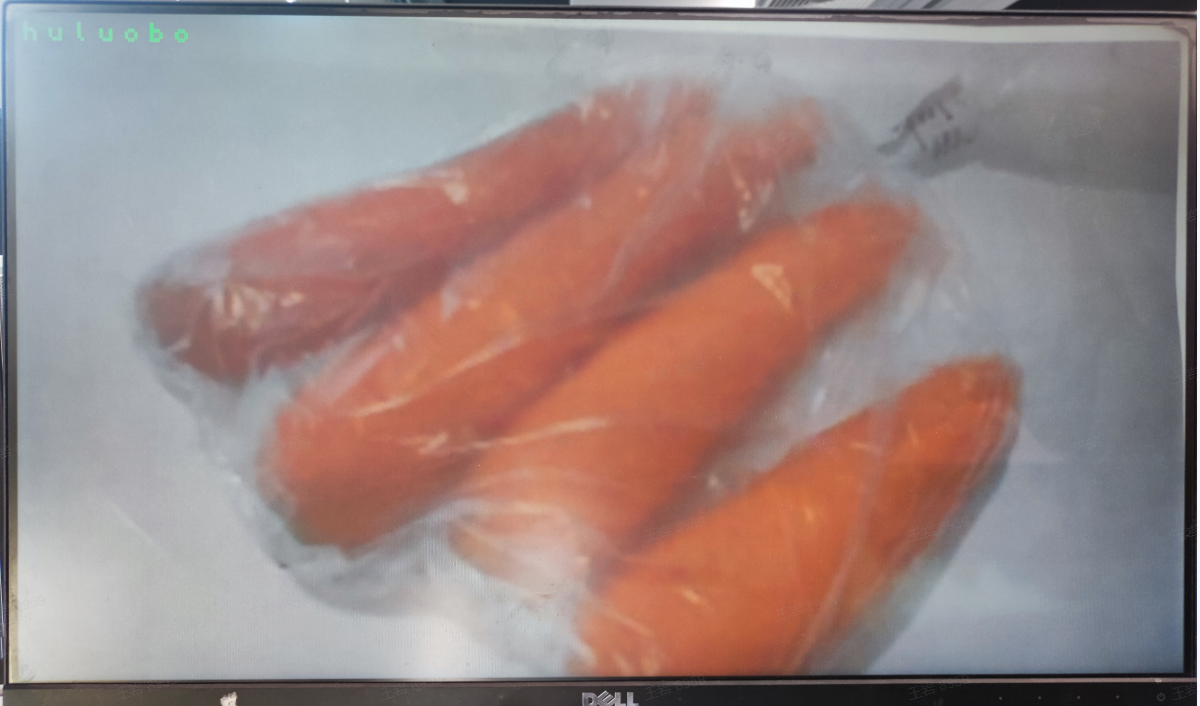
Video inference result:
9.2 Implementing Object Detection Task with AI Cube#
9.2.1 Software Installation#
Using the Windows version of AI Cube to complete the object detection task and deploy it on CanMV-K230 as an example, this section introduces the quick development process with AI Cube. Prepare a PC with Windows installed and a CUDA driver.
First, install the dotnet sdk 7.0. Download from .NET Download (Linux, macOS, and Windows) (microsoft.com). Download the corresponding version for your system, install it, and add it to the environment variables.

Next, download the Windows version of AI Cube from the Canaan Developer Community (canaan-creative.com) under Tools. It is recommended to use version V1.2.
After downloading the installation package, extract it. The directory structure after extraction is as follows:
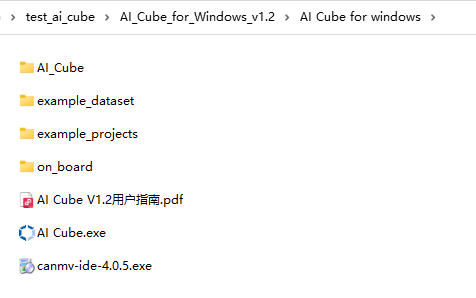
Double-click AI_Cube.exe to launch the software. Refer to the user guide for detailed operations. The example_dataset directory provides example datasets for eight tasks; example_projects provides example projects for eight tasks; the on_board directory contains images for burning on the CanMV-k230 development board, MicroPython burning images, EVB development board burning images, and executable elf files for the CanMV-k230 and EVB development boards; canmv_ide-4.0.5.exe is the IDE software for MicroPython development.
9.2.2 Feature Pages Introduction#
AI Cube includes five feature pages. The “Projects” page mainly handles project management, displaying current and recent projects. The “Images” page shows the dataset information of the current project, allowing users to view dataset images. The “Split” page displays split information, statistics on split categories, and images of different split sets. The “Training” page configures training parameters, displays training information and curves. The “Evaluation” page handles model evaluation and displays evaluation information, and can configure deployment parameters to generate deployment packages.
“Projects” page illustration:
“Images” page illustration:
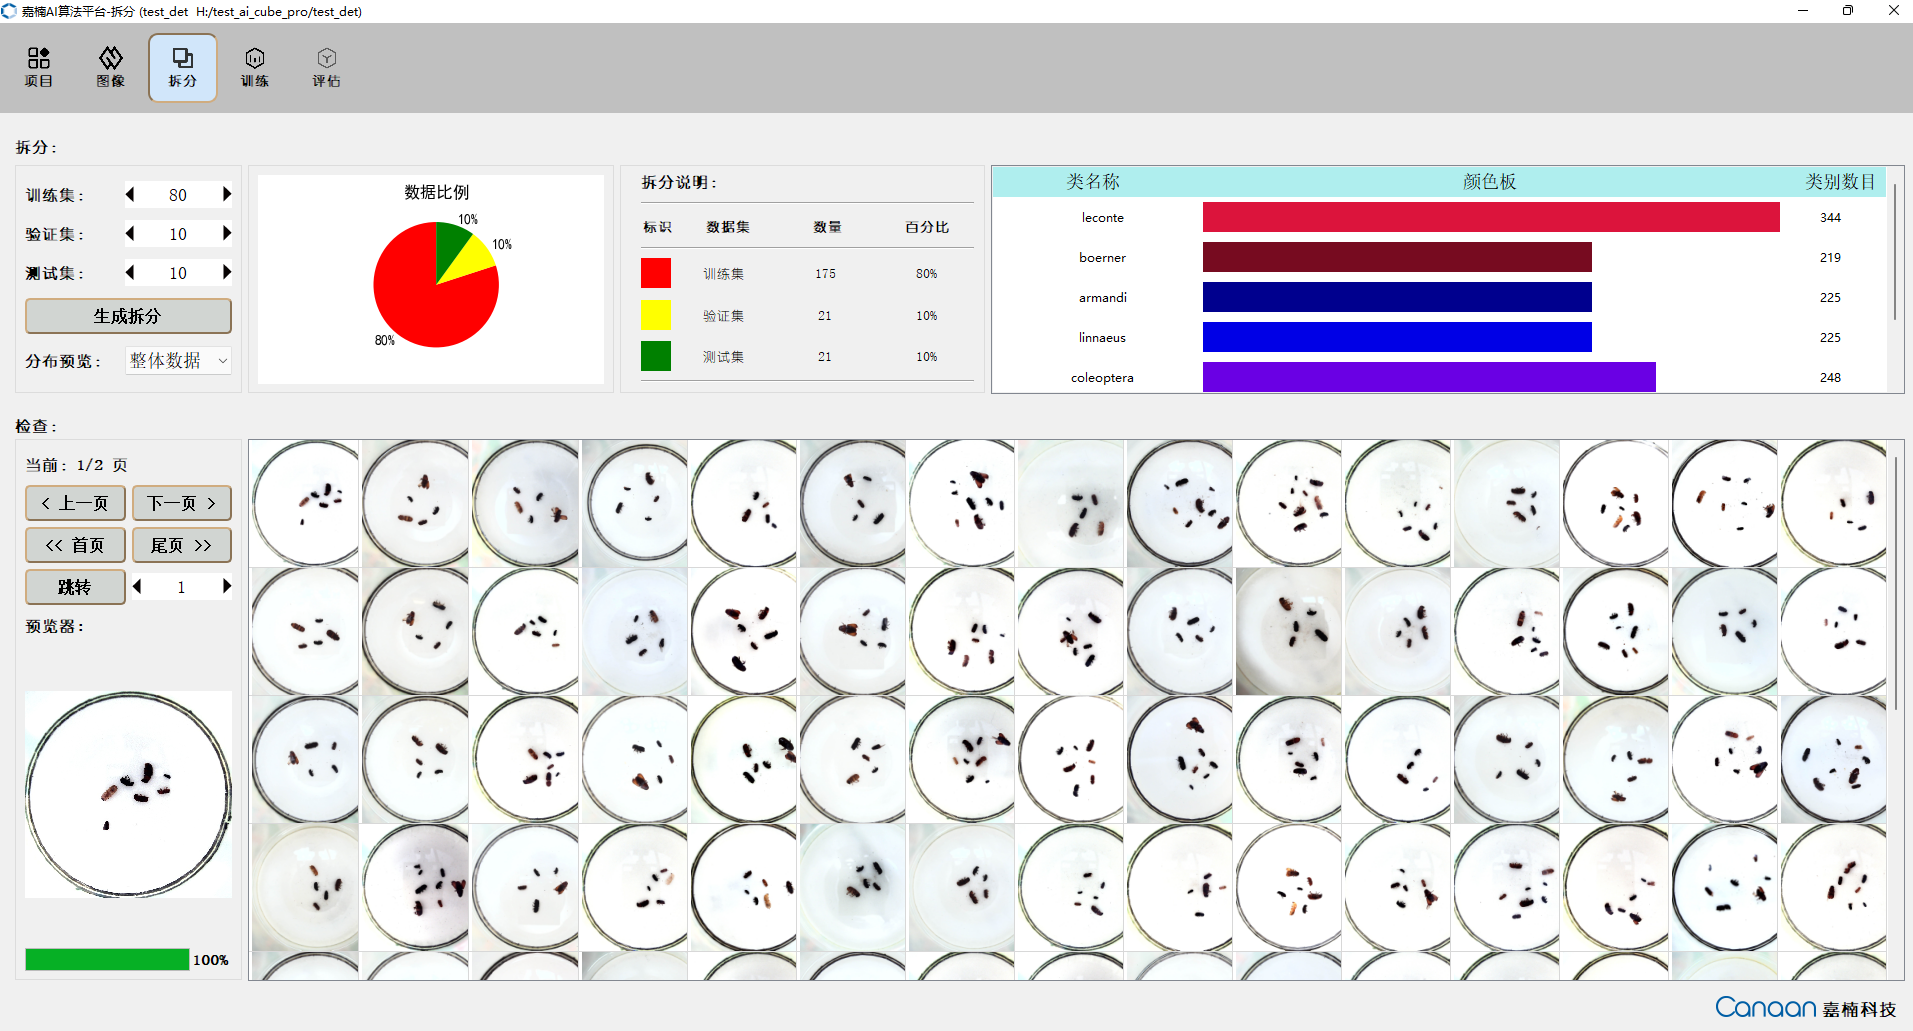
“Split” page illustration:
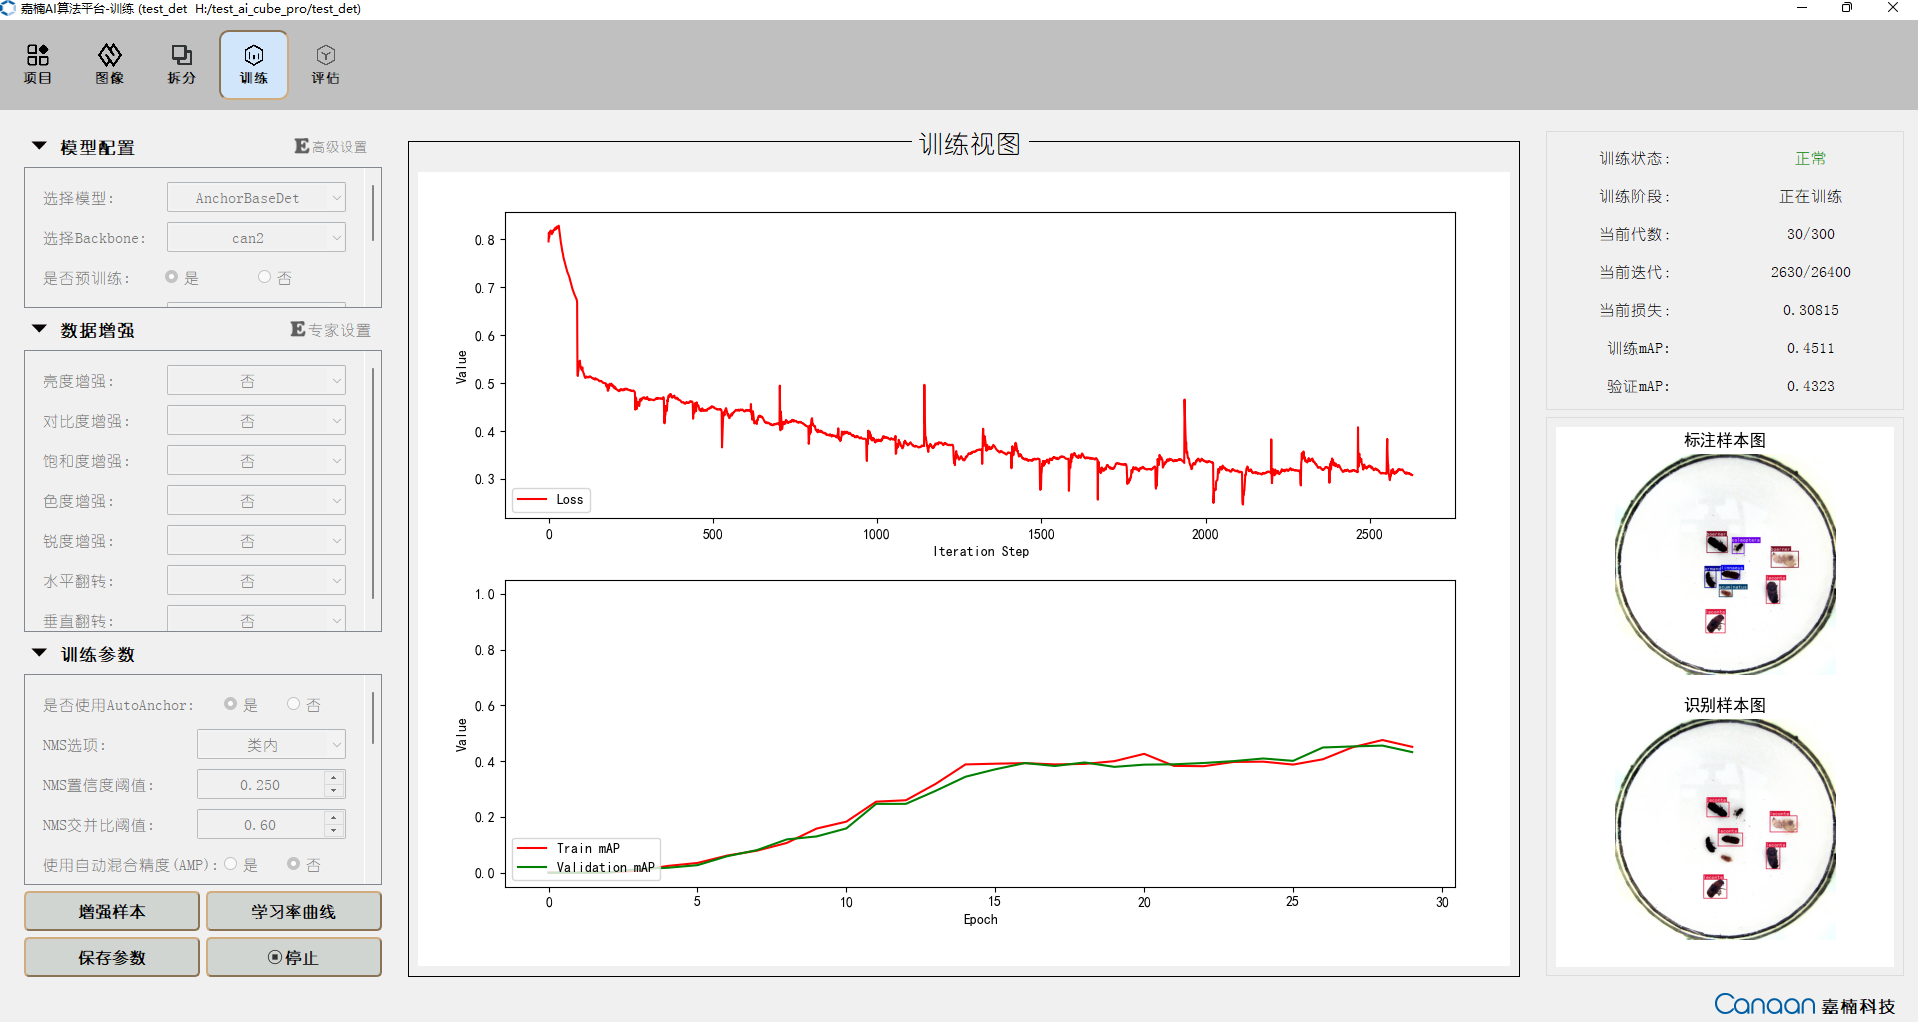
“Training” page illustration:
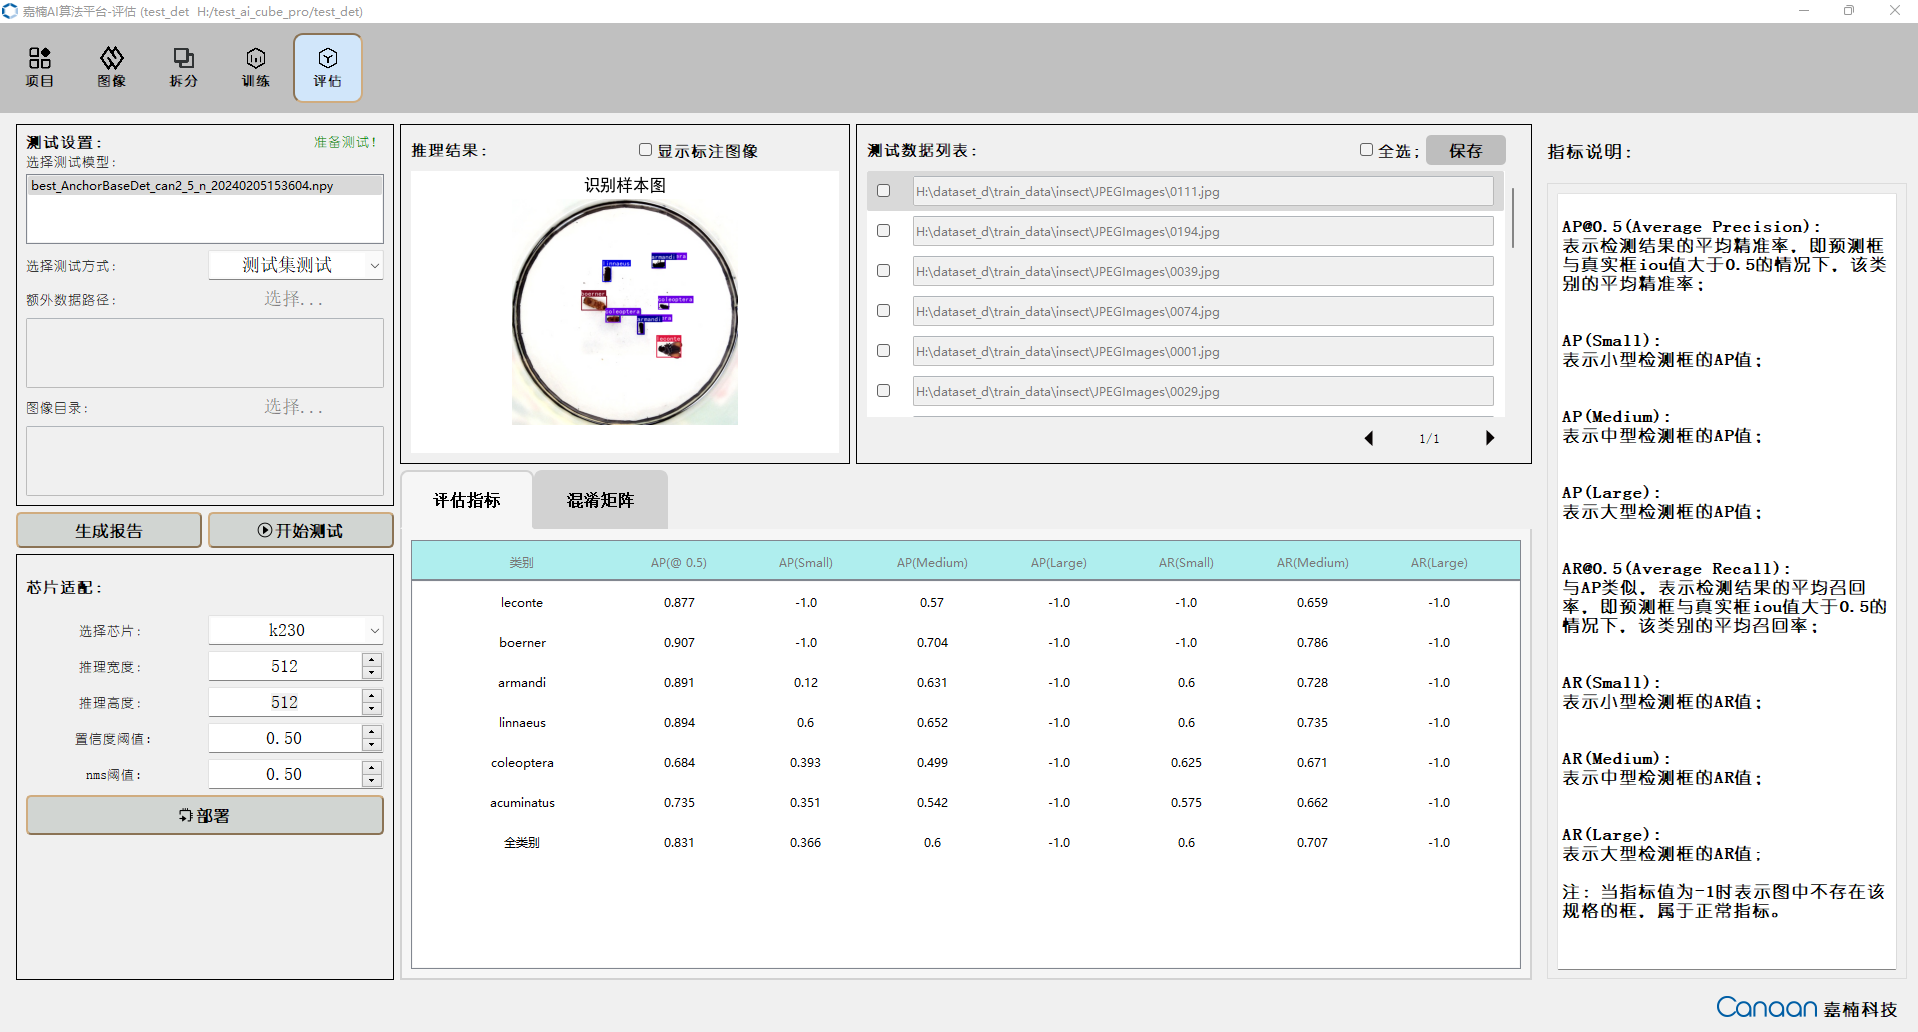
“Evaluation” page illustration:
9.2.3 Creating a Dataset#
Organize the dataset according to the format required for different tasks. View the dataset format by clicking on “New Project” on the “Projects” page. We also provide example datasets for different tasks in the AI Cube/example_dataset/ directory. For instance, insect is an example dataset for object detection tasks.
You can use our example datasets or organize your dataset according to the corresponding format. Below is the structure of the insect detection dataset, formatted to meet the VOC dataset format:
insect
|---JPEGImages
    |---0001.jpg
    |---0002.jpg
    |---0003.jpg
    |---...
|---Annotations
    |---0001.xml
    |---0002.xml
    |---0003.xml
    |---...
Note: Object detection datasets also support YOLO and CoCo data formats. Refer to the software for creating new projects.
9.2.4 Creating a Project#
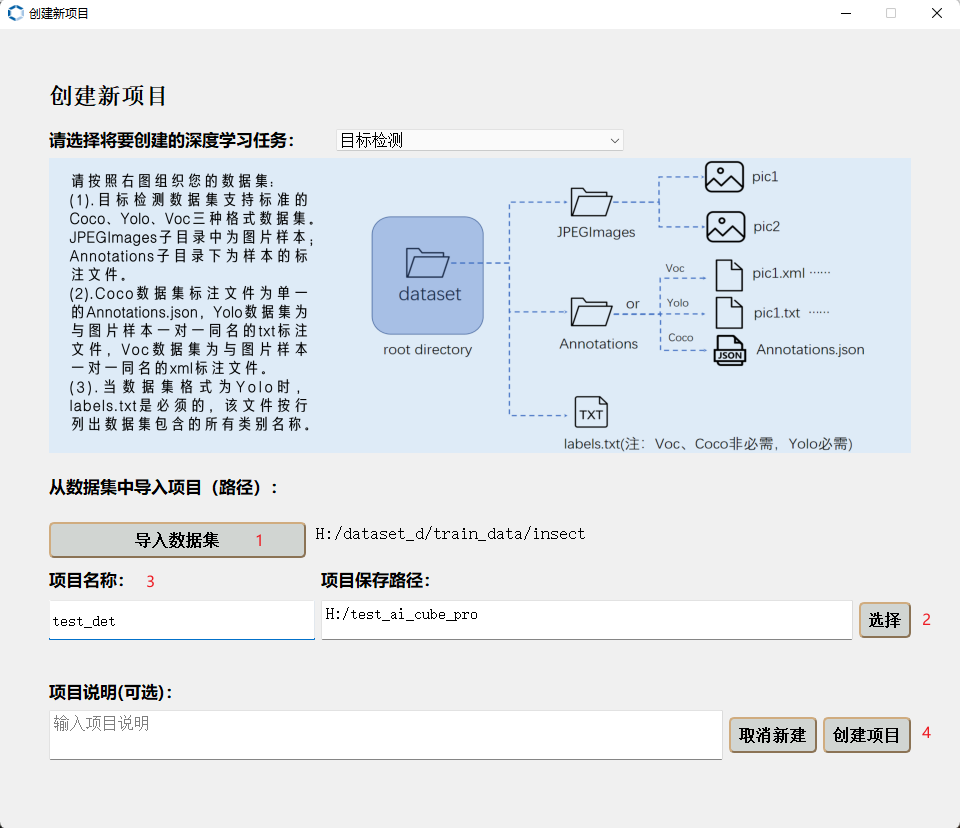
Go to the “Projects” page —> Click “New Project” button —> Select task type —> Import dataset —> Choose project storage path —> Add project name —> Create project.
The new project interface is shown below:
Create a New Object Detection Project
After creating the project, it will automatically switch to the “Images” page, where you can view the details of your dataset. On the “Split” page, you can split the dataset according to custom proportions and view the split statistics.
9.2.5 Starting Training#
For an explanation of training parameters and their configuration, refer to section 4.1.5.
After configuring the parameters, you can click the “Augment Samples” button to view some example samples after data augmentation. Click “Learning Rate Curve” to view the changes in learning rate caused by different strategies. Click the “Start Training” button to begin training. Training information will be displayed on the upper right panel, and loss and metric curves will be plotted in the middle. The prediction results of example samples will be iteratively displayed on the lower right panel for each epoch. The training interface is shown below:
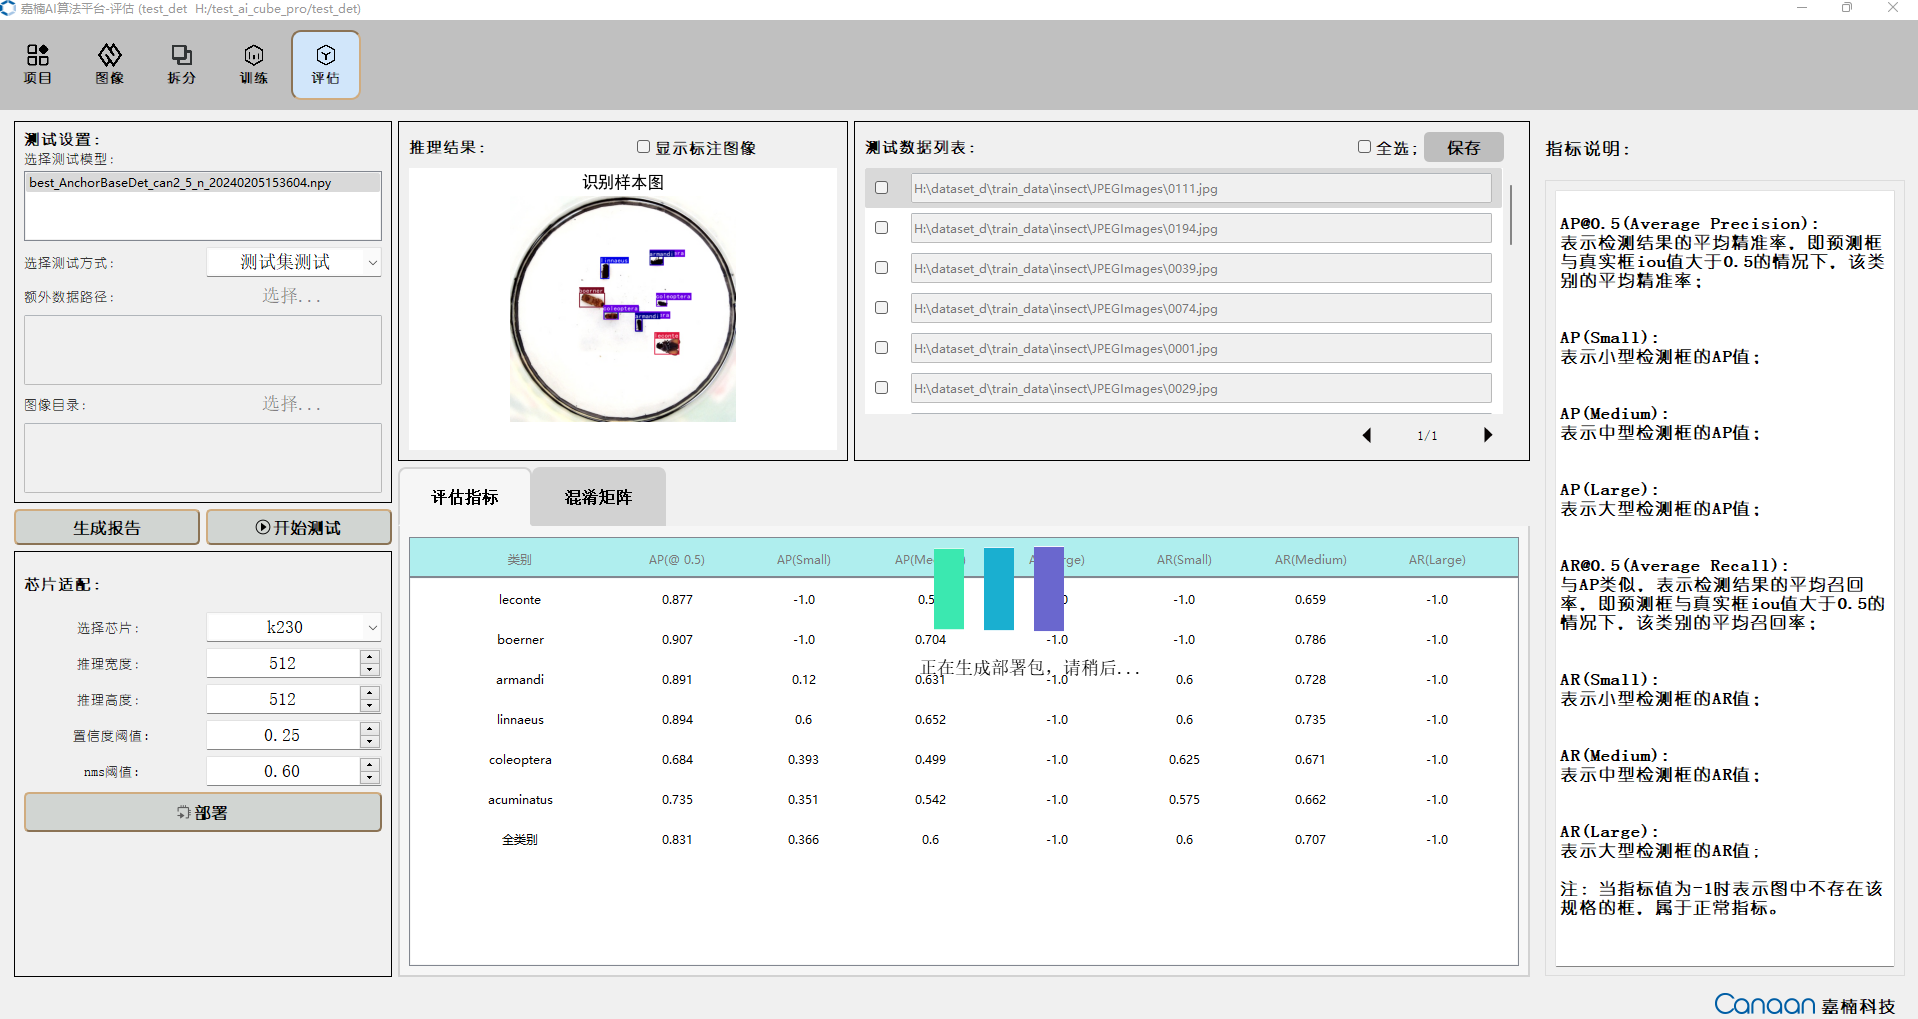
9.2.6 Model Testing#
Go to the “Evaluation” page, select the trained model, and choose the testing method. The testing methods are as follows:
Testing Method |
Description |
|---|---|
Test on Test Set |
Tests and evaluates the split test set, outputs test metric data |
Test on Additional Data |
Tests using annotated data in the same format as the training dataset, outputs test metric data |
Test on Image Directory |
Uses the trained model and parameters to infer all unannotated samples in the image directory, without test metrics |
Click the “Start Testing” button to begin testing. After testing, view your model’s performance based on evaluation metrics. Double-click the entries in the test data list to view the inference results in a larger image.
9.2.7 Model Deployment#
If the model performance meets your requirements, you can configure deployment parameters in the chip adaptation panel, mainly the model input resolution and some basic parameters, and click the “Deploy” button to generate the deployment package.
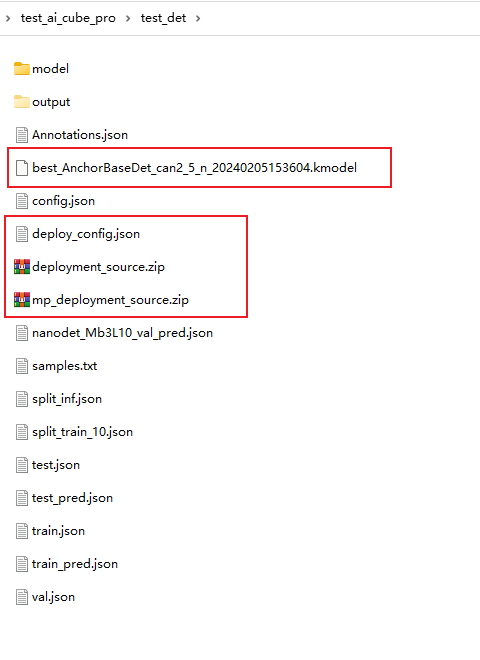
After generating the deployment package, you can find the following files in the root directory of the current project:
deployment_source.zip
mp_deployment_source.zip
*.kmodel
deploy_config.json
9.2.8 Preparing for Deployment on the Board#
After completing above steps, the AI Cube part is finished. Now, deploy the obtained kmodel on the CanMV-K230 development board. The CanMV-K230 development board is shown below:
Before deploying on the board, you need to prepare the following items:
One CanMV-K230 development board;
One USB-TypeC data cable;
One SD card;
One card reader;
One HDMI monitor, supporting 1080P;
One Ethernet cable (optional, files can also be copied directly using the SD card);
Before running on the board, you need to install the following software:
MobaXterm: serial port debugging tool, download and install at https://mobaxterm.mobatek.net/download.html.
Rufus: image burning tool, download and install at rufus tool download address.
9.2.8.1 Image Burning#
First, go to the Canaan Developer Community (canaan-creative.com) download page, select K230->Images, and choose K230_canmv_sdcard_v##_nncase_v###.img.gz. Select the corresponding version based on the “nncase_version” field in the deploy_config.json obtained in section 9.2.7.
Note:
For the version compatibility between k230_sdk and nncase, please refer to:
CanMV-K230_SDK_nncase Version Compatibility — K230 CanMV Documentation (canaan-creative.com)
The deployment package supports Linux+RT-Smart dual systems and pure RT-Smart single systems. You need to compile the single system image yourself. For the compilation steps, refer to Compile K230_SDK;
The kmodel files in the deployment package partially support inference on the K230D chip, but the running scripts need to be written and compiled into elf files by yourself;
Linux:
Before inserting the SD card into the host machine, enter:
ls -l /dev/sd\*
to check the current storage devices.
After inserting the TF card into the host machine, enter again:
ls -l /dev/sd\*
to identify the new storage device, which will be the TF card device node.
Assuming /dev/sdc is the TF card device node, execute the following command to burn the TF card:
sudo dd if=sysimage-sdcard.img of=/dev/sdc bs=1M oflag=sync
Windows:
For Windows, you can use the Rufus tool to burn the TF card. Download Rufus.
Insert the SD card into the PC, then launch Rufus. Click the “Select” button in the tool interface and choose the firmware to be burned.
Click the “Start” button to begin burning. A progress bar will display the burning process, and it will indicate “Ready” upon completion.
After burning, insert the SD card into the development board and power it on:
Connect the monitor to the HDMI port. If network usage is required, connect the Ethernet port.
9.2.8.2 Network Configuration#
Note: If you choose to use a card reader to copy files offline, you can skip this step. The following network configuration method is only applicable to Linux+RT-Smart dual systems.
Skip this step if you choose to copy files offline using a card reader.
Serial Tool Debugging
Install a serial debugging tool: MobaXterm. Download and install from https://mobaxterm.mobatek.net/download.html.
After launching MobaXterm, select Session –> Serial:
Choose two consecutive serial ports for the Serial Port, and set the Speed (bps) to 115200.
Log in to the small core serial port using “root”. For the large core serial port, press “q” and Enter to exit the auto-start face recognition program.
Network Configuration on Windows PC
Go to Control Panel -> Network and Sharing Center -> Change adapter settings -> Ethernet -> Right-click Properties -> Select (TCP/IPv4) -> Properties
Configure the IP address, subnet mask, gateway, and DNS server address:
Network Configuration on Development Board
Enter the small core command line and execute:
# Check for eth0
ifconfig
# Configure the development board IP to be on the same subnet as the PC
ifconfig eth0 192.168.1.22
# Check IP configuration
ifconfig
Note: Network configuration commands need to be re-executed after each power cycle.
9.2.8.3 File Copying#
For Linux+RT-Smart dual system image:
sharefs Directory Explanation
# Go to the root directory of the small core
cd /
# List directories
ls
# The sharefs directory is shared between the small and large cores, so files copied to the sharefs directory from the small core are also visible to the large core
Offline Card Reader Copying
Power off and remove the SD card. Use a card reader to copy files from the PC to the shared sharefs directory on the SD card. The default root directory of the SD card corresponds to the sharefs directory, so copy files here.
Local Network TFTP Copying
Install the TFTP communication tool. Download from: https://bitbucket.org/phjounin/tftpd64/downloads/.
Launch tftpd64 and configure the directory for storing files to be transferred and the service network card.
# The following commands are executed on the small core serial port
# Transfer files from the PC's tftpd64 configuration directory to the current directory on the development board
tftp -g -r your_file 192.168.1.2
# Transfer files from the current directory on the development board to the PC's tftpd64 configuration directory
tftp -p -r board_file 192.168.1.2
scp Copying
On Linux systems, connect the PC to the network normally. The development board can connect to other network ports under the same gateway as the PC via an Ethernet cable. Use the scp command for file transfer.
Power on the development board and enter the dual-core COM interface. Execute the scp transfer command on the small core:
# Copy files from the PC to the development board
scp username@domain_or_IP:path_to_file target_directory_on_board
# Copy folders
scp -r username@domain_or_IP:path_to_folder target_directory_on_board
# Copy files from the development board to the PC
scp path_to_file_on_board username@domain_or_IP:target_directory_on_PC
# Copy folders
scp -r path_to_folder_on_board username@domain_or_IP:target_directory_on_PC
Files to be Copied
File |
Description |
|---|---|
AICube project directory/*.kmodel |
kmodel generated by the project |
AICube project directory/deploy_config.json |
Deployment configuration file |
AI Cube installation directory/on_board/elfs/canmv/main_canmv.elf |
Precompiled executable file |
test.jpg |
Static image for testing |
Other files extracted from deployment_source.zip |
For example, OCR tasks require font libraries Asci0816.zf, HZKf2424.hz, and corresponding dictionary files. |
For the above image classification task, create a subfolder named test_det in the sharefs directory and copy the following files:
kmodel file, main_canmv.elf, a test sample image test.jpg, and deploy_config.json file to the test_det directory.
If you want to modify the C++ source code and compile it yourself, refer to: kendryte/k230_sdk: Kendryte K230 SDK (github.com) to set up the compilation environment. Copy the “canmv/example_code_k230” directory extracted from deployment_source.zip to “k230_sdk_root_directory/src/big/nncase”, then navigate to the example_code_k230 directory, grant execution permission to the build script, and compile:
chmod +x build_app.sh
./build_app.sh
If you do not want to compile it yourself, you can skip the above compilation steps and directly use the provided elf file.
For pure RT-Smart single system image:
Only the offline copy method can be used. The root directory of the PC disk corresponds to the sdcard folder in the root directory of the big core. Please search for the copied file in the /sdcard directory through the big core serial port.
Files to be Copied
File |
Description |
|---|---|
AICube project directory/*.kmodel |
kmodel generated by the project |
AICube project directory/deploy_config.json |
Deployment configuration file |
AI Cube installation directory/on_board/elfs/canmv/main_canmv.elf |
Precompiled executable file |
test.jpg |
Static image for testing |
Other files extracted from deployment_source.zip |
For example, OCR tasks require font libraries Asci0816.zf, HZKf2424.hz, and corresponding dictionary files. |
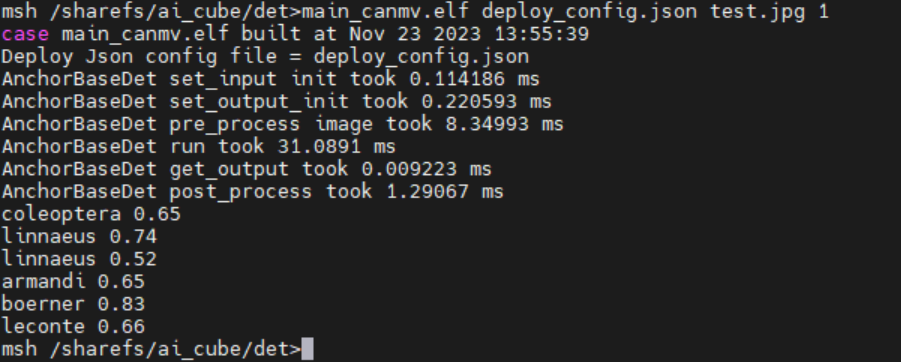
9.2.9 Running on the Board#
Static Image Inference
Connect to the large core serial port and execute the following commands:
# Linux+RT-Smart
cd /sharefs/test_det
# Only RT-Smart
cd /sdcard/test_det
# .elf <deploy_config.json> <input_path> <debug_mode>
# deploy_config.json: Deployment configuration file;
# input_path: Path to the inference image, set to None for video stream inference;
# debug_mode: Debug mode, 0 for no debug, 1 for simple debug, 2 for detailed debug;
./main_canmv.elf deploy_config.json test.jpg 0
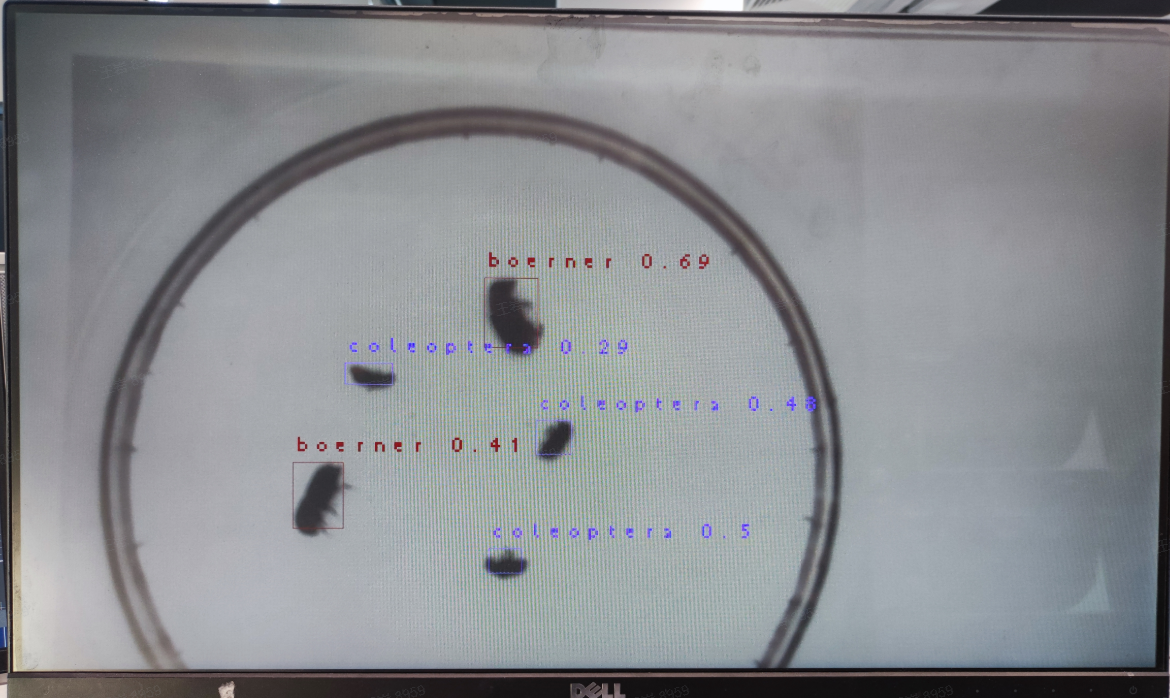
Static image inference result:
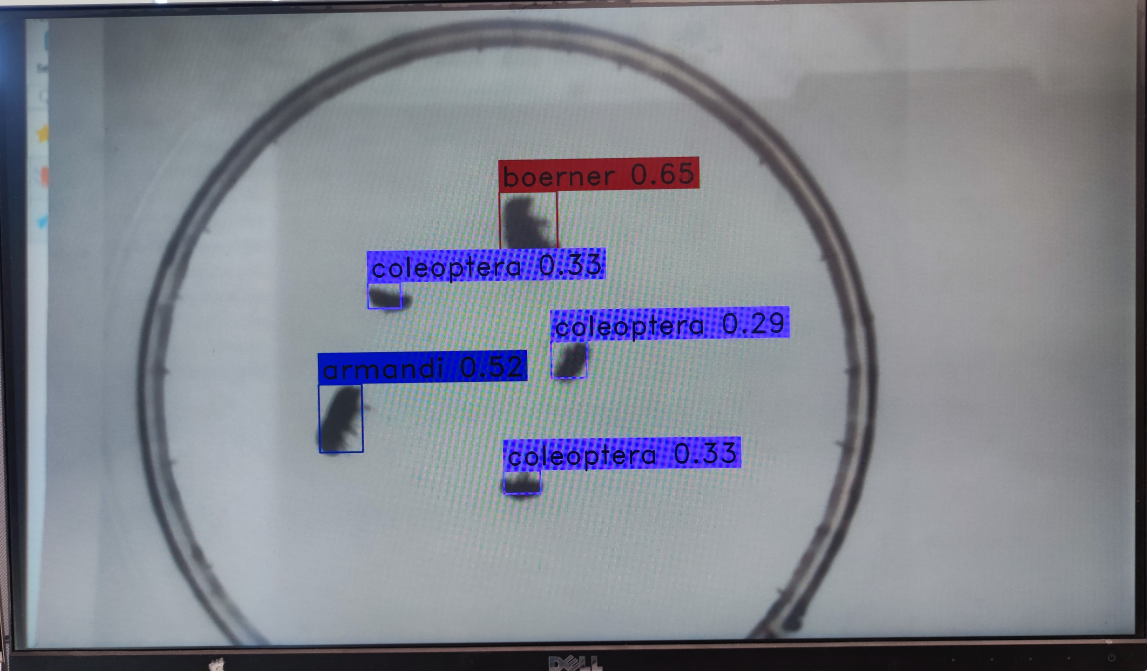
Video Stream Inference
Connect to the large core serial port and execute the following commands:
# Linux+RT-Smart
cd /sharefs/test_det
# Only RT-Smart
cd /sdcard/test_det
# .elf <deploy_config.json> <input_path> <debug_mode>
# deploy_config.json: Deployment configuration file;
# input_path: Path to the inference image, set to None for video stream inference;
# debug_mode: Debug mode, 0 for no debug, 1 for simple debug, 2 for detailed debug;
./main_canmv.elf deploy_config.json None 0
Video stream inference result:
9.2.10 Running MicroPython#
9.2.10.1 Image Burning#
Burn the MicroPython image. Go to the Canaan Developer Community (canaan-creative.com) download page, click on K230/Images, and download CanMV-K230_micropython_v##_sdk_v##__nncase_v###.img.gz. Select the version based on the “nncase_version” field in the deploy_config.json file. Use the method described in section 9.2.8.1 for burning.
Note:
For the version compatibility between k230_canmv, k230_sdk, and nncase, please refer to:
CanMV-K230_SDK_nncase Version Compatibility — K230 CanMV Documentation (canaan-creative.com)
9.2.10.2 File Copying#
Use a card reader for offline copying. Copy the kmodel file, deploy_config.json, and test image files to a directory on the SD card and note the directory.
9.2.10.3 Installing the IDE#
Install the CanMV IDE. Go to the Canaan Developer Community (canaan-creative.com) download page, click on Tools, and download the appropriate version of the CanMV IDE installation package based on your system.
9.2.10.4 Powering On#
Connect the development board as shown below and power it on:
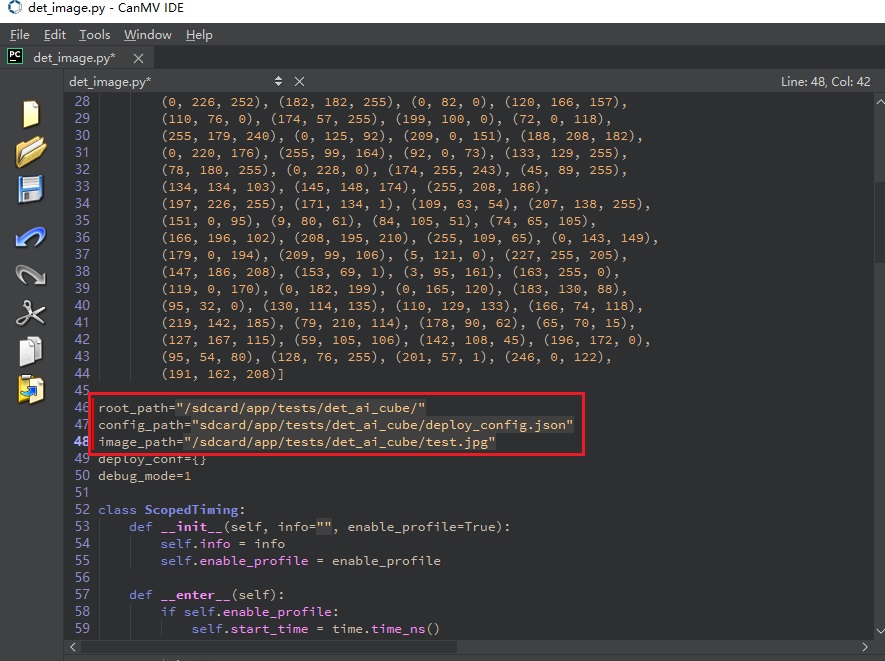
Launch the CanMV IDE, open the file, and select the cls_image.py file from the extracted mp_deployment_source.zip. Modify the file path in the red box below to the path where you copied your files for single image inference:
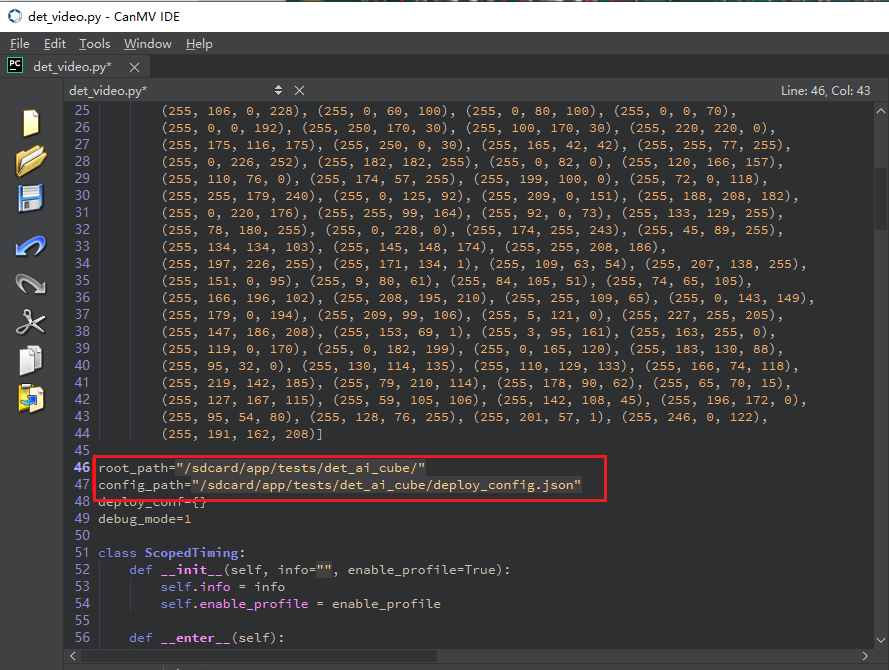
Or open the cls_video.py file, modify the file path to your copied directory, and perform video inference:
When the connection status in the lower left corner changes to the following:
Click the button to connect to the serial port. Select the third serial port, excluding the small and large core serial ports:
After connecting, click the green triangle button to run.
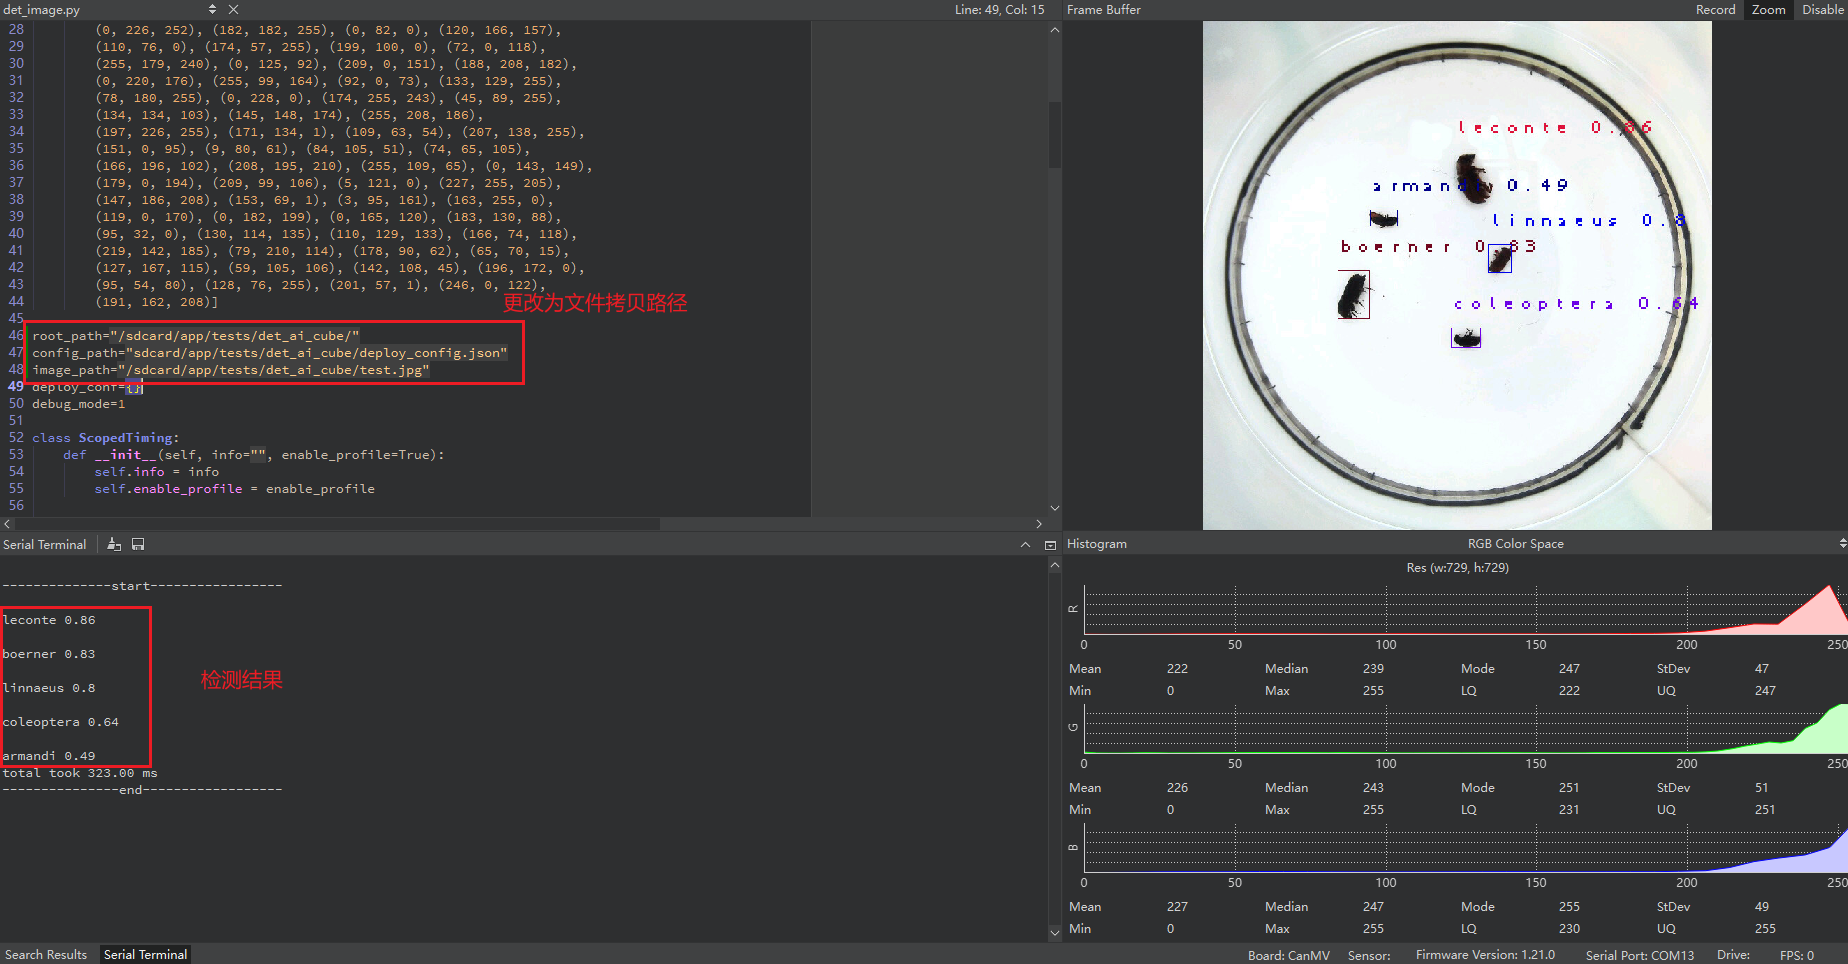
Single image inference result:
Video inference result: